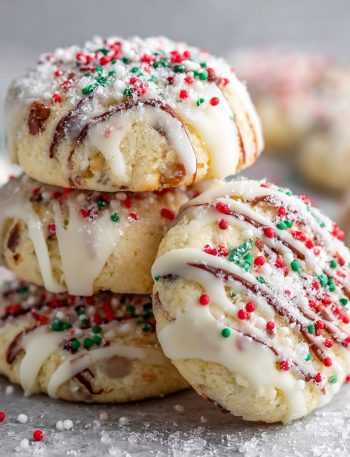
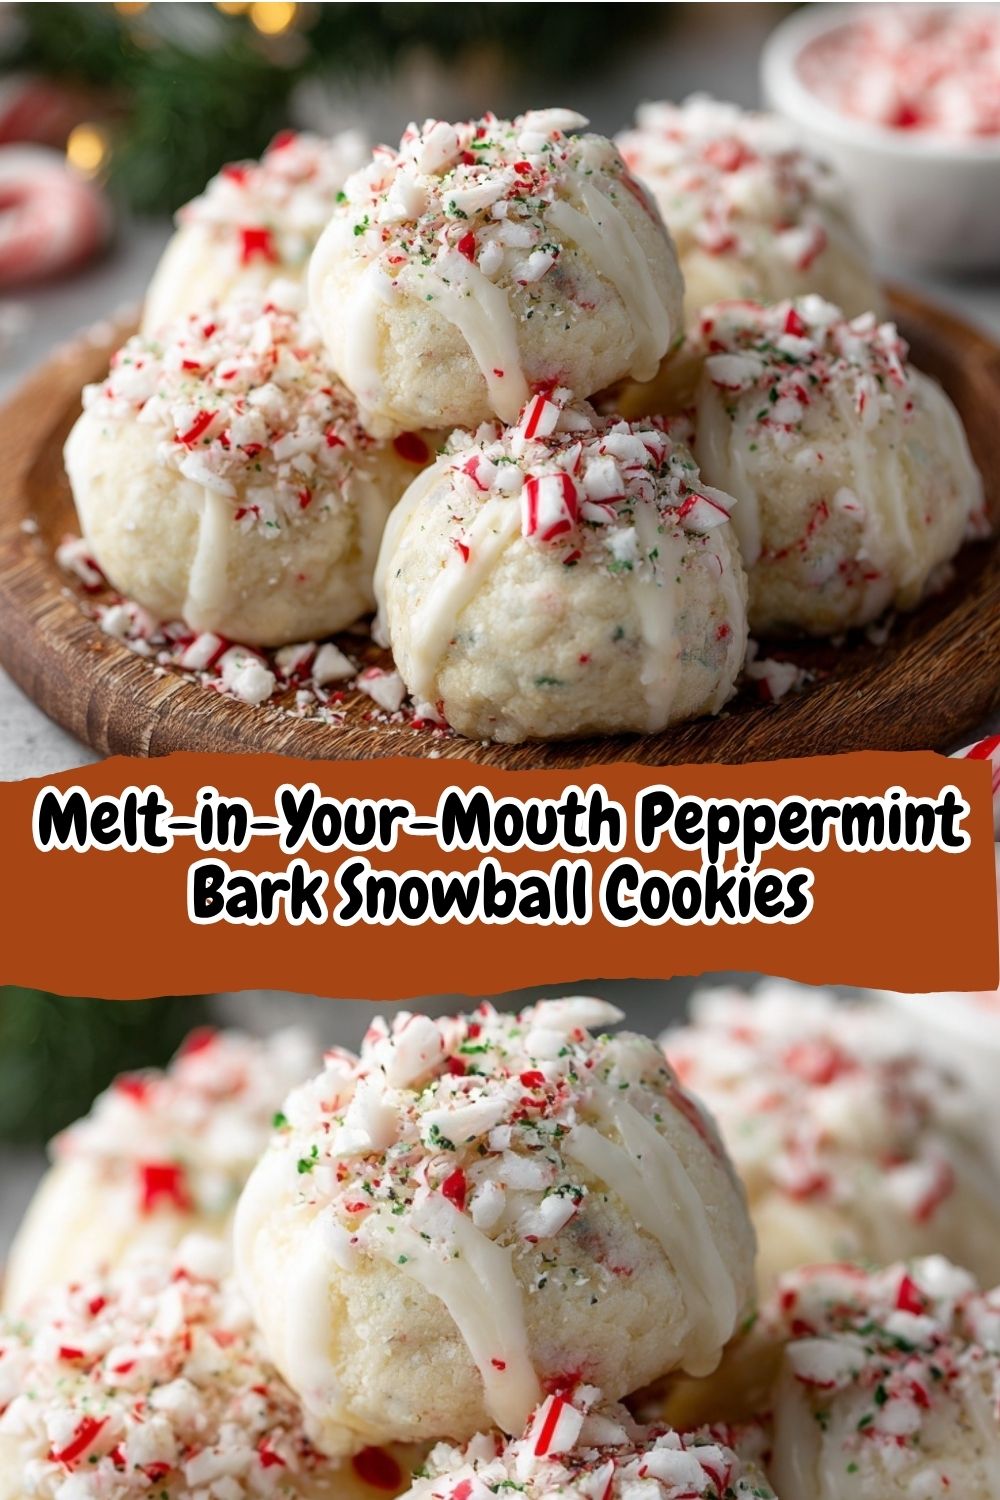
Melt-in-Your-Mouth Peppermint Bark Snowball Cookies: Your New Holiday Obsession
Hey there, friend! Isla here, from my flour-dusted kitchen to yours. Can you smell it? That magical, once-a-year scent of butter, sugar, and a whisper of peppermint dancing in the air. It’s officially cookie season, and my heart does a little happy dance every single time December rolls around. If you’re anything like me, you’re constantly searching for that one show-stopping cookie that looks gorgeous on a platter, tastes even better than it looks, and—here’s the real win—doesn’t require a culinary degree to pull off.
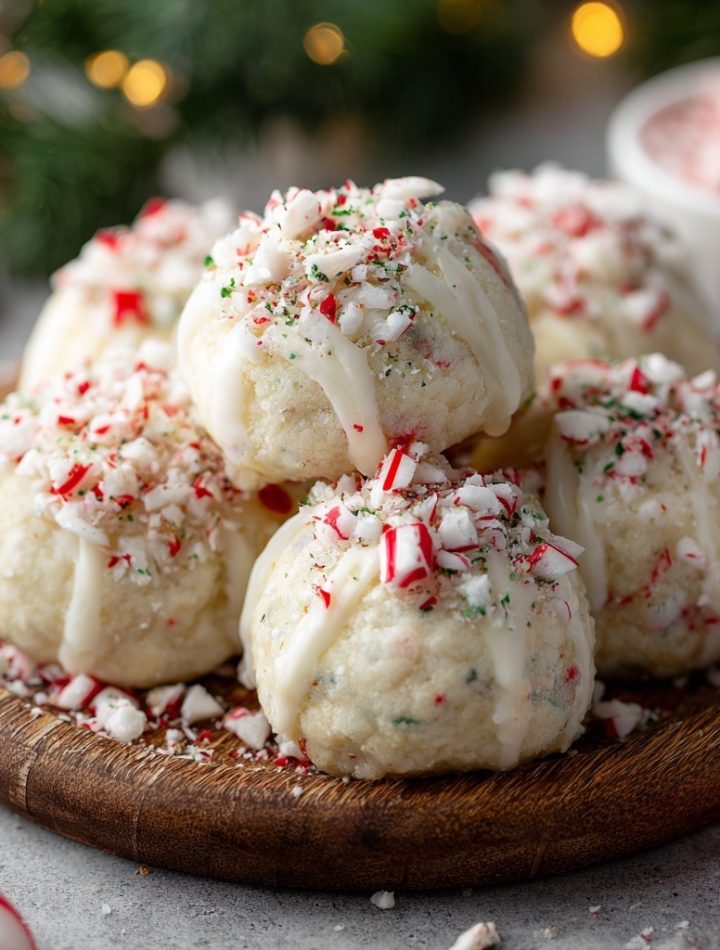
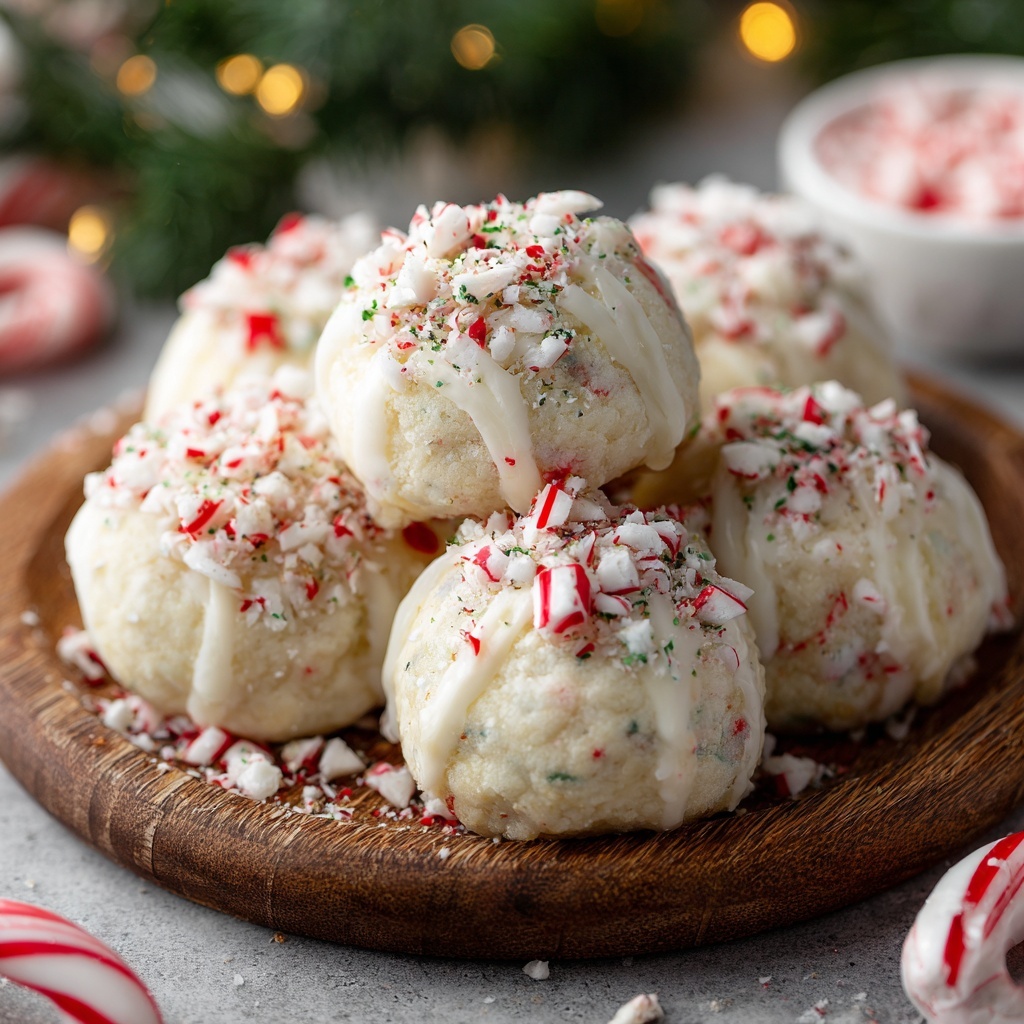
Well, search no more. I’m so incredibly excited to share with you my absolute newest obsession: these Melt-in-Your-Mouth Peppermint Bark Snowball Cookies. We’re taking the classic, buttery snowball cookie (you might know them as Russian Tea Cakes or Mexican Wedding Cookies) and giving them a festive, fabulous upgrade. We’re folding in generous chunks of crunchy, sweet peppermint bark and a hint of pure peppermint extract, then rolling them not once, but twice in a blizzard of powdered sugar.
The result? A cookie that truly lives up to its name. They’re tender, they’re crumbly, and they literally dissolve on your tongue in the most delightful way. That pop of peppermint bark? Pure holiday magic. This is the kind of recipe that turns a regular Tuesday into a festive occasion and makes you the undisputed star of any cookie swap. So, tie on your favorite apron, put on some holiday tunes, and let’s make some magic together. I promise, it’s going to be fun, fuss-free, and so, so delicious.
Print
Melt-in-Your-Mouth Peppermint Bark Snowball Cookies
- Total Time: 30 mins
- Yield: 36 cookies 1x
Description
These buttery snowball cookies are light, tender, and studded with chunks of peppermint bark. A delicate hint of peppermint and a final roll in powdered sugar make them a festive favorite—perfect for holiday platters, gift boxes, or cozy winter treats.
Ingredients
1 cup unsalted butter, softened
½ cup powdered sugar (adds tenderness vs. granulated sugar)
1 tbsp water
½ tsp pure peppermint extract
¼ tsp salt
2¼ cups all-purpose flour
¾ cup chopped peppermint bark
¼ cup mini chocolate chips (optional twist for extra richness)
1 cup powdered sugar (for rolling)
Instructions
Preheat oven to 350°F (175°C). Line two baking sheets with parchment.
Cream butter and powdered sugar together until light and fluffy. Add water, peppermint extract, and salt; mix well.
Add flour gradually and mix until dough forms. Stir in chopped peppermint bark and mini chocolate chips if using.
Scoop and roll dough into 1-inch balls. Place on baking sheets about 1 inch apart.
Bake 12–14 minutes until bottoms are just golden. Cool 5 minutes, then roll warm cookies in powdered sugar.
Cool completely and roll a second time in sugar for a snowy finish.
- Prep Time: 15 mins
- Cook Time: 15 mins
- Category: Dessert
Nutrition
- Calories: 120
- Sugar: 6g
- Fat: 6g
- Carbohydrates: 14g
A Snowy Kitchen and a Grandmother’s Wisdom
This recipe always takes me right back to my grandma’s cozy, warm kitchen, which felt like the only safe harbor during the blizzards that would whip against our little coastal town. I remember one year, the snow was coming down so thick and fast it felt like the world had been wrapped in a blanket. The power flickered, and my grandma, without missing a beat, lit every candle she owned and declared, “Well, the oven runs on gas! We’re not letting a little snow stop cookie day.”
She pulled out her tattered, butter-stained recipe card for her “snowballs.” As I creamed the butter and sugar, she told me the secret wasn’t in the ingredients, but in the love and patience you knead into the dough. She’d let me roll the warm, fragile cookies in the powdered sugar, my small hands turning into snowy mittens. We’d always eat the first one straight off the cooling rack, standing over the sink, the buttery, nutty crumbs melting in our mouths. It was pure, unadulterated joy. This peppermint bark version is my little nod to her—a classic, heartwarming treat with a modern, merry twist that I know she would have absolutely loved.
Gathering Your Cookie Crew: The Ingredients
Part of the magic of this recipe is its beautiful simplicity. You probably have most of this in your pantry right now! Here’s what you’ll need and why each ingredient is a key player in our snowy masterpiece.
- 1 cup (2 sticks) unsalted butter, softened: This is the heart and soul of our snowball. Using softened butter is non-negotiable for that light, creamed base that gives us the melt-in-your-mouth texture. Pro tip: Your butter is perfectly softened when you can press a finger into it and leave a clear indentation without it feeling greasy or melting.
- ½ cup powdered sugar: We’re using powdered sugar in the dough itself, instead of granulated, because it dissolves instantly and creates a super tender, fine crumb. No graininess here, just smooth, buttery perfection.
- 1 tbsp water: A little splash of water might seem odd, but it helps bind the dough just enough without making it tough. It’s my little secret for the perfect cookie consistency.
- ½ tsp pure peppermint extract: I’m specifying pure extract here because it has a cleaner, more authentic flavor than imitation. It gives us that beautiful, cooling peppermint essence without being medicinal. A little goes a long way!
- ¼ tsp salt: Don’t you dare skip the salt! It’s the flavor enhancer that makes the butter pop and balances the sweetness of the sugar and peppermint bark. It’s the difference between a flat cookie and a fantastic one.
- 2¼ cups all-purpose flour: The trusty foundation that gives our snowballs their structure. I like to fluff my flour with a spoon before measuring it, then level it off with a knife to avoid packing in too much and making a dry dough.
- ¾ cup chopped peppermint bark: The star of the show! I like to use a good-quality bark and chop it into small, rustic chunks. You’ll get little pockets of creamy chocolate and crunchy peppermint in every single bite. It’s a textural dream!
- ¼ cup mini chocolate chips (optional but highly recommended): This is my BiteTide twist! The mini chips disperse more evenly throughout the dough, ensuring every single cookie gets a hint of rich chocolate. It’s the ultimate flavor booster.
- 1 cup powdered sugar (for rolling): This is what gives our cookies their iconic, snowy appearance. We’ll roll them once while they’re warm to create a sticky, melting coat, and then again once they’re cool for that perfect, frosty finish.
Let’s Make Some Magic: The Step-by-Step Guide
Ready to create these little bites of heaven? It’s easier than you think. Follow these steps, and you’ll be a snowball cookie pro in no time.
- Preheat and Prep: First things first, get that oven preheating to a cozy 350°F (175°C). This ensures it’s perfectly hot and ready for our cookies. Now, line two baking sheets with parchment paper. This is my number one kitchen hack for preventing sticking and making cleanup an absolute breeze. No scrubbing required!
- Creaming is Key: In a large mixing bowl, beat the softened butter and the ½ cup of powdered sugar together. Now, here’s where we build our foundation. Don’t just mix until combined—beat it on medium-high speed for a good 2-3 minutes until it becomes light, pale, and fluffy. You’re incorporating air into the mixture, which is what gives us that beautifully tender crumb. This step is a game-changer, I promise!
- Incorporate the Flavors: Scrape down the sides of the bowl to make sure everything is mixing evenly. Now, add in the tablespoon of water, the peppermint extract, and that all-important salt. Mix again until everything is fully incorporated and your kitchen starts to smell like a candy cane factory. So good!
- Bring in the Flour: With your mixer on a low speed, gradually add the flour. I like to add it in two or three parts to prevent a white cloud of flour from erupting all over my kitchen (and me!). Mix just until the dough comes together and no dry streaks of flour remain. Be careful not to overmix at this stage, as we don’t want to develop the gluten and make our cookies tough.
- The Grand Finale Mix-In: Now for the fun part! Toss in the chopped peppermint bark and the mini chocolate chips (if you’re using them—and you really should!). Use a sturdy spatula or wooden spoon to fold them in by hand. This ensures they get evenly distributed without getting pulverized by the mixer.
- Scoop and Roll: It’s time to form our snowballs! I use a small cookie scoop (about 1 tablespoon size) to keep them uniform, but a spoon works just fine. Roll the dough between your palms to create smooth, 1-inch balls. Place them on your prepared baking sheets about 1 inch apart. They don’t spread much, but they do need a little room to breathe and get golden on the bottom.
- Bake to Perfection: Slide those trays into your preheated oven and bake for 12-14 minutes. You’re looking for the bottoms to be just lightly golden. The tops should still look pale and feel soft if you gently press them. They might look a little underdone, but trust the process! They continue to cook as they cool, and this is the secret to their supremely tender texture.
- The Double Sugar Roll (The Secret to a Snowy Finish!): Let the cookies cool on the baking sheet for exactly 5 minutes. They need to be firm enough to handle but still warm. Now, pour your remaining cup of powdered sugar into a shallow bowl. Gently roll each warm cookie in the sugar until it’s completely coated. This first layer will melt and cling to the cookie, creating a beautiful, slightly glossy coat. Place them on a wire rack to cool completely. Once they’re totally cool, give them a second roll in the powdered sugar. This is what gives them that classic, snowy, just-fell-from-the-sky look. It’s pure cookie magic.
Sharing the Joy: How to Serve Your Snowballs
Presentation is half the fun! I love piling these peppermint bark snowball cookies high on a vintage cake stand or a simple wooden board. They look stunning nestled amongst other holiday treats. For gifting, tuck them into a cellophane bag tied with a festive ribbon, or layer them carefully in a holiday tin between sheets of parchment paper. They make the most thoughtful, heartfelt homemade gift. And the best way to enjoy one? With a steaming mug of hot chocolate or a freshly brewed cup of coffee, while watching the snow fall outside. Pure bliss.
Ride Your Own Flavor Wave: Recipe Variations
Feel like mixing it up? This recipe is a wonderful canvas for your creativity! Here are a few of my favorite twists:
- Nutty Snowball: Replace the peppermint bark with ¾ cup of very finely chopped toasted pecans or walnuts for a classic, nutty version.
- Chocolate Orange Dream: Swap the peppermint extract for orange extract and use chopped Terry’s Chocolate Orange segments instead of the peppermint bark. It’s a citrusy, chocolatey wonderland.
- Gingerbread Spice: Add a teaspoon of gingerbread spice blend to the flour and use white chocolate chunks instead of peppermint bark for a warm, spiced cookie.
- Dairy-Free Delight: Use your favorite plant-based butter stick. It works like a charm!
- Gluten-Free Friendly: Substitute the all-purpose flour with a 1:1 gluten-free baking blend. The texture is nearly identical!
Isla’s Chef’s Notes: A Few More Secrets
This recipe has evolved so much since I first scribbled it down on a napkin! The addition of the mini chocolate chips was a complete “aha!” moment during a late-night baking session when I realized the dough needed just a little more chocolatey love. I’ve also learned that the quality of the peppermint bark truly matters. Splurge on the good stuff—you can taste the difference.
A funny story? The first time I made these, I was so excited that I tried to roll them in the powdered sugar straight out of the oven. Big mistake! They completely fell apart, and I was left with a bowl of delicious, but very crumbly, cookie rubble. I learned the hard way that the 5-minute cooling window is absolutely sacred. Now you know, too! Consider it a lesson from my kitchen fails so you don’t have to have your own.
Your Questions, Answered: FAQs & Troubleshooting
I’ve made these cookies more times than I can count, and I’ve answered a lot of your DMs about them! Here are the solutions to the most common questions.
Q: My dough is really crumbly and won’t roll into balls. What did I do wrong?
A: Don’t panic! This usually happens if the butter was a bit too cold or if you accidentally packed in too much flour. The fix is easy. Just add a teaspoon of water at a time to the dough and mix it in with your hands until it just comes together. Be patient—you’ll get there!
Q: Can I make the dough ahead of time and bake it later?
A: Absolutely! This is a fantastic make-ahead tip. You can scoop and roll the dough balls, then freeze them in a single layer on a baking sheet. Once they’re solid, transfer them to a freezer bag. When you’re ready to bake, just pop the frozen dough balls onto a parchment-lined sheet and add 1-2 minutes to the baking time. No need to thaw!
Q: Why do I have to roll them twice in the powdered sugar?
A> The first roll, while the cookies are warm, creates a thin, melted layer of icing that acts like glue. The second roll, once they’re completely cool, is what gives you that thick, fluffy, snow-like coating that looks professionally done. Skipping the second roll means your cookies will look a little sad and patchy. It’s worth the extra 2 minutes, I promise!
Q: My cookies spread too much and aren’t very round. What happened?
A> This is almost always a butter issue. If your butter was too soft or almost melted, the cookies will spread. Make sure your butter is softened but still cool to the touch. Also, double-check that your oven temperature is accurate with an oven thermometer—an oven that runs too cool can cause spreading.
Just the Facts: Nutritional Info (Approximate)
Per cookie (based on 36 cookies): Calories: 120 | Fat: 7g | Carbs: 14g | Sugar: 6g | Protein: 1g
Remember, these are a treat meant to be savored and shared, bringing joy one snowy bite at a time!
There you have it, my friend! My entire heart and soul poured into this recipe for Peppermint Bark Snowball Cookies. I truly hope you love making them and sharing them as much as I do. They’re more than just a cookie; they’re a little edible hug, a moment of pure holiday joy.
If you make them (and I really hope you do!), I’d be absolutely thrilled to see your creations. Tag me @BiteTide on Instagram or Pinterest so I can shower you with love and share your beautiful work. Now, go forth and bake! Sending you all the warm, buttery, pepperminty vibes.
With love and a sprinkle of sugar,
Isla 💛