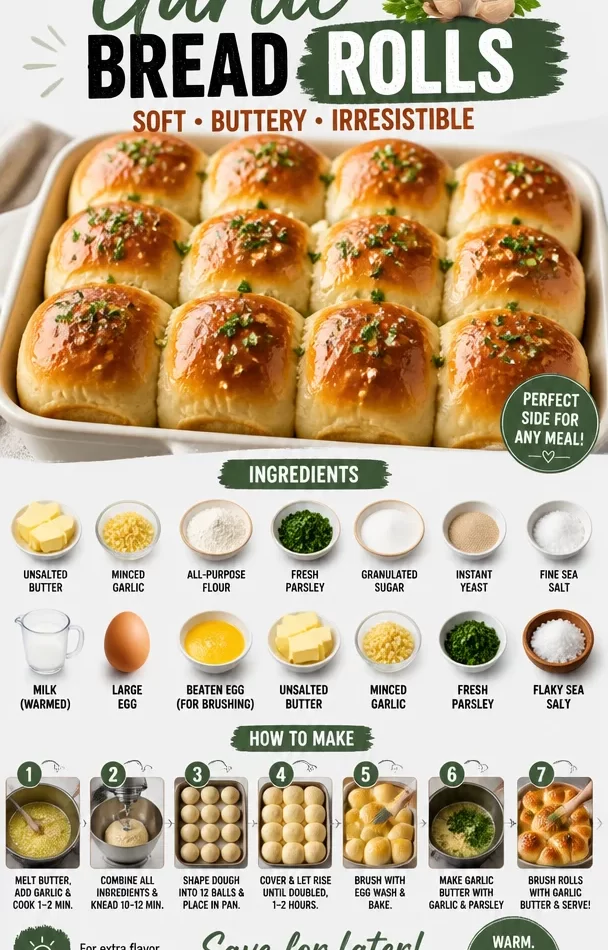
The Unforgettable Joy of Garlic Bread Rolls: A Flavorful Journey
Hey there, flavor seekers! 🎉 Today, I’m bubbling over with excitement to share a recipe that fills the air with warm memories and mouth-watering aromas—Garlic Bread Rolls! These pillowy, buttery beauties are not just a side dish; they’re an experience that unites friends and family over the dinner table. So grab your apron, and let’s dive into the deliciousness together!
A Slice of Nostalgia
Let’s take a moment to journey back in time. Picture this: it’s a chilly Sunday afternoon, and the warmth of the oven is battling the cool breeze from outside. I’m in the kitchen, surrounded by the chaotic sounds of laughter and chatter. My grandma, the queen of comfort food, is whipping up her famous garlic bread. The kitchen is flooded with that marvelous garlicky aroma—there’s nothing quite like it!
I remember getting my hands floured as I helped knead the dough, a task that felt monumental as a kid. Grandma would say, “Isla, the secret ingredient is love, and you can never have too much garlic!” I chuckle now, but those words stuck. I watched as she brushed the rolls with melted butter and sprinkled fresh parsley on top, adding that vibrant pop of color. Each bite sent me dancing with joy, warm and gooey goodness exploding in my mouth. It was the taste of love and family—something I’ve strived to recreate in my own kitchen.
Today, I’m sharing this cherished recipe with all of you, so you can build your own beautiful memories around these delicious garlic bread rolls! Whether it’s a cozy family dinner or a potluck with friends, these rolls are sure to steal the show.
Ingredients
Let’s gather those ingredients that will bring our doughy dreams to life:
-
4 1/2 tablespoons unsalted butter: Key for richness and flavor! If you’re in a pinch, you can use salted butter; just reduce the added salt a wee bit.
-
2 tablespoons minced garlic: Fresh garlic is a must for that bold flavor. You could use jarred garlic for convenience, but fresh is always a game-changer!
-
3 1/2 cups + 1 tablespoon all-purpose flour: This is our backbone. To avoid measuring mishaps, spoon your flour into the measuring cup and level it off with a knife. If you’re feeling adventurous, try swapping 1/2 cup with whole wheat flour for a nutty twist!
-
3 tablespoons chopped fresh parsley: Adds not only color but also a refreshing taste. If herbs aren’t your jam, dried parsley works too; just use a tablespoon or so as it’s more potent!
-
1 tablespoon granulated sugar: A tiny bit of sweetness balances the flavors. You can replace it with honey or maple syrup if you want a natural alternative.
-
2 1/4 teaspoons instant yeast: This is what makes your rolls rise! No active dry yeast? No problem—just add it directly to the mixture.
-
1 teaspoon fine sea salt: Essential for flavor enhancement. If you’re on a low-sodium diet, you can use kosher salt but remember it’s less salty by volume.
-
1 cup whole or 2% milk (warmed to 110°F): Provides moisture and flavor. If you’re dairy-free, almond milk or oat milk works just fine—no need to warm them significantly!
-
1 large egg (room temperature): This helps bind everything together. If you’re vegan, use a flaxseed egg (1 tablespoon ground flaxseed mixed with 3 tablespoons water) instead.
-
1 beaten egg (for brushing the tops): This gives a lovely golden finish to our rolls! You can skip this if you’re going for a more rustic look.
-
2 tablespoons unsalted butter (for the topping): Because garlic and butter are a match made in heaven! You can use olive oil if you’re looking for a lighter finish.
-
1 tablespoon minced garlic (for the topping): More garlic means more flavor! Feel free to omit this if you prefer a milder taste.
-
1 tablespoon chopped fresh parsley (for finishing): For that final pop of freshness on top. You could also drizzle some olive oil here for added richness.
-
Flaky sea salt (for finishing): A dash on top right before serving enhances the flavor of the rolls. If you don’t have flaky salt, regular sea salt will do just fine.
Step-by-Step Instructions
Ready to make some magic in the kitchen? Let’s roll up our sleeves and get started!
-
Activate the Yeast: In a small bowl, combine the warmed milk and sugar. Sprinkle the yeast on top and let it sit for about 5-10 minutes, until it’s frothy and bubbly. This step is crucial—it tells you the yeast is alive and ready to work its magic!
-
Prepare the Dough: In a large mixing bowl, whisk together the flour and the salt. Once the yeast is activated, pour the milk mixture into the flour, along with that glorious egg and softened butter. Get your hands in there or use a wooden spoon—mix until a dough forms.
-
Knead it Out: Turn the dough onto a floured surface and knead for about 8-10 minutes until it’s smooth and elastic. If it’s sticking to your hands, sprinkle a little more flour, but avoid overdoing it! A little tackiness means fluffy rolls.
-
First Rise: Form the dough into a ball and place it in a greased bowl. Cover it with a clean kitchen towel and let it rise in a warm spot for about 1 hour, or until it doubles in size. Use this time to clear your kitchen space and prepare for some delicious rolls!
-
Roll and Shape: Once risen, punch down the dough (this is the fun part!) and turn it out onto a floured surface again. Divide it into 12 equal pieces. Roll each piece into a ball, tucking the edges underneath to create that lovely round shape.
-
Second Rise: Place the rolls on a greased baking sheet, leaving some space between them for that final puffing up. Cover with the towel again and let them rise for another 30-40 minutes.
-
Prep the Topping: While waiting, melt your butter in a small pan and mix in the minced garlic and chopped parsley. This will create your aromatic topping that makes these rolls sing!
-
Bake: Preheat your oven to 375°F (190°C). Brush the tops of the rolls with the beaten egg for that beautiful shine, then pop them in the oven. Bake for about 20-25 minutes until golden brown.
-
Finishing Touches: As soon as you take them out of the oven, brush them with the garlic butter mixture and sprinkle with flaky sea salt. Give them a little time to cool, then arrange them on a wonderful platter for serving.
Serving Suggestions
These garlic bread rolls are best served warm and fresh out of the oven. Place them on a wooden board, scatter some chopped parsley for a pop of color, and maybe even accompany them with a bowl of marinara or garlic dip! Perfect for tearing apart and sharing with friends and family—there’s something intrinsically joyful about pulling apart soft rolls, don’t you think?
Recipe Variations
-
Cheesy Delight: Add shredded mozzarella or parmesan to the dough to give these rolls a cheesy twist. For an even cheesier experience, place a small cube of cheese in the center of each roll before closing it!
-
Herbed Up: Mix in different herbs—like thyme or rosemary—for a fragrant twist on the classic garlic flavor.
-
Spicy Garlic Rolls: Toss in some red pepper flakes to your garlic butter for a spicy kick. Heat lovers unite!
-
Vegan Version: Swap out the butter for coconut oil and use the flaxseed egg substitute. These rolls will still maintain their deliciousness without the dairy!
-
Sweet Garlic Rolls: For a dessert version, reduce the garlic and add cinnamon and sugar to the dough, serving these rolls with a sweet glaze!
Chef’s Notes
Every time I make these garlic bread rolls, I’m reminded of those special kitchen moments with my grandma. Over the years, I’ve played with the recipe, incorporating different flavors and tweaking techniques—but the heart of it remains the same. It’s about gathering around the table, sharing stories, and enjoying life one roll at a time. I encourage you to put your spin on these rolls! Whether it’s a dash more garlic or a sprinkle of your favorite herbs, make it yours.
And if there’s one rule in my kitchen, it’s to always dance while you cook. So crank up your favorite playlist and let those good vibes flow through! 💃✨
FAQs and Troubleshooting
Q: My rolls didn’t rise! What happened?
A: There could be a few culprits. If your yeast was old or not activated, that’s likely the issue. Always check your yeast’s expiration date and let it foam before adding it to the dough. Also, ensure your warm milk isn’t too hot—over 120°F can kill the yeast!
Q: How can I store leftover rolls?
A: Keep those beauties in an airtight container at room temperature for up to three days. If you want to save them longer, wrap them tightly and freeze for up to a month. Just pop them in the oven for a few minutes to bring back that fresh-baked taste.
Q: Can I make these ahead of time?
A: Absolutely! You can prepare the dough and place it in the fridge overnight. Just allow it to come to room temp and complete the second rise before baking.
Q: What if my rolls are too dense?
A: This often means they were over-kneaded or not given enough rising time. Aim for a stretchy, elastic dough, and allow it to double in size without rushing!
Nutritional Info (Optional)
Nutritional information can vary, but per roll (based on 12 rolls):
- Calories: Approximately 150
- Protein: 3g
- Fat: 6g
- Carbohydrates: 19g
- Fiber: 1g
- Sugar: 0.5g
And there you have it, my dear food lovers—fluffy, buttery garlic bread rolls that are sure to become a beloved staple in your home! I hope you enjoy making and sharing them as much as I do. Make some memories, have fun, and don’t forget to spread the love like butter. Happy baking from my kitchen to yours!
– Isla 💛
Print
Garlic Bread Rolls
- Total Time: 45 minutes
- Yield: 12 servings 1x
- Diet: Vegetarian
Description
Pillowy, buttery garlic bread rolls that unite friends and family around the dinner table.
Ingredients
- 4 1/2 tablespoons unsalted butter
- 2 tablespoons minced garlic
- 3 1/2 cups + 1 tablespoon all-purpose flour
- 3 tablespoons chopped fresh parsley
- 1 tablespoon granulated sugar
- 2 1/4 teaspoons instant yeast
- 1 teaspoon fine sea salt
- 1 cup whole or 2% milk (warmed to 110°F)
- 1 large egg (room temperature)
- 1 beaten egg (for brushing the tops)
- 2 tablespoons unsalted butter (for the topping)
- 1 tablespoon minced garlic (for the topping)
- 1 tablespoon chopped fresh parsley (for finishing)
- Flaky sea salt (for finishing)
Instructions
- Activate the yeast: In a small bowl, combine the warmed milk and sugar. Sprinkle the yeast on top and let it sit for about 5-10 minutes, until it’s frothy and bubbly.
- Prepare the dough: In a large mixing bowl, whisk together the flour and the salt. Once the yeast is activated, pour the milk mixture into the flour, along with the egg and softened butter, and mix until a dough forms.
- Knead it out: Turn the dough onto a floured surface and knead for about 8-10 minutes until it’s smooth and elastic.
- First rise: Form the dough into a ball and place it in a greased bowl. Cover it with a kitchen towel and let it rise in a warm spot for about 1 hour.
- Roll and shape: Once risen, punch down the dough and turn it out onto a floured surface again, dividing it into 12 equal pieces and rolling each piece into a ball.
- Second rise: Place the rolls on a greased baking sheet, cover with the towel again, and let them rise for another 30-40 minutes.
- Prep the topping: Melt your butter in a small pan and mix in the minced garlic and chopped parsley.
- Bake: Preheat your oven to 375°F (190°C). Brush the tops of the rolls with the beaten egg, then bake for about 20-25 minutes until golden brown.
- Finishing touches: Brush the rolls with the garlic butter mixture and sprinkle with flaky sea salt before serving.
Notes
Serve warm with marinara or garlic dip for a delightful experience.
- Prep Time: 15 minutes
- Cook Time: 30 minutes
- Category: Side Dish
- Method: Baking
- Cuisine: Italian
Nutrition
- Serving Size: 1 roll
- Calories: 150
- Sugar: 0.5g
- Sodium: 200mg
- Fat: 6g
- Saturated Fat: 3g
- Unsaturated Fat: 3g
- Trans Fat: 0g
- Carbohydrates: 19g
- Fiber: 1g
- Protein: 3g
- Cholesterol: 30mg
Keywords: garlic bread, rolls, baking, side dish