
Fluffy TikTok Cloud Bread: Your New Favorite Whimsical Treat!
Hey there, flavor friend! Have you ever been scrolling through your feed and stopped dead at a video of something that looked less like food and more like a fluffy, pastel dream? A puffy, cloud-like creation that’s sliced into with the most satisfying softness? Yep, I’m talking about the one and only TikTok Cloud Bread. It stopped me in my tracks, too, and I just had to bring it into the BiteTide kitchen.
I’ll be the first to admit, I’m a sucker for a fun kitchen experiment. Anything that feels like a little bit of science and a whole lot of magic is my jam. And cloud bread? It’s the ultimate edible magic trick. With just a few simple ingredients—eggs, sugar, and a touch of cornstarch—you can create a treat that’s light as air, subtly sweet, and so, so fun to make and eat.
But here’s the BiteTide upgrade: I’ve given you a double-serving version because, let’s be real, one regular-sized cloud just isn’t enough to share (or to enjoy all by yourself, no judgment here!). We’re going for sky-high, impress-your-friends, make-your-inner-child-squeal levels of fluff. Plus, I’m sharing my favorite ways to add a splash of color and flavor, turning this viral sensation into your own customizable canvas. So, are you ready to whip up some joy? Grab your mixer, and let’s make some clouds!
Print
Fluffy TikTok Cloud Bread
- Total Time: 30 mins
- Yield: 2 (or 1 giant cloud) 1x
Description
The TikTok-famous Cloud Bread is soft, sweet, and totally whimsical. This upgraded double-serving version gives you a sky-high puff with some fun flavor and color ideas to take it to the next level. Light as air and melt-in-your-mouth delicious—it’s part science, part magic.
Ingredients
6 egg whites (room temperature)
5 tablespoons sugar
2 tablespoons cornstarch
Optional Flavor & Color Twists:
½ teaspoon vanilla extract (for a sweet marshmallow flavor)
A few drops of gel food coloring (blue, pink, or swirl both!)
½ teaspoon almond or coconut extract for extra aroma
Top with a dusting of powdered sugar, edible glitter, or colored sprinkles after baking
Instructions
Preheat oven to 300°F (150°C). Line a baking sheet with parchment paper.
In a large bowl, beat the egg whites with a hand or stand mixer until frothy.
Slowly add sugar, one tablespoon at a time, while continuing to beat on high.
Once soft peaks form, add cornstarch (and vanilla or other extracts if using). Beat until stiff peaks form—this means the mixture holds its shape.
If desired, gently fold in food coloring without deflating the fluff.
Scoop the mixture into a dome or loaf shape onto the prepared baking sheet. Smooth and shape as desired.
Bake for 20–25 minutes, until slightly golden on the outside and set.
Let cool slightly, slice, and enjoy warm or room temp.
- Prep Time: 5 mins
- Cook Time: 25 mins
- Category: Dessert
Nutrition
- Calories: 90
- Carbohydrates: 9g
- Protein: 6g
A Cloud, a Kitchen, and My Grandma’s Apron
Seeing this cloud bread trend instantly took me back to my grandma’s kitchen. She wasn’t a trendy TikTok chef, but she was a wizard with egg whites. I can still see her, standing at her old Formica countertop, her favorite floral apron tied neatly around her waist, whipping up a perfect meringue for her legendary lemon meringue pie with nothing but a whisk and tireless determination.
I was her official “taste-tester,” which mostly meant I got to lick the beaters clean. But what I loved most was the transformation. She’d start with a bowl of clear, slippery egg whites and a pile of sugar, and with a little patience and a lot of elbow grease, it would puff up into this glossy, snowy-white mountain. She’d call it “snow cream” and let me dip a spoon in before she baked it. It felt like a miracle. Making this cloud bread feels like a direct line to those sunny afternoons with her—a simple, magical kitchen trick that never fails to bring a smile to my face. It’s a reminder that the most joyful recipes are often the simplest ones.
Gathering Your Cloud-Making Supplies
The beauty of this recipe is in its simplicity. You probably have everything you need right in your kitchen already! Here’s the lineup for our double-serving, extra-fluffy cloud.
- 6 Egg Whites (room temperature): This is the star of the show! Room temp egg whites whip up to a much greater volume than cold ones, giving us that incredible height. Chef’s Insight: Save those yolks! They’re perfect for a rich pasta carbonara, homemade custard, or to brush on pastry for a golden shine.
- 5 Tablespoons Sugar: We’re using granulated sugar here. It not only sweetens our cloud but also stabilizes the meringue, helping it hold its shape. Adding it slowly is key to dissolving it properly.
- 2 Tablespoons Cornstarch: This is our secret weapon for structure! The cornstarch gives the cloud a little more stability and a tender, cake-like crumb on the inside once it’s baked.
Optional Flavor & Color Twists (Get Creative!)
- ½ teaspoon Vanilla Extract: For a classic, sweet marshmallow flavor. Almond or coconut extract would be dreamy here too!
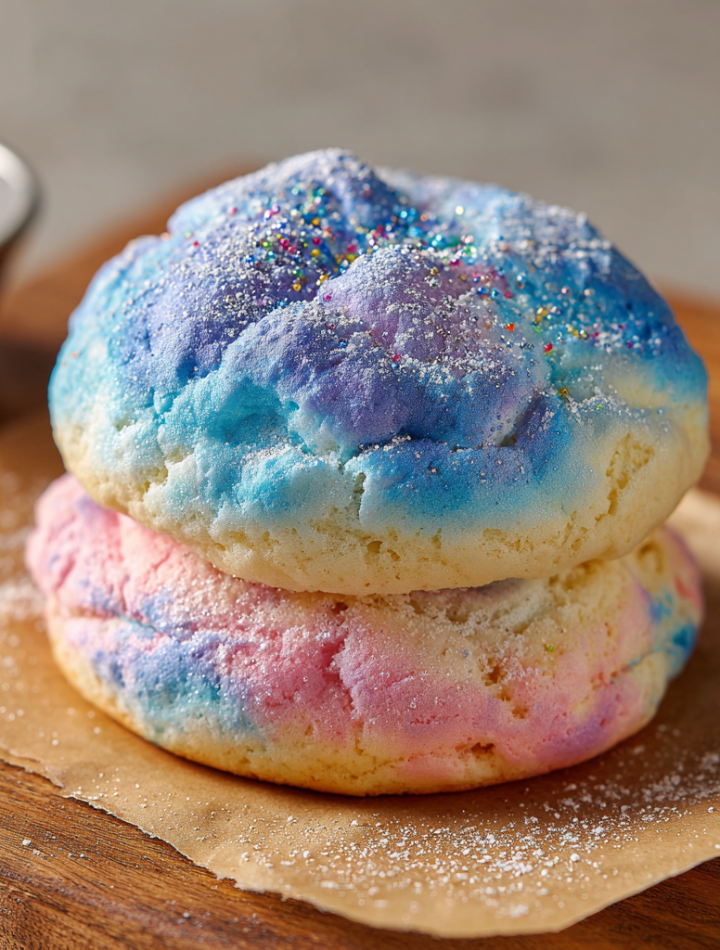
- A few drops of Gel Food Coloring: Gel coloring is best because it’s highly concentrated and won’t add extra liquid that could deflate our fluffy egg whites. Go for a single sky-blue or cotton-candy pink, or swirl both for a galaxy effect!
- Top with a dusting of Powdered Sugar, Edible Glitter, or Colored Sprinkles: Because everything is better with a little sparkle. Add this after baking for the best effect.
Creating Your Edible Masterpiece: Step-by-Step
Ready for the fun part? Let’s turn these simple ingredients into a show-stopping treat. Don’t be intimidated—it’s easier than it looks! Just follow these steps, and you’ll be a cloud-bread pro in no time.
- Preheat & Prep: First things first, preheat your oven to 300°F (150°C). This is a lower temp than many baked goods, which is perfect for gently drying out and setting our meringue without browning it too quickly. Line a baking sheet with parchment paper. Chef’s Hack: Dab a little of the meringue on the corners of the baking sheet to “glue” the parchment paper down. This prevents it from sliding around when you’re shaping your cloud!
- The Great Whip: In a large, impeccably clean bowl, add your room temperature egg whites. Any trace of grease or yolk can prevent the whites from whipping properly, so make sure your bowl and beaters are spotless! Using a hand mixer or a stand mixer fitted with the whisk attachment, beat the egg whites on medium speed until they become frothy and bubbly. This should only take a minute or so.
- The Slow Sugar Pour: Now, here’s where patience pays off. Turn your mixer up to high speed and start adding the sugar, just one tablespoon at a time. Let each tablespoon incorporate fully before adding the next. This slow addition helps the sugar dissolve completely, creating a smooth, stable, and glossy meringue. You’ll see the mixture start to turn from frothy to thick and white.
- Peak Performance: Keep beating! After all the sugar is in, continue beating until you reach the “soft peak” stage. This means when you lift the beaters out of the mixture, the peaks will curl over slightly at the tips. Now, sprinkle in the cornstarch (and your vanilla or other extract, if using). Continue beating on high until you reach “stiff peaks.” This is the goal! The peaks will stand straight up when you lift the beaters, and the mixture will be thick, glossy, and hold its shape beautifully.
- Add Some Color (Optional): If you’re using food coloring, now’s the time! Add a few drops onto the surface of the meringue. Using a spatula, gently fold the color in. The key word is GENTLY. Use big, sweeping motions to incorporate the color without knocking out all the precious air bubbles you just worked so hard to create. You can go for a solid color or stop folding early for a cool marbled effect.
- Shape Your Cloud: Scoop the glorious, fluffy meringue onto your prepared baking sheet. Use your spatula to shape it into a generous dome or a loaf shape. Have fun with it! You can make peaks and valleys to really look like a cloud. Smooth the sides as best you can.
- Bake to Perfection: Slide your creation into the preheated oven and bake for 20-25 minutes. You’re looking for a lightly golden exterior that is firm to the touch. The inside will remain soft and marshmallowy. Chef’s Note: Resist the urge to open the oven door during the first 15 minutes of baking! A sudden drop in temperature can cause your cloud to collapse.
- The Finale: Once it’s beautifully golden, take it out of the oven and let it cool on the baking sheet for a few minutes. It will deflate slightly—that’s totally normal and part of its charm! Slice it with a serrated knife (saw gently, don’t press down) and enjoy it warm for a gooey, marshmallowy center, or let it cool completely for a slightly chewier texture.
How to Serve Your Fluffy Creation
Cloud bread is a star all on its own, but presentation is half the fun! I love placing the whole cloud on a wooden board or a large platter. Just before serving, give it a generous dusting of powdered sugar through a fine-mesh sieve—it looks like a fresh snowfall. For a party, add a sprinkle of edible glitter or colorful sprinkles. Slice it right at the table for that wow factor. It’s perfect with a cup of coffee for an afternoon pick-me-up or as a light, whimsical dessert after dinner. For an extra indulgent treat, serve slices with a side of fresh berries and a dollop of whipped cream for dipping!
Ride the Flavor Wave: 5 Fun Variations
Once you’ve mastered the basic cloud, the sky’s the limit! Here are a few of my favorite ways to mix it up:
- Chocolate Swirl: Gently fold in 2 tablespoons of sifted cocoa powder at the end for a marbled chocolate-vanilla cloud.
- Fruity Pebbles Cloud: After shaping, gently press a handful of Fruity Pebbles or crushed freeze-dried strawberries into the top before baking for a fun, fruity crunch.
- Matcha Green Tea Cloud: Add 1 tablespoon of high-quality matcha powder with the cornstarch for a beautiful green hue and a subtle, earthy flavor.
- “S’mores” Cloud: Fold in ¼ cup of mini chocolate chips and crushed graham crackers. Top with a few extra pieces after baking.
- Dairy-Free & Stabilized: For an even more stable cloud, add ¼ teaspoon of cream of tartar when the egg whites are frothy. It’s naturally dairy-free!
Isla’s Chef Notes: A Little Story & Some Wisdom
This recipe has become a go-to in my house for last-minute dessert cravings or when I need a little kitchen therapy. The rhythmic sound of the mixer, watching the glossy peaks form—it’s just so satisfying. I’ve definitely had a few learning experiences along the way! The first time I made it, I got impatient and dumped all the sugar in at once. My cloud was… grainy and flat. A delicious failure, but a failure nonetheless!
It taught me that sometimes, the best things in life (and in the kitchen) require a little patience and following the steps. This recipe has evolved for me to include the cornstarch trick I picked up from a pastry chef friend—it really makes a difference in the texture. So, my biggest piece of advice? Embrace the process. Don’t rush the whipping, and have fun with the shaping. Even if it cracks or deflates a bit, it will still taste incredible. That’s the BiteTide promise: no fuss, just flavor and fun.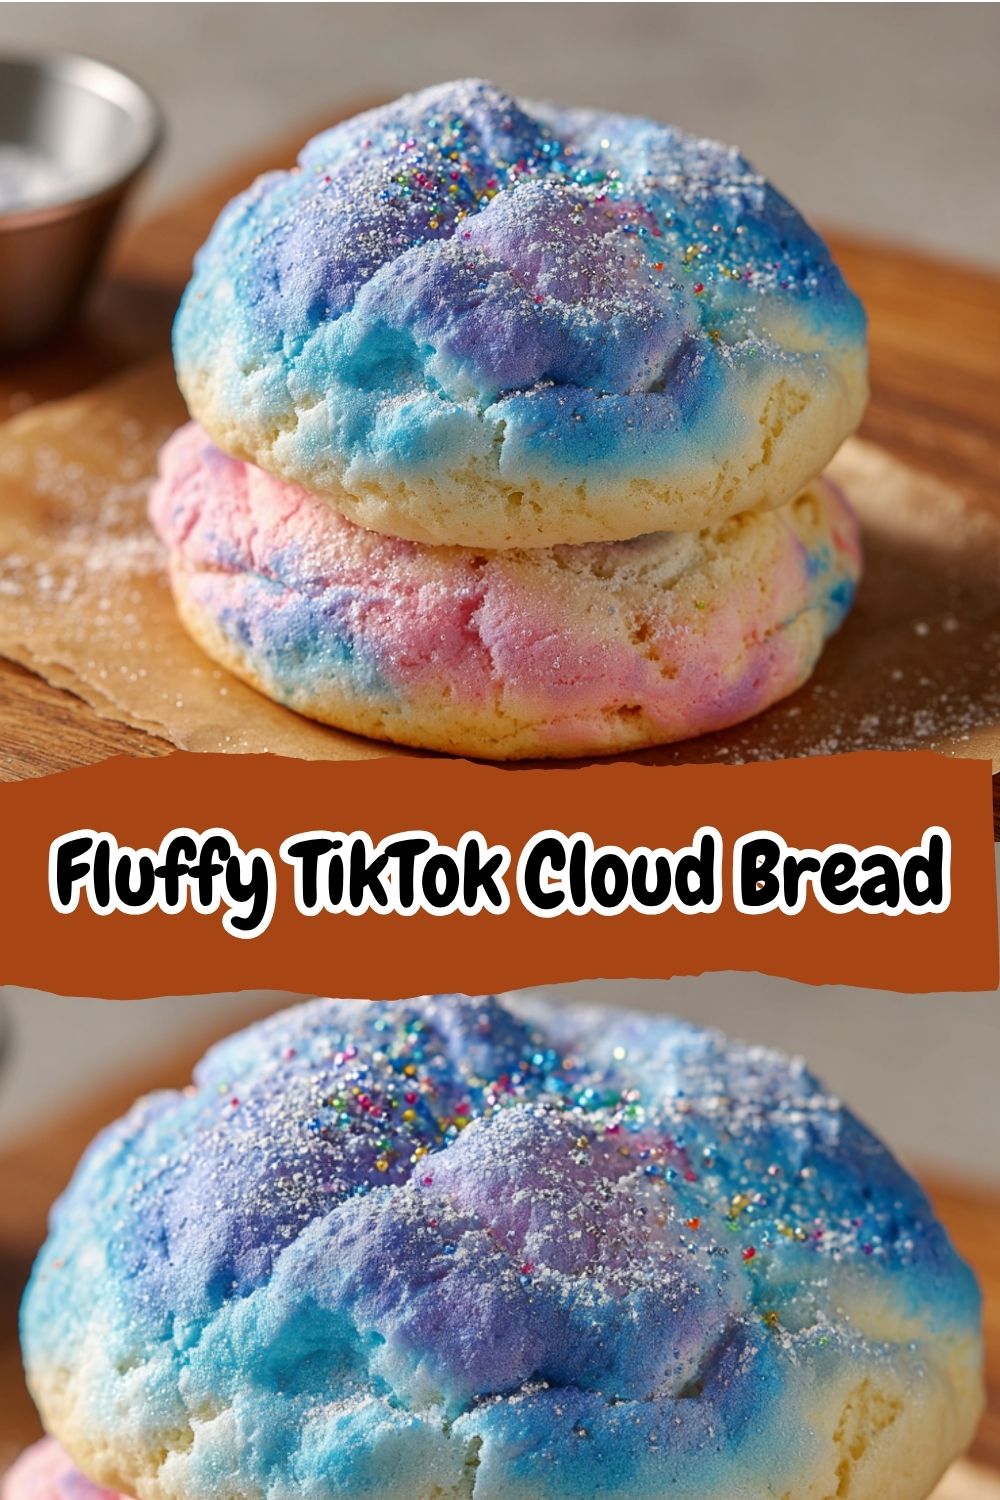
Cloud Bread FAQs: Your Questions, Answered!
I’ve gotten so many questions about this recipe from the BiteTide community! Here are the answers to the most common ones.
Q: My cloud bread collapsed! What did I do wrong?
A: Oh no! Don’t worry, it happens to the best of us. The most common culprits are:
- Under-whipped egg whites: Make sure you beat them all the way to stiff, glossy peaks. They should hold their shape firmly.
- Opening the oven door too early: The sudden temperature change can cause a collapse. Wait until at least the 15-minute mark to take a peek.
- A greasy bowl: Even a tiny bit of fat can prevent the egg whites from reaching their full volume.
Even if it collapses, it will still be delicious—think of it as a delicious, chewy meringue cookie!
Q: Can I make this without a stand mixer or hand mixer?
A: You can, but I’ll be honest—it’s a serious arm workout! My grandma did it by hand with a whisk, so it’s absolutely possible. You’ll need a large balloon whisk and a lot of endurance. Whisk in a steady, circular motion, incorporating as much air as possible. It might take 10-15 minutes of continuous whisking to get to stiff peaks. Consider it your daily workout!
Q: Why is my cloud bread chewy or sticky on the bottom?
A: A slight chewiness is normal and lovely! But if it’s very sticky, it might need a minute or two more in the oven. The cornstarch needs that full time to set. Also, make sure you’re using parchment paper, not wax paper, as wax paper can melt and cause sticking.
Q: How should I store leftovers?
A: Cloud bread is best enjoyed the day it’s made. However, you can store any leftovers in an airtight container at room temperature for up to 2 days. Be aware that it will lose its crisp exterior and become more soft and marshmallowy over time—which some people actually prefer!
Quick Nutritional Info
Prep Time: 5 minutes | Cook Time: 20-25 minutes | Total Time: ~30 minutes | Servings: 2 (or 1 giant cloud!)
Per Serving (approximate): Calories: 90, Protein: 6g, Carbs: 9g, Sugar: 7g, Fat: 0g