 Easy Mini Chicago Deep Dish Pizzas – Your New Party Superpower!
Hey there, flavor friend! Isla here, from my cozy kitchen to yours. Tell me if this sounds familiar: you’re hosting a game day gathering, a kid’s birthday party, or just a casual Friday night hang with your favorite people. You want to serve something that feels like a real “wow” moment—something cheesy, decadent, and deeply satisfying—but you absolutely do not want to be stuck in the kitchen all day, missing out on all the fun and conversation.
I’ve been there more times than I can count. That exact craving for maximum flavor with minimal fuss is what sparked the recipe I’m so excited to share with you today. Forget the complicated techniques and hours of dough-rising; we’re making Easy Mini Chicago Deep Dish Pizzas! We’re taking everything we love about that iconic, fork-and-knife Windy City masterpiece—the buttery, crispy crust, the river of molten mozzarella, the chunky, vibrant sauce—and we’re shrinking it down into adorable, handheld, party-perfect personal pies.
The best part? We’re using a simple muffin tin to make it happen. That’s right, the same trusty pan you use for blueberry muffins is your secret weapon for creating these cheesy, saucy, impossible-to-resist bites. They’re crispy on the outside, gloriously gooey in the center, and guaranteed to have everyone asking, “How did you make these?!” So, tie on your favorite apron, and let’s ride this flavor wave together. It’s pizza time, the BiteTide way!
A Slice of My Pizza Heart
My love affair with deep-dish pizza started on a frigid, windy (shocker, right?) family trip to Chicago when I was about ten. We’d been sightseeing all day, and we were all cold, tired, and so hungry we could’ve eaten the decorative breadsticks off the hotel lobby wall. My dad, in a stroke of genius, herded us into a cozy, steamy-windowed pizzeria that smelled like heaven—a potent mix of baking bread, garlic, and simmering tomatoes. When our pizza arrived, it wasn’t a flat circle; it was a pie. A deep, golden-brown vessel filled with a chaotic, beautiful mess of cheese and sauce. I remember the collective “ooooh” from our table as the server sliced into it. That first bite was a revelation—a warm, cheesy, saucy hug from the inside out. We were a mess, we were happy, and we were together. That’s the feeling I’m always chasing in my kitchen, and it’s the exact feeling I’ve packed into every single one of these mini masterpieces.
Print
Easy Mini Chicago Deep Dish Pizzas : Party-Ready Personal Pies
- Total Time: 30 mins
- Yield: 12 mini pizzas 1x
Description
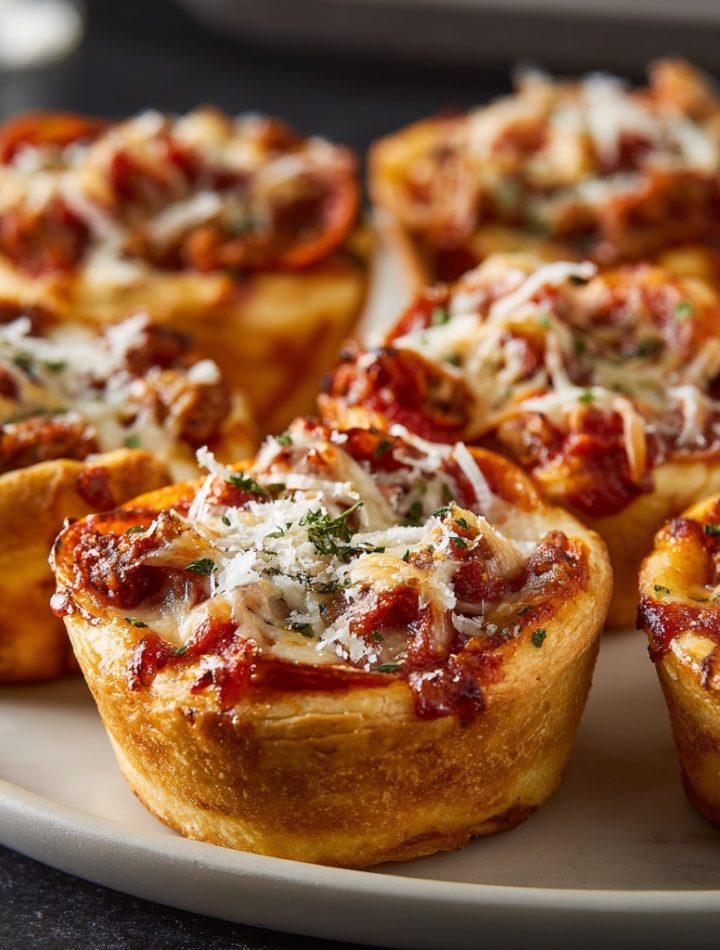
These Mini Chicago Deep Dish Pizzas bring all the cheesy, saucy, buttery crust goodness of the Windy City classic into a handheld, party-perfect bite. Made in a muffin tin for easy prep and serving, they’re crispy on the outside, gooey in the center, and impossible to stop at just one. Ideal for game day spreads, gatherings, or a fun dinner twist!
Ingredients
1 package refrigerated pizza dough or homemade dough
1 cup shredded mozzarella cheese
½ cup cooked sausage, pepperoni, or your favorite pizza topping
¾ cup thick pizza sauce or crushed tomatoes
¼ cup grated Parmesan cheese
Olive oil for brushing
Dried oregano or Italian seasoning for garnish
Instructions
Preheat oven to 425°F (220°C). Lightly grease a 12-cup muffin tin.
Roll out pizza dough and cut into 12 circles slightly larger than the muffin cups.
Press each dough round into the tin, creating little deep dish crusts.
Layer mozzarella and your chosen toppings into each cup. Spoon pizza sauce over the top.
Sprinkle with Parmesan and a pinch of oregano.
Bake for 13–15 minutes, or until the edges are golden and the cheese is bubbly.
Let cool slightly before removing and serving warm.
- Prep Time: 15 mins
- Cook Time: 15 mins
- Category: Snack
Gathering Your Flavor Crew
One of my core kitchen beliefs is that great food doesn’t require a million obscure ingredients. This recipe is a testament to that! Here’s your simple, powerful lineup. Remember, the quality of your core ingredients makes a big difference here.
- 1 package refrigerated pizza dough: This is our ultimate fuss-free hero! Look for it in the canned biscuit section. Of course, if you have a favorite homemade dough, by all means, use it! This recipe is all about ease, so no judgment here. Chef’s Insight: Let the dough sit at room temperature for about 20-30 minutes before you start. It becomes much more pliable and easier to work with, preventing it from snapping back like a rubber band.
- 1 cup shredded mozzarella cheese: The glue that holds our pizza universe together. I recommend buying a block of low-moisture, whole-milk mozzarella and shredding it yourself. The pre-shredded stuff is coated with anti-caking agents that can make the melt less smooth and silky. Substitution Tip: A provolone and mozzarella blend is also fantastic for a slightly sharper flavor.
- ½ cup cooked sausage, pepperoni, or your favorite pizza topping: This is your playground! I love using Italian sausage (casings removed and crumbled) for that classic Chicago vibe. Chef’s Insight: Make sure your toppings are cooked and not too watery. Sauté those mushrooms and bell peppers first to drive off excess moisture, which would make our mini crusts soggy.
- ¾ cup thick pizza sauce or crushed tomatoes: The crown jewel! Do not use a thin, runny marinara. You want a thick, concentrated sauce. I often use high-quality crushed tomatoes and simmer them for 10 minutes with a pinch of salt, garlic powder, and oregano to thicken them up. Substitution Tip: A good-quality jarred pizza sauce works beautifully in a pinch—I do it all the time on busy days!
- ¼ cup grated Parmesan cheese: Our flavor-boosting secret weapon. This adds a salty, nutty depth that takes these mini pies to the next level.
- Olive oil for brushing: A simple brush of olive oil on the dough before baking gives us that gorgeous, golden-brown, irresistibly crispy crust.
- Dried oregano or Italian seasoning for garnish: A little sprinkle on top before baking makes the whole kitchen smell incredible and adds a pop of herby color.
Let’s Build Some Pizza Magic: Step-by-Step
Ready to see how this all comes together? It’s so much easier than you think. Follow these steps, and you’ll be a mini pizza pro in no time.
- Preheat and Prep: First things first, get that oven roaring hot! Crank it to 425°F (220°C). While it’s heating up, grab your standard 12-cup muffin tin and give it a generous coating of non-stick spray or a brush of olive oil. Chef’s Hack: Don’t be shy with the grease! This ensures your golden, crispy pizza cups will pop right out without leaving any delicious crust behind.
- Shape Your Crusts: On a lightly floured surface, roll out your room-temperature pizza dough into a large rectangle, about ¼-inch thick. Now, grab a 3.5 to 4-inch round cutter. A glass or a wide-mouth mason jar lid works perfectly if you don’t have a cutter. Press out 12 circles. They should be just a bit larger than the muffin cup openings. Chef’s Commentary: Don’t worry if they’re not perfect circles! Rustic is charming. Just try to get them roughly the same size so they bake evenly.
- Create the “Deep Dish”: Gently press one dough round down into each greased muffin cup. Use your fingers to press it down into the bottom and up the sides. You’re creating a little edible bowl for all that cheesy goodness! Chef’s Hack: Make sure the dough comes just slightly up over the top of the cup rim. This gives you a nice, sturdy edge that will bake up beautifully crispy.
- The All-Important Layering: This is the secret to an authentic deep-dish structure! Cheese first. Divide most of your shredded mozzarella between the cups, laying it directly on the dough. This creates a protective layer that helps prevent a soggy bottom. Next, add your meat or veggie toppings. Then, spoon a heaping tablespoon of your thick pizza sauce over the top. Chef’s Insight: The sauce acts as a seal, trapping the steam from the cheese and creating that incredible, molten center. Finish with a sprinkle of the remaining mozzarella, the Parmesan, and a pinch of oregano.
- Bake to Perfection: Slide that beautiful tin into your preheated oven and bake for 13–15 minutes. You’re looking for golden-brown, crispy edges and bubbly, molten cheese peeking through the sauce. Your kitchen will smell absolutely incredible. Chef’s Tip: Ovens can vary, so start checking at the 12-minute mark. If the edges are getting too dark too fast, you can tent the tin loosely with foil.
- The Crucial Cool-Down: I know, the temptation to immediately devour one is overwhelming. But trust me on this! Let the pizzas cool in the muffin tin for at least 5-7 minutes. This allows the cheese to set slightly, making them much easier to remove without falling apart. Use a small offset spatula or a butter knife to gently loosen and lift them out.
Let’s Get This Party Served!
Presentation is part of the fun! I love piling these mini deep dish pizzas high on a big wooden cutting board or a vibrant platter. Scatter some fresh basil leaves over the top for a gorgeous pop of green. For a true Chicago experience, set out little bowls of grated Parmesan and red pepper flakes so your guests can customize their bite. These are the ultimate finger food, so no plates or forks needed—just plenty of napkins! They’re best served warm, right out of the oven, when the cheese is at its peak stretchiness.
Ride Your Own Flavor Wave: Fun Variations
The beauty of this recipe is its versatility. Once you’ve mastered the basic formula, the world is your pizza oyster! Here are a few of my favorite twists:
- Spinach & Artichoke Dip: Swap the pizza sauce for a scoop of your favorite (thawed and drained) frozen spinach and artichoke dip. It’s insanely good.
- Veggie Lover’s Dream: Skip the meat and load up with sautéed mushrooms, bell peppers, black olives, and red onions. A sprinkle of feta cheese at the end is a lovely touch.
- BBQ Chicken: Use shredded cooked chicken tossed in BBQ sauce instead of pizza sauce, and a blend of mozzarella and sharp cheddar cheese.
- Margherita Style: After baking, tuck a few small fresh basil leaves into the top of each pizza and add a tiny dollop of fresh, creamy burrata or a small slice of fresh mozzarella.
Isla’s Chef’s Notes & Kitchen Confessions
This recipe has become such a staple in my home that it’s evolved in the funniest ways. The first time I tested it, I was so excited I overfilled the cups, and I had a glorious, cheesy volcanic eruption all over my oven floor. My kitchen smelled like a burnt pizza factory for days! So, learn from my mess—don’t fill the cups more than ¾ of the way to the top.
I’ve also found that these are a fantastic meal prep hack for my family. I’ll make a double batch on a Sunday, let them cool completely, and then freeze them in a single layer on a baking sheet before transferring to a freezer bag. On a busy weeknight, I just pop a few frozen mini pizzas into the toaster oven or air fryer at 375°F until they’re hot and crispy again. It’s a lifesaver! Seeing my kids’ faces light up when they get a “pizza pie” for a Tuesday dinner never gets old.
Your Pizza Questions, Answered!
I’ve made these dozens of times and have gotten some great questions from the BiteTide community. Here are the answers to the most common ones!
Q: My dough keeps shrinking back when I try to press it into the muffin tin. Help!
A: This is almost always a temperature issue! That dough is too cold and tense. Simply let it sit on the counter for another 15-20 minutes to warm up and relax. A relaxed dough is a cooperative dough.
Q: Can I make these ahead of time?
A: Absolutely! You can assemble the entire tin, cover it tightly with plastic wrap, and refrigerate it for up to 24 hours before baking. You might need to add 1-2 extra minutes to the baking time since you’re starting with a cold tin. They also freeze beautifully after baking, as I mentioned above.
Q: Why is my mini pizza soggy on the bottom?
A: A few culprits could be at play: 1) You might have skipped the crucial “cheese first” layer. The cheese creates a barrier between the wet sauce and the dough. 2) Your sauce might have been too thin. Always opt for a thick sauce. 3) You didn’t let them cool in the tin. That resting time allows the structure to set.
Q: Can I use an air fryer to make these?
A: You sure can! They come out super crispy. Spray your air fryer basket well, place the assembled mini pizzas inside (you’ll likely have to work in batches), and air fry at 375°F for about 8-10 minutes, or until golden and bubbly.
Quick Bite of Info
Yields: 12 mini pizzas | Prep Time: 15 mins | Cook Time: 15 mins
Approx. per serving: Calories: 180 | Protein: 8g | Fat: 8g | Carbs: 18g | Sugar: 2g | Sodium: 330mg