
Crispy Loaded Hasselback Potato Bites: Your New Go-To Party Hero!
Hey there, flavor friend! Isla here, from my cozy kitchen to yours. Have you ever been to a gathering, taken one bite of a snack, and immediately thought, “I NEED the recipe for this, right now?” That’s the exact energy I’m aiming for with these Crispy Loaded Hasselback Potato Bites. We’re talking about that magical moment when a dish arrives, and a hush falls over the room, followed by a chorus of “Oh my gosh, these are incredible.”
Imagine everything you adore about a fully-loaded baked potato—the crispy skin, the fluffy interior, the river of melted cheese, the salty crunch of bacon, and that cool, creamy tang of sour cream—but transformed into a gorgeous, bite-sized, totally poppable appetizer. These aren’t just potatoes; they’re little edible works of art that look far more impressive than the effort they require. They’re the ultimate crowd-pleaser, the game-day savior, the potluck superstar that will have people asking you for the secret.
I created this recipe for those of us who believe that party food should be three things: ridiculously delicious, genuinely fun to eat, and completely stress-free for the cook. No fussy techniques, no obscure ingredients, just straightforward, bold flavor that works every single time. So, tie on your favorite apron, preheat that oven, and let’s make some kitchen magic that’s guaranteed to create a tidal wave of happy taste buds.
A Tale of Two Spuds: My First Hasselback Fiasco
I have to confess, my first encounter with a Hasselback potato was… less than graceful. I was about sixteen, feeling wildly confident in my kitchen skills after mastering my grandma’s chocolate chip cookies. I decided to impress my family with a fancy-looking potato recipe I’d seen in a magazine. Let’s just say my ambition outweighed my patience. I grabbed the biggest baking potato I could find, didn’t use any guide rails (a trick you’ll learn below!), and sawed away with a less-than-sharp knife. The result? A lopsided, partially-severed spud that looked more like a defeated accordion than a elegant side dish. My dad, ever the encourager, still ate it and declared it “deliciously creative.”
But that little kitchen flop taught me a beautiful lesson: the best recipes often come from a place of playful experimentation. It’s where we learn our best hacks! I swapped giant potatoes for cute, manageable baby ones. I embraced the flavor-holding “fan” of the cuts. And I realized that loading them up with all my favorite toppings turned them from a simple side into the main event. This recipe is the happy, polished, and wildly successful evolution of that long-ago kitchen experiment. It proves that sometimes, the best dishes are born from a happy little mess.
Print
Crispy Loaded Hasselback Potato Bites : The Ultimate Game Day Crowd-Pleaser
- Total Time: 55 minutes
- Yield: 6 servings 1x
Description
These Crispy Loaded Hasselback Potato Bites are everything you love about a loaded baked potato—packed into one delicious, bite-sized appetizer. Each potato is sliced, roasted until golden and crisp, then loaded with melty cheese, crispy bacon, sour cream, and scallions. Serve these at your next gathering and watch them disappear fast!
Ingredients
1½ lbs baby Yukon gold or red potatoes
2 tbsp olive oil
Salt & pepper to taste
1 cup shredded cheddar cheese
6 slices bacon, cooked and crumbled
½ cup sour cream
¼ cup chopped green onions
Instructions
Preheat oven to 425°F (220°C). Line a baking sheet with parchment.
Slice each potato into thin slits (Hasselback-style), stopping just before cutting through.
Brush with olive oil, season with salt and pepper, and bake for 30–35 minutes until crispy and tender.
Sprinkle cheese and bacon over the potatoes and return to oven for 5 more minutes to melt.
Top each potato with a small dollop of sour cream and sprinkle with green onions.
Serve warm and watch them vanish!
- Prep Time: 15 mins
- Cook Time: 40 minutes
- Category: Snack
Gathering Your Flavor Crew: The Ingredients
One of my core kitchen beliefs is that fantastic food doesn’t require a grocery list a mile long. We’re using simple, high-quality ingredients here, and each one plays a starring role. Here’s your shopping list and my little chef insights for each.
- 1½ lbs baby Yukon gold or red potatoes: These are our MVPs! Their small size is perfect for bite-eating, and their thin, waxy skins get incredibly crispy. Yukon golds also have a naturally buttery, creamy interior that’s just dreamy. Chef’s Tip: Try to pick potatoes that are roughly the same size for even cooking. A quick scrub and dry is all they need—no peeling required!
- 2 tbsp olive oil: This is our crisp-maker! A good glug of olive oil helps the salt and pepper stick and works its magic to create that golden, crackly exterior we’re after.
- Salt & pepper to taste: Don’t be shy! Potatoes need a good amount of seasoning. I use a coarse sea salt and freshly cracked black pepper for the best texture and flavor.
- 1 cup shredded cheddar cheese: The melty, gooey glue that holds everything together. I highly recommend shredding your own cheese from a block. Pre-shredded cheese is coated with anti-caking agents that can prevent it from melting as smoothly and beautifully.
- 6 slices bacon, cooked and crumbled: Salty, smoky, crispy bacon bits are non-negotiable for that classic “loaded” flavor. For a great shortcut, use pre-cooked bacon from the package! Dietary Swap: For a vegetarian version, crispy chopped mushrooms or a sprinkle of smoked paprika work wonders.
- ½ cup sour cream: That cool, creamy contrast is essential. It cuts through the richness of the cheese and bacon perfectly. Chef’s Insight: For a tangier kick, swap in Greek yogurt. It delivers the same cooling effect with a little extra protein.
- ¼ cup chopped green onions: The fresh pop of color and mild oniony flavor at the finish! They add a brightness that makes the whole dish sing.
Let’s Get Cooking: Your Foolproof Step-by-Step Guide
Ready to create these gorgeous little bites? Follow these steps, and you’ll be a Hasselback pro in no time. I’ve packed this section with all my favorite little hacks to ensure your success.
- Preheat and Prep: First things first, get that oven roaring hot to 425°F (220°C). A hot oven is the secret to maximum crispiness. While it heats up, line a sturdy baking sheet with parchment paper. This isn’t just for easy cleanup—it prevents the potatoes from sticking and ensures the bottoms get just as crispy as the tops. Little Chef Hack: If you have a wire rack that fits your baking sheet, placing the potatoes on that will elevate them and allow hot air to circulate all around for an all-over, unbeatable crunch.
- The Signature Slice (The No-Stress Way!): This is the step that seems intimidating, but I have the perfect trick for you. Take each potato and place it flat-side down in the bowl of a large wooden spoon. The edges of the spoon will act as guard rails, stopping your knife from slicing all the way through the potato. Using a sharp knife, make thin, vertical slices about ⅛ to ¼-inch apart across the entire potato, stopping when your knife hits the spoon. You’ll create a beautiful, fanned effect without any risk of cutting through the bottom. It’s a total game-changer! Commentary: Don’t aim for perfection here. Slightly uneven slices just mean more nooks and crannies for oil and seasoning to nestle into. It’s all good flavor!
- Oil and Season for Success: Place your beautifully sliced potatoes on the prepared baking sheet. Use a pastry brush (or your fingers!) to generously coat each potato with the olive oil, making sure you get some in between the slices. Then, shower them with a hearty amount of salt and pepper. This is where you build your foundational flavor, so be brave! Little Chef Hack: For an extra flavor boost, mix a minced garlic clove or a teaspoon of garlic powder into your olive oil before brushing. It’s a simple upgrade with a huge payoff.
- The First Roast to Crispy Perfection: Slide your tray into the preheated oven and let the potatoes roast for 30-35 minutes. You’ll know they’re ready when the outsides are golden brown and crispy, and the insides are tender and fluffy when pierced with a fork. The fans will have opened up beautifully, creating all those lovely edges we love.
- The Cheesy, Bacon-y Finale: Carefully pull the baking sheet out of the oven. Now for the fun part! Sprinkle the shredded cheddar cheese evenly over the potatoes, aiming to get some in between the slices. Follow that with a generous scattering of the crumbled bacon. Pop the tray back into the oven for just 4-5 minutes, or until the cheese is completely melted, bubbly, and glorious.
- The Grand Finale Toppings: Once out of the oven, let the potatoes cool for just a minute or two on the tray—they’re molten hot! Then, using a small spoon, add a tiny, cute dollop of sour cream to the top of each potato bite. Finish with a vibrant sprinkle of chopped green onions. This not only adds flavor but makes them look absolutely irresistible.
Plating Up for Maximum “Wow” Factor
Presentation is part of the fun! Don’t just dump these beauties on a plate. Arrange them neatly on a beautiful wooden board or a vibrant platter. Scatter any extra green onions or a little extra bacon crumble around the platter for a professional, finished look. I love serving these straight from the baking sheet (placed on a trivet, of course) for a casual, “dig in!” vibe. Place a small bowl of extra sour cream for dipping in the center for the true sour cream enthusiasts in your crowd. They’re best served warm, when the cheese is still gloriously gooey, so get them to your guests quickly!
Ride Your Own Flavor Wave: Fun Variations
The beauty of this recipe is its versatility. Once you master the basic technique, the topping world is your oyster! Here are a few of my favorite twists:
- Buffalo Chicken Style: Toss shredded rotisserie chicken in buffalo sauce. After the first roast, top the potatoes with the chicken and a blue cheese or Monterey Jack blend before the final melt.
- Everything Bagel Bliss: Swap the cheddar for a schmear of cream cheese in between the slices after baking, then top with a heavy sprinkle of everything bagel seasoning and fresh dill.
- Fully Loaded Taco: Use a pepper Jack cheese blend, and after baking, top with seasoned ground beef or black beans, pico de gallo, a dollop of guacamole, and a squeeze of lime.
- Greek Goddess: Top with crumbled feta cheese, chopped Kalamata olives, diced cucumbers, a dollop of tzatziki, and a sprinkle of fresh oregano.
Isla’s Chef’s Notes & Kitchen Chatter
This recipe has become such a staple in my entertaining arsenal that it’s evolved in little ways over the years. I once, in a pre-party panic, discovered that using kitchen shears to quickly snip the bacon into small pieces is infinitely faster than chopping with a knife. You’re welcome for that one!
I’ve also learned that these potatoes are incredibly forgiving. Did you accidentally slice one all the way through? No worries! Just press it back together, it will still roast up and taste amazing. The goal is flavor and fun, not perfection. I often double the batch for big parties because they disappear at an alarming rate. The biggest compliment I ever received was from a friend who texted me the next day saying her kids were using the leftover (ha! there were none) potatoes as a bargaining chip. That’s when you know you’ve got a winner.
Your Questions, Answered!
I’ve made these dozens of times and have answered every question imaginable from readers and friends. Here are the most common ones to ensure your Hasselback journey is smooth sailing.
Q: My potatoes are sticking to the pan! What did I do wrong?
A: This usually means you need a little more oil, or your parchment paper is your best friend! Make sure each potato is well-coated in oil, and always use parchment or a silicone baking mat. A light spray of cooking oil on the parchment can add an extra non-stick guarantee.
Q: Can I make these ahead of time?
A: Absolutely! You can complete steps 1-4 (slicing, oiling, and the first roast) a few hours ahead. Let the par-cooked potatoes cool, then leave them at room temperature. When you’re ready to serve, pop them back in a hot oven for 5-7 minutes to re-crisp, then add your cheese and bacon and finish as directed.
Q: My cheese is burning before the potato is cooked through. Help!
A> This means your oven might be too hot, or your potato slices are too thick. First, check your oven temperature with a thermometer. If the slices are too thick, the inside takes longer to cook. Ensure your slices are nice and thin (closer to ⅛-inch) so the heat can penetrate quickly. If browning is still an issue, you can tent the tray with foil for the first half of the initial roasting time.
Q: Are there any good vegan substitutions?
A> For sure! Use a vegan shredded cheddar-style cheese (they melt wonderfully these days), vegan sour cream or a cashew cream, and coconut bacon or seasoned breadcrumbs for that crunch. The potato itself is a beautiful, vegan-friendly canvas!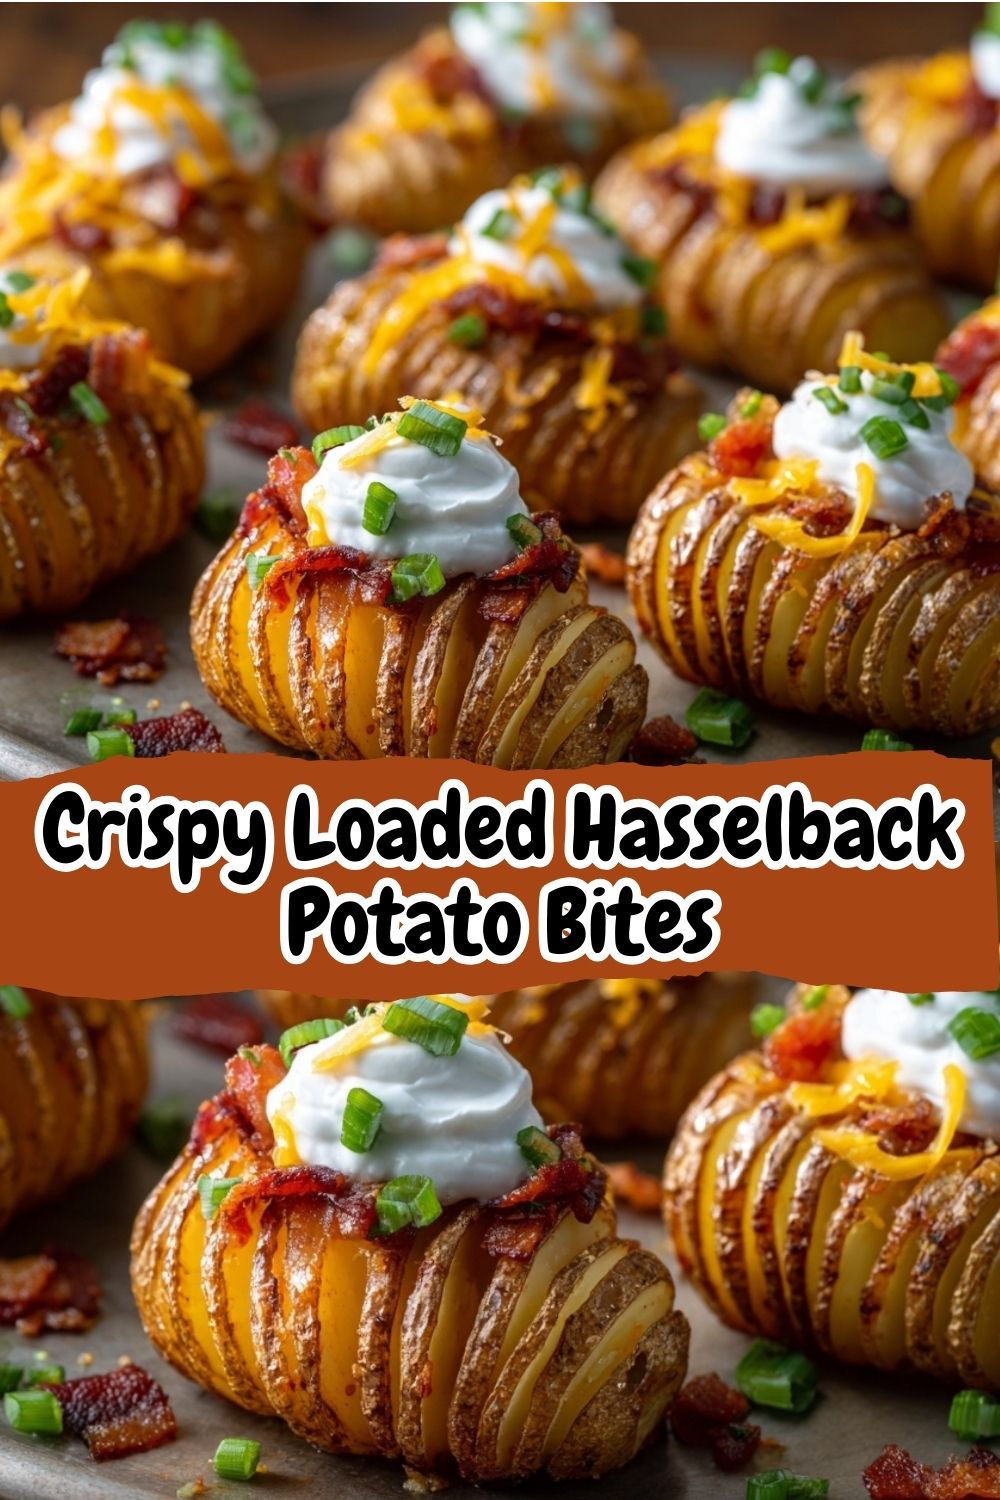
Nutritional Info*
*Please note: This is an estimated nutritional breakdown. Values can vary based on specific ingredients used.
- Servings: 6-8
- Prep Time: 15 minutes
- Cook Time: 40 minutes
- Calories: ~230 per serving
- Protein: 7g
- Fat: 13g
- Carbohydrates: 20g
- Fiber: 2g
- Sugar: 1g
- Sodium: 310mg
There you have it! Your ultimate guide to the most addictive, crispy, loaded potato bites on the planet. I can’t wait for you to make them and see your friends and family’s faces light up. If you do, please tag me @BiteTide on social media—I live for seeing your kitchen creations! Now go forth and create some crispy, cheesy, unforgettable magic.
With love and a full plate,
Isla 💛