 Your New Favorite Holiday Tradition: The Ultimate Hot Chocolate Board
Okay, let’s be real for a second. Is there anything better than wrapping your hands around a warm mug of hot chocolate on a chilly day? That first rich, chocolatey sip is like a cozy hug from the inside out. But what if I told you we could take that feeling and multiply it by about a hundred? What if your next holiday gathering, family movie night, or just-because Tuesday could be transformed into an interactive, delicious, and utterly memorable treat fest? Friends, allow me to introduce you to your new winter obsession: the Hot Chocolate Board.
This isn’t just a drink; it’s an experience. It’s the centerpiece that gets everyone talking, laughing, and customizing their perfect cup of joy. Imagine a beautiful board overflowing with fluffy marshmallows, crunchy cookies, swirls of whipped cream, and a rainbow of sprinkles and candies. It’s a dessert charcuterie board, a sweet snack platter, and the life of the party, all rolled into one. The best part? It’s incredibly easy to put together and is an absolute showstopper. No culinary degree required—just a love for good fun and great flavor. So, let’s ditch the boring single-serve packets and build something magical together. Your inner child (and all your guests) will thank you!
A Snowy Day & The Spark of an Idea
This idea for a hot chocolate board was born from a particularly chaotic, yet wonderful, snow day a few years back. My nieces and nephew had descended upon my kitchen, their boots tracking snow everywhere, cheeks rosy from the cold. They were all clamoring for hot chocolate, but of course, they all wanted something different. One wanted extra marshmallows, another only whipped cream, and the third, my adventurous little foodie, was eyeing the candy cane pieces on the counter.
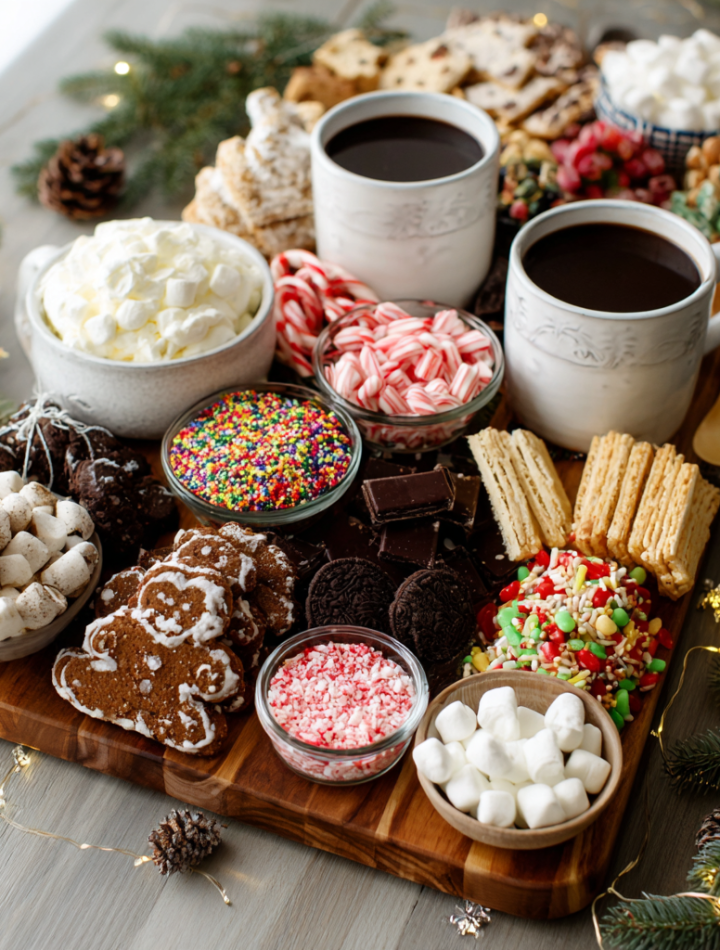
Instead of playing short-order cook and making three separate custom mugs, I had a moment of inspiration. I pulled out my biggest wooden cutting board and started raiding the pantry. I laid out little bowls of mini marshmallows, chocolate chips, and peppermint bits. I arranged cookies on one side and dropped a big cloud of whipped cream in a bowl in the center. I poured the rich hot cocoa into a carafe and let them have at it. The sheer delight on their faces was everything. They weren’t just drinking cocoa; they were creating, experimenting, and fully immersed in the moment. That messy, joyful chaos is exactly what BiteTide is all about—making food fun, interactive, and utterly unstuffy. This board is my edible love letter to that perfect, impromptu winter afternoon.
Print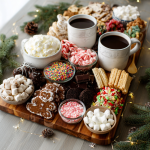
Build Your Own Hot Chocolate Board
- Total Time: 36 minute
- Yield: 6–10
Description
Turn your next holiday hangout into a cozy treat fest with a DIY Hot Chocolate Board! Packed with candies, cookies, and toppings galore, this spread is perfect for holiday parties, movie nights, or just warming up in the most delicious way.
Ingredients
Toppings & Sweets:
Whipped topping (canned or homemade)
Various holiday sprinkles
Mini candy canes or peppermint bits
Holiday candy corn
Gummy candies
Cookies & Crunch:
Holiday shortbread cookies
Chocolate-covered pretzels
Peppermint pretzels
Gingerbread cookies
Instructions
Use a large wooden board or tray.
Place mugs or a carafe of hot cocoa in the center.
Arrange toppings and treats in groups around the cocoa.
Add small spoons or tongs for serving toppings.
Finish with holiday decor—like pine sprigs or fairy lights!
- Prep Time: 10–15 mins
- Category: Dessert
Nutrition
- Calories: 250–400
- Protein: 1–3g
Gathering Your Hot Chocolate Board Crew
The beauty of this board is its flexibility! Use what you love and what you have. This is my go-to list for a fully-loaded, festive extravaganza. Think of these as your building blocks for creativity.
- Hot Chocolate Base (The Star of the Show!): You’ll need a large batch of your favorite hot chocolate, kept warm in a carafe or thermos. Chef’s Insight: I’m a from-scratch gal, so I make a big pot using good cocoa powder, sugar, a pinch of salt, and whole milk. But a quality store-bought mix or even a slow-cooker recipe works perfectly! The goal is a rich, chocolatey foundation.
- Stuffed Marshmallows (A Game-Changer!): I’m obsessed with @stuffedpuffs Milk Chocolate and Chocolate Peppermint Bark marshmallows. Why I love them: They have a molten chocolate center that melts into your cocoa, creating an next-level experience. Regular mini marshmallows are a classic and always welcome.
- Whipped Topping (The Cloud): Canned is convenient, but homemade whipped cream (with a dash of vanilla extract) is surprisingly easy and tastes incredible. Pro Tip: For a fun twist, add a tablespoon of cocoa powder or a splash of peppermint extract to your cream before whipping!
- Various Holiday Sprinkles (The Color): Jimmies, nonpareils, sugar shapes—sprinkles add a pop of color and fun crunch. Use holiday-themed ones for instant festive vibes.
- Mini Candy Canes or Peppermint Bits (The Crunch): Essential for that classic holiday flavor. Substitution Tip: If you don’t have candy canes, crushed hard peppermint candies work just as well.
- Holiday Candy Corn (The Sweet Debate): Divisive, I know! But it adds a lovely chewy texture and vintage charm. Feel free to skip it if it’s not your thing.
- Gummy Candies (The Fun): Gummy bears, worms, or even orange slices add a chewy, fruity contrast to all the chocolate.
- Holiday Shortbread Cookies (The Buttery Bliss): Their simple, buttery flavor is perfect for dipping and won’t overpower the cocoa.
- Chocolate-Covered Pretzels (The Salty-Sweet Hero): This is my #1 must-have. The salty crunch against the sweet chocolate is a flavor combo sent from heaven.
- Peppermint Pretzels (A Festive Twist): If you can find them, they double down on the minty-chocolate goodness.
- Gingerbread Cookies (The Spice): They bring warm spices like ginger and cinnamon to the party, which pair beautifully with chocolate.
Building Your Masterpiece: A Step-by-Step Guide
Don’t stress about perfection! The charm of this board is in its generous, abundant feel. Follow these steps for a board that’s both beautiful and functional.
Step 1: Choose Your Canvas.
Grab a large wooden board, a marble slab, a big platter, or even a rimmed baking sheet. If you’re worried about mess, you can line it with parchment paper first, but I love the rustic look of the wood. Make sure it’s clean and dry!
Step 2: Position Your Anchor.
Place your carafe or thermos of warm hot chocolate right in the center of the board. This is the heart of the operation! If you’re serving a crowd, you might have two carafes. If you’re doing individual mugs, you can place 3-4 empty mugs on the board itself.
Step 3: Bowl the Wet Stuff.
Next, place small bowls or ramekins for your wetter/messier toppings. This is crucial for keeping your board tidy! The whipped cream absolutely needs its own bowl. If you’re offering a sauce like caramel or chocolate syrup, add a small bowl or jar for that too.
Step 4: Create Topping Stations.
Now for the fun part! Start arranging your toppings and treats around the central carafe and bowls. Think in groups and colors. Chef’s Hack: Use small cookie cutters as makeshift bowls for tiny items like sprinkles! It’s adorable and functional.
- Place the stuffed marshmallows in a pile near the mugs.
- Scatter the chocolate-covered pretzels and peppermint pretzels in different sections to create visual interest.
- Group the cookies together on one side of the board.
- Fill in any gaps with piles of candy canes, gummies, and sprinkles. Let some things spill into each other—it looks more inviting!
Step 5: Add Utensils & Final Flourishes.
Tuck in small spoons or tongs for guests to serve themselves toppings without using their fingers. Finally, add those last bits of holiday magic! Tuck in a few fresh pine sprigs, cinnamon sticks, or even a string of battery-operated fairy lights around the base of the board for a truly magical glow. And voila! You’ve just created the ultimate winter centerpiece.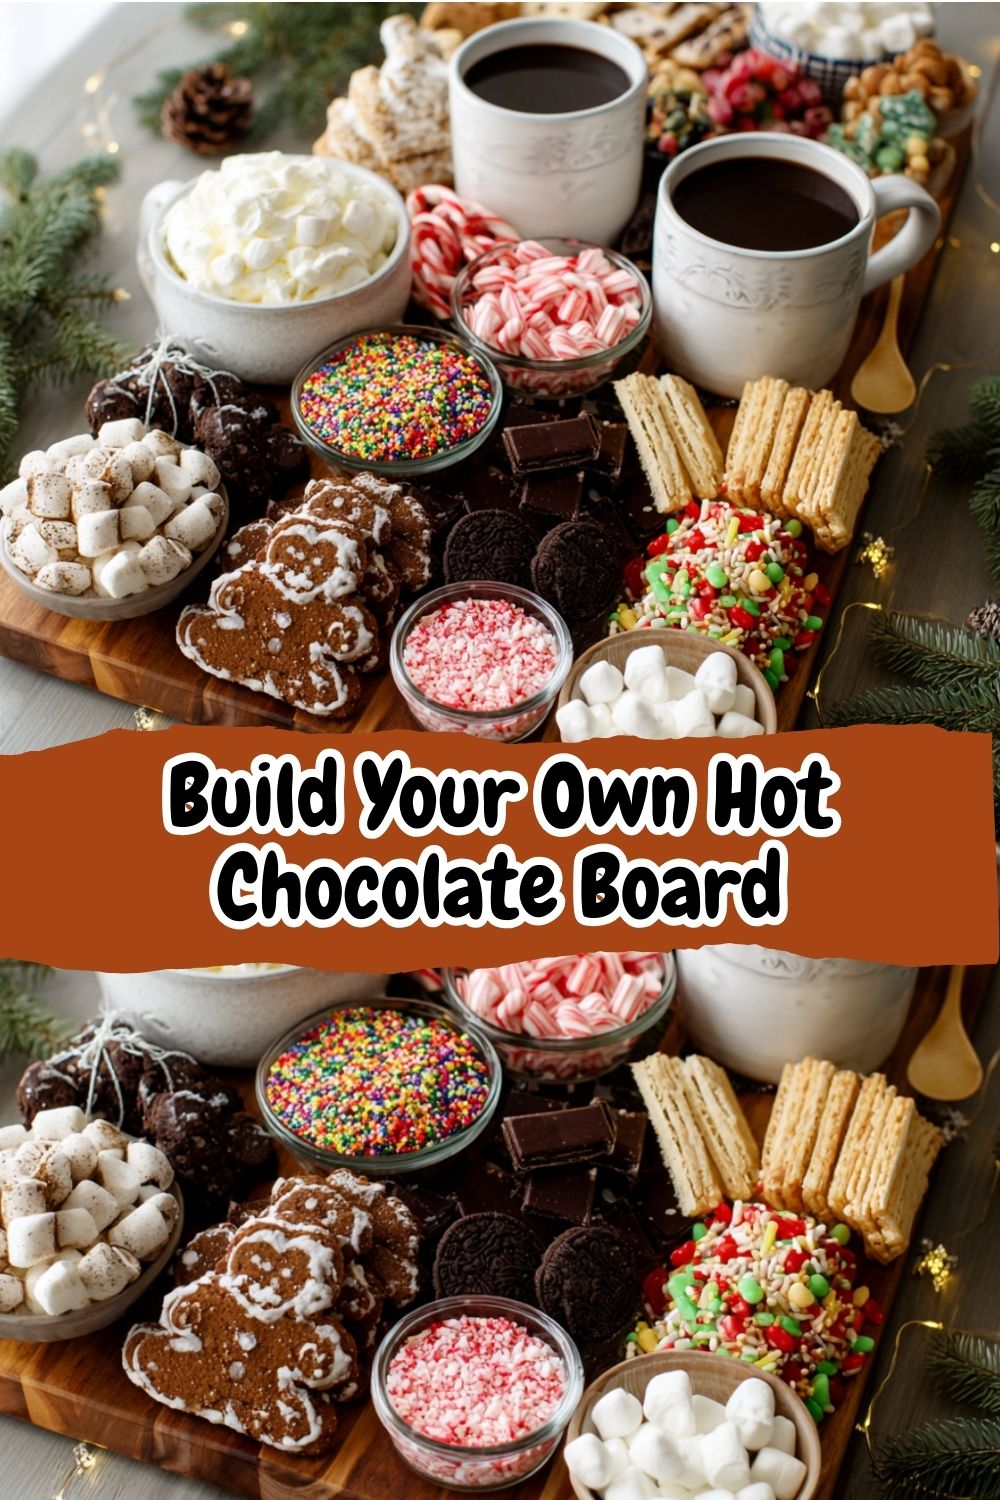
How to Serve & Savor
The serving part is easy: just let everyone dive in! I love placing the board right in the middle of the coffee table with a stack of mugs nearby. Encourage your guests to get creative—maybe a peppermint pretzel rim on their mug, a layer of whipped cream, a handful of marshmallows, and a hearty drizzle of caramel. The combination possibilities are endless. This is about conversation, customization, and pure, unadulterated joy. It’s not just a drink; it’s the main event.
Ride a Different Flavor Wave: Creative Twists!
Don’t be afraid to mix it up! This template works for any theme or dietary need.
- The “Salted Caramel” Board: Swap the hot cocoa for a salted caramel version. Top with coarse sea salt, caramel sauce, toffee bits, and vanilla marshmallows.
- The “Adults-Only” Board: Spike the cocoa with peppermint schnapps, Irish cream, or bourbon. Offer grown-up toppings like espresso beans, dark chocolate shavings, and orange zest.
- The “Winter Wonderland” Board: Keep it white and elegant! Use white hot chocolate, white chocolate chips, coconut flakes, and marshmallows. Silver and blue sprinkles complete the frosty look.
- The “Allergy-Friendly” Board: Easily adaptable! Use oat milk-based cocoa, dairy-free whipped cream, gluten-free cookies, and ensure all candies are made in nut-free facilities.
- The “Cookie Decorating” Combo: Place a batch of plain sugar cookies and bowls of icing and decorations next to the hot chocolate board for the ultimate DIY party.
Isla’s Kitchen Confidential
This board has evolved so much since that first snowy day. I’ve learned a few things along the way! First, if you’re prepping ahead of time, wait to add the whipped cream and hot cocoa until the very last minute to keep everything fresh and warm. Second, don’t underestimate the power of a good thermos—it will keep your cocoa hot for hours. My biggest kitchen fail? I once used a beautiful ceramic pitcher that was not thermos-rated. The cocoa was lukewarm within 20 minutes. Lesson learned! Now I’m all about function meeting form. The best part of this recipe is that it’s meant to be messy. Embrace the sprinkles on the floor and the chocolate smudges. That’s the sign of a great party.
Your Questions, Answered!
Q: Can I make any parts of this ahead of time?
A: Absolutely! This is a great party trick because most of it is pantry staples. You can arrange all the dry toppings, cookies, and candies on the board a few hours before your event. Just cover it loosely with plastic wrap and leave it on the counter. Make your hot cocoa and whipped cream right before guests arrive to ensure everything is fresh and warm.
Q: My hot chocolate got cold! How can I keep it warm?
A: This is a common worry! The best solution is to use an insulated thermos or a slow cooker set to the “warm” function. If your carafe isn’t keeping heat well, you can preheat it by filling it with hot water for a few minutes before pouring in the cocoa. You can also set a mug of cocoa in the microwave for a quick reheat—no shame in that!
Q: Help! I don’t have a big board. What can I use instead?
A: No problem! Get creative. A large serving tray, a rimmed baking sheet (a half-sheet pan is perfect!), a clean cutting board, or even a large pizza pan will work beautifully. You can also create a “hot chocolate bar” on a countertop using a pretty tray as the base for your toppings.
Q: How do I avoid a huge mess?
A: Embrace a little mess—it’s part of the fun! But to manage it, provide plenty of napkins and small plates for guests. Using those small bowls for wet toppings is key. You can also place the entire board on a easy-to-wipe tablecloth or a piece of parchment paper that extends beyond the board to catch any stray sprinkles.
Nutritional Information (Approximate)
Please note that this is highly variable based on the specific ingredients and portions you choose. The values below are a rough estimate for a serving of hot chocolate with a moderate amount of toppings.
- Calories: 250-400 kcal
- Carbohydrates: 45-60 g
- Sugars: 35-50 g (It’s a treat! Enjoy it mindfully.)
- Protein: 1-3 g
- Fat: 8-12 g
A Hot Chocolate Board is more than just a sweet spread—it’s an interactive, festive centerpiece that brings people together. With endless topping options and creative twists, you can customize it to suit any crowd or occasion. Whether for a holiday party, a snowy afternoon, or a cozy movie night, this idea guarantees warm mugs, happy faces, and lasting memories.