The Smoked Taco Dip That Will Steal the Show (And I Mean It!)
Hey, friend! Isla here from BiteTide. Let’s talk about that magical, mythical creature of the party world: the ultimate dip. You know the one. It’s the dish that makes people stop mid-conversation, their eyes going wide as they take that first, life-changing bite. The one that disappears in under five minutes, leaving nothing but a few lonely tortilla chips and a crowd of very hopeful, very hungry people hovering around the table.
For years, I chased that dip dragon. I’ve made them all—the classic seven-layer, the spicy buffalo chicken, the cool and creamy spinach artichoke. They’re all wonderful in their own right, but I was always searching for that *one* recipe that had it all: bold, craveable flavor, a creamy, cheesy heart, and that little something extra that makes everyone ask, “Wait, what *is* this?!”
Well, my flavor-seeking friends, I found it. And I’m so ridiculously excited to share it with you today. Welcome to the glory that is my Smoked Taco Dip. This isn’t just another layer dip. This is a flavor experience. We’re talking a creamy, dreamy base, savory taco-seasoned beef, a punch of salsa, and a blanket of perfectly melted cheese. But the real secret weapon? We’re taking it all for a gentle, smoky ride that transforms these simple ingredients into a dip so deeply flavorful, so utterly irresistible, it’s basically a party trick in a dish.
Whether you’re firing up the smoker for game day, prepping for a potluck, or just treating yourself to a seriously epic snack, this dip is your new best friend. It’s fun, it’s flavorful, and I promise—it is never, ever fussy. So, grab your favorite skillet and let’s make some magic together!
A Dip That Tastes Like Sunshine and Salt Air
This recipe, for me, is pure nostalgia in a cast-iron skillet. It all goes back to my grandma’s kitchen in my little coastal hometown. She wasn’t a fancy chef, but she was a wizard with flavor. Her version was a simple, baked taco dip she’d whip up for every single family gathering, from big summer barbecues to cozy winter get-togethers.
My most vivid memory is from a hot July afternoon. The screen door was slamming shut every few minutes as cousins poured into the house. The air was thick with the smell of salt from the ocean and the sizzle of ground beef from Grandma’s old, trusty skillet. I was her official “taste-tester,” a job I took very seriously. She’d let me sprinkle the final layer of cheese, her hands guiding mine, showing me how to cover every last inch. “That’s the love layer, Isla,” she’d whisper. “It seals in all the good stuff.” When that dip came out of the oven, bubbly and glorious, it was the centerpiece of the table—a symbol of togetherness, of shared meals, of pure, uncomplicated joy.
My smoked version is just a little nod to her, and to those days. I’ve added my own twist with the smokiness, which always reminds me of the beach bonfires we’d have later those same evenings. It’s that same heartwarming, crowd-feeding spirit, just riding a new flavor wave.
Print
Smoked Taco Dip
- Total Time: 45‑60 mins
- Diet: Low Lactose
Description
This Smoked Taco Dip is a warm, layered taco‑meat and cheese dip infused with smoky flavour—perfect for game day, tailgates or a fun party snack.
Ingredients
- 1 lb (≈450 g) ground beef (80/20 works well)
- 1 packet (≈3 Tbsp) taco seasoning
- 16 oz (≈450 g) cream cheese, softened
- 1 cup (≈240 mL) queso or cheese‑dip (jarred or homemade)
- 2 cups (≈480 mL) salsa (mild or hot, per preference)
- 8 oz (≈225 g) shredded cheese (e.g., Colby, cheddar or pepper‑jack)
- Optional: diced jalapeños for extra heat
- For serving: tortilla chips, warm tortillas or veggies for dipping
Instructions
- Pre‑heat your smoker or grill for indirect heat (around 300 °F / ~150 °C) if you’re smoking. For oven method, pre‑heat to 350 °F (~175 °C).
- In a skillet over medium heat, brown the ground beef, drain any excess fat, then stir in the taco seasoning according to packet instructions (with water if needed) and cook until the seasoning is fully blended.
- Spread the softened cream cheese as the bottom layer in a 9×13‑inch (or equivalent) foil pan or cast‑iron dish (suitable for a smoker).
- Next layer the queso/cheese dip evenly over the cream cheese.
- Spread the salsa evenly over the queso layer. If using jalapeños, sprinkle them here.
- Evenly distribute the seasoned ground beef over the salsa layer.
- Top the assembled layers with the shredded cheese.
- If using a smoker: place the pan on the smoker’s indirect side for ~30 minutes, then rotate pan, and continue for another ~15 minutes or until the cheese is fully melted, bubbling and slightly golden.
- If using an oven: bake the pan for ~20‑30 minutes or until the cheese is melted and bubbly.
- Remove from heat, let it rest a few minutes, then serve warm with tortilla chips, warm tortillas or veggies.
- Prep Time: 15 mins
- Cook Time: 30‑45 mins
- Category: Appetizer
- Cuisine: Tex‑Mex / American
Nutrition
- Serving Size: ≈1½ cups
- Calories: ≈725 kcal
- Sodium: ≈2163 mg
- Fat: ≈46 g
- Saturated Fat: ≈26 g
- Carbohydrates: ≈53 g
- Protein: ≈26 g
Gathering Your Flavor Crew: The Ingredients
Here’s the beautiful part: this dip is built from simple, real ingredients you probably already have hanging out in your fridge and pantry. Let’s break them down, because knowing your ingredients is the first step to feeling like a rockstar in the kitchen!
- 1 lb Ground Beef: I use an 80/20 blend for the best flavor, but leaner beef works great too! Chef’s Insight: For a lighter twist, ground turkey or chicken is a fantastic swap. It soaks up the taco seasoning just as beautifully.
- 1 Packet Taco Seasoning: The flavor shortcut we all know and love. Substitution Tip: If you’re out of packets, no sweat! Mix 2 tsp chili powder, 1 tsp cumin, 1 tsp garlic powder, ½ tsp paprika, and ¼ tsp each of onion powder, oregano, and a pinch of cayenne for heat.
- 8 oz Cream Cheese, Softened: This is the lush, creamy foundation of our dip. Chef’s Hack: Leave it on the counter for an hour before you start. Soft cream cheese spreads like a dream and creates that perfect, velvety base layer.
- 1 Cup Sour Cream: It adds a lovely tang that balances the richness of the cream cheese and beef. Substitution Tip: Plain Greek yogurt is my go-to healthy swap here. It gives you that same tangy creaminess with a protein boost!
- 2 Cups Shredded Cheese: I’m a huge fan of a cheddar and Monterey Jack blend for the perfect meltiness and flavor. Chef’s Insight: For the love of all that is cheesy and good, shred your own cheese from a block! Pre-shredded bags have anti-caking agents that can make your cheese a little less melty and smooth.
- 1 Cup Salsa: This is where you control the heat! I usually go for a medium salsa for a little kick. Chef’s Insight: If your salsa is really watery, give it a quick drain in a fine-mesh strainer so your dip doesn’t get soggy.
- Optional: 1 Can Black Beans (Drained) & 1 Can Corn (Drained): These are my favorite add-ins for extra texture, fiber, and a little pop of sweetness from the corn. They make the dip even heartier!
- For Topping & Dipping: The fresh finish! Chopped tomatoes, sliced green onions, pickled jalapeños, or fresh cilantro. And of course, a big ol’ bowl of sturdy tortilla chips for scooping all that goodness.
Let’s Build the Dream Dip: Step-by-Step
Okay, team. This is where the fun begins. We’re building layers of flavor, and it’s as easy as 1-2-3 (and 4-5-6!). Put on some good music, and let’s get cooking.
- Brown the Beef to Perfection. Grab your favorite skillet and crank the heat to medium. Crumble in that ground beef and let it get a good, proper sear. Don’t just stir it constantly! Let it sit for a minute to develop those delicious brown bits on the bottom of the pan—that’s pure flavor gold. Once it’s no longer pink, drain off the excess fat. Now, sprinkle in that taco seasoning and add about ⅔ cup of water. Let it simmer for 2-3 minutes until the sauce thickens and clings to every morsel of meat. Chef’s Hack: That little bit of simmering time is crucial—it wakes up all the spices in the seasoning and makes your kitchen smell incredible.
- Create the Creamy Foundation. While the beef is doing its thing, let’s prep our vessel. You can use a 9-inch cast-iron skillet, a 8×8 baking dish, or any oven/smoker-safe dish you have. Take your softened cream cheese and plop it right in the center. Now, with the back of a spoon or a small offset spatula, spread it into a smooth, even layer that covers the bottom. This is our flavor canvas! Next, gently dollop the sour cream over the cream cheese and spread it out. Don’t stress about it being perfect—we’re going for rustic and delicious! Little Chef Tip: A small offset spatula is my secret weapon for easily spreading creamy layers without making a mess.
- Layer on the Flavor. Now for the confetti! Sprinkle one cup of your shredded cheese evenly over the sour cream layer. This creates a barrier that helps keep our base extra creamy. Next, spoon your salsa over the cheese. If you’re adding the black beans and corn, now’s the time to scatter them over the salsa like you’re decorating the most delicious cake ever.
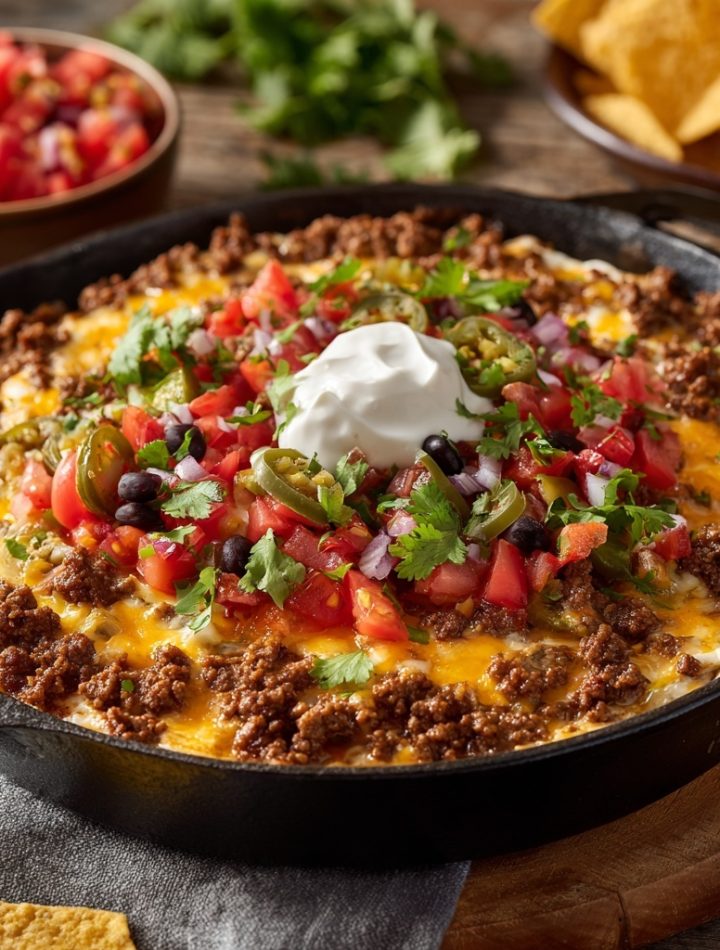
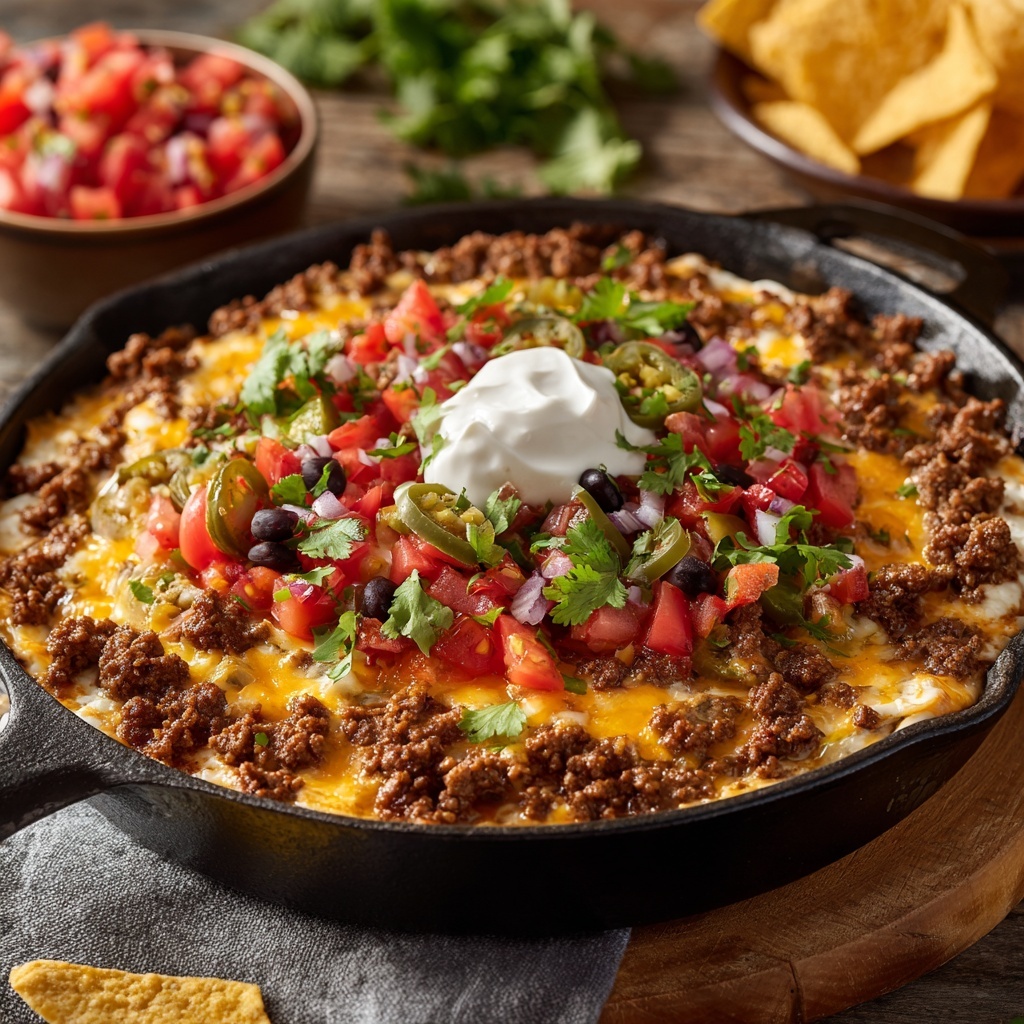
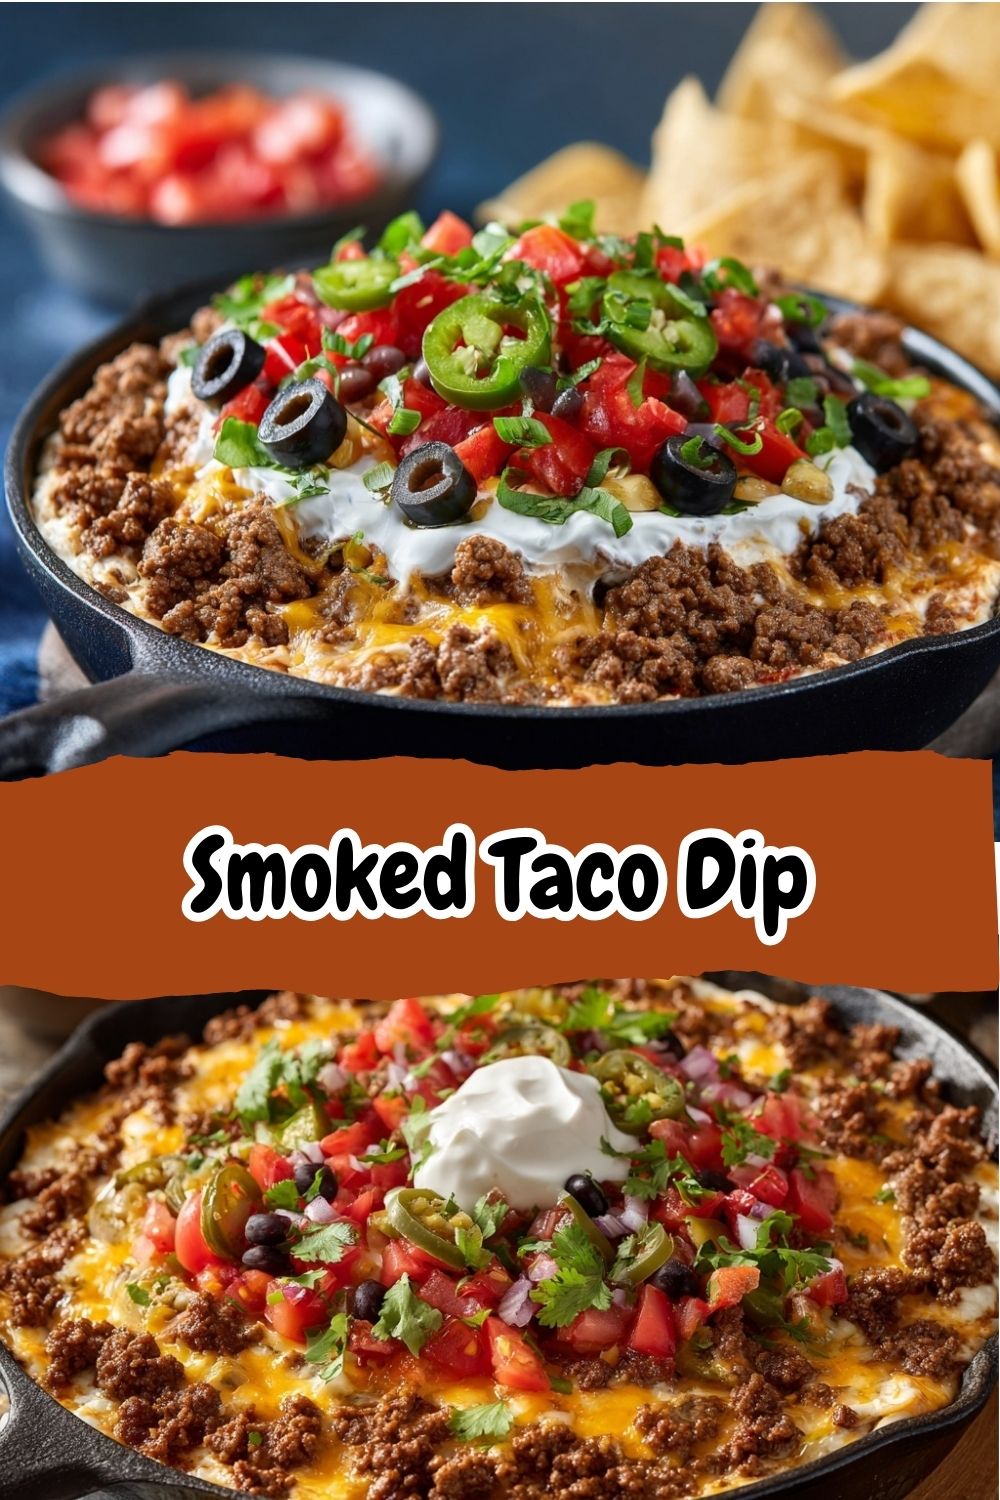
- Top It Off & Get Ready to Smoke (or Bake!). Time for the star of the show: the taco meat! Spoon it evenly over the salsa and bean/corn layer, pressing it down gently. Finally, take that remaining cup of cheese and blanket the entire creation. This is that gorgeous, bubbly, golden-brown top we’re dreaming of. Chef’s Hack: Make sure the cheese goes all the way to the edges. It creates a beautiful “cheese crust” that people will fight over.
- Smoke or Bake to Bubbly Bliss.
- For the Smoker: Preheat your smoker to about 250-300°F (120-150°C). I love using a fruitwood like apple or cherry for a lighter, sweeter smoke that pairs perfectly with the taco flavors. Place your dip dish over indirect heat, close the lid, and let it smoke for 30-45 minutes. You’re looking for that cheese to be fully melted, the edges to be bubbly, and a light kiss of smoke on the surface.
- For the Oven: No smoker? No problem! This dip is just as amazing baked. Preheat your oven to 350°F (175°C). Pop the dip in for 20-30 minutes, until it’s heated through and the cheese is magnificently melted and golden.
- The Grand Finale: Toppings & Serve! Carefully remove your masterpiece from the heat (remember, that dish is HOT!). Now, for the fresh, colorful flourish. Scatter your chopped tomatoes, green onions, jalapeños, and cilantro right over the top. This adds a fresh crunch and bright flavor that cuts through the richness. Serve it immediately while it’s hot, gooey, and absolutely irresistible!
How to Serve This Dip Like a Pro
Presentation is part of the fun! I love serving this dip right in the cast-iron skillet I cooked it in—it keeps it warm for ages and looks so rustic and inviting. Place the skillet right in the middle of the table on a trivet. Pile a mountain of sturdy, restaurant-style tortilla chips in a big bowl next to it. For your friends who are veggie-inclined, add a platter of crisp bell pepper strips, cucumber rounds, and carrot sticks. They’re perfect for dipping and add a lovely fresh crunch. Don’t forget a strong, wide spoon for serving—you want to get through all those glorious layers in one scoop!
Ride Your Own Flavor Wave: Recipe Variations
The beauty of this dip is its versatility. Make it your own! Here are a few of my favorite twists:
- Spicy Fiesta: Use hot salsa, pepper jack cheese, and top with fresh, sliced serrano peppers for a real kick.
- White Chicken Taco Dip: Swap the beef for shredded rotisserie chicken and use a green salsa verde instead of red salsa. So good!
- Fully Loaded Veggie: Skip the meat altogether and add a layer of sautéed mushrooms and zucchini with the beans and corn. It’s incredibly satisfying.
- Breakfast Taco Dip: Yes, really! Use breakfast sausage instead of beef, and mix a little salsa into the sour cream layer. Serve with hash browns or breakfast potatoes for dipping. Game-changer for brunch!
Isla’s Chef Notes & Kitchen Confessions
This recipe has been a living, evolving thing in my kitchen. The first time I made it, I was so eager to try it that I literally burned the roof of my mouth on molten cheese. (A mistake I’ve since made… oh, about a dozen more times. Some lessons are hard to learn!). My husband now knows to gently tap my hand away from the skillet until it’s had a minute to cool.
Over time, I’ve learned that this dip is incredibly forgiving. I’ve made it with leftover pulled pork instead of beef (AMAZING), and I’ve even thrown in a handful of cooked rice when I wanted to stretch it into more of a meal. It always works. The spirit of this dish is all about using what you have and creating something joyful and delicious. Don’t be afraid to play, to experiment, and to make it yours. That’s where the real kitchen magic happens.
Your Dip Questions, Answered!
I’ve made this dip a zillion times and I’ve heard all your brilliant questions. Here are the answers to the most common ones!
Q: Can I make this smoked taco dip ahead of time?
A: Absolutely! You are a meal-prep genius. Assemble the entire dip (without the fresh toppings, of course), cover it tightly with plastic wrap, and stash it in the fridge for up to 24 hours. When you’re ready, just pop it in the smoker or oven. You might need to add 5-10 extra minutes to the cook time since it’s going in cold.
Q: My dip is a little watery. What happened?
A: Great question! This usually happens for one of two reasons: the salsa was very liquidy, or the beef wasn’t drained well enough. Fix for next time: drain your salsa in a fine-mesh strainer for a few minutes before using, and make sure to drain the cooked beef thoroughly. If it happens this time, no worries—just grab a slotted spoon to serve it, or stir in a tablespoon of cornstarch mixed with a tablespoon of cold water into the beef mixture while it’s simmering to help thicken it up.
Q: I don’t have a smoker. Will it still be good baked?
A: 100% YES! It is absolutely delicious baked in a standard oven. You won’t get the smoky flavor, but you will get all the cheesy, beefy, creamy glory that makes this dip a legend. It’s a guaranteed crowd-pleaser either way.
Q: What are the best chips for dipping?
A: You need a chip with some backbone! I’m a huge fan of thick, restaurant-style tortilla chips. They can scoop up a hefty amount of dip without breaking. For a fun twist, try scoop-shaped Fritos or even plantain chips for a slightly sweet and salty combo.
Quick Nutritional Info
Yields: ~8 servings | Prep Time: 15 mins | Cook Time: 30-45 mins
Approximate per serving (with beef and cheese, without beans/corn): ~320 calories | 20g protein | 15g carbs | 20g fat
Please note: Nutrition can vary widely based on the specific ingredients and brands you use. This is just a friendly estimate!