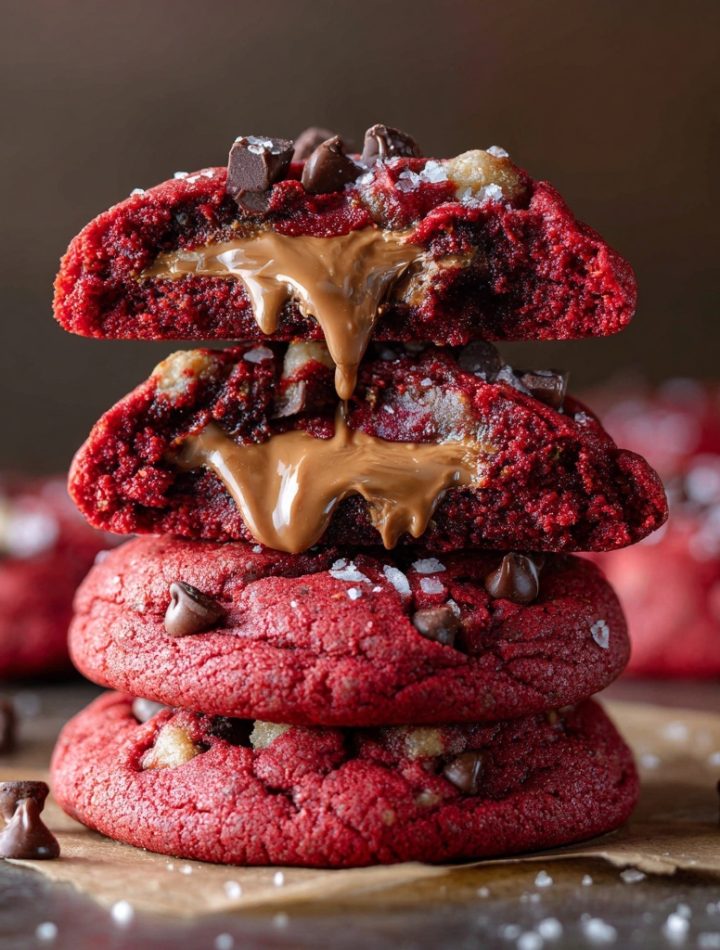
Nutella-Stuffed Red Velvet Chocolate Chip Cookies: Your New Dessert Obsession
Hey there, friend! Isla here from BiteTide, and I am absolutely buzzing to share this recipe with you today. We’re talking about a cookie that’s not just a cookie—it’s an experience. Imagine this: you’re holding a warm, beautifully red, soft-baked cookie, dotted with melty chocolate chips. It smells like a dream. You take a bite, and the tender, red velvet crumb gives way to a heart of pure, liquid, hazelnut-chocolate magic. That’s the power of these Nutella-Stuffed Red Velvet Chocolate Chip Cookies.
I live for recipes that make people’s eyes light up, and this one is a certified showstopper. They look fancy, like you spent hours in a professional bakery, but the truth is, they’re totally approachable. We’re using simple techniques to create maximum wow-factor. Whether you’re whipping these up for a holiday cookie swap, a cozy date night in, or just because it’s Tuesday and you deserve a treat, these cookies deliver on every single level. They’re decadent, rich, and oozing with pure, unapologetic goodness. So, tie on your favorite apron, and let’s make some kitchen magic together!
A Little Dash of Nostalgia & a Whole Lot of Chocolate
This recipe always takes me right back to my grandma’s linoleum-floored kitchen. She was the queen of “doctored-up” box mixes, and her signature move was a red velvet cake with a mysterious, almost-secret jar of chocolate hazelnut spread she’d let me swipe from the pantry. We’d sit at her formica table, a cloud of red cocoa dust floating around us, and she’d say, “Isla, the best recipes are the ones that feel like a hug from the inside.” She wasn’t a fancy chef, but she understood joy, and she understood that a little surprise in the middle of something delicious makes it unforgettable.
These cookies are my grown-up, from-scratch homage to those afternoons. They capture that same feeling of vibrant, red velvet comfort and the giddy excitement of discovering that hidden pocket of Nutella. It’s that same “hug from the inside,” just in portable, shareable, dangerously delicious cookie form. Every time I pull a tray of these from the oven, I can almost hear her telling me to add just a few more chocolate chips. (And honestly, she was always right.)
Print
Nutella-Stuffed Red Velvet Chocolate Chip Cookies : Decadent, Rich & Oozing with Goodness
- Total Time: 1 hour (includes chilling and freezing)
- Yield: Makes about 12 cookies 1x
- Diet: Vegetarian
Description
Red Velvet Nutella Cookies are rich, chewy, and irresistibly indulgent with a vibrant red hue and gooey Nutella center. These cookies combine the classic cocoa flavor of red velvet with the creamy decadence of chocolate hazelnut spread.
Ingredients
- 1½ cups all-purpose flour
- ¼ cup unsweetened cocoa powder
- ½ tsp baking soda
- ¼ tsp salt
- ½ cup unsalted butter, softened
- ½ cup granulated sugar
- ½ cup brown sugar
- 1 egg
- 1 tsp vanilla extract
- 1 tbsp red food coloring
- 1 tsp white vinegar
- 12 tsp Nutella (frozen into dollops)
Instructions
- Line a baking sheet with parchment paper and place 12 small dollops (about 1 tsp each) of Nutella on it. Freeze until firm (at least 30 minutes).
- In a bowl, whisk together flour, cocoa powder, baking soda, and salt.
- In a large bowl, cream together butter, granulated sugar, and brown sugar until light and fluffy.
- Add egg, vanilla, red food coloring, and vinegar. Mix until smooth.
- Gradually mix in dry ingredients until a soft dough forms. Chill dough for 20–30 minutes for easier handling.
- Preheat oven to 350°F (175°C). Scoop about 1½ tbsp of dough, flatten slightly, place a frozen Nutella dollop in the center, and wrap the dough around to seal.
- Place on a parchment-lined baking sheet and repeat with remaining dough and Nutella.
- Bake for 10–12 minutes, until edges are set but centers are still soft.
- Cool on the pan for 5 minutes before transferring to a wire rack.
Notes
- Freezing Nutella prevents it from melting too much during baking.
- Use gloves when handling food coloring to avoid stains.
- Chilling dough helps with shaping and prevents spreading.
- Store in an airtight container at room temperature for 3–4 days or freeze for longer storage.
- Prep Time: 20 minutes
- Cook Time: 12 minutes
- Category: Dessert, Cookies
- Method: Baking
- Cuisine: American
Nutrition
- Serving Size: 1 cookie
- Calories: 210
- Sugar: 16g
- Sodium: 90mg
- Fat: 11g
- Saturated Fat: 6g
- Unsaturated Fat: 4g
- Trans Fat: 0g
- Carbohydrates: 25g
- Fiber: 1g
- Protein: 2g
- Cholesterol: 30mg
Keywords: red velvet Nutella cookies, stuffed cookies, Nutella dessert, gooey center cookies, red velvet chocolate cookies, Valentine’s Day cookies
Gathering Your Flavor Arsenal
Here’s everything you’ll need to create this wave of deliciousness. I’ve included my little chef-y insights and swaps to make this recipe work for you!
- 1 3/4 cups all-purpose flour: The trusty foundation of our cookie. It gives the dough that perfect structure. For a slightly softer cookie, you can swap in 2 tablespoons of cornstarch for 2 tablespoons of the flour (this is called a “cake flour” hack!).
- 1 tablespoon cocoa powder: This is the flavor soulmate of red velvet. It provides that subtle, chocolatey depth that makes red velvet, well, red velvet! Use natural, unsweetened cocoa for the best flavor.
- 1 teaspoon baking soda: Our leavening agent! This is what gives the cookies their perfect rise and chewy texture. Make sure yours is fresh for the best lift.
- 1/4 teaspoon salt: Don’t you dare skip this! Salt is the flavor enhancer that makes all the sweet, chocolatey notes pop. It’s the secret to a perfectly balanced dessert.
- 1/2 cup unsalted butter, softened: The key to richness and that dreamy, soft texture. “Softened” means it should give easily when you press it, but not be melted or greasy. Pro tip: if you forget to take it out, you can cube it and beat it for a minute alone to soften it up!
- 1/2 cup granulated sugar: Adds sweetness and helps the cookies spread slightly and get those lovely crisp edges.
- 1/2 cup packed brown sugar: This is the MVP for chewiness and that deep, molasses-like flavor. Pack it firmly into your measuring cup!
- 1 large egg: Our binder! It brings the dough together and adds to the structure. Make sure it’s at room temperature to blend seamlessly with the butter.
- 1 teaspoon vanilla extract: The classic flavor workhorse. It rounds out all the other flavors beautifully. If you have it, a vanilla bean paste would be incredible here!
- 1 teaspoon red food coloring: For that iconic, bold red color. I prefer gel food coloring because it’s more potent and doesn’t add extra liquid, but liquid works too—you might just need a bit more.
- 1 cup semi-sweet chocolate chips: Little pockets of melty joy! You can use milk chocolate for a sweeter cookie or dark chocolate for a more intense bite.
- 1/2 cup Nutella, chilled: The star of the show! Chilling this is non-negotiable. It turns the Nutella from a spreadable dream into a scoopable, manageable filling that won’t melt instantly in the oven.
Let’s Bake! Your Step-by-Step Roadmap to Cookie Bliss
Okay, team, let’s get our hands dirty! Follow these steps, and you’ll be a cookie-stuffing pro in no time. I’ve packed this section with all my favorite hacks to ensure your success.
- Prep the Nutella (The Most Important Step!): Line a small baking sheet or plate with parchment paper. Using a 1/2 tablespoon measuring spoon, scoop out portions of the chilled Nutella and place them on the sheet. You should get about 16-18 little mounds. Pop the whole tray into the freezer for at least 30 minutes. We want these little guys rock-solid! This is the secret to a gooey center instead of a melted-through one. Chef’s Hack: I like to do this the night before and just let them hang out in the freezer overnight. One less thing to do on bake day!
- Preheat and Prep: When you’re ready to bake, preheat your oven to a cozy 350°F (175°C). This ensures a consistent temperature for even baking. Line two baking sheets with parchment paper. No parchment? A silicone baking mat works wonderfully, too! Chef’s Hack: If you only have one baking sheet, just let it cool completely between batches. A hot pan will make the cookies spread too fast.
- Make the Dough – The Fun Part!
- In a medium bowl, whisk together your flour, cocoa powder, baking soda, and salt. This isn’t just mixing; we’re aerating the dry ingredients, which helps create a tender cookie. Give it a good 20-second whisk until it’s one uniform color.
- In a separate, larger bowl, it’s time to cream the butter and sugars. Using a hand mixer or a stand mixer with the paddle attachment, beat the softened butter, granulated sugar, and brown sugar together on medium speed for about 2-3 minutes. You’re done when the mixture turns noticeably paler and feels fluffy. This step incorporates air, which is key for texture!
- Scrape down the sides of the bowl with a spatula. Add the egg, vanilla extract, and red food coloring. Beat on medium until everything is completely combined and you have a vibrant, shocking red mixture. Don’t be shy—make it red!
- Now, with your mixer on low, gradually add the dry ingredients to the wet. Mix until just combined and no dry streaks of flour remain. Overmixing is the enemy of a soft cookie!
- Finally, switch to your trusty spatula and fold in the chocolate chips. This ensures they’re evenly distributed without overworking the dough.
- Assemble the Magic: This is where the transformation happens!
- Grab your frozen Nutella discs from the freezer. You’ll want to work relatively quickly so they stay firm.
- Using a cookie scoop or a tablespoon, portion out about 1 1/2 tablespoons of dough. Flatten it slightly in the palm of your hand to create a small disc.
- Place one frozen Nutella ball right in the center of your dough disc.
- Now, carefully wrap the dough up and around the Nutella, pinching the seams at the top to seal it completely. Roll it gently between your palms to form a smooth ball. Chef’s Hack: If you see any Nutella peeking through, patch it with a tiny bit of extra dough. A good seal is what keeps the magic inside the cookie!
- Place the stuffed dough balls on your prepared baking sheet, leaving about 2 inches between them. They need room to spread and become the beautiful cookies they’re destined to be.
- Bake to Perfection: Bake for 10-12 minutes. Now, listen closely! The cookies will still look a little soft and underdone in the center, but the edges should be set. This is exactly what we want! Do not overbake. They will continue to cook on the hot baking sheet as they cool. This is the ultimate secret to a soft, chewy, melt-in-your-mouth texture.
- The (Hardest) Part: Cool & Serve: Let the cookies cool on the baking sheet for a full 5 minutes. This allows them to set up enough to move without falling apart. Then, transfer them to a wire rack to cool further… or, my personal recommendation, grab a glass of milk and eat one immediately while the Nutella is gloriously, decadently liquid and warm. You’ve earned it.
How to Serve These Showstoppers
Presentation is part of the fun! I love serving these cookies still slightly warm on a beautiful wooden board or a vintage cake stand. A light dusting of powdered sugar or a tiny flake of sea salt on top right when they come out of the oven takes them to a whole new level of gourmet. For the ultimate experience, pair one with a cold glass of milk, a hot coffee, or even a scoop of vanilla bean ice cream sandwiched between two cookies for the most epic ice cream sandwich of your life.
Ride Your Own Flavor Wave: Fun Variations
Feel like mixing it up? This recipe is a fantastic base for creativity!
- White Chocolate Craze: Swap the semi-sweet chips for white chocolate chips. The contrast with the red dough and the dark Nutella center is stunning.
- Peanut Butter Twist: Use a frozen ball of peanut butter instead of (or mixed with!) the Nutella for a peanut butter cup-inspired cookie.
- Minty Fresh: Add 1/2 teaspoon of peppermint extract to the dough along with the vanilla for a festive, refreshing twist.
- Gluten-Free Friend: Use a 1:1 gluten-free all-purpose flour blend. The results are just as fantastic!
- Double Stuffed: Feeling extra? Use a full tablespoon of Nutella for an even more explosive, gooey center. Just make sure it’s frozen solid!
Isla’s Chef Notes & Kitchen Confessions
This recipe has become a staple in my kitchen, and it’s evolved a bit over time. The first batch I ever made? Let’s just say I didn’t chill the Nutella long enough, and I ended up with a baking sheet of lovely red velvet puddles with Nutella lava flows. Tasted amazing, looked… abstract. So learn from my mess—freeze that filling!
I also once ran out of vanilla extract mid-recipe and used a splash of almond extract instead. It was a happy accident that added this incredible, almost marzipan-like depth that paired beautifully with the hazelnut. Don’t be afraid to make a recipe your own. That’s where the real magic happens. These cookies have been present at birthday parties, been my go-to “sorry your day was rough” gift for friends, and have been sneakily eaten by my kiddo straight from the cookie jar more times than I can count. They’re more than a recipe; they’re a little vessel of joy.
Your Questions, Answered!
I’ve gotten a lot of questions about this recipe over the years, so here are the answers to the most common ones!
Q: My cookies spread too much and went flat. What happened?
A: This is usually one of three things: 1) Your butter was too warm or melted. It should be softened but still cool to the touch. 2) Your baking sheet was still warm from a previous batch. Always use a cool sheet. 3) You didn’t have enough flour. Try fluffing your flour in the bag before scooping and leveling it off with a knife—don’t pack it into the cup!
Q: Can I make these without the food coloring?
A: Absolutely! You’ll have a lovely, light brown chocolate chip cookie with a delicious Nutella center. They’ll still taste incredible, just without the dramatic red velvet look. You could also try using a natural food coloring made from beet powder for a vibrant hue.
Q: My Nutella still leaked out a bit. How can I prevent that next time?
A: A small leak can happen, but a big one usually means the Nutella wasn’t frozen solid enough, or the dough seal wasn’t completely closed. Make sure those Nutella balls are hard as rocks from the freezer, and really take your time pinching the dough closed, ensuring no filling is visible.
Q: Can I freeze the dough balls to bake later?
A: Yes, and I highly recommend it for fresh cookies on demand! After you’ve assembled the stuffed dough balls, place them on a tray and freeze until solid. Then, transfer to a freezer bag. You can bake them straight from the freezer—just add 1-2 minutes to the baking time. No need to thaw!
Nutritional Information*
*Please note: These are estimates provided for informational purposes only. I’m a chef, not a nutritionist!
Per cookie (approx. 16 servings):
Calories: ~230 | Fat: 12g | Saturated Fat: 6g | Carbohydrates: 28g | Sugar: 18g | Protein: 3g
Prep Time: 30 minutes (plus 30 min freeze) | Bake Time: 12 minutes | Total Time: ~1 hr 15 min | Yield: 16–18 cookies
Storage: Keep your cooled cookies in an airtight container at room temperature for 3-4 days. They also freeze beautifully for up to 1 month. To reheat, pop a frozen cookie in the microwave for 15-20 seconds to get that just-baked, gooey center back.