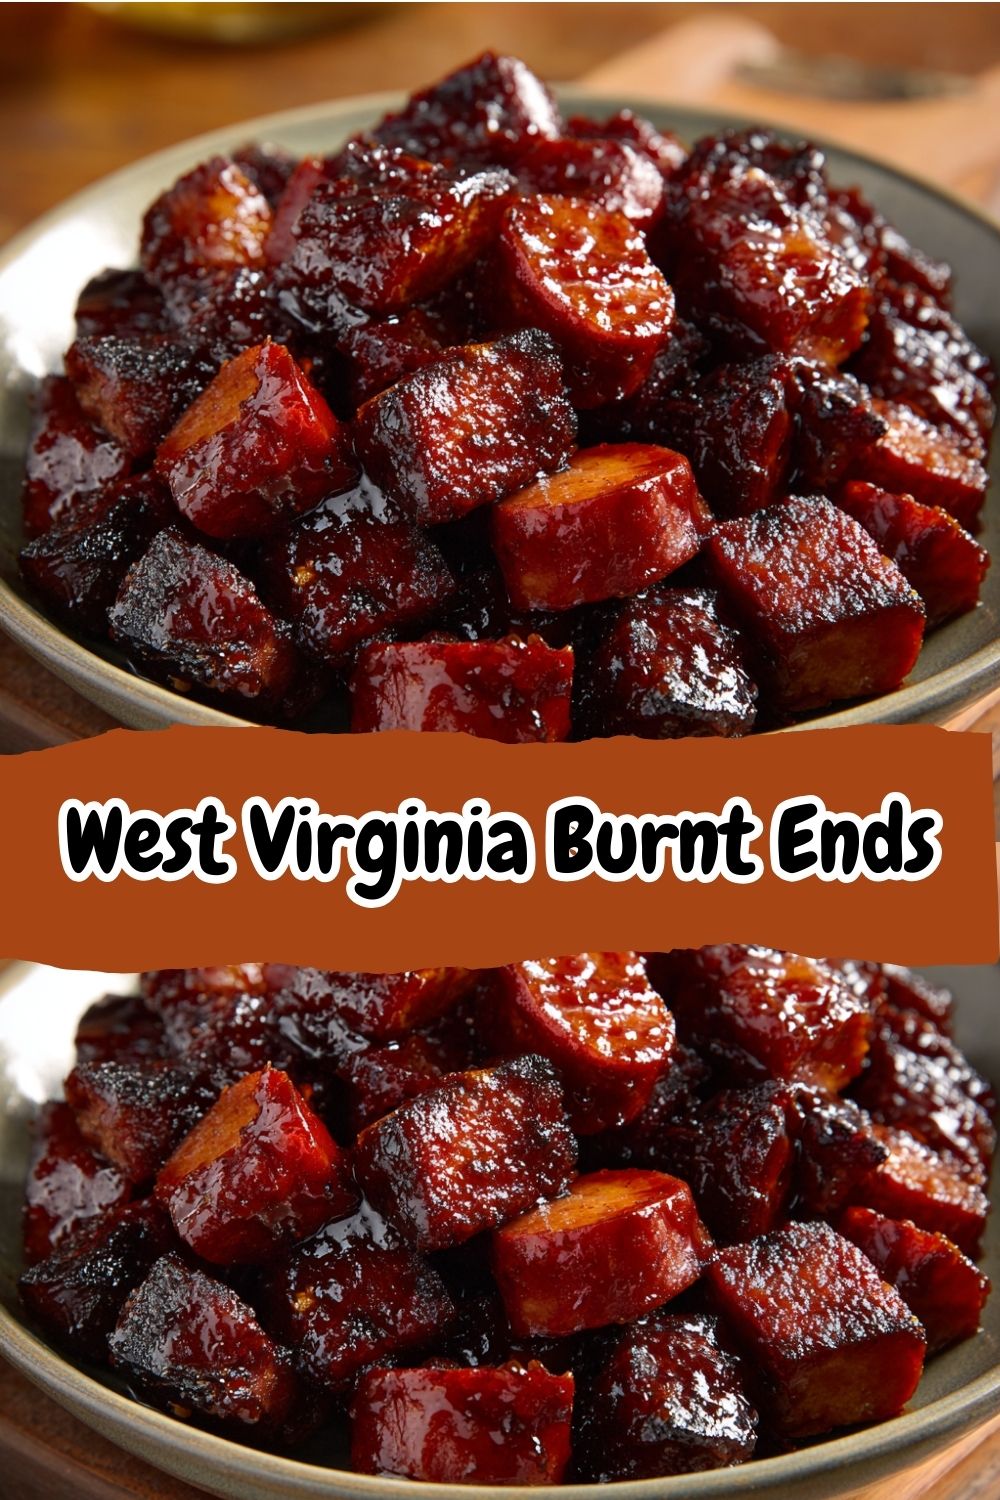
 West Virginia Burnt Ends: Your New Favorite BBQ Party Trick
Hey there, flavor friend! Isla here, from my cozy kitchen to yours. Let’s talk about one of my all-time favorite food facts: the most legendary dishes often come from a place of pure, unapologetic ingenuity. They’re born not in fancy restaurants, but in backyards, at potlucks, and in the kitchens of home cooks who looked at what they had and thought, “You know what? I can make magic with this.”
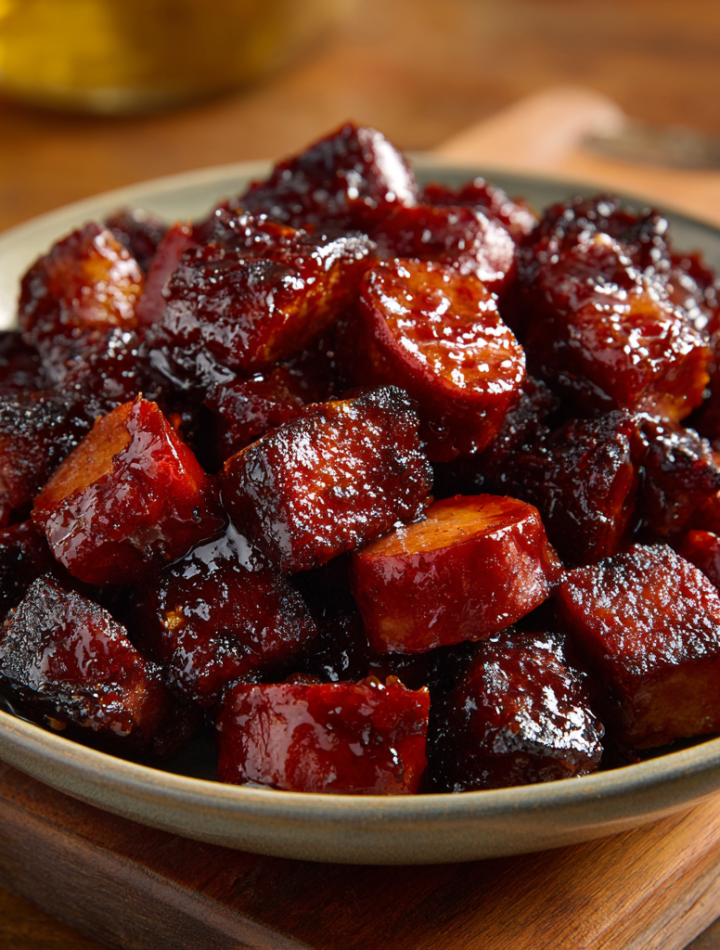
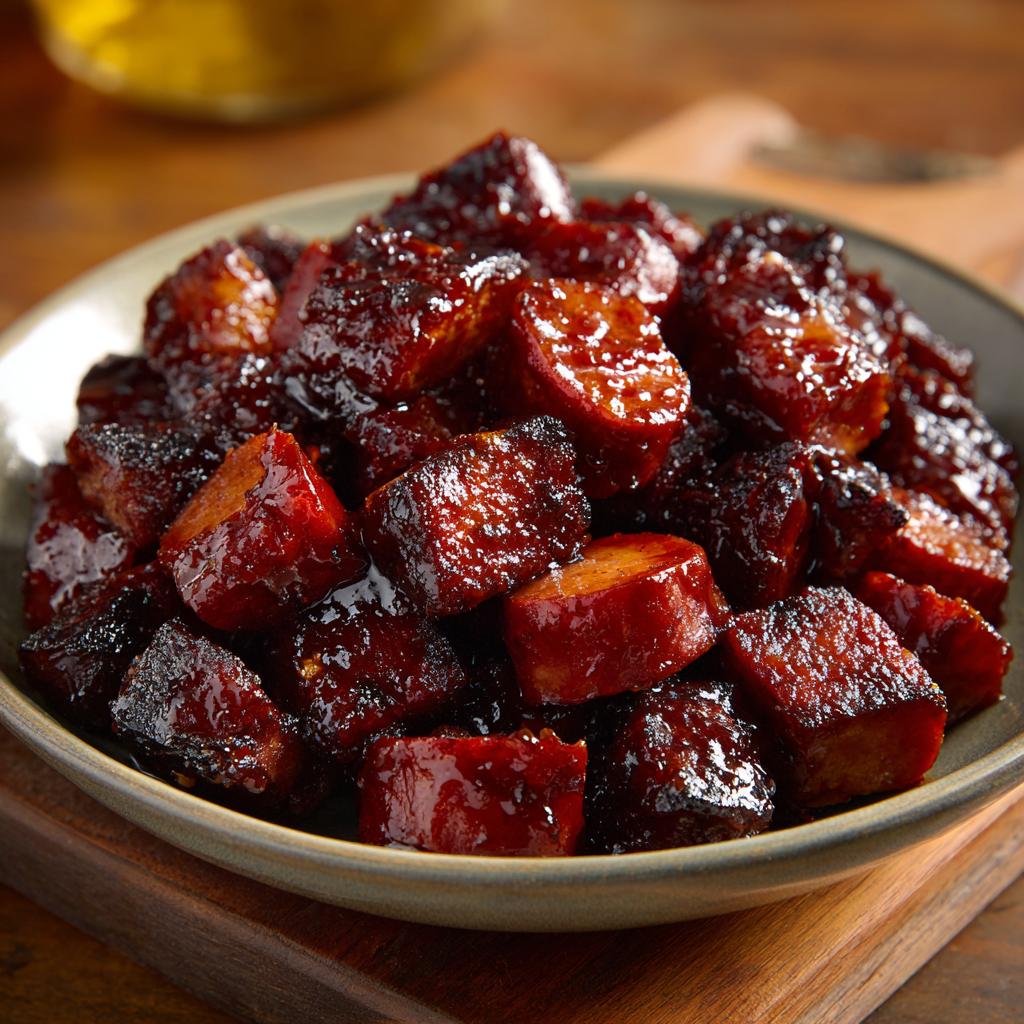
And that, my friends, is the beautiful, brilliant story behind West Virginia Burnt Ends. If you’re a BBQ purist, hold onto your hat, because this one is a delightful plot twist. We’re not using a fancy, 14-hour smoked brisket. Oh no. We’re using the humble, beloved, and wonderfully affordable hot dog. Before you raise an eyebrow, just trust me. When you toss these little nuggets in a sweet, smoky, tangy sauce and roast them until they’re sticky, caramelized, and blistered with flavor, something incredible happens.
They transform. They become these irresistible, pop-in-your-mouth bites of pure joy that are impossible to stop eating. They’re the ultimate crowd-pleaser for game day, the star of the potluck, or just the most fun you can have on a busy weeknight when you need a serious comfort food fix. So, if you’re ready to ride this flavor wave with me, grab your favorite bowl and let’s make some kitchen magic that’s anything but fussy.
A Tailgate, a Laugh, and a Genius Idea
I’ll never forget the first time I encountered these. I was at a massive, chaotic, and utterly wonderful tailgate party before a college football game. The air was crisp, the grills were smoking, and the energy was electric. My friend’s uncle, a man named Dave who was wearing an apron that simply said “SAUCE LORD,” pulled a foil pan out of his smoker. It was filled with these glistening, dark, sticky little morsels. “Try one,” he said with a wink.
I popped one in my mouth and my eyes went wide. It had the deep, smoky-sweet crust of the most perfect burnt ends, but the texture was snappy and juicy. “What cut of brisket is this?” I asked, completely fooled. He just threw his head back and laughed. “Honey, that’s no brisket! That’s a West Virginia secret!” The secret, of course, was hot dogs. I was floored. It was the best kind of kitchen trick—one that was born from a desire to make something delicious and accessible for everyone, without the hours of labor. That moment of surprise and shared laughter, surrounded by good people and even better food, is exactly the feeling I want to bring to your kitchen with this recipe.
Print
West Virginia Burnt Ends
- Total Time: 40–45 minutes
- Yield: 6 servings 1x
Description
Smoky, sticky, and irresistibly caramelized — these West Virginia Burnt Ends are the ultimate budget-friendly BBQ snack. Made with hot dogs instead of brisket, they’re tossed in a bold, sweet-smoky sauce and roasted until perfectly glazed. Great for parties, tailgates, or an easy comfort food fix.
Ingredients
3 packs hot dogs, sliced into thirds
2/3 cup BBQ sauce
1/3 cup yellow mustard
2 tsp liquid smoke
1 tbsp paprika
2 tsp garlic powder
2 tsp onion powder
1/2 tsp salt
1 tsp black pepper
1/2 cup brown sugar (divided)
Instructions
Preheat oven to 375°F (190°C).
Slice hot dogs into thirds and place in a large bowl.
Toss with BBQ sauce, mustard, liquid smoke, paprika, garlic powder, onion powder, salt, pepper, and 1/4 cup brown sugar.
Spread evenly in a foil pan or baking dish.
Bake for 25–30 minutes.
Sprinkle with remaining 1/4 cup brown sugar. Broil for 3–5 minutes, until bubbly and caramelized.
Serve hot as an appetizer or with buns for sliders.
- Prep Time: 10 mins
- Cook Time: 30–35 minutes
- Category: Snack
Nutrition
- Calories: 380
- Fat: 21g
- Carbohydrates: 32g
- Protein: 12g
Gathering Your Flavor Arsenal
This is where the fun begins! The ingredient list is short, sweet, and probably already in your pantry. Here’s what you’ll need and why each one is a rockstar in this recipe.
- 3 packs of hot dogs: This is our star! I like using a all-beef frank for a bit more flavor and a snappier texture, but any brand you love will work beautifully. This is a no-judgment zone!
- 2/3 cup BBQ sauce: This is the base of our glaze. Use your favorite store-bought kind—whether you’re a sweet and smoky fan or a tangy Carolina-style devotee, it’ll shine through. This is your chance to personalize the flavor!
- 1/3 cup yellow mustard: Don’t skip this! It’s not just for hot dogs; it adds a crucial tangy note that cuts through the sweetness and gives the sauce a fantastic base. Chef’s Insight: If you only have Dijon, that works too, but the flavor will be a bit sharper.
- 2 tsp liquid smoke: This is our magic wand for that “low-and-slow” smoked flavor without ever lighting a grill. A little goes a long way to creating that authentic BBQ depth.
- 1 tbsp paprika: For that gorgeous red color and a gentle, sweet pepper flavor. If you have smoked paprika on hand, USE IT! It adds an extra layer of smoky goodness.
- 2 tsp garlic powder & 2 tsp onion powder: The dynamic duo of dried seasonings. They provide a savory foundation that makes the sauce taste rich and well-rounded.
- 1/2 tsp salt & 1 tsp black pepper: The essential seasonings to make all the other flavors pop. We’re keeping the salt light because the hot dogs and BBQ sauce already bring some sodium to the party.
- 1/2 cup brown sugar (divided):strong> Here’s the key to the caramelized crust! We’ll use half in the sauce to build sweetness, and save the other half for a glorious sugary sprinkle right before broiling. This creates that sticky, “burnt” perfection we’re after.
Let’s Get Cooking: The Step-by-Step Flavor Magic
Ready to see the transformation happen? It’s so easy, you’ll be doing a happy dance in your kitchen. Here’s your play-by-play, with all my favorite chef hacks along the way.
- Preheat and Prep. First things first, get that oven roaring to 375°F (190°C). This high heat is going to help cook the dogs and thicken that sauce quickly. Now, grab your hot dogs. Chef’s Hack: I like to slice each hot dog into three even chunks. It creates the perfect “bite-sized” shape for maximum sauce-to-dog ratio and gives you more delicious edges to caramelize. Toss them all into a large mixing bowl—one with plenty of room for tossing!
- The Sauce Shindig. This is where the flavor party starts! To the bowl with the hot dogs, add your BBQ sauce, yellow mustard, liquid smoke, paprika, garlic powder, onion powder, salt, pepper, and 1/4 cup of the brown sugar. Chef’s Insight: Why add sugar now? It helps the sauce thicken and cling to the hot dogs as they bake, creating a beautiful glaze. Get in there with a big spoon or (my personal favorite) use your hands with food-safe gloves to make sure every single nook and cranny of those hot dog pieces is coated in that glorious, ruddy-colored sauce.
- Pan & Spread. Now, grab a 9×13 inch baking dish or a foil pan (my go-to for easy cleanup!). Pour the saucy hot dog nuggets in and spread them out into a single, even layer. Chef’s Hack: Don’t crowd the pan! If they’re all piled on top of each other, they’ll steam instead of roast. Giving them space is the secret to getting those slightly crispy, caramelized edges.
- Bake to Bubble. Slide that pan into your preheated oven and let it work its magic for 25-30 minutes. You’ll know it’s ready when the sauce is thick, bubbly, and clinging to the hot dogs for dear life. Your kitchen is going to smell absolutely incredible right now.
- The Grand Finale: The Broil. This is the most important step! Don’t you dare skip it. Carefully pull the pan out of the oven. Switch your oven setting to BROIL. Evenly sprinkle the remaining 1/4 cup of brown sugar over the top of the hot dogs. This is what creates that signature “burnt” sugary crust. Place the pan back in the oven, but watch it like a hawk! It only needs 3-5 minutes. You’re looking for a bubbly, dark, caramelized top. It might look a little *too* dark, but that’s the good stuff! That’s the “burnt” in burnt ends, and it tastes like candy.
How to Serve These Flavor Bombs
Okay, the hard part is over (wait, was there a hard part?). Now for the fun: serving them up! I love serving these straight from the oven in the foil pan with a big pile of toothpicks right on the table. It’s casual, fun, and lets people dig in. They are the ultimate appetizer. For a heartier meal, scoop them onto soft, squishy slider buns for the most epic BBQ sliders you’ve ever had. They’re also phenomenal piled on top of a bowl of creamy coleslaw or next to some classic potato salad. However you serve them, just be prepared for recipe requests!
Ride Your Own Flavor Wave: Recipe Variations
One of the best things about this recipe is how adaptable it is. Make it your own!
- Spicy Kick: Add a teaspoon of chili powder or a few shakes of your favorite hot sauce to the glaze. For the brave, a pinch of cayenne pepper will really turn up the heat.
- Honey Mustard Twist: Swap the yellow mustard for a grainy Dijon and use honey instead of brown sugar for a different kind of sweet and tangy.
- Pineapple Party: Add a cup of drained, crushed pineapple to the pan before baking. It caramelizes beautifully with the sugar and adds a tropical sweetness.
- Little Smokies Swap: You can absolutely use cocktail smokies instead of sliced hot dogs! Just reduce the initial bake time by about 5-10 minutes, as they’re smaller.
Isla’s Chef’s Notes & Kitchen Confessions
This recipe has become a staple in my house for movie nights and last-minute get-togethers. It’s evolved a bit since that first tailgate—I started adding the smoked paprika after a happy accident when I ran out of the regular stuff, and it was a total game-changer. One of my favorite kitchen memories involving these was when I was making them for a friend’s birthday party. I was broiling the final batch, got distracted by a text, and *almost* let them go from “perfectly burnt” to “genuinely charred.” I salvaged them just in time, and they were still a huge hit! The moral of the story? Don’t fear the “burnt.” A little char is flavor, but maybe set a timer for the broiling step. We’ve all been there!
Your Questions, Answered!
I’ve made these a million times, and here are the questions I get asked most often.
Q: Can I make these West Virginia Burnt Ends ahead of time?
A: Absolutely! You can assemble the dish completely (through step 3) cover it, and keep it in the fridge for up to 24 hours before you need to bake it. Just let it sit at room temp for 20 minutes or so before baking, and you might need to add a couple extra minutes to the bake time since it’s going in cold.
Q: My sauce turned out a bit watery. What happened?
A: No worries! This usually happens if the hot dogs release a lot of water or if your baking dish was too crowded. To fix it, just pour the entire contents of the pan into a skillet and simmer on the stovetop for a few minutes, stirring often, until the sauce reduces and thickens up. It’ll be just as delicious!
Q: Can I make these in an air fryer?
A: You bet! This is a fantastic hack. Toss the sauced hot dog pieces (using only the first 1/4 cup of brown sugar) and air fry at 375°F for 10-12 minutes, shaking the basket halfway through. Then, sprinkle with the remaining sugar and air fry for another 2-3 minutes until caramelized. Watch them closely as cook times can vary by machine.
Q: What’s the best way to reheat leftovers?
A: The oven or air fryer is your best friend here! Reheating them at 350°F for 5-10 minutes will bring back their sticky, slightly crispy texture. The microwave will work in a pinch, but it can make them a bit soft.
Nutritional Info & Prep Details
Prep time: 10 minutes
Cook time: 30-35 minutes
Total time: 40-45 minutes
Serves: 6
Per serving (approx.):
Calories: ~380 | Protein: 12g | Fat: 21g | Carbohydrates: 32g | Sugar: 18g
There you have it! Your new secret weapon for delicious, easy, and downright fun food. I hope this recipe brings as much laughter and satisfaction to your table as it has to mine. If you make them, I’d be absolutely thrilled to see your creation! Tag me on social @BiteTide or drop a comment right here on the blog.
Until next time, keep riding that flavor wave!
– Isla 💛