Your New Favorite Chocolate Fix Is Here (And It’s Shockingly Simple)
Hey friend! Isla here from BiteTide. Let’s be real for a second. We’ve all been there: that 3 PM slump hits, or the post-dinner sweet tooth starts whispering, and you’re caught between a rock and a hard place—specifically, the rock of your health goals and the hard place of a serious chocolate craving. You stare into the pantry abyss, willing a magical, guilt-free dessert to appear.
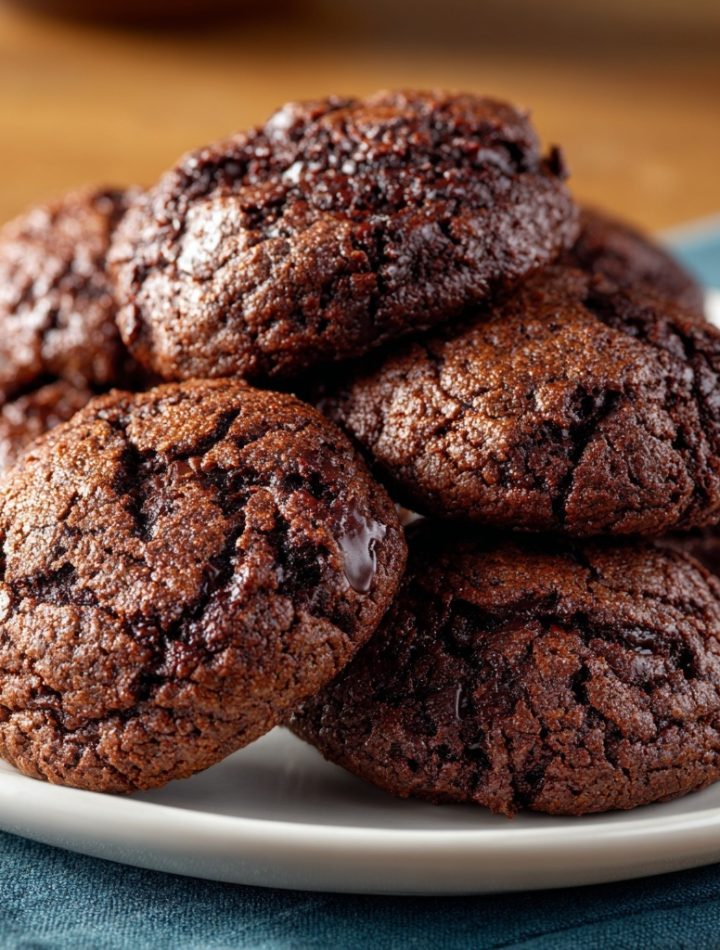
Well, consider this your culinary magic trick. I’m about to share a recipe that feels like I’m letting you in on a massive secret. These Weight Watchers Brownie Cookies are your golden ticket. Imagine the fudgy, chewy heart of a brownie, but in a perfectly portioned, handheld cookie form. They’re deeply chocolatey, satisfyingly sweet, and have that dreamy texture—slightly crisp on the outside, soft and almost gooey on the inside. And the best part? They come together with just THREE ingredients and about 15 minutes of your time. No fancy equipment, no complicated techniques. This is the kind of kitchen wizardry I live for—food that makes you do a happy dance without any of the fuss. So, tie on your apron (or don’t, I’m not the boss of you!), and let’s make some magic happen.
The Day I Discovered Kitchen Alchemy
This recipe takes me right back to my grandma’s linoleum-floored kitchen. My grandma, Rose, was the queen of “making do.” She could turn a can of beans, a leftover chicken, and a single sad-looking carrot into a feast for eight. She never followed recipes to the letter; she cooked by feel, by smell, by memory. One rainy afternoon, I was desperate to bake but we were out of eggs, oil, and—the horror—almost out of butter. I was lamenting my cookie-less fate when she just chuckled, pulled a jar of homemade applesauce from the pantry, and said, “Honey, watch this.” She doctored up a boxed cake mix with that applesauce, and what came out of the oven was the most miraculously moist, tender cake I’d ever tasted. It was a lightbulb moment. It taught me that cooking isn’t about rigid rules; it’s about creativity and understanding how ingredients work together. These brownie cookies are a direct descendant of that lesson. By swapping out the oil and eggs typically required in a brownie mix for simple, wholesome applesauce, we’re not just cutting points or calories—we’re creating something new, delicious, and wonderfully smart. It’s a little nod to my clever grandma in every single bite.
Print
Weight Watchers Brownie Cookies
- Total Time: 15 minutes
- Yield: 18–20 cookies 1x
Description
Craving something rich, chocolatey, and cookie-like—without blowing your goals? These Weight Watchers-friendly brownie cookies are chewy on the inside, slightly crisp on the outside, and made with just three simple ingredients. Perfect for a quick sweet fix that feels indulgent but stays light.
Ingredients
1 box sugar-free brownie mix
1/2 cup unsweetened applesauce
1/4 cup water
Instructions
Preheat your oven to the temperature listed on your brownie mix box (usually around 350°F / 175°C).
In a mixing bowl, combine the brownie mix, applesauce, and water. Stir until a thick dough forms.
Drop spoonfuls of dough onto a parchment-lined baking sheet, spacing them about 2 inches apart.
Bake for 9–11 minutes, or until the edges are set but the centers are still soft.
Let cool on the pan for 2–3 minutes, then transfer to a wire rack to finish cooling.
- Prep Time: 5 mins
- Cook Time: 10 minutes
- Category: dessert
Nutrition
- Calories: 70
- Sugar: 0g
- Carbohydrates: 13g
Gather Your Trio of Heroes
Here’s the beautiful shortlist of what you’ll need. Let’s get to know these ingredients a little better, shall we?
- 1 Box (approx. 16-18 oz) Sugar-Free Brownie Mix: This is our flavor foundation! Using a sugar-free mix is the key to keeping these cookies WW-friendly. I often grab a family-size box because, well, more cookies. Chef’s Insight: Don’t be tempted to use a regular brownie mix here—the sugar content is crucial for the structure, and swapping it would throw off the whole recipe. Look for one with a rich cocoa or dark chocolate profile for the deepest flavor.
- 1/2 Cup Unsweetened Applesauce: This is the magic maker! It replaces the fat (usually oil or butter) and the eggs, all in one go. It adds moisture and helps bind the cookies without any added fat. Substitution Tip: In a pinch, a mashed ripe banana or even plain pumpkin puree can work, but they will impart their own subtle flavor. For the purest chocolate experience, stick with applesauce.
- 1/4 Cup Water: Just plain ol’ water! It’s the final piece of the puzzle, bringing the dough together to the perfect, scoopable consistency. Chef’s Insight: If you’re feeling fancy, you can use cold brew coffee instead of water to really intensify that chocolate flavor. It’s a tiny switch with a big impact!
Let’s Bake: Your Foolproof Cookie Roadmap
Ready? This is quite possibly the easiest baking session of your life. Let’s do it together, step-by-step.
- Preheat & Prep. Fire up your oven to the temperature listed on your brownie mix box—this is almost always 350°F (175°C). This is a non-negotiable first step! While it’s heating, line a baking sheet with parchment paper or a silicone baking mat. Chef’s Hack: I swear by silicone mats. Nothing ever sticks, they’re reusable, and they create the perfect golden-bottomed cookie. A little spritz of non-stick spray on parchment also works in a pinch.
- The Big Mix. In a medium-sized mixing bowl, combine the entire box of brownie mix, the 1/2 cup of applesauce, and the 1/4 cup of water. Now, grab a sturdy spatula or a wooden spoon and stir! You’re going to watch a dusty dry mix transform into a thick, glossy, and incredibly fudgy dough. Little Chef Tip: Don’t overmix! Just stir until you no longer see any dry streaks of brownie mix. A few lumps are totally fine—overmixing can make the cookies tough.
- Scoop & Space. Using a tablespoon, a small cookie scoop (my personal favorite for uniform cuties), or just two spoons, drop rounded tablespoons of the dough onto your prepared baking sheet. Leave about 2 inches between each one. They don’t spread a *ton*, but they do need their personal space to puff up and get those cute little crinkles on top. Commentary: This is where you can see the texture! The dough should be thick enough to hold its shape but still soft and pliable.
- The Perfect Bake. Slide your tray into the preheated oven and bake for 9-11 minutes. This is the most critical step for texture! You want the edges to look set and dry, and the tops to be matte and slightly crackled, but the centers should still look soft and a little underdone. Chef’s Secret: I always pull mine out at the 10-minute mark for that ultimate fudgy center. They will continue to cook on the hot baking sheet. If you wait until the centers look fully cooked in the oven, you’ll end up with a drier, cakier cookie.
- The Cool Down. This part requires a smidge of patience. Let the cookies cool on the hot baking sheet for a solid 2-3 minutes. This allows them to “set” so they don’t fall apart when you move them. Then, ever so carefully, transfer them to a wire rack to cool completely. Confession: I have absolutely burned my mouth on more than one of these because I couldn’t wait. The struggle is real, but they are truly sublime once they’ve had a chance to firm up.
How to Serve These Chocolatey Clouds of Joy
Honestly, they’re perfect straight off the cooling rack, still slightly warm. But if you want to level up the experience, here are a few ideas. For a decadent (but still relatively light) treat, sandwich a small scoop of low-point vanilla ice cream or a dollop of light whipped topping between two cookies. You can also dust them with a little powdered erythritol for a bakery-style finish. My favorite way? Just pile them high on a rustic plate with a hot cup of coffee for the ultimate “I’ve got my life together” afternoon moment.
Get Creative: 5 Fun Flavor Twists
Once you’ve mastered the base recipe, the world is your oyster! Here are a few of my favorite ways to mix it up:
- Mint Chocolate Chip: Add 1/2 tsp of peppermint extract to the dough and fold in 1/4 cup of sugar-free chocolate chips.
- Orange Espresso: Add the zest of one orange and 1 tsp of instant espresso powder to the dry mix for a sophisticated, grown-up flavor.
- Rocky Road: After scooping the dough, gently press a few mini marshmallows and chopped walnuts or almonds onto the top of each cookie before baking.
- Peanut Butter Swirl: Drop small 1/4 tsp dollops of powdered peanut butter (reconstituted with water) onto the scooped dough and use a toothpick to gently swirl it in.
- Salted Carcha: Right when the cookies come out of the oven, sprinkle them with a tiny pinch of flaky sea salt. It’s a game-changer.
From My Kitchen to Yours: A Few Parting Thoughts
This recipe has become a staple in my house, and it’s evolved in funny ways. The first time I made them, I was so skeptical I ate three in a row just to make sure they were real. They were. My partner, who is a certified chocoholic and skeptic of all things “healthy,” now requests them weekly. He calls them his “cheat code cookies.” The batch size is perfect for satisfying a week-long craving, and they store beautifully in an airtight container at room temperature for up to 4 days (if they last that long!). I’ve also found they freeze like a dream—just pop them in a freezer bag and you’ve got a ready-to-go sweet treat whenever the wave hits. The beauty of this recipe is its simplicity and reliability. It’s a little beacon of hope for anyone who thinks eating well means giving up on flavor. It’s quite the opposite, my friend.
Your Questions, Answered!
I’ve gotten a lot of DMs about these cookies, so here are the answers to the most common queries.
- Q: My cookies turned out cakey, not fudgy. What happened?
A: The most common culprit is overbaking. Remember, we want to pull them out while the centers still look soft! They finish cooking on the hot pan. Another possibility is overmixing the dough, which can incorporate too much air. - Q: Can I use a regular, non-sugar-free brownie mix?
A: I don’t recommend it. The chemistry of a regular brownie mix relies on the sugar and fat for structure and spread. Using applesauce with a regular mix would likely result in a flat, greasy, or overly sweet cookie that doesn’t hold its shape. Stick with the sugar-free version for the intended result. - Q: My dough seems too runny/thick. Help!
A: Different brands of brownie mix can have slight variations. If it’s too runny, let it sit for 5 minutes to thicken up. If it’s too thick to scoop, add water one tablespoon at a time until it reaches a scoopable, thick brownie batter consistency. - Q: How do I calculate the WW points for my specific brand?
A: The best way is to use the official WW app. Input the entire box of brownie mix and the applesauce as a recipe, specify how many cookies it made, and it will calculate the points per cookie for you accurately.
Nutritional Information*
*Please note: This is an approximate estimate and can vary significantly based on the specific brand of sugar-free brownie mix you use. Always check your package for the most accurate data.
Per Cookie (based on a batch of 18):
Calories: 70 | Fat: 1g | Carbohydrates: 13g | Fiber: 1g | Sugar: 0g | Protein: 1g
There you have it! A dessert that feels like a hug from the inside. I hope you love these as much as I do. Now go forth and bake! And don’t forget to tag me @BiteTide if you make them—I love seeing your creations!
With love and a full cookie jar,
Isla 💛