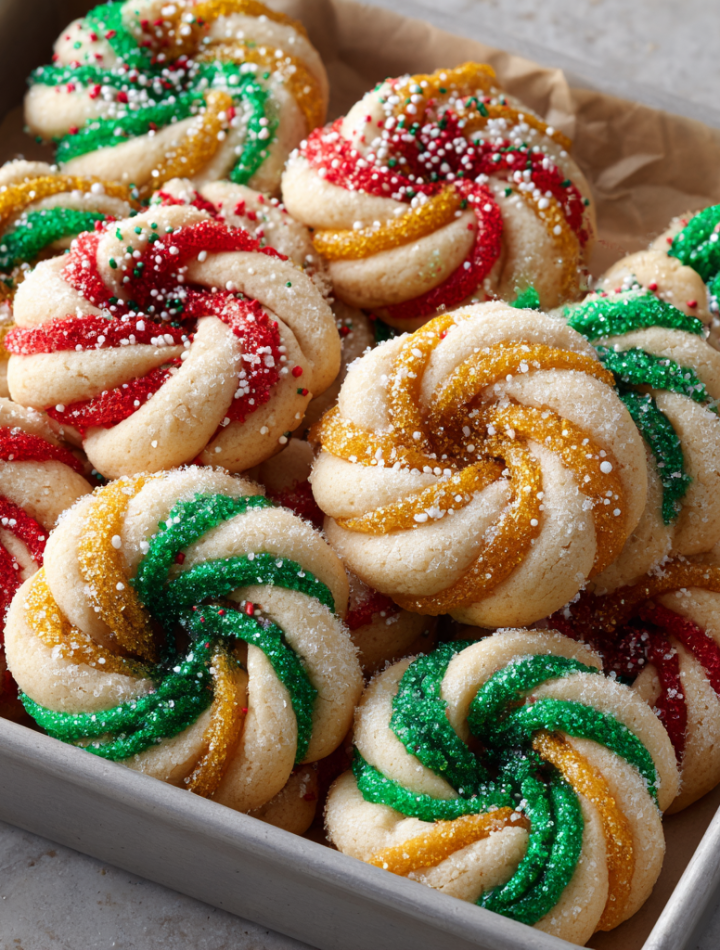

Twisted Christmas Cookies: Your New Favorite Holiday Tradition
Hey there, friend! Isla here from BiteTide, coming at you from my flour-dusted kitchen, which currently smells like a dreamy mix of butter, sugar, and pure holiday joy. If you’re anything like me, the moment the air gets that first crisp winter chill, your brain starts buzzing with visions of sugarplums… or, more accurately, visions of beautifully decorated Christmas cookies.
But let’s be real. Sometimes, the classic recipes, while beloved, can feel a little… predictable. You cream the butter and sugar, you add the flour, you cut out the shapes. They’re delicious, of course, but where’s the fun? The surprise? The moment where your taste buds do a little happy dance?
That’s exactly why I had to share my recipe for these Twisted Christmas Cookies with you. We’re taking that perfect, buttery, melt-in-your-mouth sugar cookie base you know and love and giving it a serious flavor upgrade. We’re talking a hint of almond for that nostalgic, festive warmth, a kiss of citrus zest for a surprising burst of brightness, and a royal icing that’s so smooth and satisfying to work with, you’ll feel like a pastry pro. This recipe is built for memory-making, for gifting, and for absolutely stealing the show at any holiday party. So, tie on your favorite apron, put on some festive tunes, and let’s bake up a storm together!
A Kitchen Full of Memories & Messy Icing Fingers
My love for these cookies started long before BiteTide was even a twinkle in my eye. It started in my grandma’s warm, tiny kitchen, with its checkered curtains and the ever-present scent of strong coffee. Every December, she’d clear the table, and the baking marathon would begin. My job, as her “little elf,” was to zest the orange. I’d scrape the bright skin against the old metal grater, watching the citrus oils mist into the air, making the whole room smell like a winter sunshine.
Grandma always added a “glug” (her precise measurement) of almond extract to her dough. She’d let me dip my finger in the bottle for a taste, and my eyes would widen at the powerful, sweet flavor. “That’s the magic, Isla,” she’d whisper. “It makes the cookies taste like Christmas.” We’d spend hours cutting out stars and bells, her hands guiding mine on the rolling pin. The real chaos, and the real joy, began with the icing. I’d inevitably get more on my face and the tablecloth than on the cookies, but she never minded. She’d just laugh, her eyes crinkling, and say the mess was proof we were having fun. These Twisted Christmas Cookies are my homage to her—to the magic, the mess, and the unmistakable taste of love.
Print
Twisted Christmas Cookies
- Total Time: ~1 hr 59 mins
Description
For the Cookies:
1 cup white sugar
14 oz (400g) butter, softened
2 eggs
2 tsp vanilla extract
1 tsp almond extract (for a festive flavor lift)
Zest of 1 orange (optional, for brightness)
6 cups plain flour
For the Icing:
6 tbsp meringue powder
8 tbsp water
2 tsp lemon juice
7 cups powdered sugar, sifted
Extra water (for thinning)
Gel food coloring (red, green, gold, white)
Sprinkles, edible glitter, or crushed candy canes (for topping)
Ingredients
Preheat oven to 350°F (175°C). Line 2-3 baking sheets with parchment paper.
In a large bowl, cream butter and sugar until fluffy. Add eggs, vanilla, almond extract, and orange zest. Mix until smooth.
Gradually mix in flour until dough forms. If needed, add a tablespoon of milk to bring it together.
Roll dough to ¼-inch thickness. Cut with cookie cutters—trees, stars, mittens, you name it.
Place on baking sheets and chill for 10–15 minutes.
Bake 10–12 minutes until edges are just golden. Cool completely.
For icing, whisk meringue powder, lemon juice, and water. Add sugar gradually, beating until glossy. Thin with water if needed.
Divide icing into bowls, add food coloring, and decorate. Use sprinkles, glitter, or crushed candy canes for extra flair. Let set.
- Prep Time: 50 mins
- Cook Time: 24 mins (2 batches)
- Category: Dessert
Nutrition
- Calories: ~210
- Sugar: 18g
- Fat: 9g
- Carbohydrates: 28g
- Protein: 2g
Gathering Your Cookie Crew: The Ingredients
Here’s everything you’ll need to create these festive wonders. I’ve included my best chef-y tips and substitutions so you can bake with confidence, no matter what’s in your pantry!
For the Cookies:
- 1 cup white sugar: This is our sweet foundation. Using all white sugar (instead of a brown/white mix) gives the cookies that classic crisp edge and tender center. For a slightly deeper flavor, you can swap half a cup for light brown sugar!
- 14 oz (400g) butter, softened: This is key! Use unsalted butter so we control the salt. It MUST be softened to room temperature. To test, press it with your finger—it should leave an indent but not sink all the way through. This ensures a fluffy, perfectly creamed base, not a greasy mess.
- 2 eggs: They bind everything together and add richness. Make sure they’re at room temperature too! Pop them in a bowl of warm water for 5 minutes if you forgot to take them out.
- 2 tsp vanilla extract: The other half of our flavor powerhouse. Use the real stuff, not imitation—it makes a world of difference.
- 1 tsp almond extract: This is the “twist”! It gives that unmistakable, warm, festive flavor that makes these cookies so special. If you have a nut allergy, you can omit it and double the vanilla.
- Zest of 1 orange (optional): My grandma’s secret weapon! The citrus zest cuts through the sweetness and adds a incredible bright, aromatic note. A microplane zester is your best friend here.
- 6 cups plain flour (all-purpose): The structure of our cookie. I always fluff the flour in the bag, spoon it into the measuring cup, and level it off. Don’t scoop directly with the cup—you’ll pack in too much flour and end up with dry cookies!
For the Icing & Decorations:
- 6 tbsp meringue powder: This is what gives royal icing its structure and allows it to harden. It’s a miracle worker and way easier than dealing with raw egg whites. Find it in the baking aisle!
- 8 tbsp water: For hydrating the meringue powder.
- 2 tsp lemon juice: A tiny bit of acid helps stabilize the icing and gives it a lovely, slight tang.
- 7 cups powdered sugar, sifted: Sifting is NON-NEGOTIABLE here. It removes any lumps and ensures your icing is super smooth and glossy. No one wants lumpy icing!
- Extra water (for thinning): You’ll need this to get your icing to different consistencies for outlining and flooding.
- Gel food coloring: Gel is better than liquid because it adds vibrant color without thinning out your icing. I love classic red, green, gold, and white.
- Sprinkles, edible glitter, or crushed candy canes: This is where you go wild! These are the finishing touches that make each cookie a unique little masterpiece.
Let’s Get Baking: The Step-by-Step Fun
Okay, team! Let’s do this. Read through all the steps first—it’s my number one chef hack for a smooth, stress-free baking experience.
- Preheat and Prep: Preheat your oven to 350°F (175°C). Line 2-3 baking sheets with parchment paper. This is a lifesaver for easy cleanup and prevents any sticking. Trust me, you don’t want to skip this!
- Cream the Good Stuff: In a large bowl, cream together the softened butter and sugar. Use an electric hand mixer or a stand mixer with the paddle attachment. Beat it on medium-high speed for a good 2-3 minutes until it’s light, pale, and fluffy. This step incorporates air, which is the secret to a tender cookie. Don’t rush it!
- Add the Wet Team: Scrape down the sides of the bowl with a spatula. Add the eggs, one at a time, mixing well after each addition. Now, add the vanilla extract, almond extract, and the orange zest. Mix until everything is beautifully combined and smells incredible.
- Bring in the Flour: With your mixer on low speed, gradually add the flour. I add it in about 2-cup increments to avoid a flour cloud explosion in your kitchen! Mix until the dough just comes together. It might seem a bit crumbly at first, but it should hold together when you press it. If it’s too crumbly, add a tablespoon of milk to bring it together.
- Roll and Cut: Lightly flour your work surface and rolling pin. Take about a quarter of the dough and roll it out to about ¼-inch thickness. This is the perfect thickness—thick enough to be soft, thin enough to be elegant. Now for the best part: cutting out your shapes! Dip your cookie cutters in a little flour to prevent sticking. Get creative with trees, stars, mittens, snowflakes—the more variety, the better!
- The Chill Factor: Place the cut-out cookies on your prepared baking sheets. Now, here’s a pro tip for perfectly shaped cookies that don’t spread: pop the entire baking sheet into the refrigerator for 10-15 minutes. This re-chills the butter, which helps the cookies hold their sharp edges in the oven.
- Bake to Golden Perfection: Bake for 10-12 minutes. You’re looking for the edges to be just barely starting to turn a light golden brown. The centers should still look soft and set, not wet. They will firm up as they cool! Remember, oven temperatures vary, so keep an eye on them.
- Cool Completely: This is the hardest part—you have to wait! Let the cookies cool on the baking sheet for 5 minutes before transferring them to a wire rack to cool completely. If you try to ice a warm cookie, the icing will melt into a puddle. Patience, my friend!
- Make the Royal Icing: In a large, clean bowl, whisk together the meringue powder, lemon juice, and water. Use your electric mixer with the whisk attachment on low speed until it’s frothy. Gradually add the sifted powdered sugar. Once it’s all incorporated, crank the speed up to high and beat for 4-5 minutes until the icing is thick, glossy, and forms stiff peaks. It should be thick enough that a knife drawn through it leaves a clear path that doesn’t immediately fill in. This is your “stiff consistency” for outlining.
- Thin and Color: To create “flood consistency” icing for filling in your cookies, transfer some of the stiff icing to separate smaller bowls. Add a few drops of water at a time, stirring gently, until the icing flows like thick honey. A ribbon of icing drizzled back into the bowl should disappear back into the surface within 10-15 seconds. Now, add your gel food coloring and mix well!
- Decorate! Time for the Picasso phase! Use piping bags with small tips (or just snip a tiny corner off a Ziploc bag) to outline each cookie with your stiff icing. Then, “flood” the inside with the thinner icing, using a toothpick to guide it into all the corners. Immediately add your sprinkles or glitter before the icing sets. Let your edible masterpieces dry completely, undisturbed, for at least 4-6 hours, or ideally overnight.
Sharing the Joy: How to Serve Them Up
These cookies are a showstopper all on their own! Pile them high on a beautiful vintage platter for a holiday party. For gifting, stack them in a clear cellophane bag tied with a rustic ribbon, or arrange them in a festive tin lined with parchment paper. They also make incredible edible ornaments—just use a straw to poke a hole in the top of the cookie before baking, and thread a ribbon through once they’re iced and cooled. However you serve them, be prepared for recipe requests and happy sighs!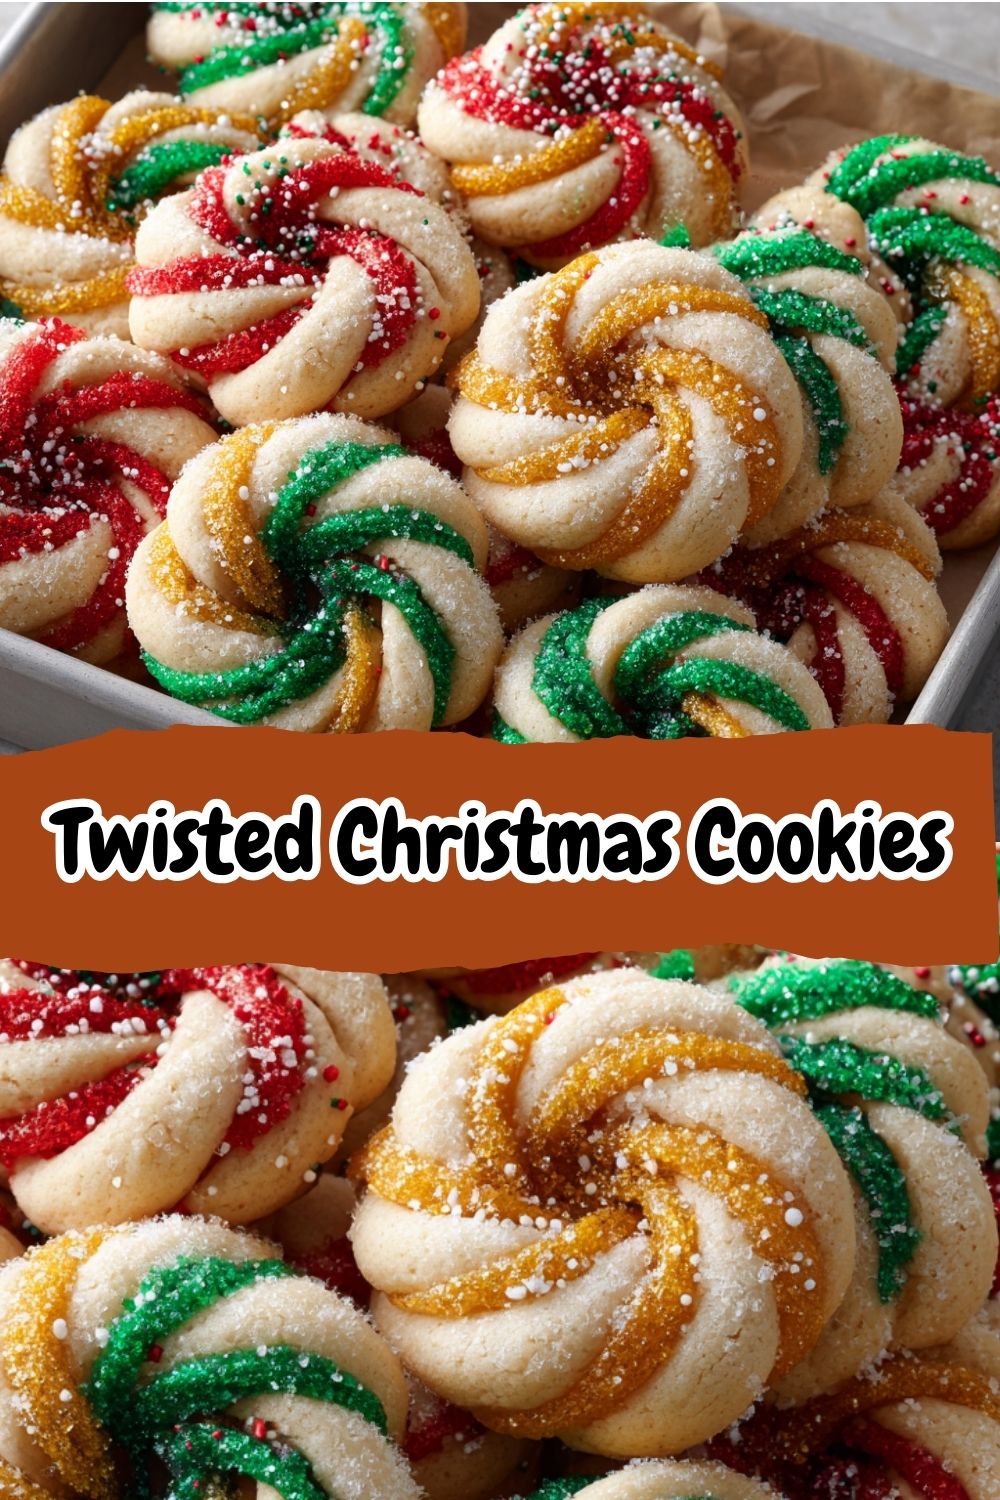
Ride Your Own Flavor Wave: Fun Variations
Feel like mixing it up? Here are a few of my favorite twists on the twist:
- Lemon-Poppy Seed: Swap the orange zest for lemon zest and fold in 2 tablespoons of poppy seeds into the dough for a delightful texture and tang.
- Chocolate Dip: Skip the royal icing altogether. Once cooled, dip half of each cookie in melted dark chocolate and let it set. Simple and decadent.
- Spiced Cookie: Add 2 teaspoons of ground cinnamon, ½ teaspoon of nutmeg, and a pinch of cloves to the flour for a warm, spiced flavor profile.
- Peppermint Bliss: Omit the almond extract. Add ½ teaspoon of peppermint extract to the dough and top the iced cookies with finely crushed candy canes.
- Gluten-Free Swap: You can use a 1:1 gluten-free all-purpose flour blend. The texture might be slightly more delicate, but they’ll be just as delicious!
Isla’s Chef Notes & Kitchen Confessions
This recipe has evolved so much over the years in my kitchen. The first time I made it, I was so eager I iced the cookies while they were still warm. Let’s just say I ended up with a platter of delicious, but very sad-looking, puddle-cookies. Live and learn!
My other big kitchen confession? I always double this batch. The dough freezes beautifully—just wrap it tightly in plastic wrap and freeze for up to 3 months. You can also freeze the baked, un-iced cookies. This means you can have cookie dough on hand for unexpected holiday guests or a sudden baking urge (we’ve all been there!). The joy of this recipe isn’t just in the eating; it’s in the process. So put on some music, call over your family or friends, and embrace the messy, fun, floury chaos. That’s where the real magic happens.
Your Questions, Answered: FAQs & Troubleshooting
Q: My dough is too sticky to roll! What do I do?
A: No worries! This is common. Just add a little more flour, a tablespoon at a time, until it’s manageable. Also, make sure you’re chilling the dough between batches. If the kitchen is warm, the butter can soften quickly.
Q: My cookies spread too much and lost their shape.
A: The most likely culprit is butter that was too warm. Next time, make sure your butter is just softened, not melty. Also, don’t skip the chilling step before baking! That solidifies the butter again and prevents spreading.
Q: My royal icing is too runny/thick. How can I fix it?
A: Icing consistency is everything! If it’s too runny, add more sifted powdered sugar, a quarter cup at a time. If it’s too thick to flood, add water literally drop by drop. It’s easier to thin it out than to thicken it back up, so go slowly!
Q: Can I make these cookies ahead of time?
A: Absolutely! You can make the dough and refrigerate it for up to 3 days, or freeze it. The baked cookies (un-iced) will keep in an airtight container at room temperature for a week, or frozen for a month. Once iced, they’ll keep beautifully in a single layer in a container for about 5 days.
Nutritional Information*
*This is an estimate provided for informational purposes only. I’m a chef, not a nutritionist!
Per Cookie (based on 36 cookies): Calories: ~210 | Fat: 9g | Saturated Fat: 5.5g | Cholesterol: 35mg | Sodium: 75mg | Carbohydrates: 28g | Fiber: 0.5g | Sugar: 18g | Protein: 2g
These Twisted Christmas Cookies with Almond & Citrus Icing are the perfect blend of tradition and festive flair. Soft, buttery, and full of bright holiday flavor, they’re as fun to decorate as they are to eat. Whether for a cookie swap, a holiday party, or gifting to loved ones, these cookies are sure to spread cheer with every bite!