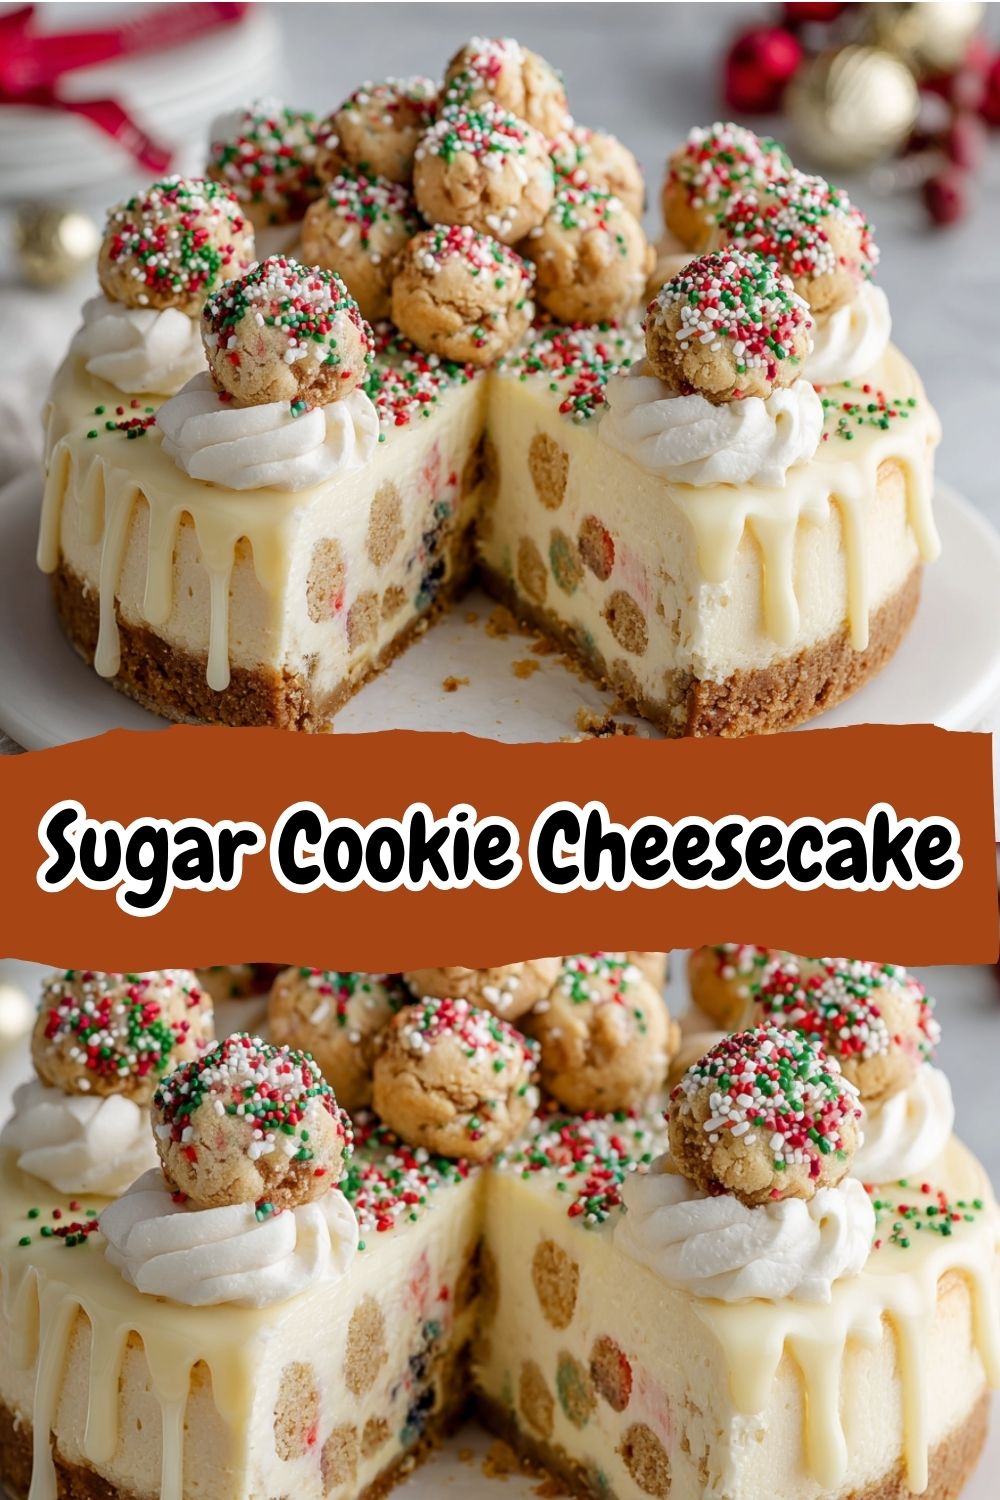
The Dessert Mashup of Your Dreams: Sugar Cookie Cheesecake
Hey there, friend! Isla here from BiteTide, and I am just buzzing with excitement to share this recipe with you today. Have you ever found yourself staring into the fridge, torn between two incredible desserts? Maybe you’re craving the rich, creamy, melt-in-your-mouth luxury of a classic New York cheesecake. But then… a little voice whispers about the soft, buttery, vanilla-kissed joy of a fresh sugar cookie. Why should you have to choose? You absolutely shouldn’t! That’s how this glorious, show-stopping, makes-everyone-ask-for-the-recipe Sugar Cookie Cheesecake was born.
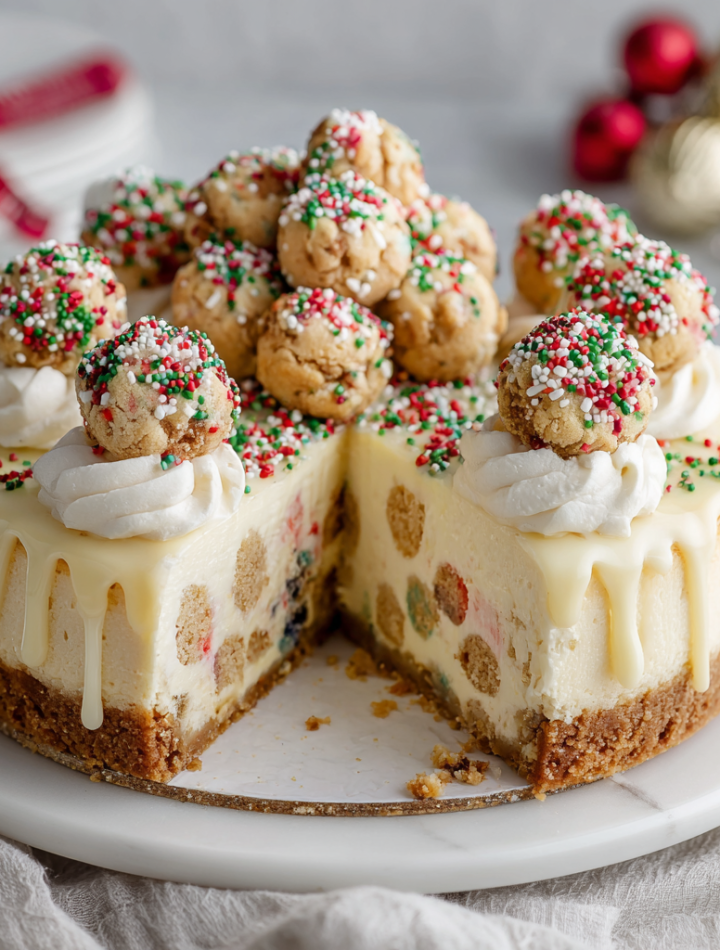
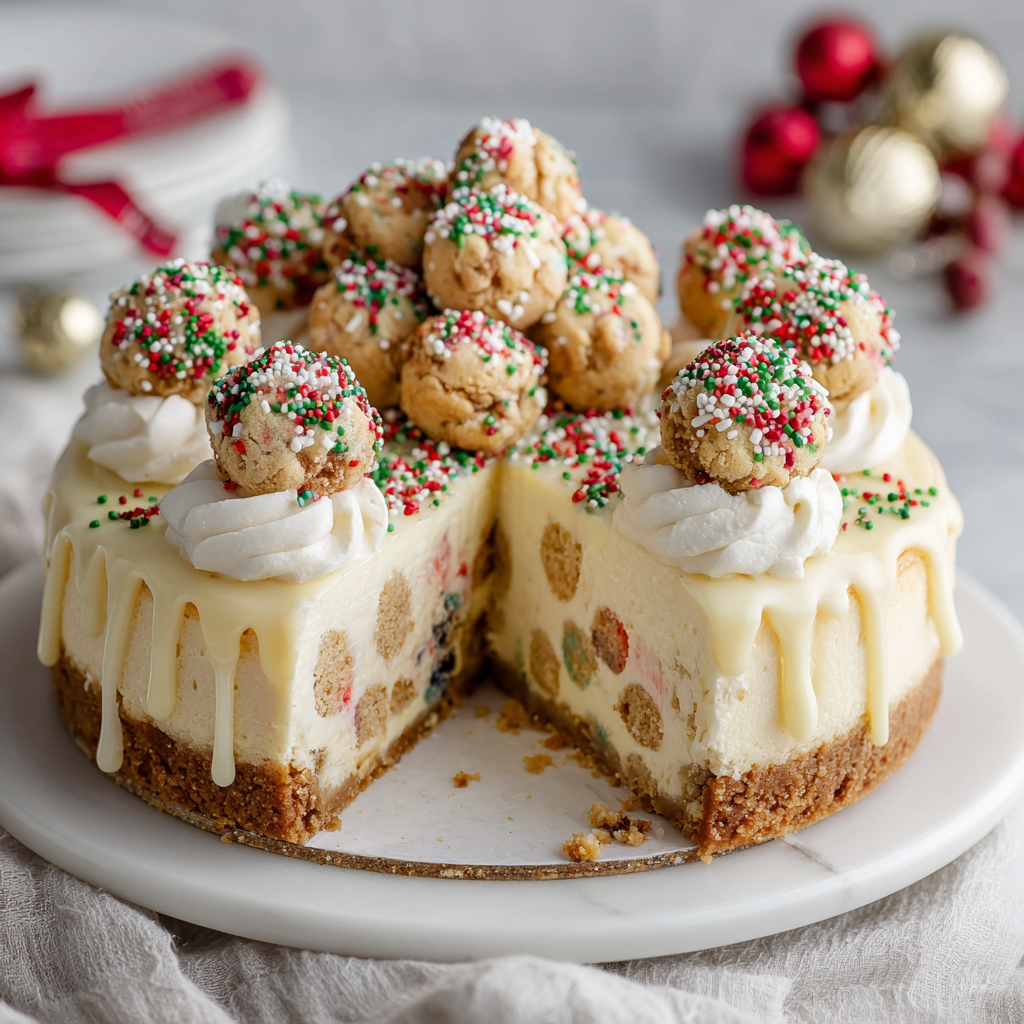
This isn’t just a dessert; it’s a celebration on a plate. Imagine it: a thick, velvety cheesecake filling, perfectly tangy and sweet, sitting on a base of soft, chewy sugar cookie. It’s a match made in dessert heaven, and it’s about to become your new secret weapon for birthdays, holidays, potlucks, or just a Tuesday that needs a little extra sparkle. It looks fancy and tastes like it took you all day, but I’ve packed this recipe with all my best chef hacks to keep it totally fuss-free. So, preheat that oven, grab your favorite mixing bowl, and let’s make some magic together!
A Sweet Slice of Nostalgia
This recipe takes me right back to my grandma’s warm, always-smelling-like-sugar kitchen. Every Christmas, our family tradition was a full-day cookie decorating extravaganza. My brother would be meticulously crafting intricate snowflakes, my dad would be on “sprinkle duty” (which mostly meant eating them), and I? I was always stationed at the sugar cookie dough. I loved the feel of it—soft, pliable, and promising something wonderful. But my favorite part was sneaking a few pinches of the raw dough when Grandma wasn’t looking (a habit I do NOT recommend now, but hey, it was the 90s!).
That simple, pure flavor of sugar cookie dough is pure happiness for me. This cheesecake is my way of capturing that childhood joy and elevating it into a sophisticated, shareable dessert. It’s the taste of my best memories, baked into something new. Every time I make it, I think of her, and it makes the first bite that much sweeter.
Print
Sugar Cookie Cheesecake
- Total Time: ~6 hours
- Yield: 10–12 1x
Description
This Sugar Cookie Cheesecake is the ultimate dessert mashup — a rich, creamy cheesecake layered over a soft sugar cookie crust and topped with whipped cream or sprinkles for a playful finish. It’s festive, crowd-pleasing, and perfect for holidays, birthdays, or anytime you want something a little extra sweet.
Ingredients
Sugar Cookie Crust
1 (16 oz) roll of refrigerated sugar cookie dough
—or—
2 cups sugar cookie crumbs (or crushed sugar cookies)
1/4 cup melted butter
Cheesecake Filling
24 oz (3 blocks) cream cheese, softened
1 cup granulated sugar
3 large eggs
1/2 cup sour cream
2 tsp vanilla extract
2 tbsp all-purpose flour
Optional Toppings
Whipped cream
Sprinkles or sugar cookie crumbles
White chocolate drizzle
Instructions
Preheat oven to 325°F (160°C). Grease a 9-inch springform pan and line the bottom with parchment.
Make the crust: Press sugar cookie dough into the bottom of the pan or mix crumbs and melted butter and press into an even layer. Bake 10–12 minutes. Cool slightly.
Make the filling: Beat cream cheese and sugar until smooth. Add eggs one at a time. Mix in sour cream, vanilla, and flour until just combined.
Bake: Pour filling over the crust. Bake for 50–60 minutes until the center is just set. Cool completely, then refrigerate for at least 4 hours or overnight.
Decorate & serve: Top with whipped cream and cookie crumbles or sprinkles before slicing.
- Prep Time: 20 min
- Cook Time: 60 min
- Category: Dessert
Nutrition
- Calories: 410
- Sugar: 26g
- Fat: 28g
- Carbohydrates: 35g
- Protein: 6g
Gathering Your Flavor Crew
Here’s everything you’ll need to create this masterpiece. Remember, the quality of your ingredients makes a huge difference in a simple recipe like this, so use the best you can!
For the Sugar Cookie Crust:
- 1 (16 oz) roll of refrigerated sugar cookie dough – This is our ultimate shortcut to deliciousness! It creates a soft, chewy cookie base that’s just *chef’s kiss*. Chef’s Insight: I love the Pillsbury™ kind for its consistent texture and flavor.
- OR 2 cups sugar cookie crumbs + ¼ cup melted butter – If you’re a from-scratch superstar or have leftover cookies, this is your move! Simply pulse about 20-25 soft sugar cookies in a food processor until you have fine crumbs. The melted butter binds it all together for a firmer, more traditional crust.
For the Cheesecake Filling:
- 24 oz (3 blocks) full-fat cream cheese, softened – This is non-negotiable. Full-fat cream cheese gives you that luxuriously rich and creamy texture. Please, please let it sit on the counter for at least 1-2 hours until it’s room temperature. This is the #1 secret to a smooth, lump-free filling!
- 1 cup granulated sugar – The perfect amount of sweetness to balance the tang of the cream cheese.
- 3 large eggs, at room temperature – Another room temp must! Cold eggs can cause the cream cheese to seize up and create a chunky batter. Pro Tip: To quickly bring eggs to room temp, place them in a bowl of warm water for 10 minutes.
- ½ cup full-fat sour cream, at room temperature – This is the magic ingredient! Sour cream adds incredible tanginess and helps create an ultra-creamy, velvety texture that’s simply unmatched.
- 2 tsp pure vanilla extract – The flavor backbone. Use the real stuff—it makes a world of difference.
- 2 tbsp all-purpose flour – A little bit of flour helps stabilize the cheesecake, giving it structure and preventing it from cracking too much as it cools.
For the Toppings (Go Wild!):
- Whipped cream – A classic cloud of deliciousness.
- Sprinkles or sugar cookie crumbles – For that festive, fun finish.
- White chocolate drizzle – Because more is more when it comes to dessert.
Let’s Build This Beauty: Step-by-Step
Don’t let the fancy look intimidate you! We’re going to walk through this together, one simple step at a time.
Step 1: Prep Like a Pro
Preheat your oven to 325°F (160°C). Grab your trusty 9-inch springform pan—this is essential for getting the cheesecake out cleanly! Grease the bottom and sides lightly with butter or baking spray. Then, cut a round of parchment paper to line the bottom. This little trick is a lifesaver and guarantees your crust won’t stick. Trust me on this one.
Step 2: Create the Cookie Canvas
If you’re using the roll of cookie dough, simply press it evenly into the bottom of your prepared pan. I like to use my fingers or the bottom of a measuring cup to get a nice, smooth, compact layer. If you’re using the cookie crumb method, mix your fine crumbs with the melted butter until it resembles wet sand, then press it firmly into the pan. Bake this glorious crust for 10-12 minutes, just until it’s lightly golden and set. It will puff up a bit—that’s perfect! Let it cool on a wire rack for about 15-20 minutes. Chef’s Hack: While it’s cooling, wrap the outside of your springform pan in a double layer of heavy-duty aluminum foil. This will prevent any water from seeping in during the water bath step later!
Step 3: Whip Up the Dreamy Filling
In the bowl of a stand mixer fitted with a paddle attachment (or a large bowl with a hand mixer), beat your softened cream cheese and sugar on medium speed for a full 2-3 minutes. You want it to be completely smooth, creamy, and free of any lumps. Scrape down the sides and bottom of the bowl well! Now, add your room-temperature eggs one at a time, beating on low speed just until each egg is incorporated. Over-mixing after adding the eggs incorporates too much air and can lead to cracking. Finally, mix in the sour cream, vanilla extract, and flour, again just until everything is combined and smooth. Be gentle! The less you mix from here on out, the better.
Step 4: The Bake-Off
Pour your beautiful, velvety filling over the slightly cooled crust. Give the pan a few gentle taps on the counter to release any air bubbles. Now, place your foil-wrapped springform pan into a larger roasting pan. Carefully pour hot water into the roasting pan until it comes about halfway up the sides of the springform pan. This water bath (or bain-marie) is the secret to baking your cheesecake evenly and preventing a dry, cracked top! Bake for 50-60 minutes. The cheesecake is done when the edges are set but the center still has a slight jiggle—like Jell-O—when you gently shake the pan.
Step 5: The All-Important Cool Down
Turn off the oven, crack the oven door open, and let the cheesecake cool inside for about an hour. This gradual temperature change is another key player in the no-crack game! After an hour, remove it from the oven and the water bath, carefully take off the foil, and let it cool completely to room temperature on a wire rack. Then, and this is the hardest part, you must cover it and refrigerate it for at least 4 hours, but preferably overnight. This patience allows the flavors to meld and the texture to become perfectly firm and sliceable.
Serving Up the Sweetness
The moment of truth! Run a thin, sharp knife under hot water, wipe it dry, and gently slide it around the edge of the cheesecake to loosen it before unclipping the springform ring. Slide the cheesecake (on its parchment paper) onto a serving plate. Now, for the fun part: decorating! I love using a piping bag to add big, fluffy swirls of whipped cream around the border. Then, go to town with a flurry of colorful sprinkles and some crumbled bits of leftover sugar cookies. Slice with that warm, clean knife for perfect pieces, and get ready for the applause.
Ride Your Own Flavor Wave
This recipe is a fantastic canvas for your creativity! Here are a few of my favorite twists:
- Lemon Berry Bliss: Add the zest of one lemon to the filling. Top with a pile of fresh macerated strawberries and blueberries instead of sprinkles.
- Chocolate Chip Cookie Dream: Use chocolate chip cookie dough for the crust and fold ½ cup of mini chocolate chips into the cheesecake batter.
- Funfetti Party: Fold ¼ cup of rainbow sprinkles right into the cheesecake batter along with the vanilla for a confetti-filled surprise!
- Gingerbread Spice: In the fall, use gingersnap crumbs for the crust and add a teaspoon of cinnamon and a pinch of nutmeg to the filling.
- Gluten-Free Friendly: Use a gluten-free sugar cookie dough or crumbs for the crust and ensure your flour is a gluten-free 1:1 baking blend.
Isla’s Chef Notes
This recipe has evolved so much in my kitchen! The first time I made it, I was so impatient that I tried to slice it after only two hours in the fridge. It was a delicious, creamy, slightly soupy mess—still utterly tasty, but not the elegant slice I envisioned. I’ve learned that the overnight chill is truly the secret ingredient you can’t see.
Another funny kitchen story: I once, in a pre-coffee haze, forgot to add the sugar to the filling. I didn’t realize it until I licked the spatula and was met with a startlingly tangy punch. Thank goodness I caught it before it went in the oven! It was a good reminder to always mise en place—that’s just a fancy way of saying measure and organize all your ingredients before you start. It saves you from sugary (or un-sugary) disasters!
Your Questions, Answered
Q: My cheesecake cracked on top! What did I do wrong?
A: First, don’t panic! A cracked cheesecake is still a delicious cheesecake. Cracking usually happens from over-mixing (incorporating too much air), a too-rapid temperature change, or over-baking. The water bath and gradual cooling in the oven are your best defenses against this. But if it does happen, just cover it with a beautiful blanket of whipped cream—no one will ever know!
Q: Can I make this completely from scratch, including the sugar cookie crust?
A: Absolutely! If you have a favorite sugar cookie recipe, simply make the dough and press about 2 cups’ worth into the pan for the crust. You might need to adjust the pre-bake time by a few minutes. Just make sure your homemade dough isn’t too leavened (too much baking soda/powder), or it will puff up too much.
Q: How long will this keep in the fridge?
A: Stored properly in an airtight container (or well-wrapped in the springform pan), your cheesecake will be delicious for up to 5 days. The crust might get a tiny bit softer, but the flavor will still be incredible.
Q: Can I freeze Sugar Cookie Cheesecake?
A: You sure can! After it has chilled completely, wrap the whole cheesecake (or individual slices) tightly in plastic wrap and then aluminum foil. Freeze for up to 2 months. Thaw overnight in the refrigerator before serving and adding toppings.
Nutritional Information*
*Please note: This is an estimated nutritional breakdown provided by an online calculator. For exact information, please calculate with your specific ingredients.
Per Slice (1 of 12): Calories: 410 | Carbohydrates: 35g | Protein: 6g | Fat: 28g | Saturated Fat: 16g | Sugar: 26g
There you have it! My ultimate, heart-happy, crowd-pleasing Sugar Cookie Cheesecake. I hope this recipe brings as much joy to your kitchen as it has to mine. If you make it (and you totally should!), I’d be absolutely thrilled to see it. Tag me @BiteTide on Instagram or Pinterest so I can share in your dessert victory! Now go forth and bake something unforgettable.
With love and a full stomach,
Isla 💛