 Spooky, Silly & Seriously Delicious: Meet Your New Favorite Monster Snack!
Hey there, flavor friend! Isla here, from my cozy kitchen to yours. Can you feel it? That crisp, cool air, the rustle of brightly colored leaves, and the undeniable buzz of excitement that means one thing: Halloween is just around the corner! And while I’m a sucker for a good costume and all the spooky decor, let’s be real—my favorite part of any holiday is the food. But I’m not talking about complicated, all-day recipes that leave you with a mountain of dishes. Nope. I’m talking about the fun stuff.
You know, the recipes that make kids’ eyes light up and bring out the inner child in every adult. The ones that are as much about the experience of making them as they are about eating them. That’s exactly why I’m so utterly obsessed with these Monster Apple Mouths. They are the ultimate kitchen craft project: zero bake, minimal fuss, and maximum payoff in the cute-and-creepy department.
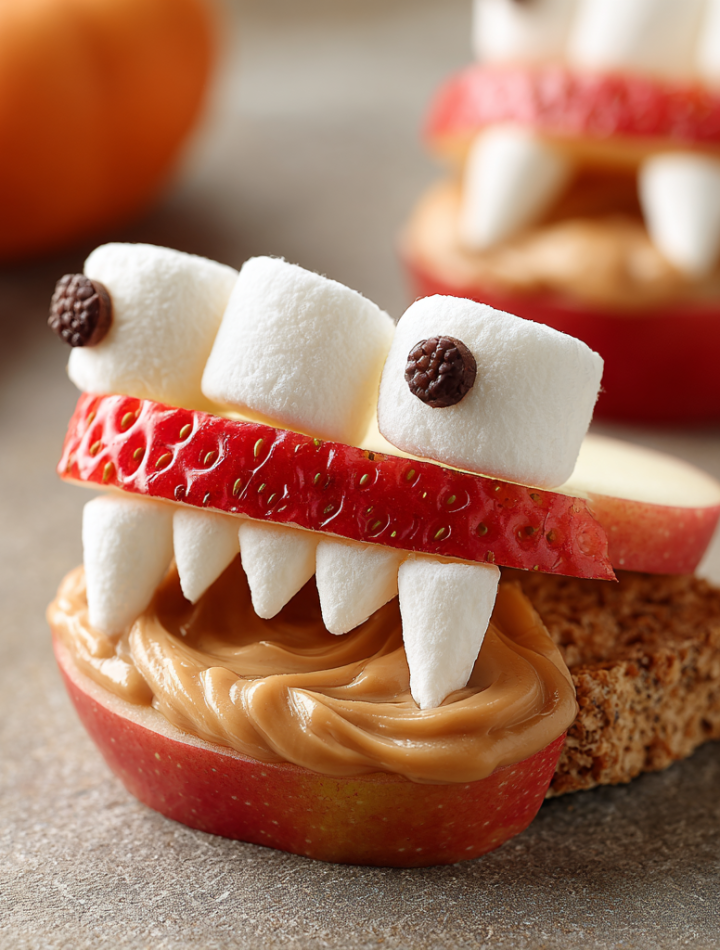
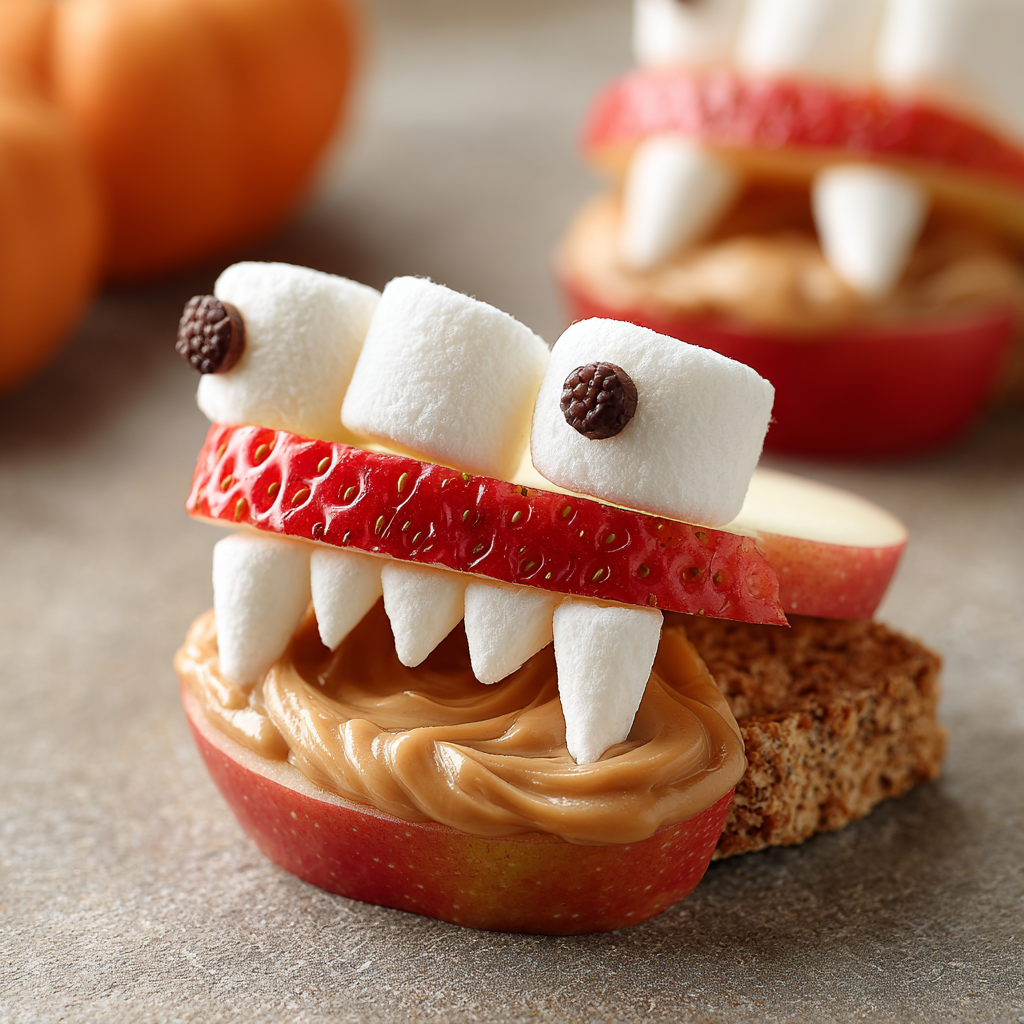
Imagine crisp, sweet apple slices acting as monstrous lips, held together by creamy peanut butter, with a row of mini marshmallow teeth and a juicy strawberry tongue peeking out. They’re playful, they’re healthy-ish, and they are guaranteed to be the star of any Halloween party spread or the most epic after-school snack of all time. So, put on your favorite spooky playlist, grab your little monsters (the human kind!), and let’s create some deliciously silly memories together. This is cooking that’s pure, unadulterated joy—and I am so ready for it.
A Kitchen Full of Giggles & Goblin Grins
This recipe takes me right back to my grandma’s warm, always-bustling kitchen. She was the queen of what she called “kitchen magic”—turning simple, everyday ingredients into something whimsical and wonderful. One rainy autumn afternoon, when my brother and I were bouncing off the walls with pre-Halloween energy, she sat us down at the big wooden table with a bowl of apples, a jar of peanut butter, and a mischievous twinkle in her eye.
“Right then,” she said, in that no-nonsense way of hers. “We’re not making a snack. We’re building monsters.” What followed was an hour of utter, beautiful chaos. There was peanut butter on noses, apple juice on the tablecloth, and a fierce debate over whether the marshmallow teeth should be perfectly straight or deliciously crooked. The result wasn’t just a plate of cute snacks; it was a core memory. It was the laughter, the creativity, and the sheer pride of making something ourselves. That’s the spirit I want to bring to your kitchen with this recipe. It’s not about perfection; it’s about the happy, sticky, giggle-filled process. It’s about making a mess and making memories, all at once.
Print
Monster Apple Mouths
- Total Time: 15 minutes
- Yield: 6 monster mouths 1x
Description
Monster Apple Mouths are spooky snacks that are as fun to make as they are to eat. Crisp apple slices form the “lips,” peanut butter acts as the glue, mini marshmallows become creepy little teeth, and a strawberry slice adds a juicy tongue. Perfect for Halloween parties or after-school bites with a twist.
Ingredients
2 apples (any variety), sliced into wedges
¼ cup peanut butter (or sunflower butter for nut-free)
½ cup mini marshmallows
1 large strawberry, sliced thin
Instructions
Spread peanut butter on one side of two apple slices.
Line mini marshmallows along one slice to resemble teeth.
Add a thin slice of strawberry near the center for the tongue.
Top with the second apple slice, peanut butter side down, to form the mouth.
Repeat with remaining ingredients and serve immediately.
- Prep Time: 15 minutes
Nutrition
- Calories: 120 per serving
- Sugar: 10g
- Fat: 6g
- Carbohydrates: 15g
- Protein: 3g
Gathering Your Monster-Making Supplies
The beauty of this recipe is in its simplicity. You only need four key players to create these edible masterpieces. Here’s what to grab and my little chef insights on each one:
- 2 apples (any variety): This is the foundation of your monster’s head! I love using a firm, crisp variety like Honeycrisp or Granny Smith. The tartness of a Granny Smith is a fantastic contrast to the sweet fillings, but honestly, any apple you have on hand will work. The key is to slice them into sturdy wedges—not too thin, or they might break!
- ¼ cup peanut butter: This is our magical edible glue! It holds the entire monster mouth together and adds a hit of protein and creamy flavor. Chef’s Insight: For easiest spreading, let your peanut butter come to room temperature if it’s been in the fridge. If it’s still too thick, a quick 10-second zap in the microwave will make it perfectly spreadable.
- ½ cup mini marshmallows: These are the iconic monster teeth! Their tiny size is just perfect for lining up along the apple “lips.” I love the classic white for a traditional look, but you could absolutely use pastel-colored marshmallows for a more fantastical, friendly monster vibe.
- 1 large strawberry, sliced thin: The pièce de résistance—the lolling, juicy tongue! A strawberry’s vibrant red color and pointed tip make it the ideal choice. If you don’t have a strawberry, a thin slice of a peach or nectarine could work in a pinch for a similar effect.
Important Substitution Tip! To make this completely nut-free for school parties or allergies, simply swap the peanut butter for sunflower seed butter. It has a similar color and consistency and works just as perfectly as our delicious edible glue.
Building Your Best Monster Mouth: A Step-by-Step Guide
Ready to play mouth doctor? Let’s assemble these adorable creatures! This is where the fun really begins. Don’t be afraid to get creative and give each monster its own personality.
- Prep Your Apples: First, wash and dry your apples thoroughly. Using a sharp knife (and this is a great job for a grown-up or with close supervision for little chefs), slice your apples vertically into quarters. Cut out the core from each quarter, and then slice each quarter in half again, so you end with 8 sturdy wedges per apple. You’ll need two wedges per monster mouth. Chef’s Hack: To prevent your apple slices from browning too quickly, you can give them a quick spritz of lemon juice. But honestly, they get eaten so fast around here that I often don’t bother!
- Spread the “Glue”: Take one apple wedge and, using a butter knife or a small spatula, spread a generous layer of peanut butter on the inner, skinless side. This is going to be the top of your monster’s mouth. Then, take a second apple wedge and also spread peanut butter on one side—this will be the bottom jaw. You want a good, thick layer to help the marshmallows stick.
- Add the Chompers: Now for the dentistry! Take your top apple wedge (the one with the peanut butter facing up) and carefully line up a row of mini marshmallows along the curved edge, with the sticky peanut butter acting as your anchor. Press them down gently so they adhere. You can make them perfectly straight for a “refined” monster or crazy and crooked for a goofy, just-woke-up monster. Both are awesome!
- The Tongue: Grab one of your thin strawberry slices. Tuck it slightly underneath the row of marshmallow teeth on the top apple slice, letting the red tip peek out juicily. This little detail is what really brings the monster to life!
- Complete the Bite: Finally, bring it all home! Take your second peanut-butter-covered apple wedge (the bottom jaw) and gently press it, peanut butter side down, onto the marshmallows and strawberry tongue of the top slice. Press down lightly but firmly to seal the mouth shut. And voilà! You’ve created your first Monster Apple Mouth! Repeat the process with the remaining apple wedges.
- Serve Immediately: These snacks are best enjoyed right after they’re made. The apple might start to brown a little and the peanut butter can dry out if left too long, so assemble them just before you’re ready to serve for the ultimate crisp, creamy, creepy experience!
How to Serve These Ghoulish Grins
Presentation is part of the fun! Arrange your finished Monster Apple Mouths on a large platter. You can get creative with the scene—crumble some chocolate cookies to look like “dirt,” add a few gummy worms slithering around, or place them next to a bowl of “eyeball” grapes (peeled grapes are seriously creepy!). For individual servings at a party, place each mouth on a small napkin—it makes for a adorable, no-plate-necessary treat that guests can just grab and go. They’re the perfect centerpiece for your Halloween spread, guaranteed to get laughs and questions of “How did you make these?!”
Let’s Get Creative! Monster Mouth Variations
The basic formula is just the beginning. Feel free to customize your monsters to your heart’s content! Here are a few ideas to ride that flavor wave:
- Vampire Bites: Use almond butter instead of peanut butter and add two slivered almonds as pointed fangs on the top row.
- Zombie Edition: For a messy, “rotting” effect, swirl a little bit of blue or green food coloring into your peanut butter before spreading.
- Chocolate Lover’s Monster: Swap the peanut butter for Nutella or a chocolate-hazelnut spread. Use white chocolate chips as teeth for an extra decadent treat.
- Frankenstein’s Smile: Use green apples (Granny Smith) for a classic monster look. A single chocolate chip pressed into the apple skin above the mouth can act as a bolt!
- Pumpkin Smiles: For a non-Halloween twist, use orange-colored candy melts as the “glue” and candy corn as the teeth for a perfect Thanksgiving treat.
Isla’s Chef Notes: A Little Story & A Big Tip
I can’t make these without thinking of the first time I tried them with my nephew. He was determined to create a monster with a “double row” of teeth and used about half a bag of marshmallows on one single mouth. It was less of a mouth and more of a marshmallow monster with an apple accessory. It was hilarious and completely inedible, but he was so proud. The lesson? There is no wrong way to do this.
Over time, I’ve learned that the best tool for the job is a small offset spatula for spreading the peanut butter—it gives you so much control. Also, if you *must* make these a little ahead of time, you can store them in a single layer in an airtight container in the fridge for an hour or two. The lemon juice trick will help, but they will still soften slightly. Honestly, I think they’re a perfect opportunity to be in the moment. Assemble them with your favorite people, lean into the mess, and enjoy the giggles. That’s the real secret ingredient.
FAQs & Troubleshooting Your Monster Creations
Q: My apple slices are browning before I finish assembling. How can I prevent this?
A: This is totally normal! Apples oxidize when exposed to air. The best defense is to work quickly. You can also toss your apple wedges in a little lemon juice (or a mix of 1 cup water with 1 tablespoon lemon juice) before you start assembling. This will buy you some extra time without affecting the flavor too much.
Q: I need a nut-free version for my child’s school. What’s the best peanut butter substitute?
A: Sunflower seed butter is your best friend here! It has a very similar texture and color to peanut butter, so it works identically as the “glue.” You could also use cream cheese for a tangier, still-delicious option.
Q: The marshmallows won’t stick to the peanut butter. What am I doing wrong?
A: This usually means the peanut butter layer is too thin or the peanut butter is too cold and firm. Make sure you’re spreading a generous, thick layer. If your peanut butter is straight from the fridge, let it sit on the counter for 15-20 minutes to soften, or give it a very short burst in the microwave to make it more adhesive.
Q: Can I make these ahead of time?
A: I really don’t recommend it. The apples will release moisture into the peanut butter and the marshmallows can get sticky and soft. For the best texture and visual appeal, these are a “make-and-eat-immediately” kind of snack. Turn the assembly into part of the party fun!
Nutritional Information*
Per Serving (1 monster mouth): Calories: 120 | Total Fat: 6g | Saturated Fat: 1g | Carbohydrates: 15g | Sugars: 10g | Protein: 3g
*Please note: This is an estimate generated from an online nutrition calculator. Values can vary based on specific ingredients used and portion sizes.