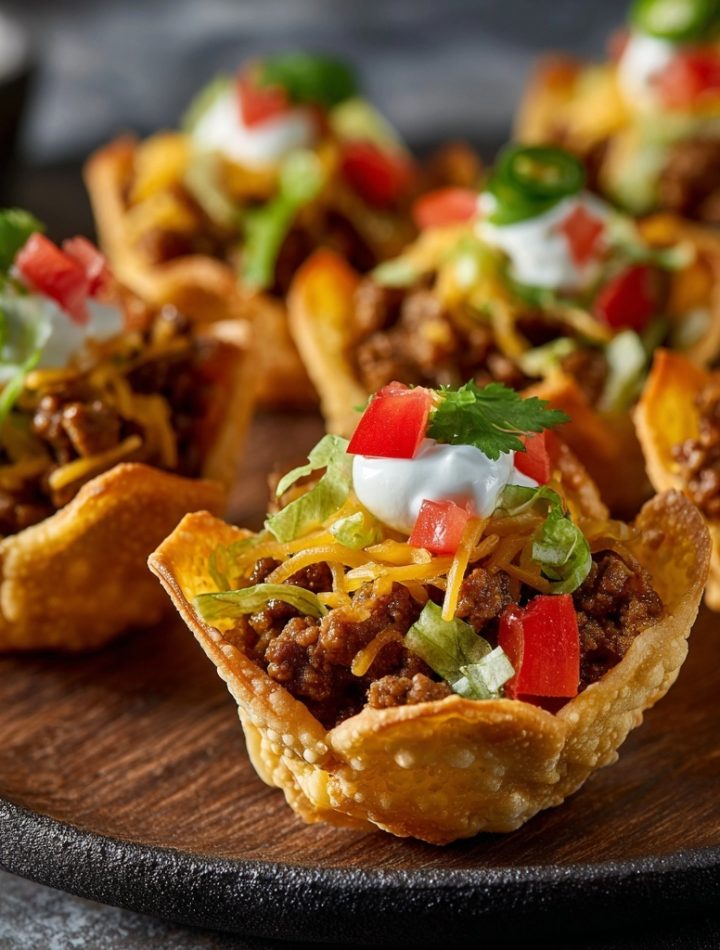
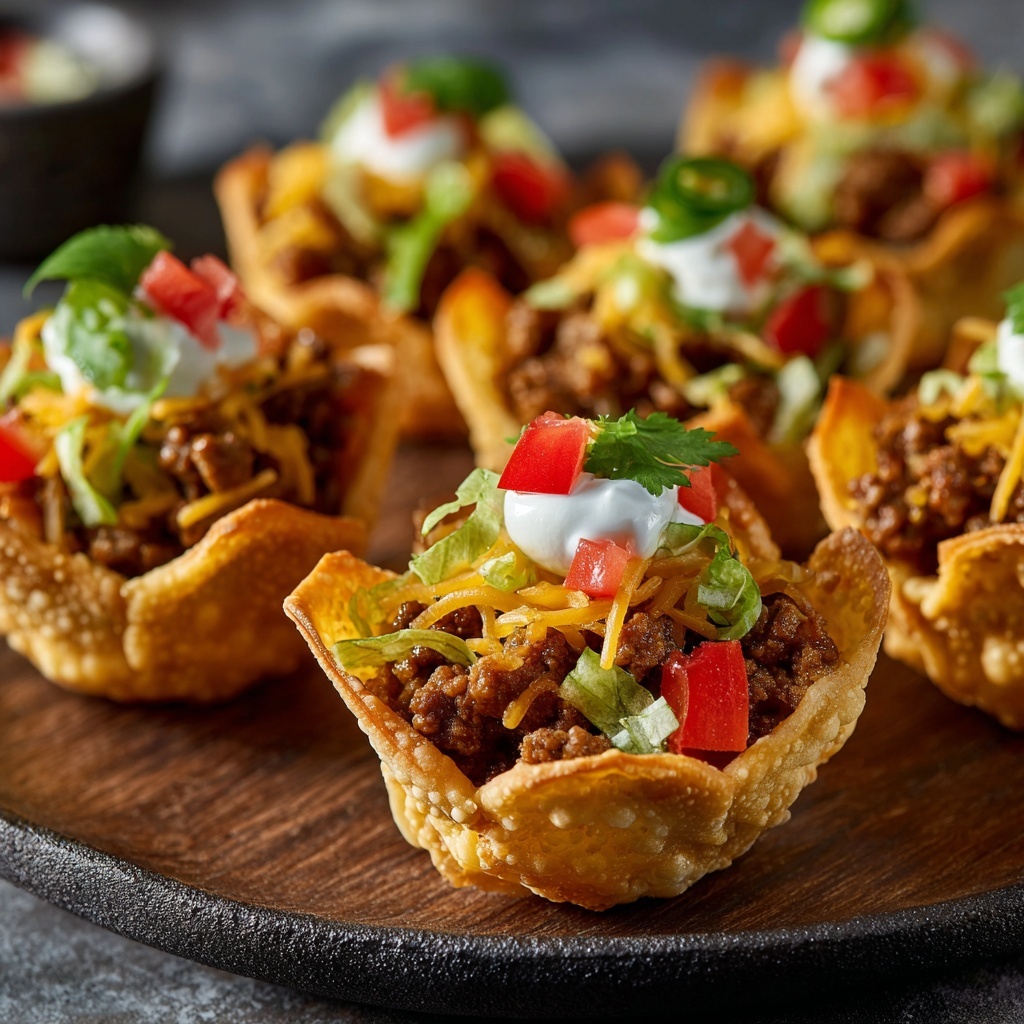
Mini Taco Cups: Your New Go-To Party Hero (They Disappear in Seconds!)
Hey there, flavor friend! Isla here from BiteTide. Tell me if this sounds familiar: You’ve got people coming over, your playlist is ready, the drinks are chilled… but you’re staring into the fridge abyss wondering what to feed a crowd that’s actually fun, easy, and delicious. You want something shareable, something that sparks joy, something that doesn’t chain you to the stove all night. My friend, I have your answer, and it comes in a delightfully crispy, totally adorable, one-bite package.
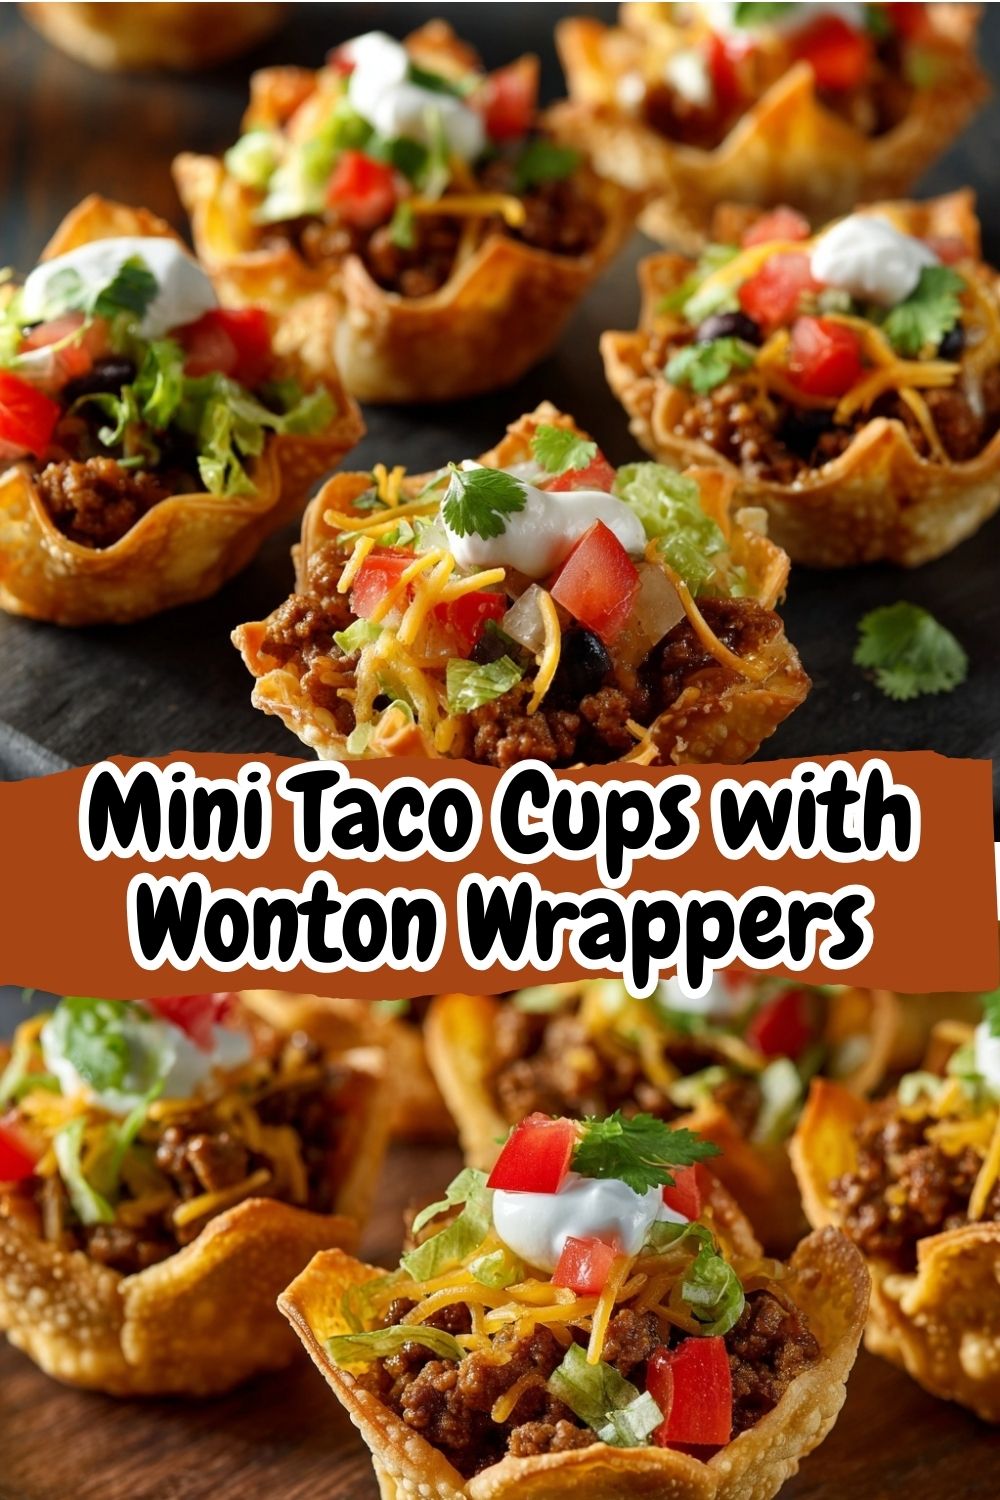
Let me introduce you to your new kitchen sidekick: Mini Taco Cups with Wonton Wrappers. Imagine all the cozy, savory, spice-kissed goodness of your favorite taco, but baked into a golden, edible cup you can hold in one hand. These little guys are the ultimate crowd-pleaser. They’re perfect for game day snacking, the star of your girls’ night spread, or even a hilariously fun twist on Taco Tuesday dinner. The best part? They’re deceptively simple. We’re talking about 30 minutes, one bowl, one muffin tin, and a whole lot of “wow, you made these?!” vibes. So, tie on your favorite apron (the cute one with pockets, obviously), and let’s turn your kitchen into the most popular snack spot in town. Trust me, this recipe is about to become your secret weapon.
The Night of the Great Taco Cup Revelation
This recipe wasn’t born in a pristine test kitchen; oh no. It was a happy accident born from pure, unadulterated snack desperation. Picture it: A last-minute “football” gathering (I use the term loosely—we were mostly there for the snacks). My grand plan for homemade tortillas had just gone out the window. I had a pound of sizzling taco meat, a fridge full of toppings, and a pantry staring back at me. And there they were, tucked behind the rice noodles: a lonely package of wonton wrappers.
In a moment of “what’s the worst that could happen?” inspiration, I spritzed a muffin tin, crimped those square wrappers into the cups, and popped them in the oven. I figured we’d just scoop the meat onto them like weird, crunchy plates. But when they came out—transformed into these perfect, golden little bowls—my whole crew gathered around the oven like it was a campfire. We filled them assembly-line style, laughing and arguing over who got the one with extra cheese. They were gone in literal minutes. That night, amidst the chaos and crunch, I realized the best recipes aren’t about perfection; they’re about flavor, fun, and making it work with what you’ve got. These taco cups are exactly that: a little bit clever, a whole lot tasty, and 100% joyful.
Print
Mini Taco Cups with Wonton Wrappers : Crispy Bite-Sized Taco Appetizer
- Total Time: 30 mins
- Yield: 12–16 mini cups 1x
Description
These Mini Taco Cups are crunchy, savory, and made to disappear fast. Wonton wrappers bake into golden cups that hold perfectly seasoned taco filling and all your favorite toppings. They’re fun, easy, and built for parties—ideal for game day, girls’ night, or anytime you want taco flavor in a cute, handheld bite.
Ingredients
Base
12–16 wonton wrappers
Nonstick spray or olive oil
Filling
1 lb ground beef or ground turkey
1 tablespoon taco seasoning
¼ cup water
Toppings
Shredded cheddar or Mexican-blend cheese
Diced tomatoes or pico de gallo
Shredded lettuce
Sour cream or crema
Chopped cilantro
Jalapeños (optional)
Instructions
Preheat oven to 375°F (190°C). Lightly grease a muffin tin.
Press one wonton wrapper into each muffin cup, forming a bowl shape.
Bake for 6–8 minutes until lightly golden and crisp.
Meanwhile, cook ground meat in a skillet until browned. Drain excess fat.
Add taco seasoning and water; simmer until thick and flavorful.
Spoon taco meat into baked wonton cups.
Sprinkle cheese on top and return to oven for 3–4 minutes until melted.
Remove from oven and add desired toppings just before serving.
- Prep Time: 15 mins
- Cook Time: 15 mins
- Category: Dinner
What You’ll Need to Make the Magic
Here’s your shopping list for these bite-sized wonders. I’ve added my little chef-y notes next to each one because knowing your ingredients is the first step to feeling like a kitchen rockstar.
- 12–16 Wonton Wrappers: These are the magic shells! Find them in the refrigerated section near the tofu. Chef’s Insight: Don’t stress if they tear a little while pressing; they’ll puff and seal as they bake. You can also use round gyoza wrappers for a different look.
- Nonstick Spray or Olive Oil: Just a light mist to guarantee a crispy, non-stick release. I use an avocado oil spray for its high smoke point.
- 1 lb Ground Beef or Ground Turkey: This is your flavor canvas. I use 85/15 beef for a great balance of flavor without being too greasy. Ground chicken or even a plant-based crumble work beautifully here too!
- 1 Tablespoon Taco Seasoning: The flavor boss! Use your favorite store-bought packet, or be a superstar and use 2 tsp chili powder, 1 tsp cumin, ½ tsp garlic powder, ½ tsp paprika, and ¼ tsp each of salt and oregano.
- ¼ Cup Water: This steams with the seasoning to create that saucy, cohesive taco filling we all love. It makes everything cling together perfectly for easy scooping.
- Shredded Cheddar or Mexican-Blend Cheese: Melty, gooey goodness. I love a pre-shredded “fiesta blend” for convenience, but grating a block of sharp cheddar off the side of your box grater (carefully!) gives you superior melt.
- Diced Tomatoes or Pico de Gallo: For a fresh, juicy pop. Pico de gallo adds a bit of onion and cilantro already mixed in—a great time-saver!
- Shredded Lettuce: The cool, crisp contrast. I use the thin inner leaves of romaine or iceberg for the best texture.
- Sour Cream or Crema: The creamy, tangy finish. Crema is slightly thinner and drizzles like a dream. Pro tip: thin regular sour cream with a splash of milk or lime juice for the same effect.
- Chopped Cilantro & Sliced Jalapeños (Optional): The grand finale! Cilantro adds herby freshness, and jalapeños bring the heat. For less spice, remove the seeds and ribs from the jalapeño first.
Let’s Build Those Crispy Flavor Boats: Step-by-Step
Ready? This is where the fun happens. Follow these steps, and you’ll have a tray of golden perfection in no time. I’ve packed each step with my tried-and-true tips to make sure your first batch is a smash hit.
- Preheat & Prep: Fire up your oven to 375°F (190°C). While it’s warming, grab your standard 12-cup muffin tin. Give it a light but thorough mist with nonstick spray. This is non-negotiable for easy removal later—trust me on this!
- Form the Cups: Gently press one wonton wrapper into each muffin cup. Don’t be shy! Push it down into the bottom and let the corners flair up the sides. They won’t lie perfectly flat, and that’s good! Those ruffled edges will get extra crispy. Little Chef Hack: If you want deeper cups, you can slightly overlap a second wrapper at a 45-degree angle before pressing down. It makes for a sturdier vessel for extra toppings!
- First Bake (The Crispening!): Pop the tray into the oven and bake for 6-8 minutes. You’re looking for a light golden color and a dry, crisp texture. They’ll puff up a bit in the center—this is normal. Keep an eye on them, as oven temps can vary. This step pre-crisps the shell so it can hold the juicy filling without getting soggy.
- Cook the Filling: While the cups bake, let’s make the filling. In a skillet over medium-high heat, cook your ground meat, breaking it up with a spoon, until it’s beautifully browned and no pink remains. Drain off any excess fat (I just tip the skillet and use a spoon).
- Season & Simmer: Sprinkle your taco seasoning over the meat, then pour in that ¼ cup of water. Give it a good stir, reduce the heat to low, and let it simmer for 3-4 minutes. You want the water to mostly evaporate, leaving the meat incredibly flavorful and moist, but not watery. This is the secret to a filling that sticks together.
- Fill & Cheese: Once your wonton cups are golden, carefully remove the tray (it’s hot!). Evenly divide the taco meat among the cups. Don’t overfill—just a heaping spoonful per cup. Now, shower them with cheese! The cheese layer acts as a delicious barrier between the hot meat and the cold toppings.
- Second Bake (The Melt!): Return the tray to the oven for just 3-4 more minutes. We’re not cooking further, just melting that cheese into a glorious, gooey blanket. Your kitchen will smell incredible right about now.
- Top & Serve: Take the tray out and let it cool for a minute or two on the counter—this lets the cups firm up for easy handling. Now, the artistic part! Let everyone, or just your own creative spirit, go wild with the cold toppings: lettuce, tomato, a dollop of sour cream, cilantro, and jalapeños. Serve them immediately and watch them vanish.
How to Serve These Little Treasures
Presentation is half the fun! I love taking the whole muffin tin (placed on a trivet or folded kitchen towel, because hot!) straight to the table. It feels rustic, inviting, and interactive. Set up small bowls of all the toppings and let people customize their own cups. For a more polished look, arrange them on a large platter with a bowl of crema for drizzling and a big pile of chopped cilantro in the center. Have napkins ready—these are joyfully messy in the best possible way!
Ride the Flavor Wave: 5 Tasty Twists
The beauty of this recipe is its versatility. Once you master the basic cup, the flavor world is your oyster! Here are a few of my favorite spins:
- Buffalo Chicken: Swap the taco meat for shredded cooked chicken tossed in buffalo sauce. Fill cups, top with blue cheese crumbles and a drizzle of ranch after baking.
- Breakfast Taco Cups: Fill pre-baked cups with scrambled eggs, crumbled cooked sausage, and cheese. Bake just to melt cheese, then top with avocado and hot sauce.
- Fully Loaded Nacho: Use seasoned black beans instead of meat. After the cheese melt, add a squeeze of lime, pickled jalapeños, and a sprinkle of cotija cheese.
- Greek-Inspired: Fill with seasoned ground lamb or beef with oregano and mint. Top after baking with tzatziki, diced cucumber, and crumbled feta.
- Dessert Cups: Yes, really! Bake the wonton cups as directed, then fill with chocolate mousse, lemon curd, or sweetened ricotta. Top with berries and a dusting of powdered sugar.
Isla’s Kitchen Notes & Stories
This recipe has evolved so much since that first frantic football night. I’ve learned that letting the baked cups cool for a hot minute before filling makes them sturdier. I’ve also had a hilarious kitchen fail where I tried to make a “mega cup” using two full wrappers in a jumbo muffin tin—it was a delicious, structurally unsound mess that we ate with forks! The moral? Stick to standard size for perfect finger food.
Over time, I’ve also started adding a tiny pinch of cheese to the bottom of the wonton cup before the first bake. It melts and creates an extra flavor layer and a barrier against sogginess. It’s my little “insider” upgrade for you. Remember, cooking is about joy, not perfection. If a cup tears, patch it with a scrap of wrapper. If you burn one edge, call it “extra caramelized.” The goal is to have fun and make something delicious together.
Your Questions, Answered!
Q: My wonton cups got soggy. What happened?
A: The most common culprit is filling them with the meat mixture while it’s still piping hot and steamy, or adding wet toppings too early. Ensure your meat has simmered until the liquid is reduced, let it cool for 5 minutes, and always add cold, watery toppings (like salsa or lettuce) right before serving. The pre-bake is also crucial for creating a moisture-resistant shell.
Q: Can I make these ahead of time?
A: Absolutely! You have two great options. 1) Bake the empty wonton cups up to 2 days ahead and store them in an airtight container at room temp. 2) Assemble filled cups (with meat and cheese) up to the point of the second bake, cover, and refrigerate for up to 24 hours. Just add a few extra minutes to the bake time since they’re going in cold.
Q: What’s the best way to reheat leftovers?
A> Leftovers? I’m impressed! To keep them crisp, reheat in a 350°F oven or toaster oven for 5-7 minutes. Avoid the microwave, as it will turn the cups soft and chewy.
Q: I’m vegetarian. What’s a good meatless filling?
A> I love using a can of black beans or lentils, rinsed and slightly mashed, mixed with the taco seasoning and a splash of water. “Beef” or “chorizo” style plant-based crumbles also work perfectly with the same cooking instructions!
Quick Nutrition Note
Estimated per cup (made with lean ground beef and light cheese): ~120 calories, 6g fat, 10g carbs, 6g protein. Remember, this is a rough estimate and can vary based on your specific ingredients and toppings.
There you have it, friend! Your complete guide to making the most fun, flavorful, and fuss-free party appetizer. I can’t wait for you to try them. When you do, tag me on Instagram @BiteTide so I can see your beautiful creations! Now, go forth and bake some joy.
With love and crispy crumbs,
Isla 💛