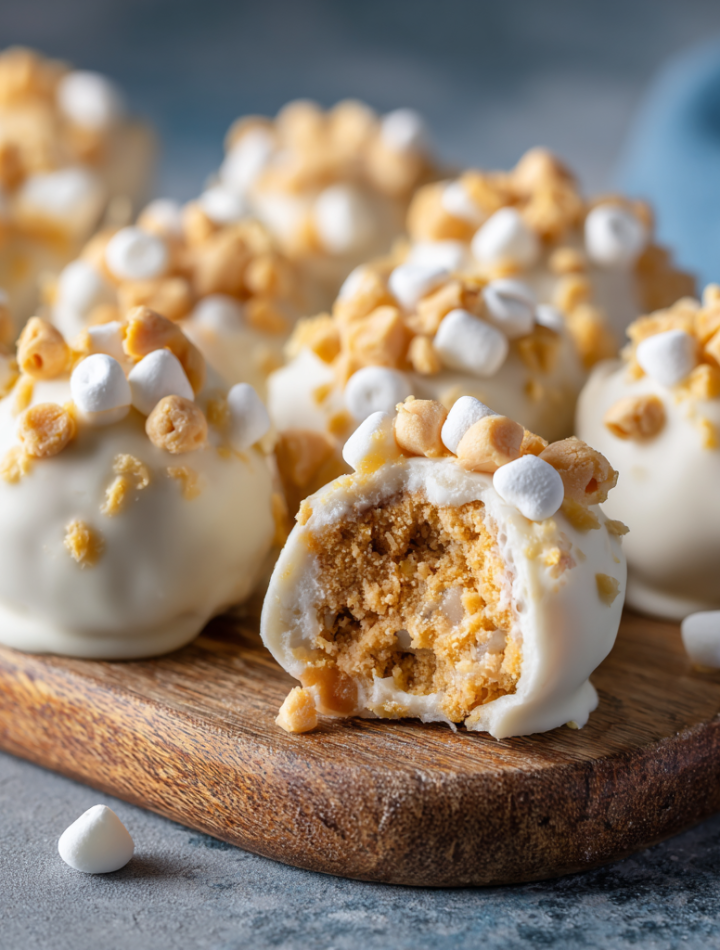

Marshmallow Peanut Butter Snowballs: Your New No-Bake Obsession
Hey there, friend! Isla here from BiteTide, and I am just bursting with excitement to share today’s recipe with you. If you’ve ever found yourself standing in front of the pantry, craving something sweet, chewy, and ridiculously easy to make, you’ve come to the absolute right place. We’re diving into the magical world of Marshmallow Peanut Butter Snowballs! These little bites of joy are the definition of a no-fuss, maximum-flavor treat. Imagine: a soft, chewy center packed with peanut butter flavor, hugged by a sleek, creamy white chocolate coating. They’re like a cozy, edible snowball that melts all your worries away with every single bite.
I’m a huge believer that the best desserts are often the ones that don’t require turning on the oven. Whether you’re a baking newbie, a busy parent racing against the clock, or a seasoned pro looking for a quick win, this recipe is your new secret weapon. They’re perfect for holiday parties, after-school snacks, potlucks, or just those late-night moments when a sweet tooth attacks. So, tie on your favorite apron (the one with the fun pattern, obviously), and let’s whip up a batch of these utterly irresistible, no-bake snowballs together. I promise, they’re so simple and so delicious, you’ll be doing a little happy dance right there in your kitchen.
A Blizzard of Sweet Memories
This recipe always takes me right back to my grandma’s kitchen during the first big snowfall of the year. The world outside would be turning quiet and white, but inside, her kitchen was a warm, fragrant hub of chaos and love. One year, a blizzard blew in and canceled our plans to go to the town’s tree-lighting ceremony. My cousins and I were, to put it mildly, devastated. My grandma, being the kitchen wizard she was, looked at our long faces and declared, “Well, if we can’t go see the snow, we’ll just have to bring it inside!”
With a twinkle in her eye, she pulled out a bag of marshmallows, some peanut butter chips, and a bar of white chocolate. We gathered around the table, our disappointment forgotten, and she guided our little hands as we melted, stirred, and rolled. We made a glorious, sticky mess, laughing as we tried to dip our lopsided snowballs without getting chocolate everywhere. That first bite was pure magic—sweet, salty, and overwhelmingly happy. It wasn’t about a perfect dessert; it was about the joy we created together. That’s the spirit I try to bring into every recipe I share with you. It’s not just food; it’s a feeling.
Print
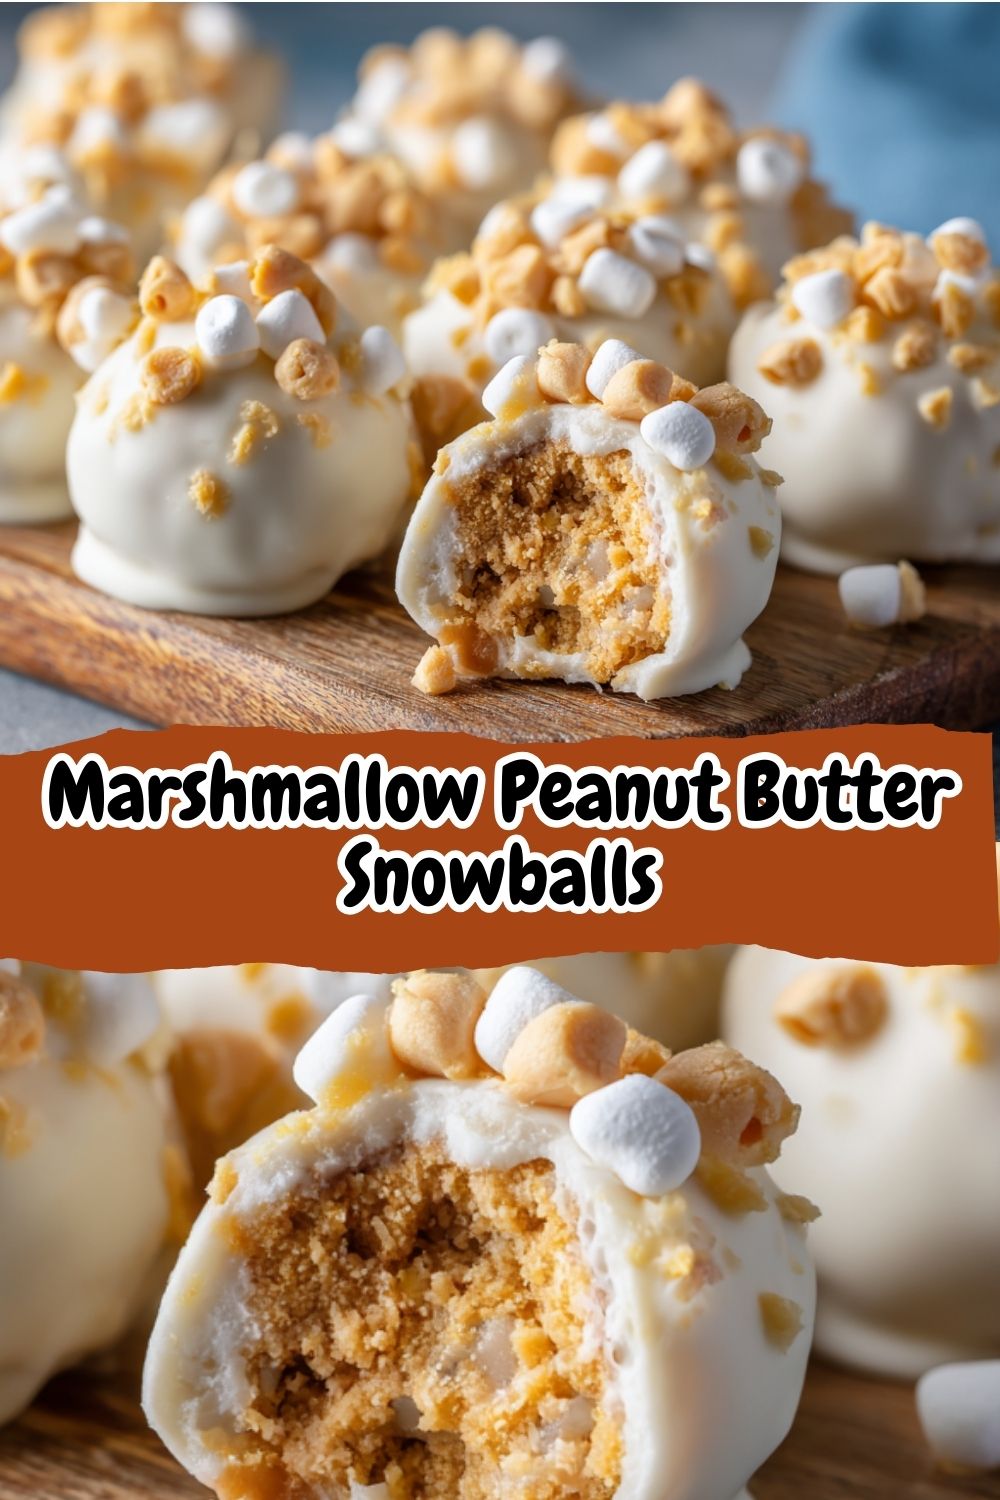
Marshmallow Peanut Butter Snowballs
- Total Time: 50 minutes
- Yield: About 24 snowballs 1x
Description
These bite-sized snowballs are the perfect no-bake treat—sweet, chewy, and rich with peanut butter flavor. Soft mini marshmallows are folded into melted peanut butter chips, shaped into balls, and dipped in creamy white chocolate for a festive finish. They’re freezer-friendly, easy to make, and totally irresistible.
Ingredients
1 bag (10 oz) peanut butter chips
3 cups mini marshmallows
1 tablespoon butter
1½ cups white chocolate chips or white candy coating
Instructions
In a saucepan over low heat, melt peanut butter chips with butter, stirring until smooth.
Remove from heat and gently fold in mini marshmallows.
Let the mixture cool slightly, then scoop and roll into small balls using your hands or a cookie scoop.
Place balls on a lined baking sheet and freeze for 15–20 minutes to firm up.
Meanwhile, melt white chocolate chips until smooth.
Dip each ball into melted white chocolate and place back on the lined tray.
Refrigerate until set.
- Prep Time: 20 minutes
- Cook Time: 30 minutes
- Category: Dessert
Nutrition
- Calories: 140
- Sugar: 14g
- Sodium: 60mg
- Fat: 7g
- Saturated Fat: 3.5g
- Carbohydrates: 17g
- Protein: 2g
Gathering Your Snowball Squad: The Ingredients
One of the best things about this recipe is the short and sweet ingredient list! You probably have most of this in your pantry right now. Here’s what you’ll need and my little chef-y insights on each one.
- 1 bag (10 oz) Peanut Butter Chips: This is the star of the show, providing that deep, nutty, and sweet flavor base. Chef’s Tip: If you can’t find peanut butter chips, you can gently melt 1 cup of creamy peanut butter with 1 tablespoon of powdered sugar for a similar effect, though the texture will be a bit softer.
- 3 cups Mini Marshmallows: These give the snowballs their iconic chewy, pillowy texture. The mini size is key for easy mixing and rolling! Chef’s Tip: For a fun twist, try using a mix of white and pastel mini marshmallows for a “confetti” effect inside.
- 1 tablespoon Butter: Just a pat to help the peanut butter chips melt down smoothly and add a hint of rich, creamy fat. Salted or unsalted works fine here!
- 1½ cups White Chocolate Chips or White Candy Coating: This is for that beautiful, snowy exterior. Chef’s Tip: White candy coating (like Candiquik or almond bark) is often more forgiving and easier to melt without seizing than pure white chocolate chips. But if you’re a white chocolate purist, go for the good stuff! Just add a teaspoon of coconut oil when melting to help it stay smooth and dippable.
Let’s Make Some Magic: Step-by-Step Instructions
Ready to create? Let’s do this! I’ll walk you through each step with all my favorite hacks to ensure your snowball success.
- Melt the Base: In a medium saucepan, combine the peanut butter chips and the tablespoon of butter. Place the saucepan over LOW heat. This is crucial! Peanut butter chips can scorch easily if the heat is too high. Stir constantly with a silicone spatula until the mixture is completely smooth and velvety. Once it’s melted, immediately remove it from the heat. You should have a gorgeous, glossy pool of peanut butter goodness.
- Fold in the Marshmallows: Now, gently fold in all 3 cups of mini marshmallows. I like to use a folding motion rather than stirring aggressively—this helps keep the marshmallows from completely melting and maintains that wonderful chewy texture. You want every marshmallow to be lovingly coated in that peanut butter sauce.
- Cool and Scoop: Let the mixture sit for about 5-10 minutes, just until it’s cool enough to handle. If it’s too hot, it’ll be a sticky mess; too cold, and it’ll be hard to roll. You’re looking for a warm, pliable consistency. Using a small cookie scoop (a #60 scoop is perfect!), a melon baller, or just a tablespoon, portion out the mixture. Then, with lightly buttered or cooking-sprayed hands, quickly roll each portion into a neat ball. Place them on a baking sheet lined with parchment paper or a silicone mat.
- The Big Chill: Pop the entire baking sheet into the freezer for 15-20 minutes. Don’t skip this step! This firms them up perfectly, making the dipping process clean and easy. They shouldn’t be frozen solid, just very firm to the touch.
- Melt the Coating: While the balls are chilling, melt your white chocolate or candy coating. You can do this in a double boiler or, my favorite lazy method, in the microwave. Microwave in 30-second bursts at 50% power, stirring well between each burst, until it’s completely smooth. Pro Hack: If using white chocolate chips, adding that teaspoon of coconut oil is a game-changer for achieving a fluid, dippable consistency.
- The Dip: Remove the balls from the freezer. Using a fork or a dipping tool, submerge each ball into the melted white chocolate, let the excess drip off, and place it back on the parchment-lined tray. For a super pretty finish, use the fork to create a little swirl on top as you set it down.
- Set and Enjoy: Once all the snowballs are beautifully coated, refrigerate the tray for at least 15-20 minutes, or until the white chocolate shell is completely firm. Then, it’s time for the best part—the taste test!
How to Serve These Sweet Snowballs
Presentation is part of the fun! For a simple, elegant look, arrange them on a white platter for a true “winter wonderland” effect. You can also place them in festive mini cupcake liners for easy serving at a party. They’re fantastic with a hot cup of coffee, a glass of cold milk, or even as a sweet ending to a weeknight dinner. Stack them high on a cake stand for a real centerpiece moment—they’re almost too pretty to eat! (Keyword: almost.)
Ride the Flavor Wave: Recipe Variations
Feel like getting creative? This recipe is a fantastic canvas! Here are a few of my favorite twists:
- Chocolate Lover’s Dream: Swap the white chocolate coating for melted semi-sweet or milk chocolate. It’s a classic peanut butter and chocolate combo that never fails.
- Crunchy Carnival: Roll the finished, dipped snowballs in crushed peanuts, graham cracker crumbs, or even colorful sprinkles before the chocolate sets for extra texture and fun.
- Nut-Free Twist: Use sunflower seed butter chips (available at most health food stores) and a dairy-free chocolate coating to make this allergy-friendly.
- Candy Cane Crush: Add a teaspoon of peppermint extract to the white chocolate coating and sprinkle the dipped snowballs with crushed candy canes for the ultimate holiday treat.
Isla’s Chef Notes & Kitchen Stories
This recipe has evolved so much since that first blizzardy day in my grandma’s kitchen. My original attempt involved trying to chop large marshmallows with a butter knife—do not recommend, it was a sticky disaster of epic proportions! The switch to mini marshmallows was a total revelation. I’ve also learned that the temperature of your hands is everything when rolling. If you find the mixture sticking too much, don’t be afraid to re-grease your hands halfway through. I can’t tell you how many times I’ve had to call my husband over to wash my hands for me because they were covered in peanut butter and I was mid-roll—true love, right there!
The best part? These snowballs are incredibly freezer-friendly. I almost always double the batch and keep a stash in the freezer for unexpected guests (or unexpected cravings). They thaw to the perfect consistency in just a few minutes. This recipe is a testament to my core belief: good food doesn’t have to be complicated to be incredible.
Your Questions, Answered: FAQs & Troubleshooting
Q: My peanut butter chip mixture is super sticky and hard to roll. What did I do wrong?
A: This usually means the mixture is still too warm. Peanut butter chips set up as they cool. Just let it sit for a few more minutes and try again. If it’s still sticky, a light coating of butter or cooking spray on your hands is your best friend! You can also pop the whole bowl into the fridge for 5 minutes to speed up the process.
Q: My white chocolate coating is thick and clumpy! How do I fix it?
A: Ah, white chocolate can be temperamental and seize up if it gets too hot or a drop of water gets in. If it’s just a little thick, try stirring in a teaspoon of coconut oil or vegetable shortening. If it’s truly seized (grainy and solid), unfortunately, it’s often beyond saving. This is why I often recommend the white candy coating for beginners—it’s much more forgiving!
Q: Can I use natural peanut butter instead of chips?
A: I don’t recommend it for this specific recipe. Natural peanut butter has a different oil content and texture that won’t set up firmly enough to hold the snowball shape. The chips are formulated to melt and reset perfectly.
Q: How far in advance can I make these?
A: They are fantastic make-ahead treats! Store them in an airtight container in the fridge for up to a week, or in the freezer for up to 3 months. Just let them sit at room temperature for about 10 minutes before serving for the best texture.
Quick Nutritional Info
Prep Time: 20 minutes | Chill Time: 30 minutes | Total Time: 50 minutes | Yield: About 24 snowballs
Per Snowball: Calories: 140 | Fat: 7g | Saturated Fat: 3.5g | Carbohydrates: 17g | Sugar: 14g | Protein: 2g | Sodium: 60mg
There you have it! My beloved Marshmallow Peanut Butter Snowballs. I hope this recipe brings as much joy and sweetness to your kitchen as it has to mine. If you make them, I’d be utterly thrilled to see your creations! Tag me on Instagram @BiteTide or pin your favorite photo to Pinterest. Happy no-baking, my friend!
With love and full bellies,
Isla 💛