 Forget Drive-Thru Dreams: Your Homemade Cheesy Gordita Crunch Adventure Starts Now!
Hey there, flavor seeker! Isla here, from my cozy kitchen to yours. Let me paint you a picture: It’s been a long day. Your stomach is growling, and your brain is chanting one thing and one thing only—Cheesy. Gordita. Crunch. That iconic, craveable combination of a warm, soft flatbread hugging a crispy taco shell, all filled with savory, seasoned meat and cool, crunchy toppings. It’s a textural masterpiece, a flavor fiesta, and let’s be real, a serious fast-food weakness.
But what if I told you that you could create a version at home that’s not just a copycat, but a glorious upgrade? One that’s fresher, cheesier, and made with ingredients you can actually pronounce? A version that lets you be the hero of your own kitchen, no mysterious “meat-like substance” or lukewarm sauce packets in sight.
That’s exactly what we’re diving into today. This recipe is my love letter to that perfect bite, deconstructed and rebuilt with a whole lot of heart and zero fuss. We’re talking about a 25-minute project that’s more fun than folding laundry (and infinitely more rewarding). So, tie on your favorite apron, crank up some good music, and let’s turn that fast-food fantasy into a delicious, homemade reality. Get ready for the ultimate melty, crunchy, better-than-takeout triumph!
The Midnight Craving That Started It All
I have to confess, my relationship with the Cheesy Gordita Crunch goes way back. Picture a younger me, fresh out of culinary school and pulling late shifts at a buzzy downtown restaurant. After hours on my feet, the only thing that sounded better than sleep was salty, cheesy, crunchy comfort food. My best friend, Leo, and I had a ritual. We’d clock out, still smelling of garlic and grill smoke, and make a beeline for the one drive-thru that was still open.
We’d sit on the hood of his beat-up car, unwrapping our prized Gordita Crunches under the streetlights, dissecting our night shift dramas between bites. It was our little pocket of joy—a salty, savory reward. But one night, we got ambitious. “We could totally make these,” Leo said, mouth full. “And make them better.” Challenge accepted. Our first few attempts were… messy. Tortillas stuck to pans, cheese avalanches onto the stovetop, shells breaking mid-fold. But that moment we finally nailed it? The perfect, cheesy seal, the warm, pliable flatbread, the explosive crunch? It was a revelation. It wasn’t just about replicating a fast-food item; it was about reclaiming the joy of a shared memory and making it our own. Every time I make these now, I think of those late-night kitchen experiments and smile. It’s a reminder that the best recipes are often born from a little bit of craving and a whole lot of heart.
Gathering Your Flavor Arsenal
Here’s the beautiful part: the ingredient list is short, sweet, and totally manageable. This is where we build our flavor foundation, so let’s break it down. No fancy, hard-to-find items here—just good, honest components ready to become something magical.
For the Taco Shells (The Structural Heroes):
- 4 Crunchy Taco Shells: The heart of the crunch! I like the standard corn ones for that authentic flavor. Chef’s Insight: Look for the ones with the flat bottom—they stand up better during assembly and prevent filling-fallout!
- 4 Soft Flour Tortillas (Taco-Size): Our “gordita” blanket. Flour tortillas are more pliable than corn, which is key for that perfect, soft wrap. Substitution Tip: For a whole-wheat boost or a gluten-free version, feel free to use your favorite alternative tortilla, just make sure they’re soft and bendy.
- 1 Cup Shredded Mexican Blend Cheese: The glue that holds our dream together! This melty magic is what fuses the soft and crunchy layers. Chef’s Insight: I’m a big fan of pre-shredded blends for convenience, but if you have a block of Monterey Jack or a Queso Quesadilla cheese, shred it yourself! It melts even more beautifully and doesn’t have the anti-caking agents.Print
Homemade Cheesy Gordita Crunch Tacos : Melty, Crunchy & Better Than Takeout
- Total Time: 30 mins
- Yield: 8 sliders 1x
Description
These Chicken Nugget Sliders are small in size but big on flavor. Piled high with crispy nuggets, melty cheese, tangy pickles, and your favorite sauces—all tucked into soft slider buns—these mini sandwiches are perfect for game days, parties, or a fun twist on family dinner. Fast, flexible, and totally craveable.
Ingredients
Scale16 chicken nuggets (frozen or homemade)
8 slider buns
4 slices cheddar or American cheese, halved
8 pickle slices
Sauce options: ranch, BBQ, buffalo, or honey mustard
Optional: shredded lettuce or coleslaw for crunch
Instructions
Cook chicken nuggets according to package or homemade recipe.
Toast slider buns lightly if desired.
On the bottom bun, place 1–2 nuggets (depending on size), half a cheese slice, a pickle, and a drizzle of your chosen sauce.
Add lettuce or slaw if using, then top with the other bun.
Serve warm, or assemble in batches for easy entertaining.
- Prep Time: 10 mins
- Cook Time: 15 mins
- Category: Dinner
For the Filling (The Flavor Powerhouse):
- 1 lb Ground Beef or Turkey: The main event! I use 85/15 beef for a great balance of flavor without being too greasy. Substitution Tip: Ground turkey, chicken, or even a plant-based ground “meat” work wonderfully here. It’s all about that seasoned, savory base.
- 2 Tablespoons Taco Seasoning: The soul of the operation. You can use a store-bought packet, but I highly recommend my 5-Minute Homemade Taco Seasoning—it’s less salty and you control the spice! Chef’s Insight: Toasting the seasoning with the meat for a minute before adding water deepens the flavors immensely.
- 1/3 Cup Water: Don’t skip this! It seems simple, but it’s crucial for creating a saucy, cohesive filling that clings to every nook and cranny of the taco shell.
- Salt, to taste: Your final flavor tune-up. Always taste your filling at the end and adjust as needed, especially if you’re using a low-sodium seasoning blend.
Optional Toppings (The Grand Finale):
- Shredded Lettuce: For that essential cool, crisp contrast. I like romaine or iceberg for the crunch factor.
- Diced Tomatoes: A pop of juicy, fresh acidity. Pat them dry with a paper towel to prevent a soggy shell!
- Sour Cream or Greek Yogurt: The creamy, tangy element that brings it all together. Greek yogurt is my healthy hack—it provides the same cool creaminess with a protein boost.
- Hot Sauce or Creamy Chipotle Sauce: This is non-negotiable for me. A creamy chipotle sauce is the closest to the fast-food version, but your favorite hot sauce works too! Chef’s Hack: Mix a few tablespoons of sour cream with a spoonful of chipotle in adobo sauce for an instant, incredible drizzle.
- Extra Cheese: Because more cheese is always the answer.
Let’s Build Some Magic: Your Step-by-Step Guide
Okay, team! This is where the fun begins. We’re going to move with purpose, but there’s no need to stress. I’ll be with you every step of the way, sharing all my little hacks to ensure taco-building triumph.
- Wake Up Your Filling: Grab a large skillet and place it over medium heat. Crumble in your ground beef (or turkey) and cook it, breaking it up with a wooden spoon, until it’s beautifully browned and no pink remains. This should take about 6-8 minutes. Now, here’s a pro move: drain off the excess fat. I know, I know, flavor lives there, but too much grease will make our tacos soggy, and we are on Team Crunch. Once drained, sprinkle the taco seasoning over the meat. Don’t just dump it in one spot—sprinkle it evenly so every morsel gets some love. Give it a good stir and let it toast for 30 seconds until it’s super fragrant. Then, pour in that 1/3 cup of water. It will sizzle and steam—that’s the sound of flavor melding! Let it simmer for 2-3 minutes, stirring occasionally, until the liquid has reduced and created a glossy, flavorful coating on the meat. Remove from heat and give it a taste. Need more salt? More spice? Now’s the time! Chef’s Hack: Cover the pan with a lid to keep the filling warm while you work on the shells.
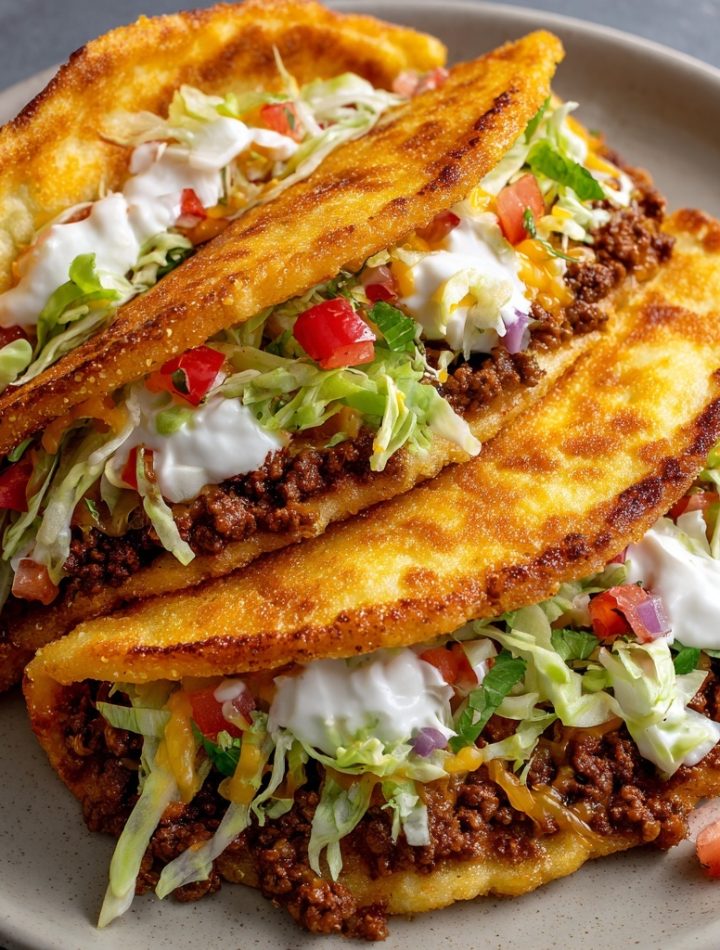
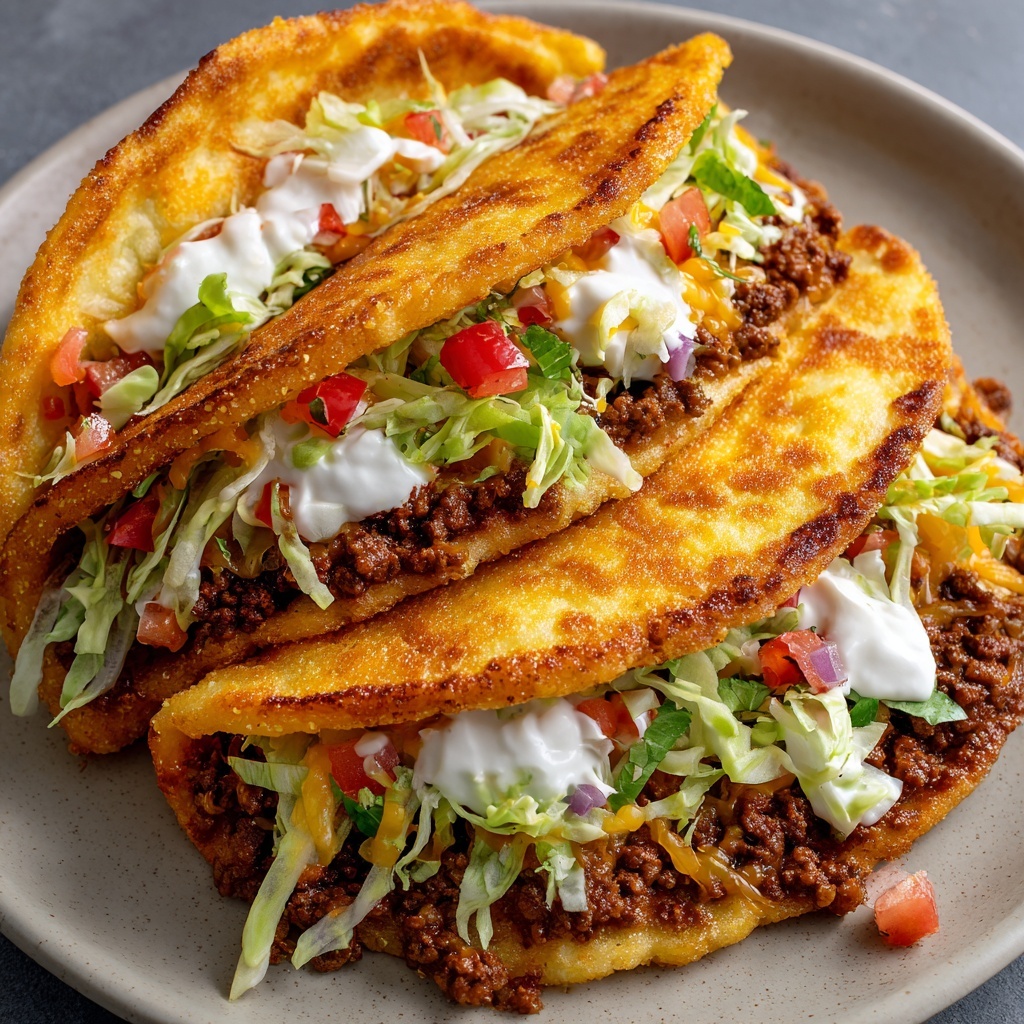
- Create the Cheesy “Gordita” Blanket: This is the signature move, and it’s easier than it looks, I promise! Take a second non-stick skillet or a flat griddle and heat it over medium heat. No oil needed. Place one of your soft flour tortillas in the dry pan. Immediately sprinkle a generous 1/4 cup of that shredded Mexican cheese right in the center of the tortilla, shaping it into a rough circle that’s just a bit smaller than your crunchy taco shell. We’re creating a cheesy landing pad. Let the cheese melt for about 1-2 minutes. You’ll see it start to bubble and become one glorious, melty layer. Chef’s Tip: If your cheese isn’t melting, your heat might be too low. You want a gentle sizzle, not a scorch.
- The Big Embrace: Now for the magic trick! Take one of your crunchy taco shells and gently press it down onto the melty cheese circle. You want to press firmly enough that the cheese acts like glue, but not so hard that you shatter the shell. Using a spatula (and maybe your fingers, carefully!), quickly fold the soft, cheesy tortilla edges up and around the hard shell. The melted cheese will seal it all together, creating that iconic double-layer. Let it cook for another 30-60 seconds to really set that seal and get the outside tortilla a little toasty. Repeat this process with the remaining three tortillas and shells. Chef’s Hack: Work in batches if your pan is small. It’s better to take your time than to rush and have a cheesy mess!
- The Grand Assembly: Your cheesy gordita shells are ready! Place them on a serving plate. Now, let’s fill ’em up. Start with a hearty spoonful of the warm, seasoned meat. Then, layer on the cool, crisp shredded lettuce and diced tomatoes. The contrast in temperatures is part of the magic! Finish with a generous dollop of sour cream (or Greek yogurt) and a glorious drizzle of that creamy chipotle sauce or your favorite hot sauce. Don’t be shy!
Plating Up Your Masterpiece
Presentation is part of the fun! I love serving these tacos upright in a taco holder or simply leaning them against each other on a vibrant, colorful platter. Scatter any extra toppings like a few extra tomato dice or a sprinkle of cheese around the plate for a restaurant-worthy look. Have extra sauce on the side for dipping—because you can never have too much. These are handheld wonders, so serve them immediately with plenty of napkins and a big, happy smile. They’re meant to be eaten with your hands, so lean in, take that big, messy, perfect bite, and enjoy the crunchy, cheesy, savory symphony you just created!
Ride Your Own Flavor Wave: Fun Variations
The beauty of this recipe is its versatility. Don’t be afraid to get creative and make it your own! Here are a few of my favorite twists:
- Spicy Sriracha Chicken: Swap the beef for shredded rotisserie chicken tossed in a mix of sriracha, lime juice, and a touch of honey. Top with a crunchy Asian slaw (shredded cabbage, carrots, cilantro) and a drizzle of sriracha mayo.
- Baja Fish Gordita Crunch: Use beer-battered or panko-crusted white fish fillets inside the shell. Top with a tangy cabbage slaw and a creamy cilantro-lime sauce.
- Breakfast-for-Dinner Gordita: Fill with scrambled eggs, crispy bacon or chorizo, and melted cheddar cheese. Top with avocado slices and a dash of hot sauce. Yes, please!
- Fully Loaded Veggie: For a meatless marvel, use seasoned black beans, roasted corn, sautéed peppers and onions, and top with guacamole and pico de gallo.
- Buffalo Cauliflower Crunch: Toss roasted cauliflower florets in buffalo sauce and use those as your filling. Top with blue cheese or ranch dressing and shredded celery and carrots.
Isla’s Kitchen Confidential
This recipe has been through so many iterations in my kitchen! The first time I made it for my now-husband, I was so nervous about the cheese-seal that I basically super-glued the taco shell to the tortilla with a half-cup of cheese. It was delicious, but structurally… questionable. We’ve refined it since then!
A few key lessons learned: First, warm your crunchy taco shells for a few minutes in the oven before assembling. It makes them less prone to cracking when you press them into the cheese. Second, don’t overload the filling. It’s tempting to pack in as much as humanly possible, but it will lead to a blowout on the first bite. Show a little restraint for the sake of structural integrity! Finally, this is a great recipe to get kids involved in the kitchen. They love the hands-on assembly of pressing the shell into the cheese and adding their own toppings. It turns dinner into a fun, interactive activity. The ultimate goal here isn’t perfection; it’s a delicious, fun, and deeply satisfying meal that makes you feel like a kitchen rockstar.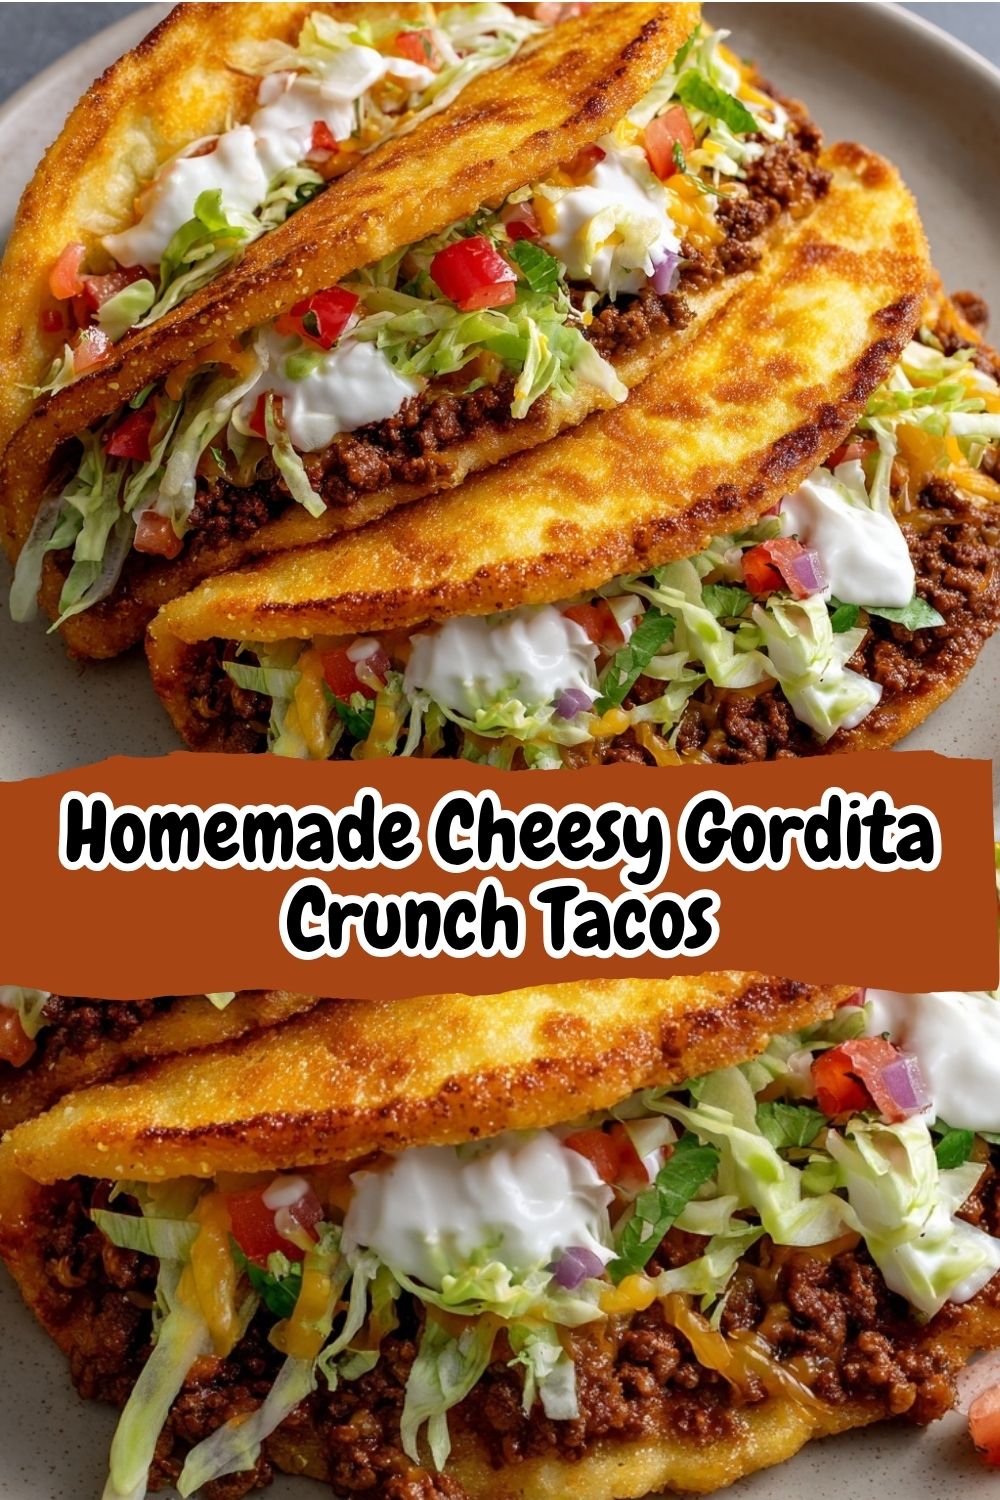
Your Taco Questions, Answered!
I’ve made these a million times and I’ve heard all your brilliant questions. Here are the answers to the most common ones!
Q: My cheese isn’t melting enough to act as “glue.” What am I doing wrong?
A: This is the number one question! A couple of things could be at play. First, check your heat. The pan needs to be fully preheated to a solid medium. If it’s too low, the tortilla will just dry out before the cheese melts. Second, make sure you’re using a good melting cheese. A pre-shredded “Mexican blend” or Monterey Jack is perfect. Avoid very hard, dry cheeses like cotija or pre-shredded parmesan for this specific step. Finally, cover the pan with a lid for the last 30 seconds of melting. This traps steam and helps the cheese melt faster and more evenly.
Q: Can I make these ahead of time?
A: You can do some component prep to make assembly lightning fast! You can cook and season the meat filling up to 2 days in advance and keep it stored in an airtight container in the fridge—just reheat it gently in a pan with a splash of water before using. You can also shred your cheese and chop your veggies ahead of time. However, I highly recommend assembling the cheesy gordita shells and filling them just before serving. The contrast between the warm, soft/crunchy shell and the cool toppings is a huge part of the experience, and the shell can get soggy if assembled too far in advance.
Q: My taco shell keeps cracking when I press it into the cheese. Help!
A: Oh, I feel this pain! Taco shells are delicate. My best hack is to warm them first. Just pop them on a baking sheet in a 350°F (175°C) oven for 3-4 minutes. This makes them more pliable and less brittle. Also, be gentle! You don’t need to apply a ton of pressure. Let the melted cheese do the work. Gently press the shell down and hold it for a few seconds—the heat from the pan and the cheese will help it adhere.
Q: What’s the best way to reheat leftovers?
A: Leftovers are tricky because the shell will lose its crunch. The best method is to disassemble! Gently pull the soft tortilla away from the hard shell (they might separate easily). Reheat the meat filling and the soft, cheesy tortilla in the microwave or a skillet. Re-crisp the hard taco shell in a 350°F oven for 3-4 minutes. Then, reassemble with fresh, cold toppings. It’s a bit of work, but it’s the only way to preserve that iconic texture.
After countless kitchen experiments, Isla’s perfected the art of the cheesy taco hybrid—crispy, gooey, and gloriously satisfying. With her simple tips for melting, assembling, and reheating, you’ll never fear the cheese-seal again. Whether it’s a casual weeknight dinner or a playful family cooking night, these tacos promise a little mess, a lot of flavor, and pure joy in every bite.