Heaven in a Bowl: The Ultimate Chocolate-Peanut Butter Trifle That’ll Steal the Show
Hey there, flavor friend! Isla here. Let’s be real for a second. Some days, you don’t just need a dessert. You need the dessert. The one that makes people’s eyes go wide when you carry it to the table. The one that has everyone secretly hoping for a second scoop before they’ve even finished the first. The kind of dessert that doesn’t just satisfy a sweet tooth—it declares a full-blown celebration.
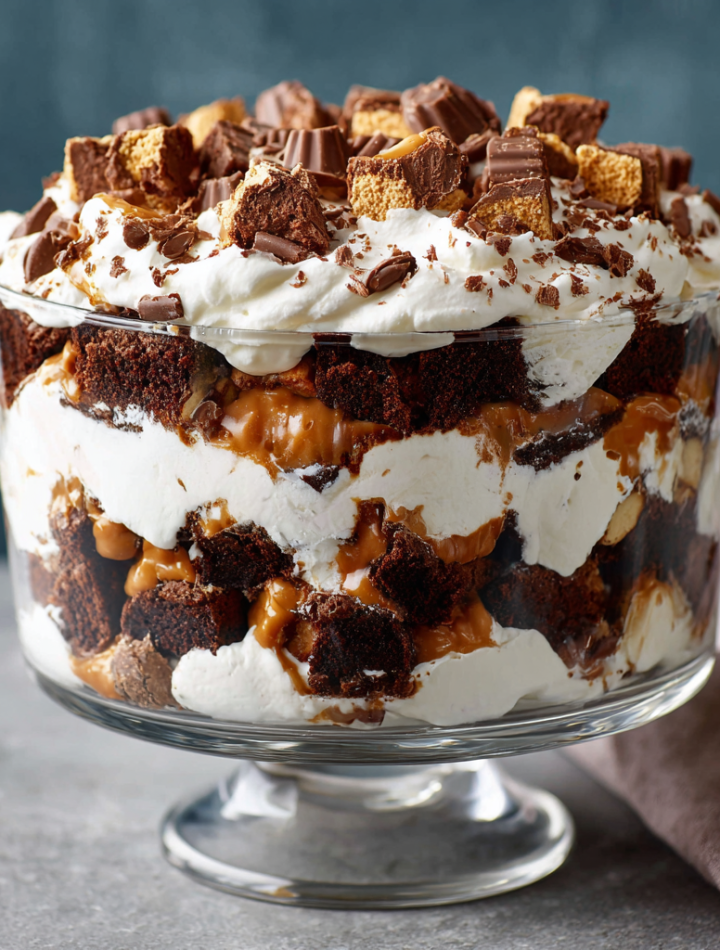
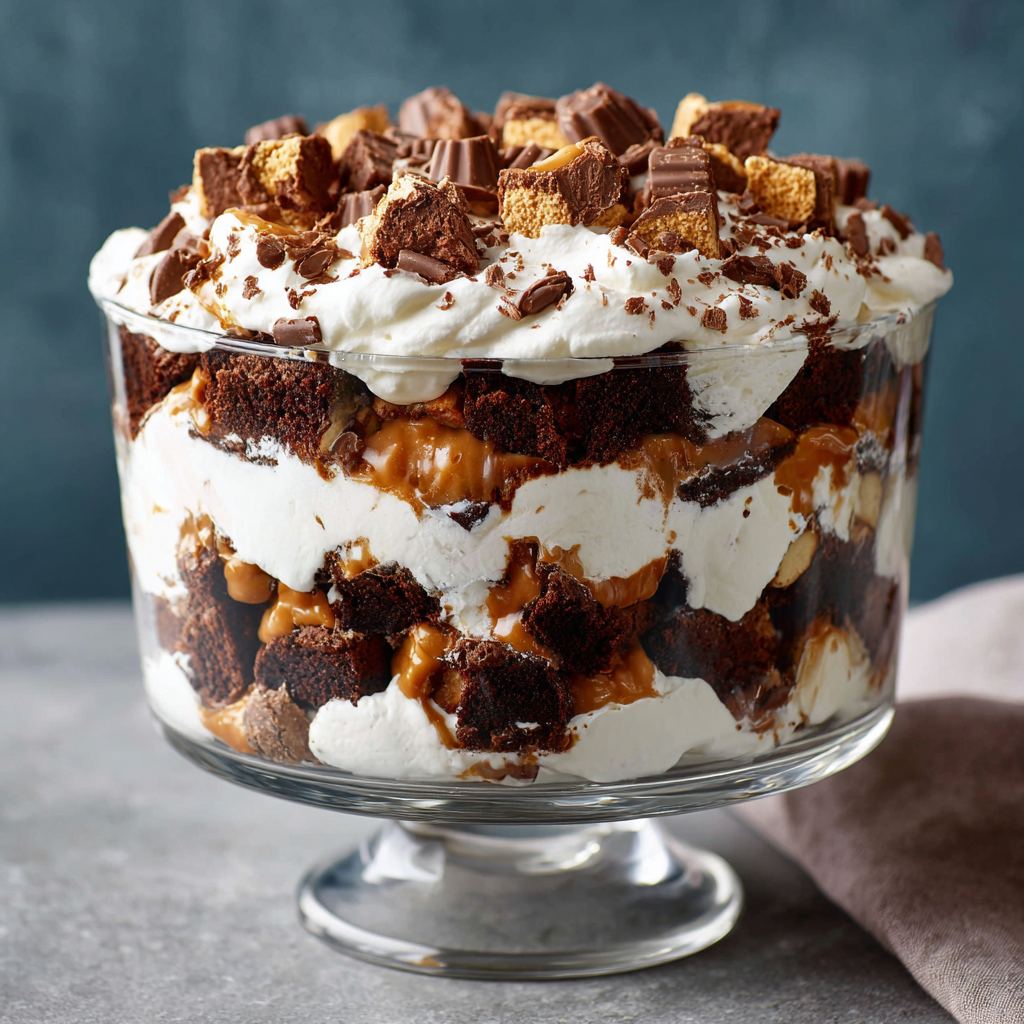
Well, my friend, you’ve just found it. This Ultimate Chocolate-Peanut Butter Trifle is my absolute go-to when I want to create a moment of pure, unadulterated joy. We’re talking layers upon layers of fudgy brownies, silky-smooth vanilla pudding, clouds of whipped topping, and the star of the show: a glorious avalanche of mini Reese’s peanut butter cups.
The best part? It looks like you slaved away for hours, but this beauty is secretly a breeze to put together. There’s no fancy pastry skills required, no tempering chocolate, and no oven drama (beyond baking a simple box of brownies). This is all about the art of assembly, and I’m here to guide you through every delicious step. So, grab your biggest, prettiest bowl and let’s create some magic. This is the dessert that turns a regular Tuesday into a party and makes any holiday table unforgettable. Get ready for spoonfuls of pure heaven!
A Sweet Memory: Where My Love for This Trifle Began
This trifle recipe always takes me right back to my best friend’s potluck wedding reception. It was a beautifully chaotic, DIY affair in her parents’ backyard, and everyone was asked to bring a dish. I, of course, volunteered for dessert duty. The pressure was on! I needed something that could feed a crowd, travel well, and stand up to a warm summer evening.
I remember the kitchen that morning: flour everywhere, me trying to coordinate three different components while simultaneously picking out an outfit. My grandma’s voice popped into my head, saying, “Isla, darling, when in doubt, layer it out.” She was a trifle queen, and her wisdom saved the day. I took my dad’s favorite fudge brownie recipe (which, for ease, I’ve swapped with a trusty box mix here!), my mom’s foolproof pudding, and a mountain of my favorite candy—the chocolate and peanut butter combo I’ve loved since I was a kid stealing Reese’s from my dad’s secret stash.
When I arrived at the reception, I placed my trifle dish next to a towering, professionally decorated wedding cake. I’ll admit, I felt a little intimidated. But by the end of the night, that trifle bowl was scraped clean, and I had a line of new friends asking for the recipe. That’s the power of this dessert—it’s not just food; it’s a conversation starter, a memory maker, and a guaranteed smile-bringer.
Print
Heaven in a Bowl Dessert – The Ultimate Chocolate-Peanut Butter Trifle
- Total Time: 2 hours 30 minutes
Description
When indulgence is the goal, this is your masterpiece. Layers of rich fudge brownies, creamy pudding, whipped topping, and chunks of mini Reese’s come together in one epic, show-stopping dessert. Whether it’s for a party, holiday, or just because, this trifle brings the wow factor—no oven drama, just pure joy in every spoonful.
Ingredients
1 box fudge brownie mix (plus ingredients to prepare it)
2 bags mini Reese’s peanut butter cups, halved or chopped
4 cups cold 2% milk
2 boxes (3.4 oz each) instant vanilla pudding mix
1 large container whipped topping (Cool Whip or similar), thawed
Optional add-ins:
Chocolate chunks or chopped peanut butter cookies
Caramel drizzle or hot fudge sauce
Pinch of sea salt for contrast
Instructions
Bake the brownies as directed on the box. Let them cool completely, then cut into small cubes.
Prepare the pudding by whisking together cold milk and instant pudding mix until thick (about 2–3 minutes). Chill for 5–10 minutes.
In a large trifle dish or glass bowl, layer the ingredients in this order:
Brownie cubes
Pudding
Whipped topping
Chopped Reese’s
Optional add-ins
Repeat layers until ingredients are used up, finishing with whipped topping and plenty of chopped Reese’s and chocolate chunks on top.
Chill for at least 2 hours before serving to let the flavors meld together.
- Prep Time: 30 minutes
- Cook Time: 2 hours
- Category: Dessert
Nutrition
- Calories: 550
- Fat: 30g
- Protein: 7g
Gathering Your Treasure Trove of Ingredients
Here’s your shopping list for sheer deliciousness. Don’t be intimidated by the list—it’s mostly assembly of fantastic ready-made components! I’ve included my little chef insights and swaps to make this recipe your own.
- 1 Box Fudge Brownie Mix (plus ingredients listed on the box, typically oil, water, and an egg): This is our foundation! The dense, chewy texture of fudge brownies holds up beautifully against the creamy layers. Chef’s Insight: I use a box mix for reliability and speed, but if you have a beloved homemade recipe, by all means, use it! Just bake it in a 9×13 pan so you get nice, thick brownies.
- 2 Bags of Mini Reese’s Peanut Butter Cups, halved or chopped: The heart and soul of the operation! The mini size is perfect for distributing peanut butter-chocolate bliss throughout every layer. Pro Tip: Unwrap them and pop them in the freezer for 15 minutes before chopping—they’ll be less messy to cut!
- 4 Cups Cold 2% Milk: The base for our pudding. Using cold milk is non-negotiable—it helps the pudding set up thick and luxurious faster. Substitution Tip: You can use whole milk for an even richer pudding or a milk alternative like almond or oat milk. Just make sure it’s unsweetened and unflavored.
- 2 Boxes (3.4 oz each) Instant Vanilla Pudding Mix: Vanilla is the perfect neutral canvas that lets the chocolate and peanut butter flavors shine. Chef’s Insight: Why two boxes? We’re building a massive trifle! This ensures we have a glorious, thick layer of creaminess in every bite.
- 1 Large Container (16 oz) Whipped Topping (like Cool Whip), thawed: This gives us that light, airy contrast to the dense brownies. Substitution Tip: You can absolutely use an equal amount of freshly whipped cream sweetened with a little powdered sugar. It’s divine!
Optional Add-ins for Next-Level Glory:
- Chocolate Chunks or Chopped Peanut Butter Cookies: For extra texture and surprise! A handful of chocolate chunks mixed in with the Reese’s or a layer of crushed peanut butter cookies (like Nutter Butters) adds a wonderful crunch.
- Caramel Drizzle or Hot Fudge Sauce: Because more is more! Swirling a little caramel or fudge sauce between the layers takes this from incredible to mind-blowing.
- Pinch of Flaky Sea Salt: My secret weapon! A tiny sprinkle of sea salt on the very top layer cuts the sweetness and makes all the flavors pop in the most sophisticated way.
Building Your Edible Masterpiece: Step-by-Step
Okay, the fun part! Let’s build this beauty. I’ll walk you through each step with my favorite little hacks to ensure trifle perfection.
- Bake and Cool the Brownies. Prepare and bake the brownies according to the package directions for a 9×13-inch pan. Now, here’s the most important patience-testing step: LET THEM COOL COMPLETELY. I mean it! If you layer warm brownies into the trifle, they’ll turn the pudding runny and make the whole thing soggy. I usually bake them the night before or let them cool on a wire rack for a few hours. Once cool, cut them into 1-inch cubes. Chef’s Hack: Use a plastic or silicone knife to cut brownies—it cuts cleanly without sticking and tearing!
- Whip Up the Pudding. In a large bowl, whisk the two packets of instant pudding mix with the 4 cups of cold milk. Whisk for a solid 2-3 minutes until it’s thick and smooth. Don’t under-whisk! Pop it in the fridge for 5-10 minutes to set up further while you get your other components ready. This chilling time is a game-changer for a sturdy pudding layer.
- Chop the Reese’s. While the pudding chills, unwrap those mini Reese’s. As I mentioned, if they’re a bit soft, a quick freeze helps. I like to chop about three-quarters of them roughly (halves or quarters are perfect) and reserve the rest for the gorgeous top layer.
- The Grand Layering Begins! Grab your trifle dish—a clear glass bowl is essential here because the layers are half the fun! Start with a layer of brownie cubes, using about one-third of them. Press them down gently to create a solid base. Chef’s Tip: It’s okay if there are gaps; the pudding will seep down and fill them, creating a delicious brownie-pudding fusion.
- Add the Pudding. Spoon half of the chilled pudding over the brownie layer. Use the back of the spoon to spread it evenly, making sure to reach the edges of the bowl so every serving gets a perfect view.
- Cloud of Whipped Topping. Now for the fluffy layer! Spread half of the container of whipped topping over the pudding. Be gentle so you don’t mix the layers together.
- The Candy Cascade. Sprinkle a generous handful of the chopped Reese’s over the whipped topping. If you’re using any optional add-ins like caramel drizzle or crushed cookies, this is the time to add them!
- Repeat the Magic. Create a second layer in the same order: remaining brownies, the rest of the pudding, the rest of the whipped topping (reserving a little for a final flourish if you like), and most of the remaining Reese’s.
- The Grand Finale. Now, make it beautiful! Take the reserved whole or halved mini Reese’s and artfully arrange them on top. Add any chocolate chunks, a final dollop of whipped topping, and that magical pinch of flaky sea salt.
- The Crucial Chill. Cover the trifle with plastic wrap and refrigerate for at least 2 hours, but preferably 4-6 or even overnight. This is not a suggestion—it’s the step that transforms separate ingredients into one cohesive, heavenly dessert. The flavors meld, the brownies soften just enough, and every spoonful becomes pure bliss.
How to Serve This Show-Stopping Dessert
When it’s time to serve, you want to do it right! Use a large, clear-glass spoon or a small ladle to dig all the way down to the bottom of the bowl, ensuring you get every single glorious layer in each serving. I love using wide, shallow bowls so everyone can admire the beautiful stripes of chocolate, cream, and peanut butter. For a real “wow” moment, bring the whole trifle dish to the table and let your guests ooh and aah before you dive in. It’s a dessert that deserves a grand entrance!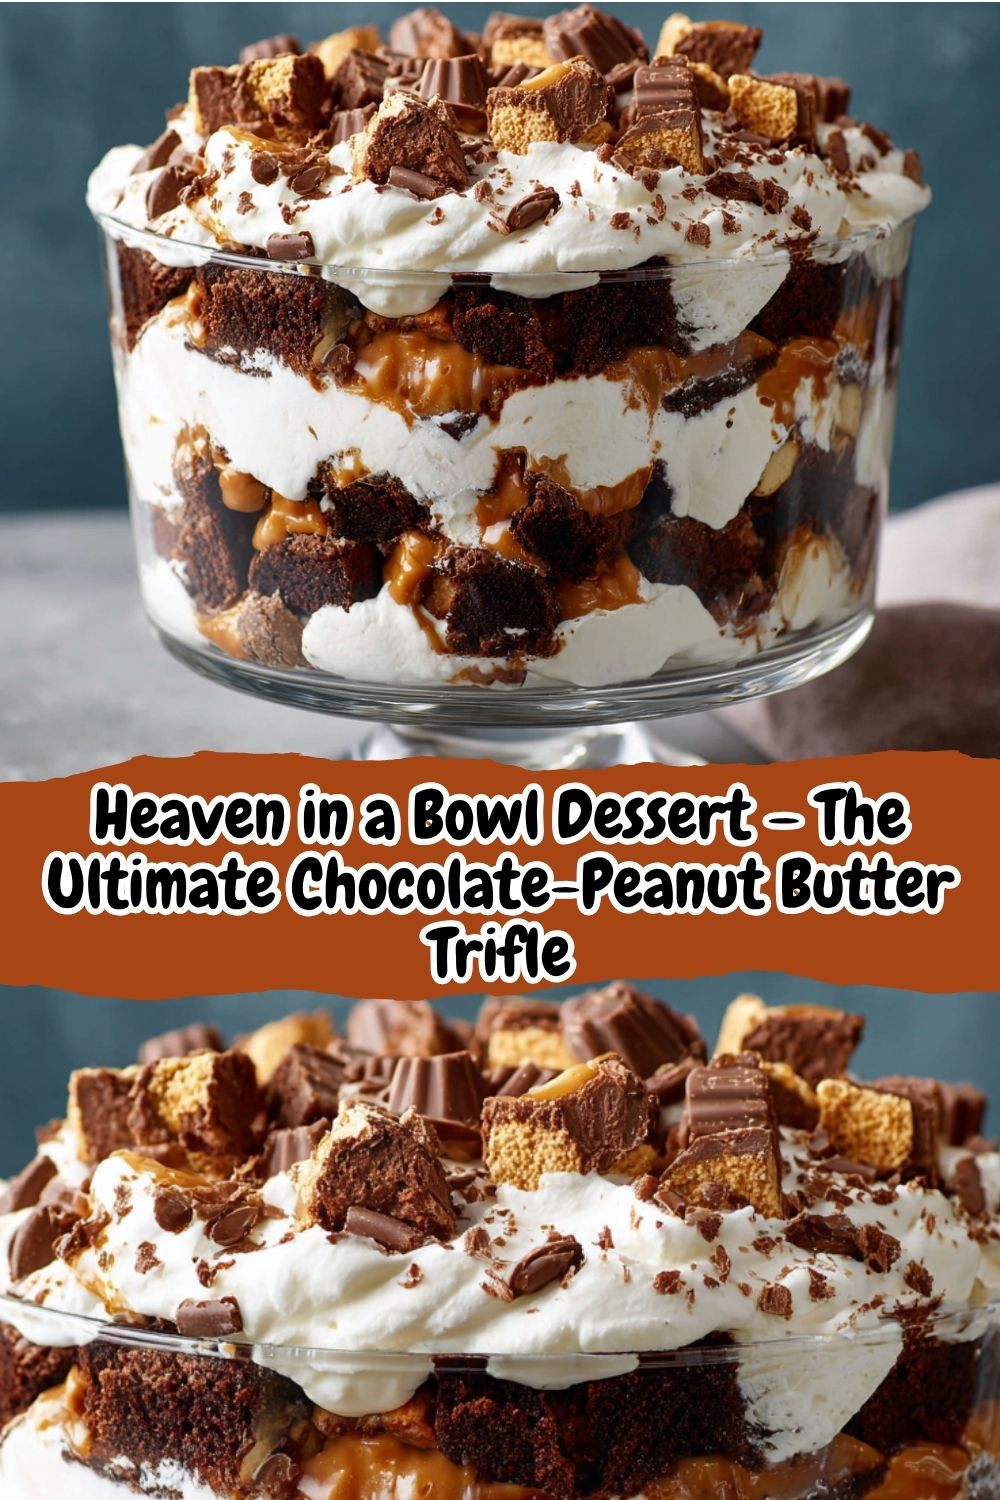
Make It Your Own: Delicious Recipe Variations
The beauty of a trifle is its versatility! Here are a few ways to ride a different flavor wave:
- Cookies & Cream Twist: Swap the brownies for crumbled chocolate sandwich cookies (Oreos) and use chocolate pudding instead of vanilla. Replace the Reese’s with more crushed cookies for a quintessential cookies-and-cream experience.
- Salted Carilla Delight: For a more grown-up, sophisticated vibe, use a dark chocolate brownie base, add a generous swirl of caramel sauce between each layer, and top with a sprinkle of flaky sea salt. You can even use chopped salted pretzels for a sweet-and-salty crunch!
- Berry Blast Version: Not a peanut butter fan? No problem! Use chocolate pudding, keep the brownies, and layer with fresh raspberries or sliced strawberries. Top with fresh berries and white chocolate shavings.
- Peanut Butter Lover’s Overload: Stir a half-cup of creamy peanut butter into the vanilla pudding mixture before chilling. Then, use chopped peanut butter cups and chopped peanut butter cookies for a PB explosion.
Isla’s Chef Notes & Kitchen Stories
This recipe has been my trusty sidekick for years, and it’s evolved in the most fun ways. I once made it for a bake sale and accidentally used chocolate pudding instead of vanilla. It was so decadent and rich that it became a permanent variation in my recipe box! Another time, my nephew “helped” me layer it and we ended up with a hilarious, mixed-up, but still utterly delicious mess. That’s the thing about this trifle—it’s incredibly forgiving.
My biggest lesson learned? The chill time. I was once impatient and only chilled it for an hour before a party. It was still tasty, but it sliced messily and the layers weren’t as distinct. Trust me, the wait is worth it. Letting it sit overnight is truly the ultimate secret for the most incredible texture and flavor fusion. Now, I always make it the day before a big event. One less thing to do on the day-of, and a even better dessert? That’s what I call a win-win.
Your Questions, Answered: FAQs & Troubleshooting
Q: Can I make this trifle ahead of time?
A: Absolutely! In fact, I highly recommend it. You can assemble the entire trifle up to 24 hours in advance. Just keep it tightly covered in the refrigerator. The layers will hold up beautifully, and the flavors will have even more time to become best friends.
Q: My pudding layer seems runny. What did I do wrong?
A> The most common culprits are not using cold milk or not whisking for the full 2-3 minutes. Instant pudding needs the shock of cold liquid and a vigorous whisking to activate the thickening agents properly. If it’s still a bit thin after mixing, just give it the full 10 minutes in the fridge—it should firm up nicely.
Q: Can I use homemade whipped cream instead of Cool Whip?
A> You sure can! Whip 3 cups of heavy cream with 1/3 cup of powdered sugar and 1 teaspoon of vanilla extract until you get stiff peaks. The texture will be a bit lighter and less sweet, which is a fantastic option. Just note that fresh whipped cream doesn’t hold its structure quite as long as stabilized toppings, so it’s best to assemble the trifle the day you plan to serve it.
Q: I don’t have a trifle bowl. What can I use instead?
A> No worries! Any large, clear glass bowl will work perfectly. You could also use a 9×13-inch baking dish, though you won’t get the same dramatic layered effect when serving. For a fun, individual twist, you can even layer the ingredients in individual mason jars or clear cups!
Nutritional Information*
*Please note: This is an approximate calculation based on the ingredients used and can vary significantly with specific brands and optional additions. This dessert is a treat, meant to be enjoyed in celebration!
Per Serving (assuming 12 servings): Calories: ~550, Protein: ~7g, Carbohydrates: ~60g, Fat: ~30g, Sugar: Very, very yes. 😉
Prep Time: 30 minutes (plus brownie baking & cooling time)
Chill Time: 2 hours (minimum)
Servings: 10-12 happy people