 That First Bite of Summer: Meet Your New Favorite Tomato Tart
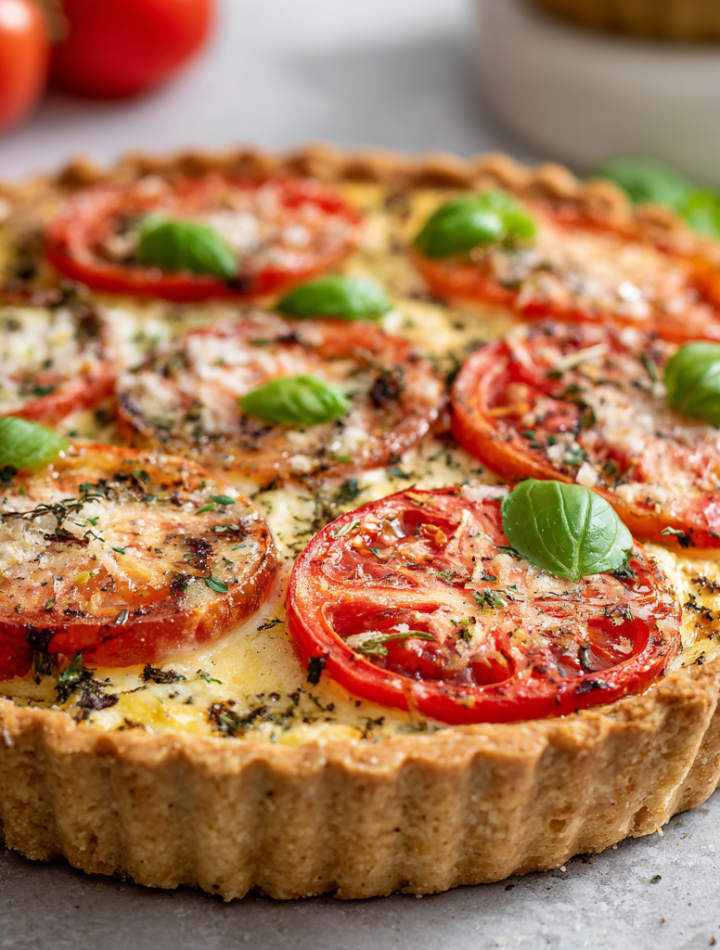
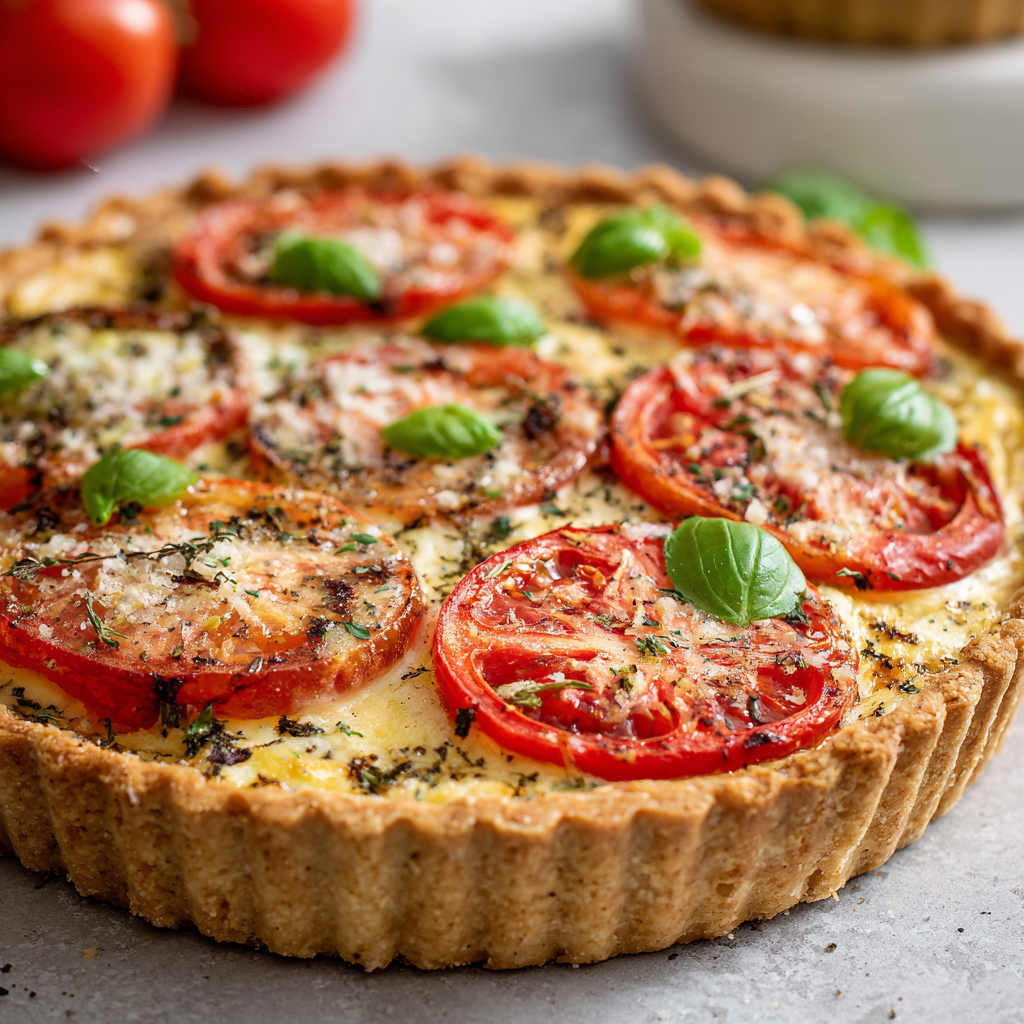
Hey friend! Isla here from BiteTide, your partner-in-crime for turning simple ingredients into flavor fireworks. Picture this: golden, buttery crust cradling juicy, sun-ripened tomatoes, all hugged by creamy, herby cheese. It’s not just a tart—it’s summer on a plate, a rustic masterpiece that whispers, “You totally nailed this,” without demanding you spend hours in the kitchen. Whether you’re hosting brunch, packing a picnic that’ll make everyone jealous, or just treating yourself to a light dinner that feels fancy (but isn’t!), this Fresh Tomato Tart with Homemade Crust is your secret weapon. I live for recipes like this—unpretentious, bursting with seasonal joy, and guaranteed to make you do a little happy dance when you pull it out of the oven. So, tie on your favorite apron, crank up that playlist, and let’s turn those gorgeous tomatoes into a showstopper together. Trust me, your fork is ready for this adventure! 🍅✨
Sunshine, Salt Air, and Grandma’s Countertop Wisdom
This tart? It tastes like my childhood summers in our little coastal town. Every August, my grandma’s kitchen counter would disappear under a mountain of tomatoes from Pop’s garden—ruby reds, sunny yellows, even quirky purples. One sweltering afternoon, when I was maybe ten, I watched her transform them into her “magic pie.” No recipe card, just flour-dusted hands and intuition. She’d wink as she sliced tomatoes, saying, “Let ’em weep, Isla girl. A soggy bottom’s the enemy of a good tart!” as we pressed paper towels onto the slices. I’d sneak bites of the tangy goat cheese filling (earning a playful swat with her wooden spoon), and we’d chat about seashells while the buttery crust crisped up. That tart wasn’t just food; it was pure, sticky-fingered joy. Years later, when I launched BiteTide, recreating that feeling became my mission. This recipe? It’s my love letter to Grandma’s countertop wisdom—simple, heartfelt, and packed with flavor that feels like a sunbeam. Every time I make it, I swear I smell the salt air.
Print
Fresh Tomato Tart with Homemade Crust
- Total Time: 1 hr 40 min
- Yield: 6–8 servings 1x
- Diet: Vegetarian
Description
A savory tart with juicy ripe tomatoes, herbed cheese, and a buttery homemade crust. Perfect for brunch, lunch, or a light dinner, it’s as beautiful as it is delicious.
Ingredients
- 1 1/4 cups all-purpose flour
- 1/2 tsp salt
- 8 tbsp unsalted butter, cold and cubed
- 3–4 tbsp ice water
- 4–5 medium ripe tomatoes, sliced, lightly salted, and drained on paper towels
- 1 cup ricotta or goat cheese
- 1/2 cup shredded mozzarella or Gruyère
- 1 egg
- 1 tsp fresh thyme (or 1/2 tsp dried thyme)
- Salt & pepper, to taste
Instructions
- Preheat oven to 375°F (190°C).
- In a bowl, mix flour and salt. Cut in cold butter until the mixture resembles coarse crumbs. Gradually add ice water, mixing just until dough comes together. Shape into a disc, wrap in plastic, and chill for 30 minutes.
- On a floured surface, roll out dough to fit a 9-inch tart pan. Press into the pan and trim excess. Prick the base with a fork, line with parchment, and fill with pie weights. Bake for 15 minutes, remove weights and parchment, then bake for an additional 5 minutes. Let cool slightly.
- In a medium bowl, mix ricotta (or goat cheese), shredded mozzarella (or Gruyère), egg, thyme, salt, and pepper until smooth.
- Spread cheese mixture evenly into the cooled crust. Arrange tomato slices on top in overlapping layers.
- Bake for 25–30 minutes, or until crust is golden and tomatoes are slightly roasted.
- Cool for at least 10 minutes before slicing. Serve warm or chilled.
Notes
- Draining the tomatoes helps prevent a soggy crust.
- Fresh herbs like basil or oregano can be added for extra flavor.
- This tart can be made a few hours ahead and served at room temperature.
- Prep Time: 20 min (plus 30 min chilling)
- Cook Time: 50 min
- Category: Main Course
- Method: Baking
- Cuisine: French
Nutrition
- Serving Size: 1 slice
- Calories: 280
- Sugar: 3g
- Sodium: 300mg
- Fat: 18g
- Saturated Fat: 11g
- Unsaturated Fat: 6g
- Trans Fat: 0g
- Carbohydrates: 22g
- Fiber: 2g
- Protein: 9g
- Cholesterol: 60mg
Keywords: tomato tart, fresh tomato recipe, homemade tart crust, summer tart, savory tart
Gather Your Flavor Crew: Ingredients & Why They Matter
For the Crust:
- 1¼ cups all-purpose flour: The trusty backbone! It gives structure. For a nuttier twist, swap ¼ cup with whole wheat flour—just add an extra tbsp of ice water.
- ½ tsp salt: Balances the butter and brightens the tomatoes. Sea salt flakes work great too!
- ½ cup (1 stick) cold unsalted butter, cubed: Cold is KEY here! It creates flaky layers when it melts in the oven. Vegan? Use frozen, grated plant-based butter.
- 3–4 tbsp ice water: Hydrates without activating gluten too much (which = toughness). Add one tbsp at a time—dough shouldn’t feel wet!
For the Filling:
- 4–5 ripe tomatoes, sliced & drained: Use heirlooms for color or Romas for less moisture. Pro tip: Drain slices on paper towels for 15 mins—saves your crust!
- ¾ cup ricotta or goat cheese: Ricotta = creamy mildness; goat cheese = tangy punch. Both are winners!
- ½ cup shredded mozzarella or Gruyère: Mozzarella is melty & mild; Gruyère adds a savory depth. Pre-shredded works in a pinch.
- 1 egg: Binds the filling so it doesn’t run. Room temp blends smoother!
- 1 tsp fresh thyme or ½ tsp dried: Fresh is aromatic heaven, but dried works—just rub it between your fingers first to wake it up.
- ½ tsp garlic powder: Distributes flavor evenly without raw garlic bite. Onion powder is a fun swap!
- Salt & pepper to taste: Season like you mean it—tomatoes love salt!
- Olive oil for drizzling: Adds richness and helps tomatoes caramelize. Use your good stuff!
- Fresh basil or parsley (garnish): A pop of color and freshness. Tear, don’t chop, basil for maximum aroma!
Let’s Build That Tart! Step-by-Step with Chef Isla
Step 1: Make the Crust (Chill Time = Flaky Magic!)
Mix flour and salt in a big bowl. Toss in your ice-cold butter cubes. Now, channel your inner pastry rebel: use a pastry cutter, two forks, or even your fingertips to “cut” the butter into the flour until it looks like chunky breadcrumbs with pea-sized butter bits. Why? Those butter pockets steam up in the oven = FLAKINESS! Sprinkle ice water over the mix, 1 tbsp at a time, gently stirring with a fork just until the dough clumps together when pressed. Don’t overmix! Shape into a disk, wrap in plastic, and chill for 30 mins. Chef Hack: Pop it in the freezer for 15 mins if you’re impatient!
Step 2: Blind Bake the Crust (No Soggy Bottoms Allowed!)
Preheat oven to 375°F (190°C). Roll your dough disk on a floured surface into a 12-inch circle. Drape it gently into a 9-inch tart pan (with removable bottom!), pressing into corners. Trim excess. Prick the base everywhere with a fork—this stops air bubbles. Line the crust with parchment paper and fill with pie weights, dried beans, or even uncooked rice. Bake 15 mins. Carefully lift out the parchment and weights. Bake another 10 mins until lightly golden. Let it cool slightly. Why blind bake? It sets the crust so your cheesy filling won’t turn it mushy!
Step 3: Whip Up That Dreamy Filling
In a bowl, mix ricotta (or goat cheese!), shredded mozzarella (or Gruyère), egg, thyme, garlic powder, a big pinch of salt, and a few cracks of pepper. Stir until smooth and happy. Taste it! Adjust seasoning if needed. Spread this creamy goodness evenly into your cooled crust. Chef Hack: A small offset spatula makes this super easy and keeps the crust clean.
Step 4: Tomato Time! Arrange & Drizzle
Arrange your well-drained tomato slices over the cheese filling in concentric circles, overlapping slightly—they’ll shrink as they bake! Drizzle lightly with olive oil and sprinkle another tiny pinch of salt over the tomatoes. This draws out flavor and helps them caramelize.
Step 5: Bake to Golden Perfection
Slide the tart into the oven. Bake 25-30 minutes. You’ll know it’s ready when the tomatoes look slightly wrinkled and juicy, the cheese filling is set (no jiggle!), and the crust edges are a deep golden brown. Watch closely near the end! Ovens vary.
Step 6: The Grand Finale: Garnish & Slice!
Let the tart cool on a rack for at least 15 minutes—this helps the filling set for cleaner slices. Just before serving, scatter fresh basil or parsley over the top. Use a sharp knife to slice. Admire your handiwork! ✨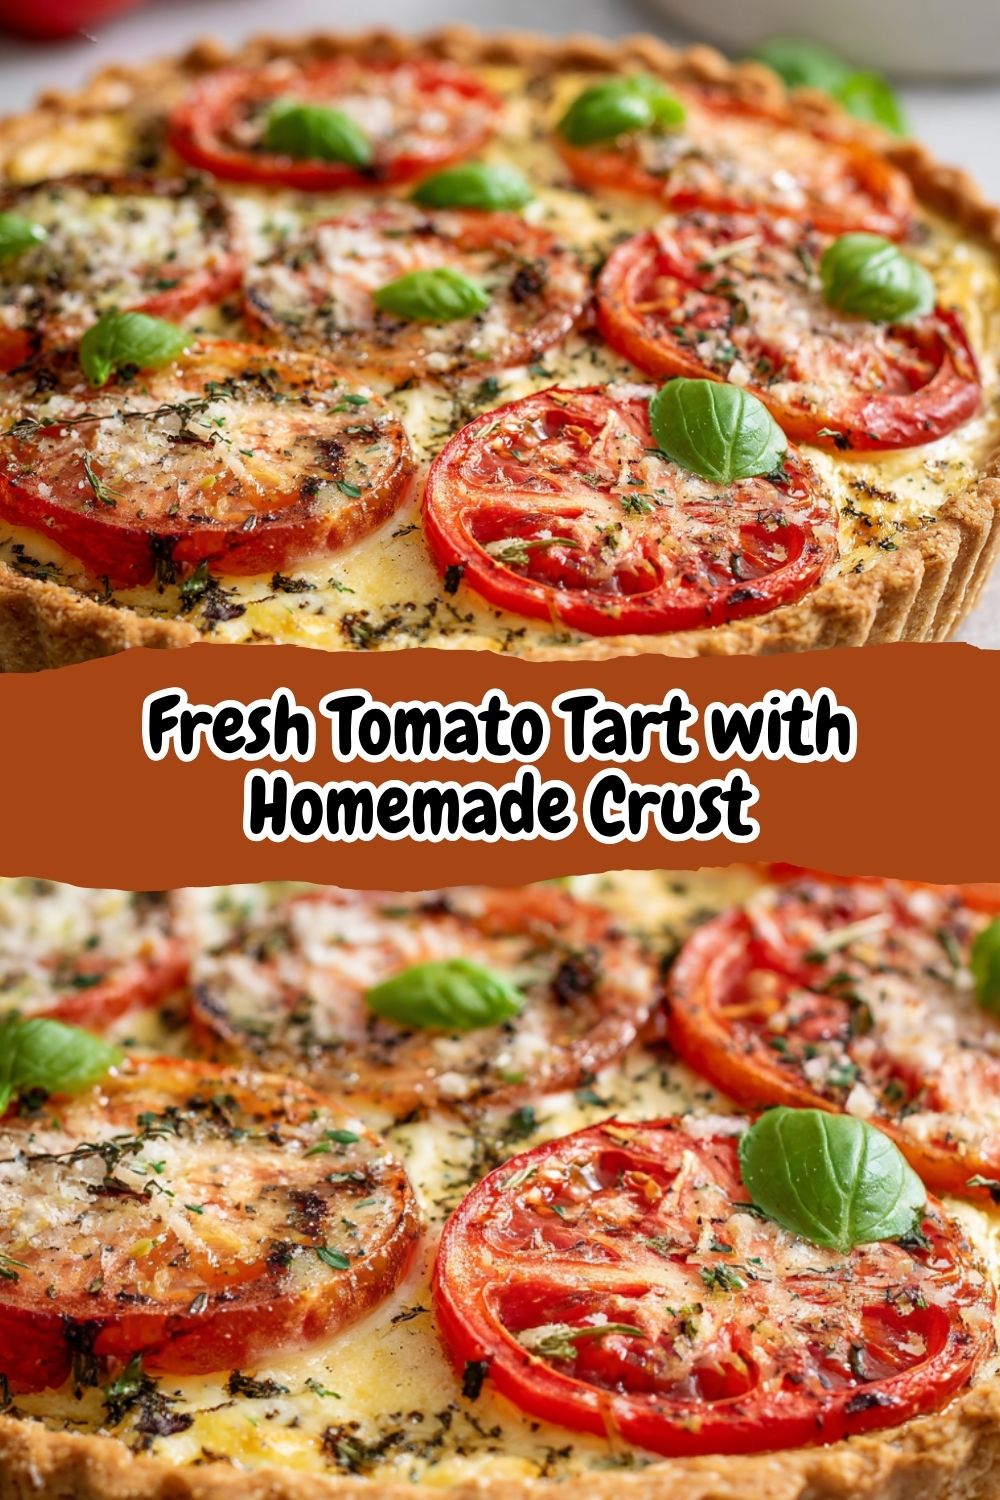
Show It Off: Serving Your Tomato Tart Like a Pro
This tart is a stunner all on its own! Slide it onto a rustic wooden board or a simple white platter to let those vibrant tomatoes shine. For a casual brunch or picnic, cut it into wedges and serve warm or at room temp—it travels like a dream! Pair it with a zippy arugula salad tossed in lemon vinaigrette to cut the richness. Hosting dinner? Add a chilled glass of rosé or sparkling water with lemon. Leftovers? (Unlikely, but!) Reheat gently in the oven or enjoy cold straight from the fridge—it’s delicious any way!
Make It Yours: 5 Tasty Twists to Try
- Mediterranean Magic: Swap ricotta for feta, add ¼ cup chopped Kalamata olives and 1 tbsp chopped oregano to the filling. Top tomatoes with a sprinkle of za’atar before baking.
- Pesto Party: Spread 2 tbsp basil pesto over the baked crust before adding the cheese filling. Game-changer!
- Vegan Vibes: Use vegan butter in the crust. For filling, blend ¾ cup firm tofu (pressed!) with 2 tbsp nutritional yeast, 1 tbsp lemon juice, and 1 tsp miso paste instead of cheese/egg.
- Caramelized Onion Bliss: Sauté 1 thinly sliced onion until golden brown. Cool, then spread over the cheese filling before adding tomatoes.
- Zucchini Ribbon Upgrade: Layer thinly sliced zucchini ribbons with the tomatoes for extra garden goodness!
Isla’s Insider Scoop: More Than Just a Recipe
This tart has evolved SO much since my first wobbly attempt! I once used under-drained tomatoes, and let’s just say… it was “tomato soup in a crust boat.” Lesson learned! Now I keep paper towels permanently on standby. The beauty? It’s forgiving. Crust crack? Patch it with dough scraps! Cheese filling too thick? A splash of cream fixes it. One Sunday, my nephew (the pickiest eater alive) devoured two slices because I called it “Pizza Pie”—marketing wins! It’s become my go-to for last-minute guests. I’ve even prepped the crust and filling the night before, then assembled and baked it fresh in the morning. The best part? That moment when you slice into it and see those gorgeous layers—pure kitchen pride. Don’t stress perfection; embrace the rustic charm!
Tomato Tart SOS: Fixes for Common Hiccups
Q: My crust shrank/slumped in the pan! Help?
A: No panic! Did you chill the dough? Cold dough = less shrinkage. Also, avoid stretching it when fitting into the pan—gently press it in. Using pie weights religiously helps too!
Q: Why is my filling watery?
A: Tomatoes are sneaky! Draining slices thoroughly is crucial. If it’s still wet, try salting slices, letting them sit 10 mins, then patting dry. Also, ensure your cheese filling isn’t too loose—ricotta varies in moisture. Drain it in a sieve if needed!
Q: Can I use store-bought crust?
A: Absolutely! A good-quality puff pastry or shortcrust works. Pre-bake according to package directions. But hey, homemade tastes extra special—you got this!
Q: My tart bottom got soggy. What happened?
A: Likely culprit: adding filling to a hot crust or under-baking during blind bake. Always cool the crust first, and bake those weights the full time! Also, don’t skip pricking the base.
Nutritional Info (Per Slice, 1 of 8)
- Prep Time: 40 mins (includes chilling)
- Bake Time: 40 mins
- Total Time: ~1 hr 20 mins
- Yields: 8 slices
- Calories: ~260
- Carbs: 18g
- Sugar: 2g
- Fat: 18g
- Protein: 7g
- Sodium: 270mg