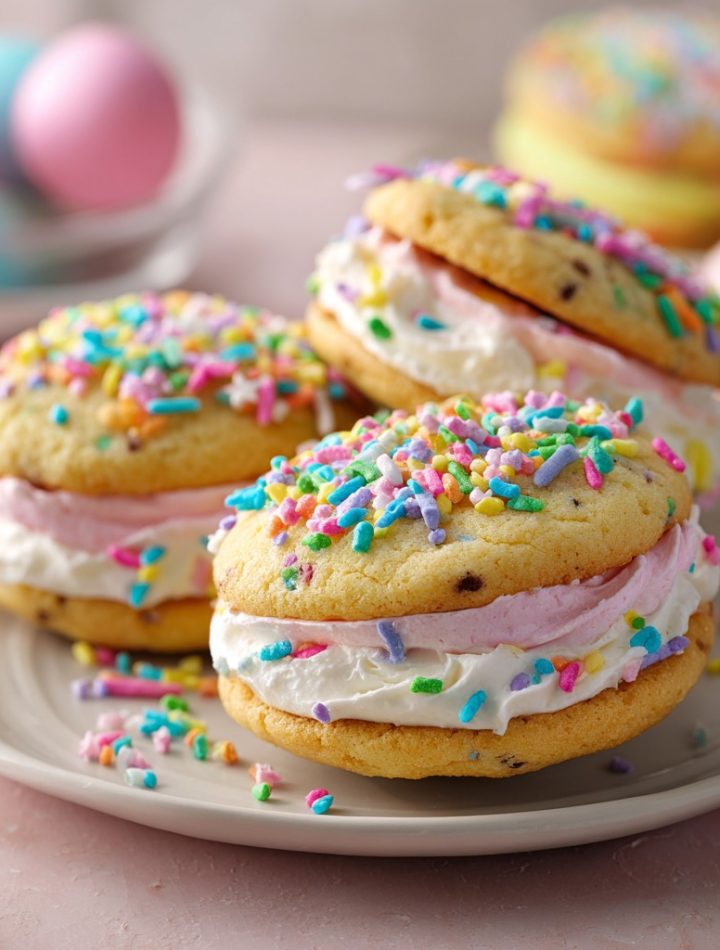

Easter Whoopie Pies: Your New Favorite Spring Tradition!
Hey there, friend! Isla here, waving from my flour-dusted kitchen counter. Can you feel it? That light, breezy, pastel-colored shift in the air? Spring has officially sprung, and with it comes that wonderful, contagious urge to bake something joyful. Something that looks like a celebration and tastes like a hug. Enter the star of today’s show: Easter Whoopie Pies.
Now, I know what you might be thinking. “Isla, whoopie pies seem… fancy.” I’m here to tell you, with a wink and a whisk, that these are anything but. Imagine the softest, most buttery cookie you’ve ever had, rolled in a tidal wave of cheerful sprinkles, then sandwiched with a cloud of homemade vanilla frosting so fluffy you could take a nap on it. The magic? We’re starting with a simple cake mix. That’s right—this is a shortcut so smart it feels like a kitchen superpower. These colorful sandwich cookies are a guaranteed crowd-pleaser, perfect for Easter baskets, spring brunches, or just because-Tuesday deserves a rainbow. So, tie on your favorite apron, crank up some happy tunes, and let’s make baking memories that are as bright and fun as these treats!
The Sprinkles of My Childhood
This recipe takes me right back to my grandma’s linoleum-floored kitchen, the air thick with the scent of sugar and impending mischief. She wasn’t a “precise measure” kind of baker; she was a “dump, stir, and taste” legend. Her version of whoopie pies (which she boldly called “Gobs”) were legendary at our town’s spring picnic. My job, from the age of about five, was Official Sprinkle Applier. I’d sit at the table with a bowl of rainbow jimmies, painstakingly rolling each warm cookie in them until my fingers were stained every color of the rainbow. I felt like a culinary artist, and the pride when someone took a bite and said, “Isla did the sprinkles!” was everything. These Easter Whoopie Pies are my grown-up, pastel-hued homage to those days. They’re less about perfection and more about the pure, unadulterated fun of making something delicious with your own two hands. Every sprinkle is a little bit of that kitchen joy, and I can’t wait for you to feel it.
Print
Easter Whoopie Pies : Colorful Sandwich Cookies Made Easy
- Total Time: 50 minutes
- Yield: 12 sandwich cookies 1x
Description
These Easter Whoopie Pies are the perfect mix of soft, buttery cookies and creamy homemade frosting, dressed up in pastel sprinkles to match the holiday vibe. Using a simple cake mix base, they come together quickly and taste like spring in every bite. Whether you’re baking for a crowd or just your own sweet tooth, these cheerful cookie sandwiches are sure to impress.
Ingredients
For the cookies:
1 box French vanilla cake mix
1 large egg
½ cup unsalted sweet cream butter, softened
3 cups pastel Easter sprinkles (1 cup mixed in, 2 cups for rolling)
For the vanilla frosting:
½ cup unsalted sweet cream butter, softened
2½ cups powdered sugar
2 tablespoons heavy whipping cream
1 teaspoon pure vanilla extract
A few drops of pink gel food coloring
1 piping bag with a star tip
Instructions
Preheat oven to 350°F (175°C) and line two baking sheets with parchment or silicone mats.
In a mixing bowl, beat cake mix, egg, and butter until soft dough forms. Fold in 1 cup of sprinkles.
Scoop dough using a small cookie scoop, roll into balls, then coat each in remaining sprinkles.
Place dough balls on baking sheets and bake 10–12 minutes. Let cool completely.
For the frosting, beat softened butter until creamy. Add powdered sugar, cream, vanilla, and food coloring. Beat until fluffy and holds a peak.
Pair up cookies and pipe frosting onto the flat side of one. Gently press the second cookie on top.
- Prep Time: 20 minutes
- Cook Time: 10–12 minutes
- Category: Dessert
Gathering Your Flavor Wave
Here’s the beautiful part: this ingredient list is short, sweet, and totally approachable. Let’s break it down like we’re chatting over the grocery cart.
- 1 box French vanilla cake mix: This is our secret weapon! It gives the cookies that perfect, consistent texture and flavor base. Chef’s Insight: I love French vanilla for its rich, almost custardy note, but a regular vanilla or even a funfetti mix works brilliantly too!
- 1 large egg: Our binder. It brings the dough together and adds structure. Make sure it’s at room temperature for easier mixing.
- ½ cup unsalted sweet cream butter, softened: The key to tenderness and that melt-in-your-mouth feel. “Sweet cream butter” just means it’s made from fresh cream (it’s the standard at the store). Pro Tip: Softened means you can easily make a dent with your finger. Too melted, and the cookies will spread; too cold, and your dough will be crumbly.
- 3 cups pastel Easter sprinkles: The festive heart of the operation! We’ll use 1 cup mixed right into the dough for bursts of color inside, and 2 cups for the glorious outer coating. Substitution Tip: Use any sprinkle blend you love! Jimmies work best for rolling as they stick easily. For a non-holiday version, try rainbow or chocolate sprinkles.
For the Vanilla Frosting:
- ½ cup unsalted sweet cream butter, softened: Same rules apply here. This forms the luxurious base of our frosting.
- 2½ cups powdered sugar: Also called confectioners’ sugar. It dissolves beautifully for a smooth, not-grainy frosting. Chef’s Hack: Sift it if you have time! It makes the fluffiest frosting.
- 2 tablespoons heavy whipping cream: This is what takes our frosting from good to “can I eat it with a spoon?” levels of amazing. It adds richness and the perfect pipeable consistency. Milk can sub in a pinch, but cream is king.
- 1 teaspoon pure vanilla extract: The flavor backbone. Always opt for pure over imitation for the best taste.
- A few drops of pink gel food coloring: Gel coloring gives vibrant color without thinning the frosting. A pastel pink frosting peeking out of those sprinkle-coated cookies? Chef’s kiss!
- 1 piping bag with a star tip: Makes you look like a pro and creates gorgeous swirls. No piping bag? A zip-top bag with the corner snipped off works just fine!
Let’s Bake Some Magic: Step-by-Step
Ready? Let’s do this. I’m right here with you, virtually handing you the spatula.
- Preheat & Prep: Fire up that oven to 350°F (175°C). This is our first step for a reason—it gives the oven time to get perfectly, evenly hot. Line your baking sheets with parchment paper or silicone mats. This is non-negotiable for easy release and no sticking. No one wants a sprinkle casualty stuck to the pan!
- Make the Dough: In a large mixing bowl, combine the cake mix, egg, and softened butter. Beat it with a hand mixer (or strong arm power!) on medium until a soft, pliable dough comes together. It will seem crumbly at first, but keep going—it’ll form a ball. Now, grab a spatula and gently fold in that 1 cup of sprinkles. Watch the colors marble through the dough—it’s instant happiness.
- Scoop, Roll, and Coat: Use a small cookie scoop (about 1 tablespoon size) for perfect, even cookies. Roll each scoop into a smooth ball between your palms. Now, the fun part: pour those remaining 2 cups of sprinkles into a shallow bowl. Roll each dough ball generously in the sprinkles, pressing lightly so they adhere. You want a full, festive coverage! Place them about 2 inches apart on your prepared sheets.
- Bake to Perfection: Slide those trays into your preheated oven. Bake for 10-12 minutes. Watch closely at the 10-minute mark! You want the cookies to look set and just barely starting to golden on the bottom. They will still be soft in the center—that’s perfect! They firm up as they cool. Overbaking is the enemy of soft whoopie pies. Let them cool on the baking sheet for 5 minutes, then transfer to a wire rack to cool completely. Patience is key here—warm cookies will melt our fluffy frosting.
- Whip Up the Frosting: While the cookies cool, let’s make the frosting cloud. In a clean bowl, beat the softened butter on medium-high speed for 2-3 minutes until it’s pale, creamy, and dreamy. Gradually add the powdered sugar, a cup at a time, beating on low first to avoid a sugar snowstorm, then increasing the speed. Add the heavy cream, vanilla, and your pink gel coloring. Now, beat it on medium-high for a full 2-3 minutes. You’ll see it transform—becoming light, airy, and holding stiff peaks. Taste it. You’re welcome.
- Assemble with Love: Fit your piping bag with the star tip and fill it with frosting. Pair up your cooled cookies by size. Pipe a generous swirl (or a dollop!) of frosting onto the flat side of one cookie. Gently press its partner on top, giving a slight twist to secure it. That’s it! You’ve just created edible joy.
How to Serve Your Edible Sunshine
Presentation is part of the fun! Arrange these whoopie pies on a vintage cake stand or a simple white platter to let their colors really pop. For an Easter brunch, tuck a few into pastel napkins in a basket. They’re fantastic with a cold glass of milk, a hot cup of coffee, or a springtime mimosa. They’re rich, so one is a perfect sweet treat—but I won’t judge if you go back for seconds. The leftover frosting? (If there is any!). It’s amazing on graham crackers or stirred into your morning oatmeal. No waste here!
Ride Your Own Flavor Wave: Fun Variations
The beauty of this recipe is its versatility. Here are a few ways to make it your own:
- Chocolate Lover’s Dream: Use a devil’s food cake mix and add ½ cup of mini chocolate chips to the dough. Pair with a chocolate buttercream or a marshmallow fluff filling.
- Lemon Berry Burst: Use a lemon cake mix. Add 1 teaspoon of lemon zest to the frosting instead of pink coloring, and fold in some freeze-dried raspberry powder for a tangy twist.
- Funfetti Party: Use a funfetti cake mix and roll the dough balls in rainbow sprinkles. Instant birthday vibes!
- Gluten-Free Friendly: Simply use your favorite gluten-free vanilla cake mix! The method stays exactly the same.
- “Naked” Whoopie Pies: Skip the outer sprinkle roll and just have the sprinkles inside. They’ll have a lovely, rustic look and a fun confetti surprise in every bite.
Isla’s Kitchen Confidential
This recipe has evolved from many happy (and a couple hilarious) kitchen experiments. The first time I made them, I was so excited I tried to roll the dough balls in sprinkles before chilling the dough. Cue a kitchen counter that looked like a unicorn exploded—sprinkles everywhere, dough sticking to everything. Lesson learned: the dough is perfect to work with right after mixing! Another time, I got ambitious and tried to make the cookies giant. They baked into each other, creating one giant “whoopie slab.” We just broke it apart and called it “deconstructed whoopie pie cake.” It was still devoured. The moral? Don’t stress. Baking is about the joy, not the perfection. These cookies are forgiving and full of love. I keep a batch in the fridge because I love the firmer, almost cake-pop-like texture when they’re chilled. Try it!
Your Questions, Answered!
Q: My dough is really sticky! What did I do wrong?
A: Don’t worry! This usually means your butter was a bit too soft or your egg was large. The cake mix has variation too. Just pop the dough in the fridge for 15-20 minutes to firm up. It’ll be much easier to handle.
Q: Can I make these ahead of time?
A> Absolutely! You have options. 1) Bake the cookies, let them cool completely, and store unfrosted in an airtight container at room temp for 2 days, or freeze for up to a month. 2) Assemble the whoopie pies and store them in a single layer in the fridge for up to 3 days. The frosting may soften the cookies slightly, making them even more cake-like and delicious.
Q: My cookies spread too much/flattened a lot.
A> This typically points to butter that was too melted or an oven that wasn’t hot enough. Make sure your butter is just softened, and always let your oven preheat fully. Also, check your oven temperature with a separate thermometer—they can be off!
Q: Can I use a different frosting?
A> Of course! A classic marshmallow fluff filling is divine. Or, for a lighter option, mix 4 oz of softened cream cheese into the buttercream recipe. Just adjust the powdered sugar if it gets too thin.
Nutritional Info (Approximate, per sandwich cookie)
Calories: ~320 | Fat: 16g | Saturated Fat: 10g | Carbohydrates: 43g | Sugar: 33g | Protein: 1g
Note: This is an estimate based on the ingredients used. For precise dietary calculations, please use your preferred nutrition calculator with the exact brands and quantities you use.