
Crescent Roll Taco Ring: The Ultimate Fun & Family-Friendly Dinner
Hey there, flavor friend! Isla here, ready to pull up a virtual stool at my kitchen island and talk about one of my all-time favorite ways to turn a regular Tuesday into a celebration. We’re talking about the legendary, the magnificent, the always-a-hit Crescent Roll Taco Ring.
Now, I know what you might be thinking. “Isla, a taco… ring?” Trust me, I get it. But this isn’t just a recipe; it’s an experience. Imagine all the craveable, bold flavors of your favorite taco night—the savory seasoned beef, the gooey melted cheese, the cool, crisp toppings—wrapped up in a warm, golden, buttery crescent roll blanket, baked into a gorgeous, pull-apart ring that lands right in the center of your table like a culinary trophy.
This dish is the hero of busy weeknights, the star of game-day spreads, and the secret weapon for hassle-free entertaining. It looks like you spent hours crafting something fancy, but the truth is, it’s incredibly simple. No fussy techniques, no hard-to-find ingredients—just pure, unadulterated joy in food form. So, if you’re ready to make everyone at your table do a little happy dance, grab your favorite skillet and let’s ride this delicious wave together.
The Taco Night Upgrade We Never Knew We Needed
My love for this taco ring is deeply personal. It goes back to my first “hosted” dinner party in my tiny, post-college apartment. The kitchen was about the size of a broom closet, my budget was tight, but my desire to impress my new friends was huge. I wanted something that felt special, communal, and fun—a far cry from the usual pot of spaghetti.
I stumbled upon the concept of a “ring” made from crescent dough, and a lightbulb went off. Tacos were our universal love language. What if I combined them? I remember the slight panic as I arranged the dough triangles, convinced they’d somehow explode in the oven. But when I pulled that golden, puffy, cheesy-smelling masterpiece out of the oven, the entire apartment erupted in “oohs” and “aahs.” We gathered around, pulling off warm, stuffed pieces, loading them up with toppings, and laughing the whole time. It wasn’t just dinner; it was an event. That’s the magic I want to share with you—the magic of food that brings people together, literally and figuratively, around one delicious centerpiece.
Print
Crescent Roll Taco Ring : Fun, Cheesy & Family-Friendly Dinner
- Total Time: 40 minutes
- Yield: 8 servings 1x
Description
This Crescent Roll Taco Ring is a show-stopping twist on taco night! Made with seasoned ground beef, melty cheese, and buttery crescent dough, it’s easy to pull apart and perfect for sharing. Whether it’s game day, a party, or just dinner with the family, this fun-to-make ring brings everyone to the table with big smiles and bigger appetites.
Ingredients
2 cans (8 oz each) crescent roll dough
1 lb ground beef
1 packet taco seasoning
1/3 cup water
1 cup shredded cheddar cheese
Optional toppings: shredded lettuce, diced tomatoes, sour cream, sliced olives, salsa, jalapeños
Instructions
Preheat oven to 375°F (190°C).
In a skillet, cook ground beef over medium heat until browned. Drain excess grease.
Add taco seasoning and water. Simmer for 2–3 minutes until thickened.
On a baking sheet, arrange crescent dough triangles in a circle with the wide ends in the center, overlapping slightly.
Spoon taco meat onto the wide ends of the dough, then sprinkle with cheese.
Fold the pointed ends over the filling and tuck under the ring to secure.
Bake for 20–25 minutes, or until golden brown.
Cool slightly, then garnish with your favorite taco toppings.
- Prep Time: 15 minutes
- Cook Time: 25 minutes
- Category: Dinner, Main Course
What You’ll Need: Simple Ingredients, Maximum Flavor
Here’s your shopping list for fun! I’ve included my little chef notes to help you understand the “why” and give you the confidence to make swaps if you need to.
- 2 cans (8 oz each) refrigerated crescent roll dough: The buttery, flaky foundation of our ring. Don’t unroll them until you’re ready to assemble—cold dough is easier to work with! For a flakier texture, look for the “crescent sheet” dough if available.
- 1 lb ground beef (85/15 or 90/10 lean/fat ratio): This is our flavor anchor. The little bit of fat keeps it juicy. Chef’s Insight: You can easily swap this for ground turkey, chicken, or a plant-based crumble for a different twist!
- 1 packet (about 1 oz) taco seasoning: The quick flavor hero. I’m all for shortcuts that work! If you have a homemade blend you love, use about 2-3 tablespoons of that instead.
- 1/3 cup water: This helps the seasoning bloom and cling to the meat, creating a saucy, cohesive filling that won’t be dry.
- 1 cup shredded cheddar cheese: The glorious, melty glue. I prefer a sharp cheddar for a flavor punch, but a Mexican blend (cheddar, Monterey Jack, etc.) is absolutely fantastic here. Pre-shredded is fine for convenience, but block cheese you shred yourself melts even creamier.
- Optional Toppings for Serving: This is where you make it your own! Think: shredded crisp lettuce, diced ripe tomatoes, a big dollop of cool sour cream or Greek yogurt, sliced black olives, your favorite salsa (pico de gallo is amazing), pickled jalapeños for heat, or a squeeze of fresh lime juice.
Let’s Build Some Deliciousness: Step-by-Step
Ready? Aprons on, oven pre-heating, let’s get into the fun part! I’ll walk you through each step with my favorite tips to guarantee success.
- Heat Things Up: Preheat your oven to 375°F (190°C). Place one rack in the center. Grab a large rimmed baking sheet. No need to grease it—the crescent dough has enough butter to handle that! Little Chef Hack: For easy cleanup and a perfect golden bottom, line the sheet with parchment paper.
- Brown the Beef: In a large skillet over medium-high heat, cook your ground beef. Use a wooden spoon or spatula to break it up into small crumbles. Cook until it’s no longer pink, about 5-7 minutes. Carefully drain the excess grease. Pro Tip: I tilt the skillet and use a wad of paper towels held with tongs to soak it up—saves a dish versus pouring it into a can!
- Season to Perfection: Sprinkle the taco seasoning packet (or your homemade mix) evenly over the browned beef. Pour in the 1/3 cup of water. Give it a really good stir, reduce the heat to medium-low, and let it simmer for 2-3 minutes. You’ll see it thicken up beautifully. Remove it from the heat and let it cool for just a few minutes while you work on the dough. Why Cool? A super-hot filling can start melting the dough before it even hits the oven, making assembly tricky.
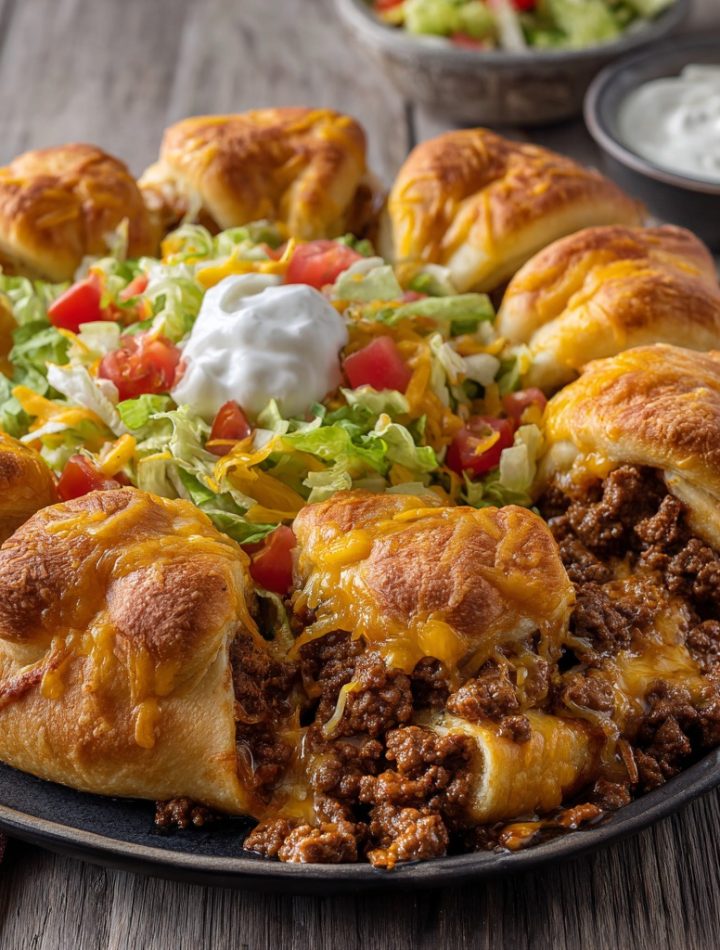
- Create Your Canvas: Now for the artsy part! Open your crescent roll cans and unroll the dough. You’ll see it’s perforated into triangles. On your prepared baking sheet, arrange these triangles in a large circle (about 10-12 inches in diameter) with the wide ends overlapping in the center and the pointed ends facing outward. It should look like a sun with thick, overlapping rays in the middle. Don’t stress about perfection—a little rustic charm is welcome!
- Load It Up: Spoon your slightly cooled taco meat evenly over the wide, overlapping ends of the dough in the center. Leave a small border of dough (about a 1/2 inch) clear. Next, take a generous handful of that glorious shredded cheese and sprinkle it right over the meat layer. Cheese on top of the meat helps “glue” the filling together as it melts.
- Wrap & Tuck: Here’s the satisfying part. Take the pointed end of each dough triangle and lift it up and over the filling, tucking the tip underneath the wide part of the dough in the center to secure it. Continue all the way around until your ring is fully wrapped. It will look like a beautiful, stuffed braid or crown. If a little filling peeks out, no worries—it adds character!
- Bake to Golden Glory: Carefully slide your creation into the preheated oven. Bake for 20-25 minutes, or until the entire crescent dough is a deep, golden brown and sounds hollow when gently tapped. The cheesy, beefy aroma filling your kitchen will be your first clue it’s done!
- The Grand Finale: Take the ring out of the oven and let it cool on the baking sheet for about 5-10 minutes. This is crucial! Letting it rest allows the cheesy filling to set slightly, so it doesn’t gush out when you cut into it. Now, transfer it to a serving platter (or serve right from the sheet for ease) and get ready to decorate with all your fresh, colorful toppings!
Serving Your Masterpiece
Presentation is part of the fun! Place the warm ring on a large platter or board. I love to create a “toppings bar” in small bowls around it: a mound of shredded lettuce, a bowl of diced tomatoes, a dish of sour cream, a small jar of salsa, and a bowl of sliced olives or jalapeños. Let everyone pull off their own piece and customize it to their heart’s content. It’s interactive, it’s delicious, and it makes everyone feel like a chef at their own personal taco station!
Make It Your Own: Flavor Twists & Swaps
The beauty of this recipe is its versatility. Here are a few ways to ride a different flavor wave:
- Buffalo Chicken Ring: Swap the beef for shredded cooked chicken tossed in buffalo sauce. Use a ranch seasoning packet instead of taco, and mix blue cheese crumbles into the cheddar.
- Breakfast-for-Dinner Ring: Fill it with scrambled eggs, cooked breakfast sausage, and shredded pepper jack cheese. Serve with a side of salsa for dipping!
- Fiesta Veggie Ring: Sauté bell peppers, onions, black beans, and corn with the taco seasoning. Use a Mexican cheese blend. Perfect for a meatless Monday.
- Pizza Party Ring: Use Italian sausage or pepperoni as the base meat, mix with pizza sauce, and fill with mozzarella and Parmesan cheese. Dip in extra marinara!
- Low-Carb/Low-Fat Twist: Use ground turkey or chicken, low-fat cheese, and serve the ring deconstructed over a big salad with all the toppings for a lighter meal.

Isla’s Kitchen Notes & Stories
Over the years, this taco ring has seen it all in my kitchen. I’ve made it with my niece and nephew, their little hands carefully (and messily) arranging the dough triangles. I’ve whipped it up for last-minute potlucks where it’s always the first thing to disappear. I’ve even made a mini, personal-sized version on a rough day just for me—because comfort food doesn’t always need an audience.
One of my favorite evolutions is adding a layer of cream cheese mixed with a bit of the taco seasoning right onto the dough before adding the meat. It creates this luscious, creamy layer that’s absolutely divine. Don’t be afraid to play and make it yours! The only rule in my kitchen is that food should bring joy, and this ring is a pure, unfiltered dose of it.
Your Questions, Answered!
Q: Can I make this ahead of time?
A: Absolutely! You can prepare the filling (let it cool completely) and shred the cheese a day ahead. Store them separately in the fridge. When ready to bake, assemble the ring with the cold filling and cheese—you might need to add 2-3 extra minutes to the bake time.
Q: My ring opened up in the oven! The filling is spilling out. What happened?
A: No drama! This usually means the filling was too hot when assembled (melting the dough’s butter too quickly) or the pointed ends weren’t tucked securely underneath. It will still taste amazing. Next time, ensure your meat is cooler and give those dough points a good, firm tuck. A little spillage is just extra “flavor confetti.”
Q: Can I use something other than crescent dough?
A: Yes! Puff pastry sheets, cut into triangles, will give you an even flakier, more voluminous ring. Pizza dough, rolled thin and cut, will give you a chewier, breadier base. The method remains the same!
Q: How do I store and reheat leftovers?
A: Store any leftover ring (good luck with that!) in an airtight container in the fridge for up to 3 days. Reheat individual slices in the air fryer or toaster oven for best crispiness, or microwave for 30-60 seconds if you’re in a hurry.
Nutritional Info (Per Serving, Approximate)
This is a general estimate based on the core ingredients without optional toppings. Values will vary with specific brands and swaps.
- Servings: 8
- Calories: ~310
- Fat: 19g
- Carbohydrates: 20g
- Protein: 15g
And there you have it, my friend! Your guide to creating a dinner that’s as fun to make as it is to eat. I hope this Crescent Roll Taco Ring brings as much laughter and flavor to your table as it has to mine. Don’t forget to tag @BiteTide if you share a photo—I love seeing your kitchen wins! Now, go create some delicious memories.
With love and a full plate,
Isla 💛