 Let’s Make Some Magic: Easy Chocolate Nest Treats for Easter!
Hey there, friend! Isla here, ready to dive into one of my all-time favorite springtime traditions. If your heart does a little happy dance at the thought of no-bake treats, adorable edible crafts, and that magical moment when chocolate melts into something utterly irresistible, you are in the *perfect* place. Today, we’re whipping up the cutest, crunchiest, most joy-filled little bites: Chocolate Nest Treats.
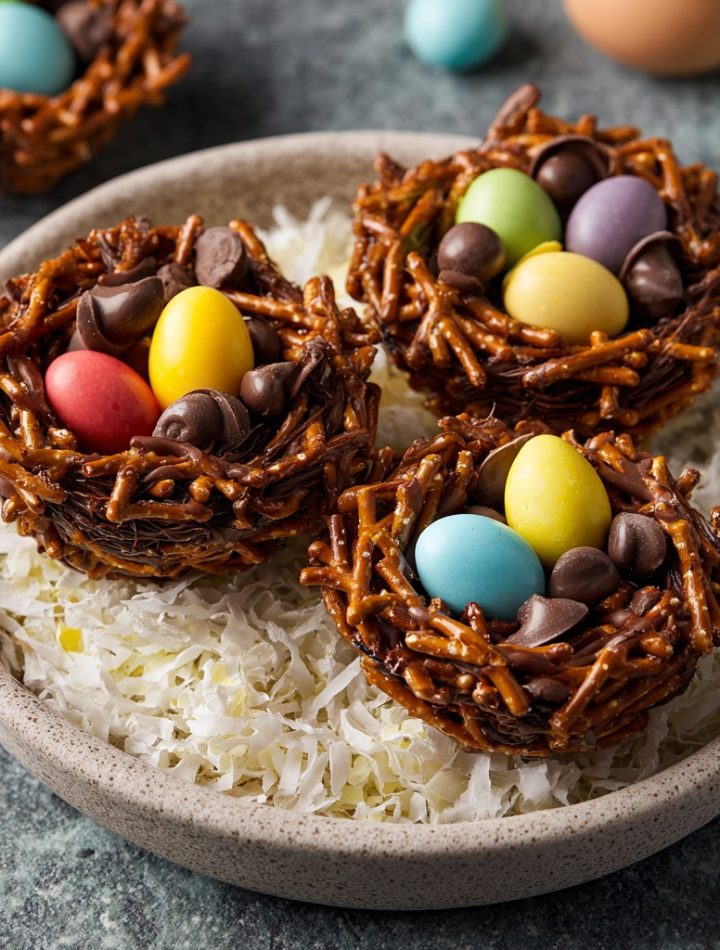
Picture this: crisp chow mein noodles (yes, the kind from the classic American-Chinese takeout side!) or salty pretzel sticks, all snuggled together in a rich coat of melted chocolate, forming a perfect little nest. Then, we tuck in a few brightly colored candy eggs. The result? Pure, unadulterated edible happiness. These aren’t just desserts; they’re a moment of playfulness in your kitchen, a guaranteed smile-maker for kids (and let’s be real, adults too), and the absolute star of any Easter table, spring party, or “I-need-a-sweet-treat-STAT” situation.
The best part? Zero baking required. We’re talking 15 minutes of active, fun kitchen time and a quick chill in the fridge. That’s it. This is the kind of recipe that proves incredible flavor and stunning results don’t have to come with a side of fuss and a sink full of dishes. So, tie on your favorite apron, cue up a good playlist, and let’s ride this delicious, no-bake wave together. Your inner child (and your actual children, if you have them) will thank you.
A Nest Full of Memories: My Grandma’s Kitchen
Every time I make these nests, I’m instantly transported back to my Grandma Rose’s sunny, yellow kitchen. The air would be thick with the scent of her famous lemon loaf cake, but for me, the real magic happened at the little Formica table in the corner. That’s where she’d set out bowls of melting chocolate, a giant box of crispy chow mein noodles, and a treasure trove of pastel candy eggs.
My job, as her officially appointed “Nest Architect,” was to stir the chocolate and noodles with a wooden spoon almost as big as I was. She’d let me drop messy spoonfuls onto wax paper (parchment is my modern upgrade!) and shape them with my little fingers. The rule was: you get to eat one broken “mistake” nest for every three perfect ones you make. Let’s just say I became a master of “strategic imperfections.” Making these wasn’t just about the treat; it was about the laughter, the sticky fingers, and the proud moment of presenting our edible masterpiece to the family. That’s the spirit I want to bring to your kitchen today—a little mess, a lot of heart, and a whole lot of delicious fun.
Print
Chocolate Nest Treats : Easy No-Bake Easter Nests with Candy Eggs
- Total Time: 30 minutes
- Yield: 12 nests 1x
- Diet: Vegetarian
Description
These Chocolate Nest Treats are adorable, easy, and no-bake — perfect for Easter or spring celebrations. Made with melted chocolate and crunchy noodles or cereal, they’re shaped into cute nests and filled with candy eggs for a festive, kid-friendly dessert.
Ingredients
- 1½ cups chocolate chips (semi-sweet, milk, or dark)
- 1 cup butterscotch chips or peanut butter chips (optional)
- 3 cups chow mein noodles or shredded wheat cereal (crushed)
- Candy-coated chocolate eggs (like Mini Eggs or jelly beans)
Instructions
- Line a baking sheet with parchment paper.
- In a microwave-safe bowl, melt chocolate chips (and butterscotch/peanut butter chips if using) in 30-second intervals, stirring between each until smooth.
- Stir in the chow mein noodles until evenly coated.
- Drop spoonfuls of the mixture onto the baking sheet and shape each into a small nest with a dip in the center.
- Place 2–3 candy eggs in the center of each nest while still soft.
- Let the nests set at room temperature or chill in the fridge for 15–20 minutes until firm.
Notes
- Use white chocolate or colored candy melts for a different look.
- For allergy-friendly versions, use nut-free chocolate and cereal.
- Kids can help shape the nests and add eggs — fun for family baking!
- Prep Time: 15 minutes
- Cook Time: undefined
- Category: Dessert
- Method: No-Bake
- Cuisine: American
Nutrition
- Serving Size: 1 nest
- Calories: 180
- Sugar: 14g
- Sodium: 65mg
- Fat: 9g
- Saturated Fat: undefined
- Unsaturated Fat: undefined
- Trans Fat: undefined
- Carbohydrates: 22g
- Fiber: undefined
- Protein: 2g
- Cholesterol: 5mg
Keywords: Easter treats, no-bake dessert, kids recipe, chocolate nests, candy eggs, holiday recipe
Gathering Your Flavor Crew: What You’ll Need
Here’s your simple, straightforward shopping list. I’ve added my favorite chef-y insights and swaps so you can make this recipe your own, no matter what’s in your pantry!
- 2 cups chow mein noodles or broken pretzel sticks – This is the “nest” structure! Chow mein noodles (found in the Asian food aisle) give that authentic, wispy, crunchy nest look. Pretzel sticks, broken into 1-inch pieces, are a fantastic salty-sweet alternative with a more robust crunch. For a nutty twist, you could even use **shredded wheat cereal**!
- 1½ cups chocolate chips – The glue and the glory! I use semi-sweet for a perfect balance, but milk chocolate is a kid-pleaser, and dark chocolate adds a sophisticated edge. Chef’s Tip: The quality of your chocolate matters here. A good chocolate chip melts smoothly and sets with a nice snap.
- ¼ cup peanut butter (optional, but highly recommended) – This is my secret weapon! It adds a subtle richness, helps bind everything together, and gives the chocolate a marvelous flavor depth. For a nut-free version, swap in sun butter or even a tablespoon of coconut oil to keep things smooth.
- 36 candy-coated chocolate eggs – The jewels of the nest! About 3 per nest. You can use mini eggs or the smaller robin’s eggs. This is where the festive color comes in!
- Optional Garnishes: This is your playground! A sprinkle of shredded coconut looks like straw, pastel sprinkles add confetti-like joy, or a white chocolate drizzle makes them extra fancy. Have fun with it!
Building Your Nests: A Step-by-Step Adventure
Ready to create? Follow these simple steps, and I’ll walk you through every tip and trick I’ve learned from years of nest-making!
- Prep Your Landing Zone. Line a large baking sheet with parchment paper or a silicone baking mat. This non-stick surface is crucial for easy removal later. Do this first! There’s nothing worse than scrambling with melted chocolate on your hands.
- Melt the Chocolate (& Peanut Butter) Dream Team. In a large, microwave-safe bowl, combine the chocolate chips and peanut butter (if using). Microwave in 30-second bursts, stirring vigorously after each burst. Stop when just a few small lumps remain—the residual heat will melt them as you stir. Chef’s Hack: For ultimate control and to avoid seizing, use a double boiler: place the bowl over a pot of gently simmering water (make sure the bowl doesn’t touch the water). Stir until silky smooth.
- Bring in the Crunch. Once your chocolate mixture is gloriously smooth, add your chosen “nest” material (chow mein noodles or pretzels). Using a flexible spatula, gently fold and stir until every single piece is thoroughly coated. Be patient and gentle—you don’t want to crush all your crunch! The goal is a glossy, even coating.
- Shape Your Masterpieces. Drop heaping tablespoonfuls of the mixture onto your prepared sheet. Now, with the back of a spoon or lightly greased fingers, gently shape each mound into a nest. Create a slight depression in the center—this is where your candy eggs will live! They don’t need to be perfect; rustic is charming.
- Add the Eggs (The Best Part!). Working quickly before the chocolate sets, press 2-3 candy eggs into the center of each nest. If you’re adding sprinkles or coconut, sprinkle them on now so they stick.
- The Big Chill. Carefully transfer the tray to the refrigerator. Let the nests chill for at least 30 minutes, or until the chocolate is completely firm and set. This is the perfect time to clean up your (minimal) mess!
- Serve & Savor! Once set, gently peel the nests off the parchment. They’re ready to enjoy! Arrange them on a festive platter, pack them into treat bags, or sneak one straight from the fridge—I won’t tell.
How to Serve These Adorable Bites
Presentation is half the fun! Pile these nests high on a cake stand lined with a pastel napkin for a stunning centerpiece. For individual treats, place each nest in a mini parchment cupcake liner. Tuck them into Easter baskets alongside a chocolate bunny, or pack them in lunchboxes for a sweet surprise. They pair beautifully with a glass of cold milk, a cup of coffee, or a scoop of vanilla ice cream for next-level decadence.
Ride Your Own Flavor Wave: Fun Variations
Don’t stop at the classic! This recipe is a fantastic canvas for creativity. Here are a few of my favorite twists:
- Caramel Pretzel Dream: Use pretzel sticks and add 2 tablespoons of dulce de leche or thick caramel sauce to the melted chocolate. Top with a sprinkle of flaky sea salt.
- Tropical Coconut Nest: Use white chocolate instead of dark. Mix in ½ cup of toasted shredded coconut with the noodles. Top with jelly bean “eggs.”
- Cookie Butter Bliss: Swap the peanut butter for speculoos cookie butter. Use a mix of broken waffle cone pieces and chow mein for the crunch.
- Minty Fresh: Use dark chocolate and add ¼ teaspoon of peppermint extract to the melted mixture. Top with pastel green m&m’s or mint chocolate eggs.
- Everything-But-The-Kitchen-Sink: Add a handful of mini marshmallows, crushed potato chips, or even a sprinkle of your favorite cereal to the mix for extra texture and surprise!
Isla’s Chef Notes & Kitchen Confessions
This recipe has been my go-to for so long, it’s practically a member of the family. I’ve made them in a pristine, quiet kitchen and I’ve made them with a toddler “helping” by eating more chocolate chips than made it into the bowl. Both versions were delicious. Over time, I’ve learned that a little warmth is your friend: if your mixture starts to firm up too much while you’re shaping, just pop the bowl back in the microwave for 10 seconds to loosen it up. Also, if you’re a precision person, a small ice cream scoop is fantastic for getting evenly sized nests. But honestly? I love that they’re all a little different. It gives them personality. The biggest evolution? Convincing my husband that the “ugly” one (read: the one with the most extra chocolate pooled at the bottom) is the chef’s mandatory taste-test sample. Some traditions are worth keeping.
Your Questions, Answered!
Q: My chocolate got thick and clumpy when I melted it! What happened?
A: Ah, chocolate can be a finicky friend. This is called “seizing,” and it usually happens if a tiny drop of water or steam gets into the melting chocolate. To fix it, try stirring in a teaspoon of neutral oil (like vegetable or coconut) until it smooths back out. Prevention is key: make sure your bowl and utensils are completely dry, and use the gentle heat of the double-boiler method if you’re worried.
Q: Can I make these ahead of time?
A: Absolutely! They are fantastic make-ahead treats. Store them in a single layer in an airtight container in the refrigerator for up to 5 days. You can also freeze them for up to a month! Just thaw in the fridge before serving.
Q: Are there nut-free alternatives to peanut butter?
A> Yes! SunButter (made from sunflower seeds) works wonderfully and has a similar binding quality. You can also simply omit it and use just chocolate—it will still work! If the mixture seems a bit thick, add a tiny splash of oil to help it coat the noodles.
Q: My nests are falling apart! Help!
A> This usually means they need more “glue” (chocolate) or more chill time. Make sure you’re coating every noodle/pretzel piece thoroughly. If your mixture seems skimpy, don’t be afraid to melt a few more chocolate chips to stir in. And patience, young grasshopper! Let them chill until they are completely firm—no peeking!
Quick Nutrition & Prep Facts
Prep Time: 15 minutes | Chill Time: 30 minutes | Total Time: 45 minutes | Servings: 12 nests
Nutritional info is approximate, per nest (using semi-sweet chocolate and without peanut butter):
Calories: ~180 | Carbohydrates: 20g | Fat: 10g | Protein: 38
These Chocolate Nest Treats prove that simple can still feel special. With just a few ingredients and almost no effort, you get an adorable Easter dessert everyone loves — especially kids. They’re perfect for parties, baskets, or make-ahead holiday treats, and you can customize them with any chocolate or toppings you like. Once you try them, they’ll become an Easter tradition year after year. 🐣🍫