Your New Pizza Night Secret: A Dough That’s Fast, Foolproof, and Fabulous
Let’s have a real talk for a second. How many times have you craved a truly great pizza—the kind with a crust that’s simultaneously shatteringly crisp on the bottom, tender and chewy on the inside, with those beautiful, puffy, leopard-spotted edges—only to be met with the reality of floppy delivery or cardboard-like frozen disks? I’ve been there too. For the longest time, I thought that kind of pizza magic was reserved for wood-fired ovens and chefs with flour perpetually in their hair.
Well, I’m here to tell you a delicious secret: the gateway to pizza nirvana is not a fancy degree or a $1000 oven. It’s a simple, forgiving, incredibly fast homemade dough. And it lives right here, in this recipe. This is the dough that broke the spell for me. The one I make on a regular Tuesday because, why not? The one that has survived my kitchen chaos, my forgetfulness (yes, I’ve walked away from rising dough to chase my dog with a rogue meatball), and my endless experiments.
This isn’t just a recipe; it’s your ticket to freedom. Freedom from takeout menus, from disappointment, and from the myth that homemade pizza is a weekend-only project. In about an hour—most of which is just the dough happily puffing up on its own—you can be sliding a crispy, chewy, personalized masterpiece into your oven. We’re talking about real-life, bold flavor, with zero fuss. So, tie on your apron, clear a little counter space, and let’s turn your kitchen into the best pizzeria in town. Trust me, your inner pizza fanatic is about to throw a party.
Print
Easy Pizza Dough Recipe (Crispy, Chewy & Ready Fast)
- Total Time: ~1 hour 15 minutes
Description
This simple homemade pizza dough recipe is foolproof, flexible, and ready in under an hour. With a chewy crust and crisp edges, it’s perfect for classic pizzas, calzones, or flatbreads—no special tools needed.
Ingredients
2¼ tsp active dry yeast (1 packet)
1 tsp sugar
¾ cup warm water (about 110°F / 43°C)
2 cups all-purpose flour (plus extra for dusting)
1 tsp salt
1 tbsp olive oil
Instructions
Activate yeast: In a small bowl, mix warm water, sugar, and yeast. Let sit for 5–10 minutes until foamy.
Mix the dough: In a large bowl, combine flour and salt. Add yeast mixture and olive oil. Stir until a dough forms.
Knead: On a floured surface, knead for 5–7 minutes until smooth and elastic.
First rise: Place dough in a greased bowl, cover, and let rise in a warm place for 30–45 minutes, or until doubled.
Shape and bake: Punch down dough, roll out, and top as desired.
Bake at 475°F (245°C) for 10–14 minutes, until golden and crisp.
- Prep Time: 15 mins
- Cook Time: 12 minutes
- Category: Breakfast
Nutrition
- Calories: 140
- Carbohydrates: 26g
- Protein: 4g
More Than Dough: A Love Letter to Friday Night Tradition
My love affair with pizza dough started not in a fancy kitchen, but on the worn linoleum floor of my grandma’s coastal cottage. Every other Friday was “Pizza Friday,” a sacred, sauce-splattered ritual. The air would be thick with the scent of garlic and tomatoes simmering for hours, but the real magic was in the dough. My job, from the time I could reach the counter on a step-stool, was the “punch down.”
Grandma would mix the flour, yeast, and water in her big yellow bowl, let it rise under a clean tea towel on the sunny windowsill, and then call me over. “Isla! The dough is ready for you!” I’d scramble over, plunge my tiny fist into the soft, pillowy cloud, and giggle as it deflated with a gentle whoosh. She’d show me how to fold it over itself, explaining it was “putting the dough to bed for a little nap.” To me, it was alive. It was a living, breathing thing we were nurturing together before we turned it into dinner.
Those nights weren’t about perfect circles (ours were always charmingly amoeba-shaped). They were about laughter, flour fights, and the profound joy of creating something from just a few humble ingredients. This recipe is that feeling, distilled. It’s that same simple, forgiving process, streamlined for our busy lives. Every time I punch down a risen bowl of dough, I’m seven years old again, standing on that stool, surrounded by love and the promise of a delicious, shared meal. That’s the spirit I want you to bring to your countertop today.
Gathering Your Flavor Toolkit: Simple Ingredients, Big Impact
Here’s the beautiful part: greatness requires just six basic ingredients. No trek to a specialty store needed. Let’s break them down, because knowing the why makes you a more confident cook!
- 2¼ tsp (1 packet) Active Dry Yeast: This is our tiny, powerful engine. It’s what makes the dough rise and creates those lovely air pockets. Make sure your yeast isn’t ancient! If it’s past its prime, your dough might not wake up. Chef’s Insight: You can use instant yeast interchangeably here—just mix it right in with the dry flour. No need to activate it separately!
- 1 tsp Sugar: Don’t worry, your crust won’t taste sweet. This tiny bit is just food for the yeast, giving it a quick boost to get foamy and active. Easy Swap: Honey or maple syrup works beautifully too.
- ¾ cup Warm Water (about 110°F / 43°C): Temperature is key! Too hot, and you’ll scald the yeast. Too cold, and it’ll stay dormant. Aim for water that feels warm to the touch, like a pleasant bath. If you’re a gadget person, a thermometer is great, but your wrist is a perfectly good sensor.
- 2 cups All-Purpose Flour, plus extra for dusting: The workhorse. All-purpose flour gives us the ideal balance of protein for structure and tenderness. Pro-Tip: For a chewier, more artisanal crust, swap in ½ cup of bread flour. For a lighter, crispier crust, try 00 pizza flour if you have it!
- 1 tsp Salt: The flavor hero. Salt strengthens the gluten and makes every bite sing. Never add it directly to the yeast water, as it can inhibit growth. Always mix it with the flour first.
- 1 tbsp Olive Oil: Our secret weapon for a supple, easy-to-work-with dough and a golden, flavorful crust. It also helps keep the dough from sticking. Fun Twist: Use garlic-infused or chili oil here for an extra flavor layer in your crust!
Let’s Make Some Magic: The Step-by-Step, No-Stress Guide
Ready? Let’s do this. I’ll walk you through each step with all my favorite hacks so you feel like a pro on your first try.
- Wake Up the Yeast: In a small bowl or even a liquid measuring cup, combine the warm water and sugar. Stir until the sugar dissolves. Sprinkle the yeast over the top and give it one gentle stir. Now, walk away for 5-10 minutes. This is your first test of success! When you come back, it should look foamy, creamy, and smell bready. If it doesn’t, your yeast might be old or your water was too hot/cold. No foam? Start over with new yeast. Chef’s Hack: No need to dirty a spoon—just swirl the bowl gently.
- The Big Mix: In a large mixing bowl, whisk together your flour and salt. This ensures the salt is evenly distributed. Make a well in the center and pour in the foamy yeast mixture and the olive oil. Using a wooden spoon or a silicone spatula, start stirring from the center outward, gradually incorporating the flour. It will look shaggy and messy—that’s perfect! Just keep mixing until no dry patches of flour remain.
- The Knead for Speed (and Texture!): Lightly dust your clean countertop with flour. Dump the dough out and start kneading. The motion is: push the dough away from you with the heel of your hand, fold it back over itself, give it a quarter turn, and repeat. Do this for 5-7 minutes. You’re looking for the dough to transform from a sticky, ragged ball into a smooth, soft, and elastic one. The Windowpane Test: To know it’s ready, pinch off a small piece and gently stretch it. If you can stretch it thin enough to see light through it without it tearing immediately, you’ve built perfect gluten! If it tears, knead for another minute and test again.
- The First Rise (The “Patience is a Virtue” Step): Drizzle a clean bowl with a tiny bit of olive oil. Place your smooth dough ball in, turn it once to coat it lightly in oil (this prevents a dry skin from forming), and cover the bowl with a damp kitchen towel, plastic wrap, or even a fitted plate. Place it in a warm, draft-free spot. On top of the fridge, in a turned-off oven with the light on, or on a sunny counter are all great spots. Let it rise for 30-45 minutes, until it’s roughly doubled in size. Busy Life Tip: Need to pause? You can let this rise slowly in the fridge for up to 24 hours for incredible flavor development!
- Shape Your Canvas: Once puffy, it’s time for the satisfying “punch down”! Gently press your fist into the center to deflate it. Turn it out onto a lightly floured surface. Now, you can shape it. For a classic round pizza, use your fingers to press and stretch from the center out, or carefully lift it and let gravity help you stretch it by draping it over your knuckles. Don’t stress about a perfect circle—rustic is charming! For a rectangular pizza or sheet pan style, use a rolling pin. Pro Move: If the dough keeps shrinking back, let it rest for 5-10 minutes; the gluten is just tense and needs to relax.
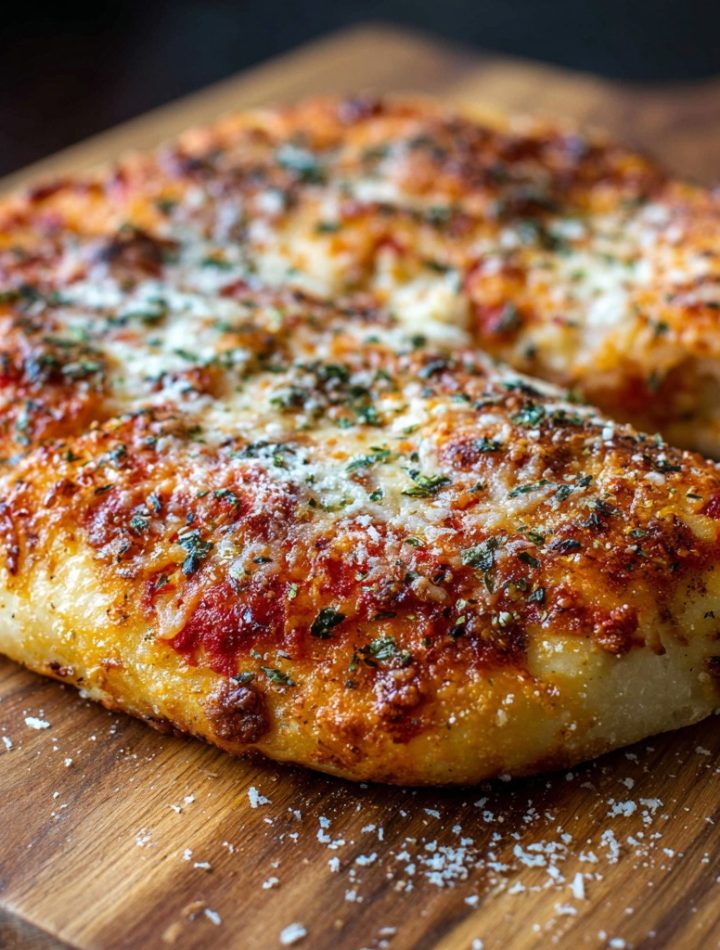
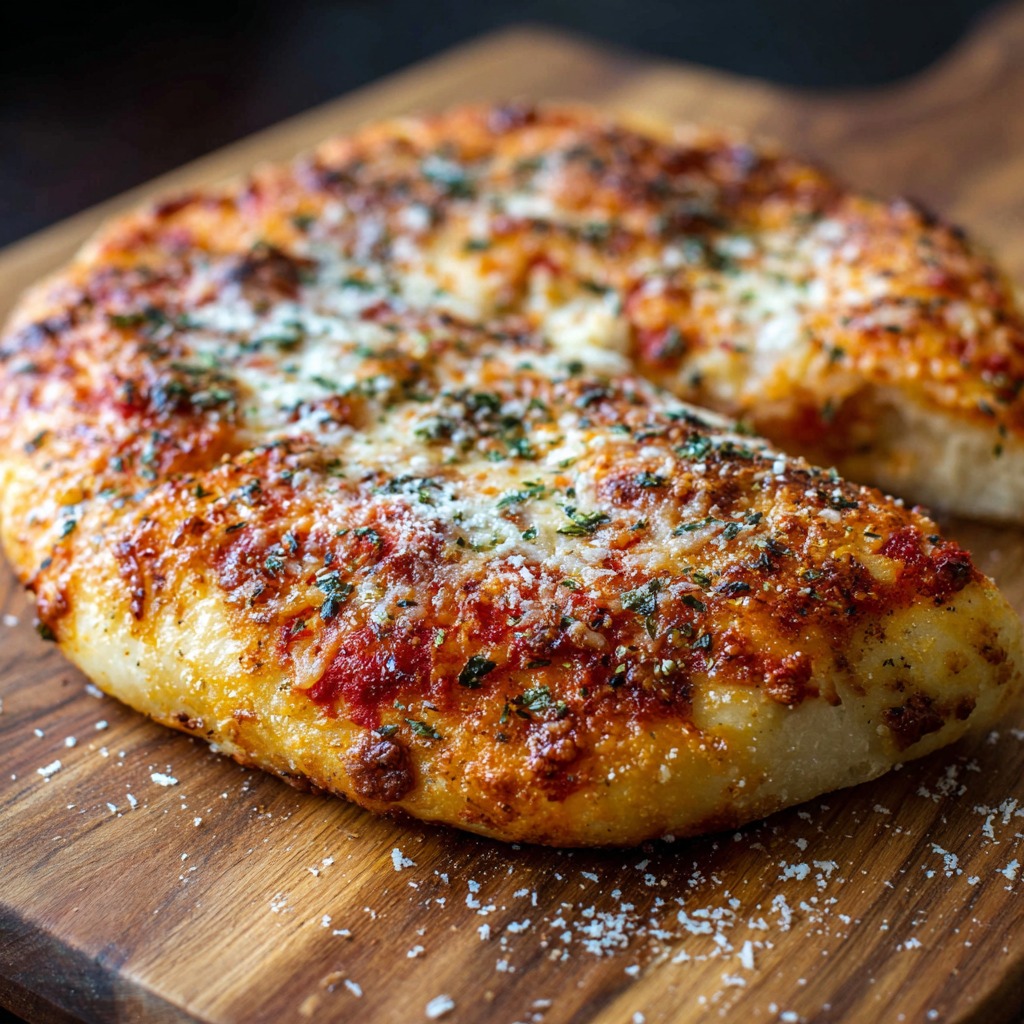
- Top & Bake to Perfection: Transfer your shaped dough to a piece of parchment paper (this is my #1 trick for easy transfer!), a lightly floured pizza peel, or a baking sheet. Add your favorite sauce and toppings, but remember: less is more! Overloading leads to a soggy crust. Crank your oven as high as it will go (475°F-500°F/245°C-260°C is ideal). If you have a pizza stone or steel, preheat it for a full hour for the crispiest bottom. Bake for 10-14 minutes, until the crust is golden, the cheese is bubbly, and your kitchen smells like heaven.
From Oven to Table: The Grand Finale
Pull that gorgeous pie from the oven and let it rest for just 2-3 minutes on a cutting board. This lets the cheese set slightly so it doesn’t all slide off when you slice! Use a pizza wheel, a large chef’s knife, or even kitchen scissors to cut it. I love serving it right on the board in the middle of the table for that rustic, family-style feel. A final flourish? A drizzle of good olive oil, a sprinkle of fresh basil or red pepper flakes, or a dusting of grated Parmesan. Then, stand back and accept the compliments. You earned them!
Ride Your Own Flavor Wave: 5 Tasty Twists
This dough is your blank slate. Here’s how to customize it:
- Herb-Infused Crust: Add 1 tbsp of dried Italian herbs or 2 tbsp of finely chopped fresh rosemary/thyme to the flour before mixing.
- Whole Wheat Boost: Substitute up to 1 cup of all-purpose flour with whole wheat flour for a nuttier flavor and extra fiber.
- Garlic & Parmesan Edge: After shaping, brush the outer crust with garlic butter and press grated Parmesan into it before adding other toppings.
- Make it a Calzone: Divide dough in two after the rise. Roll each into a circle, pile toppings on one half, fold over, seal edges, and bake. Brilliant for packed lunches!
- Breakfast Pizza: Top baked crust with ricotta, scrambled eggs, crispy bacon, and chives. Yes, please.
Isla’s Kitchen Confidential: The Dough Truths
This recipe has been my steadfast companion for years, but it wasn’t always perfect. I vividly remember the first time I tried to “improve” it by adding a ton of extra flour during kneading because it felt sticky. I ended up with a dense, tough pizza biscuit. Lesson learned: trust the process, and a little stickiness is okay—it often works itself out. The dough will absorb flour as you knead, so add it sparingly.
Another evolution? The rise time. I used to be a slave to the clock, but now I go by look and feel. Is your kitchen chilly? It might take an hour. Is it a hot summer day? Maybe 25 minutes. Your dough is ready when it’s ready, not when a timer dings. This flexible mindset is what makes real-life cooking joyful, not stressful. This dough is resilient. It forgives. It adapts. Just like we do in our kitchens and in our lives. So have fun with it!
Your Questions, Answered: Pizza Dough 911
Q: My dough didn’t rise. What went wrong?
A: The most likely culprits are old yeast or water that was too hot (which killed the yeast) or too cold (which put it to sleep). Always test your yeast if it’s been in the pantry for a while. The water should feel warmly pleasant on your wrist.
Q: The dough is too sticky and impossible to handle!
A: Don’t panic! First, make sure you gave it the full kneading time; the dough often comes together in the last minute. Have a small bowl of flour nearby and dust your hands lightly—not the dough directly—to prevent sticking. Resist the urge to add tons of extra flour, as this makes the crust tough.
Q: Can I make this dough ahead of time?
A> Absolutely, and I often do! After kneading, place the dough in an oiled bowl, cover tightly, and refrigerate for 1-3 days. The slow rise develops amazing flavor. Let it sit at room temperature for an hour before shaping. You can also freeze the dough ball after the first rise for up to 3 months. Thaw overnight in the fridge.
Q: Why is my crust chewy but not crispy?
A> The enemy of crispiness is moisture and low heat. Make sure your oven is fully preheated (give it 20-30 extra minutes). Use a pizza stone/steel or a preheated inverted baking sheet. Don’t overload with wet toppings. Baking directly on parchment can also trap a little steam; for max crisp, slide the pizza off the parchment onto the hot stone halfway through baking if you’re feeling brave.
Nutritional Information (For the dough only, yields 8 slices)
Please note: This is for the plain dough base. Toppings will significantly alter these values.
Calories: 140 | Total Carbohydrates: 26g | Protein: 4g | Total Fat: 2.5g | Fiber: 1g
Prep Time: 15 mins | Rise Time: 45 mins | Cook Time: 12 mins | Total Time: ~1 hr 15 mins | Yields: 1 medium pizza (8 slices)
This homemade pizza dough isn’t just a recipe—it’s a little act of rebellion against mediocre pizza. It’s flexible, foolproof, and built for real life, whether you’re cooking on a random Tuesday or turning dinner into a shared tradition. Once you feel that soft dough in your hands and pull a bubbling, golden pizza from your oven, you’ll never look at takeout the same way again. Save this recipe, make it your own, and let your kitchen become the pizzeria you always wished you had. 🍕✨