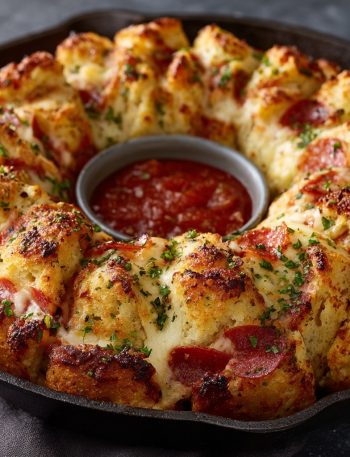
Pillsbury Biscuit Garlic Butter Cheese Bombs: Your New Go-To Party Hero
Hey friend! Let’s talk about that magical moment when you pull a tray of golden, puffy, buttery bites out of the oven. The aroma of roasted garlic fills the air, and you just know that inside each fluffy parcel is a heart of molten, stretchy cheese. That’s the pure, uncomplicated joy of these Garlic Butter Cheese Bombs. If you’ve ever wished you could bottle up the cozy, indulgent feeling of your favorite breadstick and a cheesy garlic knot having the most delicious love child, you have found your recipe.
This is one of those legendary recipes that lives in the sweet spot between “impossibly easy” and “wildly impressive.” We’re using a brilliant shortcut—trusty Pillsbury biscuits—to create a treat that feels homemade and special. In about 25 minutes, you can transform a few simple ingredients into the ultimate snack, appetizer, or side dish that will have everyone hovering around the oven door. Whether you’re wrangling hangry kids before dinner, need a last-minute potluck savior, or are just treating yourself to a solo flavor celebration, these cheese bombs are your answer. They’re crispy, they’re soft, they’re savory, and they are utterly, completely irresistible. Let’s make some magic happen!
The Cheese Pull That Started It All
My love for these cheesy bombs traces back to a seriously chaotic (and hilarious) Friendsgiving a few years ago. I’d spent two days preparing a “feast for the ages,” but as friends started arriving, the inevitable question arose: “What can we snack on RIGHT NOW?” Panic! I rummaged through the fridge and pantry, spotting a forgotten can of biscuits, a nub of mozzarella, and of course, my ever-present stick of butter. With 15 minutes on the clock, I threw these together on a whim, not expecting much.
The moment I pulled that first batch out and broke one open, a collective, dramatic gasp filled the kitchen. That epic, Instagram-worthy cheese pull stopped the party in its tracks. The platter was demolished in 60 seconds flat, and my elaborate turkey was suddenly upstaged by the humble, last-minute appetizer. It was a beautiful lesson: the best food isn’t about the most ingredients or the fussiest techniques. It’s about the joy you share and that glorious, gooey cheese pull that brings everyone together. Now, I always keep the ingredients on hand, because you never know when you’ll need to create a little moment of cheesy, buttery bliss.
Print
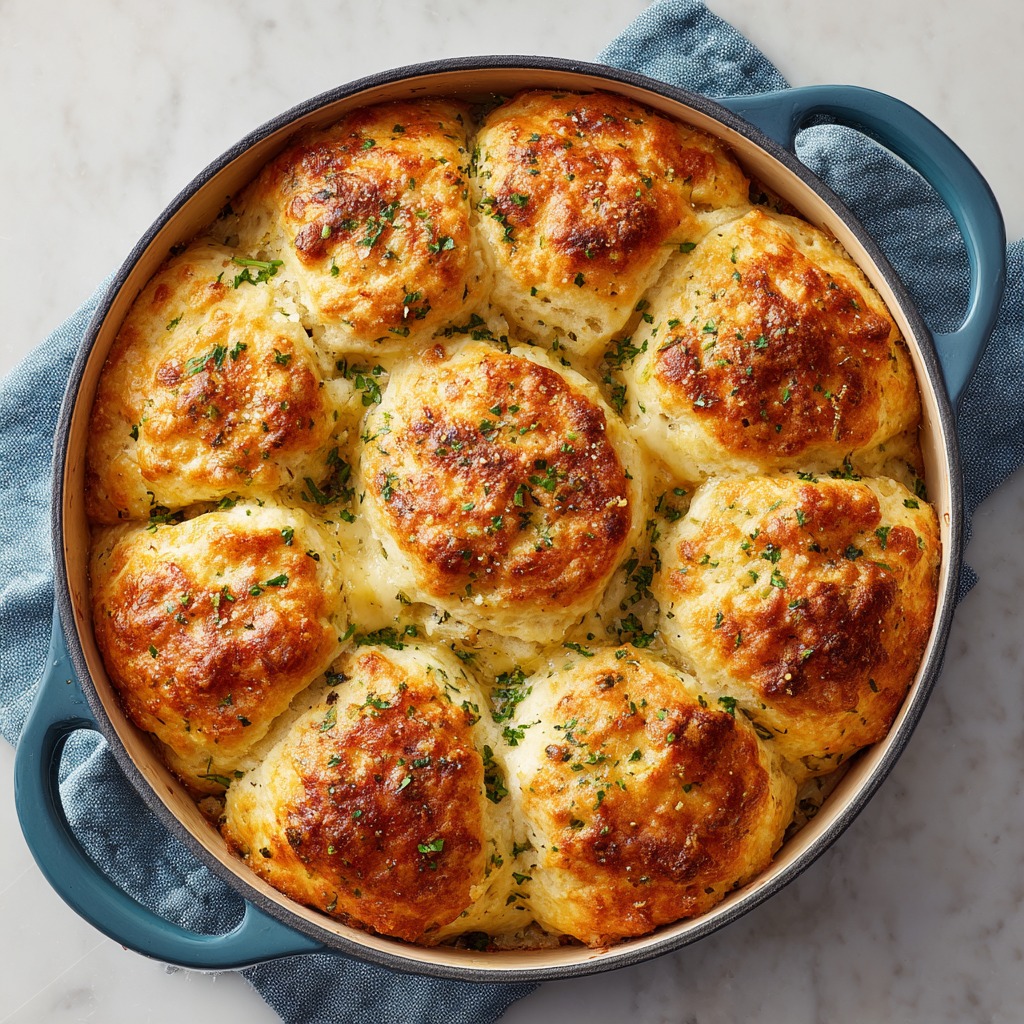
Pillsbury Biscuit Garlic Butter Cheese Bombs : Gooey, Buttery & Irresistible
- Total Time: 25 minutes
- Yield: 16 cheese bombs 1x
- Diet: Vegetarian
Description
Pillsbury biscuit garlic butter cheese bombs are gooey, buttery, and irresistible pull-apart bites filled with melty cheese and brushed with garlicky butter. Made with refrigerated biscuit dough, they’re the perfect quick appetizer, snack, or side for any meal.
Ingredients
- 1 can (16 oz) Pillsbury Grands refrigerated biscuits
- 16 small cubes of mozzarella or cheddar cheese
- 4 tbsp unsalted butter, melted
- 2 cloves garlic, minced
- 1 tsp Italian seasoning
- 1 tbsp chopped parsley (optional)
- 2 tbsp grated Parmesan cheese (optional, for topping)
Instructions
- Preheat oven to 375°F (190°C). Line a baking sheet with parchment paper.
- Separate biscuits and flatten each one slightly with your fingers.
- Place a cube of cheese in the center of each biscuit. Fold the dough around the cheese and pinch to seal, forming a ball.
- Place seam-side down on the prepared baking sheet.
- In a small bowl, mix melted butter, garlic, and Italian seasoning.
- Brush each dough ball generously with garlic butter mixture.
- Bake for 12–15 minutes, or until golden brown and puffed.
- Immediately brush with more garlic butter, sprinkle with Parmesan and parsley if desired.
- Serve warm and enjoy the melty, cheesy center!
Notes
- Use string cheese cut into chunks for easy filling.
- Add a pinch of red pepper flakes to the garlic butter for heat.
- Swap in herbed or garlic cheese for extra flavor.
- Perfect for dipping in marinara or ranch.
- Best served warm—reheat in oven or air fryer for crispiness.
- Prep Time: 10 minutes
- Cook Time: 15 minutes
- Category: Appetizer
- Method: Baking
- Cuisine: American
Nutrition
- Serving Size: 1 cheese bomb
- Calories: 110
- Sugar: 1g
- Sodium: 230mg
- Fat: 7g
- Saturated Fat: 4g
- Unsaturated Fat: 2g
- Trans Fat: 0g
- Carbohydrates: 9g
- Fiber: 0g
- Protein: 3g
- Cholesterol: 15mg
Keywords: biscuit cheese bombs, garlic butter bites, cheesy pull-apart biscuits, Pillsbury appetizers, easy party snack
Gathering Your Flavor Arsenal
Here’s everything you need to create these little bites of heaven. I’ve added my chef-y notes and swaps so you can make this recipe work with what you’ve got!
- 1 can Pillsbury Grands! Southern Homestyle or Buttermilk Biscuits (8-count): The hero of our shortcut! The “Grands” size gives us the perfect dough-to-cheese ratio. The flaky layers puff up beautifully. Chef’s Tip: Don’t use the “Flaky Layers” variety for this—they’re harder to seal. The “Southern Homestyle” or classic “Buttermilk” biscuits are perfect.
- 8 cubes of low-moisture, part-skim mozzarella cheese (about 1-inch each): This is our gooey core! Low-moisture mozzarella melts wonderfully without making the dough soggy. Easy Swap: No cubes? Use string cheese! Just cut each stick into 3 pieces. You can also use a sharp cheddar cube for a more pungent bite, or a pepper jack cube for a kick.
- 3 tablespoons unsalted butter, melted: This is the golden glue that gives us flavor and that gorgeous sheen. Chef’s Insight: Using unsalted butter lets you control the salt level. If you only have salted, just skip adding any extra salt elsewhere.
- 1 large garlic clove, minced (or ½ teaspoon garlic powder): Fresh garlic gives an incredible aromatic punch, but garlic powder works in a pinch and distributes flavor evenly. Pro Move: For a deeper flavor, sauté the minced garlic in the butter for 30 seconds before brushing. It’s next-level!
- 1 tablespoon chopped fresh parsley (or 1 teaspoon dried): This adds a pop of color and a fresh, herbal note that cuts through the richness. Fun Twist: Try fresh chopped chives or dill for a different herbal vibe.
- 2 tablespoons grated Parmesan cheese (optional): The salty, umami-packed finishing touch. It adds a little extra savoriness and texture. Don’t Skip It: I highly recommend it! The nuttiness of Parmesan takes these from great to unforgettable.
Let’s Build Some Bombs: Your Step-by-Step Guide
Get ready for the easiest, most satisfying 25 minutes in your kitchen. Follow these steps, lean into my tips, and you’ll be a cheese bomb master in no time.
- Preheat & Prep: Fire up your oven to 375°F (190°C). This is the perfect temperature to cook the dough through and get that golden-brown exterior without burning the garlic. Line a baking sheet with parchment paper—not just for easy cleanup, but to prevent the buttery bottoms from sticking. My Little Hack: If you don’t have parchment, a light mist of cooking spray on the bare pan will do the trick.
- Stuff & Seal: Pop open that can of biscuits (the best sound in the world, right?). Separate them. On a clean surface, gently flatten and stretch each biscuit into a 4-5 inch circle. It doesn’t need to be perfect! Place a mozzarella cube in the center. Now, bring the edges of the dough up and over the cheese, pinching them firmly together at the top to create a seal. Really squeeze that seam! This is your cheese containment system. Place each bomb seam-side down on your prepared sheet. Critical Tip: If your dough feels sticky, dust your fingers with a tiny bit of flour. A good seal is the secret to preventing a cheese eruption in your oven!
- Whip Up The Liquid Gold: While your oven finishes heating, make the garlic butter. Melt the butter in a small bowl. Mince your garlic clove super fine (or measure out your garlic powder) and stir it into the warm butter along with the parsley. The warmth will soften the raw garlic bite and bloom the dried herbs if you’re using them. This mixture is pure flavor magic.
- Brush & Bath: Using a pastry brush (or a spoon in a pinch), generously brush each stuffed dough ball with the garlic butter. Don’t be shy! Get the tops and sides. This butter bath is what creates that crispy, flavorful, golden crust. Chef’s Secret: Reserve about half of the garlic butter for after baking. Trust me on this.
- Bake to Golden Perfection: Slide the tray into your preheated oven. Bake for 13-15 minutes. You’re looking for a beautiful, deep golden brown color and a puffed-up appearance. Watch Closely: Ovens vary! At the 13-minute mark, peek in. If they’re lightly golden, give them another minute or two. That color equals flavor.
- The Final, Flavor-Boosting Touch: As soon as you pull the tray out of the oven, immediately brush the bombs with the remaining garlic butter. This double-butter treatment infuses them with an insane amount of flavor and gives them a gorgeous glossy finish. While they’re still hot, sprinkle them with the optional grated Parmesan. It will stick beautifully to the warm, buttery surface.
- The Most Important Step: Let them cool on the baking sheet for exactly 2-3 minutes. I know it’s torture, but this allows the molten cheese to set just slightly, so when you bite in, it’s gloriously gooey instead of lava-hot. Then, serve immediately and prepare for the applause!
How to Serve These Cheesy Clouds of Joy
Presentation is part of the fun! Pile these warm cheese bombs high on a rustic wooden board or a simple platter. Tuck in a few sprigs of fresh parsley or rosemary for a green accent. I love placing a small bowl of warm marinara sauce or a creamy ranch dressing in the center for dipping—it turns them into an interactive, communal snack. They’re perfect as a standalone appetizer, but they also shine as a sidekick to a big, cozy bowl of tomato soup or a hearty pasta salad. No matter how you serve them, just make sure they’re warm. That’s when the magic cheese pull is at its peak performance!
Ride Your Own Flavor Wave: Fun Variations
Once you’ve mastered the classic, the world is your cheesy oyster! Here are a few of my favorite twists:
- Everything Bagel Bombs: After the final butter brush, dip the top of each bomb in Everything Bagel seasoning before the Parmesan. Instant savory crunch!
- Pepperoni Pizza Bombs: Add a few mini pepperoni slices inside with the cheese, and brush the tops with butter mixed with garlic powder and a pinch of dried oregano. Serve with pizza sauce.
- Herb & Sun-Dried Tomato: Mix a tablespoon of finely chopped sun-dried tomatoes into the cream cheese (if using) or add a few small pieces inside with the mozzarella. Use fresh basil in your butter brush.
- “Cinnamon Roll” Sweet Bombs: For a dessert version! Stuff with a small chunk of cream cheese or a chocolate chip. Brush with melted butter mixed with cinnamon and sugar, and finish with a vanilla glaze after baking.
- Dairy-Free Swap: Use your favorite vegan butter and a block-style vegan mozzarella that melts well (they’re getting so good!). Check your biscuit can label for dairy content.
Isla’s Kitchen Notebook
This recipe has become a living, evolving staple in my home. I’ve made it probably a hundred times, and I’ve learned a thing or two! First, the cheese leakage: if a bomb does burst, don’t stress. It’s just bonus “cheese crisp” on the pan, and they still taste amazing. I’ve found that if my kitchen is really warm and the dough gets too soft, popping the sealed bombs in the freezer for 5 minutes before baking helps them hold their shape. Also, my kids now demand a “kids’ batch” where I swap half the garlic butter for just plain melted butter and honey—a weird but delicious sweet-and-salty treat they adore. The beauty of this recipe is its flexibility. It’s a blueprint for fun. So grab your can of biscuits and make it your own!
Your Questions, Answered
Q: Can I make these ahead of time?
A: You can assemble them ahead! Seal the stuffed bombs, place them on the parchment-lined sheet, cover tightly with plastic wrap, and refrigerate for up to 4 hours before baking. Add 1-2 minutes to the bake time since they’ll be cold. I don’t recommend freezing the raw assembled bombs, as the dough can get soggy.
Q: My cheese totally leaked out! What did I do wrong?
A: The two most common culprits are: 1) The seal wasn’t tight enough. Really pinch that dough closed and make sure no cheese is peeking through. 2) The cheese cubes were too big. Stick to a 1-inch cube max. A little leakage is normal and tasty, but a full blow-out usually means one of these two things.
Q: Can I use shredded cheese instead of cubes?
A: I don’t recommend it for the classic version. Shredded cheese has anti-caking agents that can make the melt less smooth, and it’s harder to contain inside the dough. The solid cube gives you that signature molten center. For a different texture, though, a mix of a small cube and a pinch of shredded sharp cheddar can be fun!
Q: Why brush with butter twice?
A: The first brush before baking helps the crust brown beautifully and starts the flavor infusion. The second brush right after baking is the flavor bomb—the hot dough soaks it up instantly, making it infinitely more garlicky, buttery, and delicious. Never skip the post-bake butter!
Nutritional Info*
*This is a rough estimate per cheese bomb, based on the specific brands and quantities used. Values can vary.
- Calories: ~220
- Total Fat: 13g
- Saturated Fat: 6g
- Carbohydrates: 20g
- Protein: 6g
- Sodium: 430mg
Prep Time: 10 mins | Cook Time: 15 mins | Total Time: 25 mins | Makes: 8 Cheese Bombs