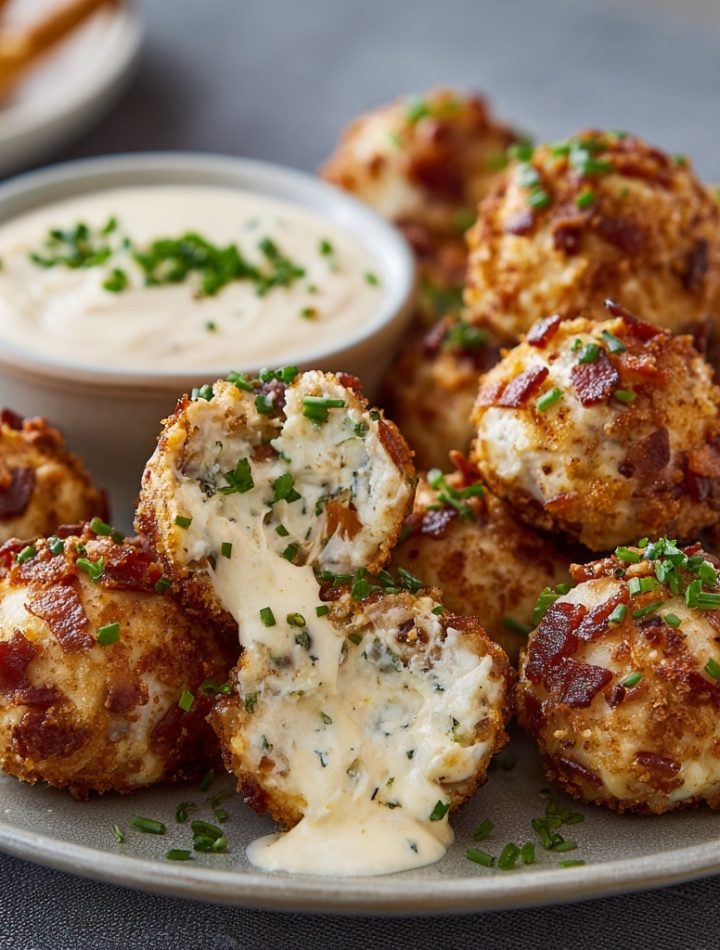
Your New Go-To Party Hero: Mini Bacon Ranch Cheeseballs
Hey there, flavor friend! Isla here from BiteTide. Can we talk about party food for a second? You know the scene: you’ve got a house full of people, the game is on (or the music is pumping), and you’re trying to be a good host while also secretly wanting to join the fun. The last thing you need is a fussy, high-maintenance appetizer that chains you to the oven while everyone else is living their best life.
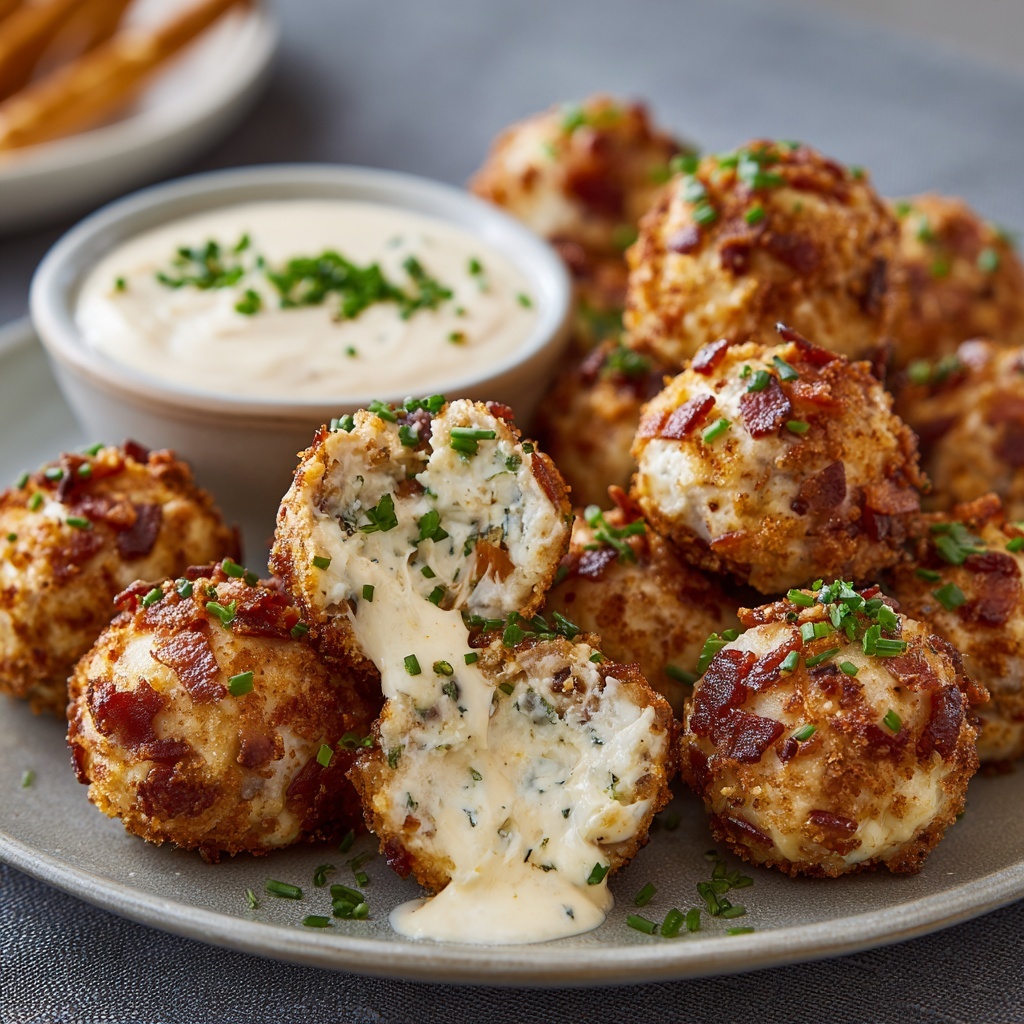
That’s exactly why I’m so completely, utterly obsessed with these Mini Bacon Ranch Cheeseballs. Think of them as the incredibly charming, bite-sized cousins of the classic cheese ball. They’re little, no-cook, flavor-packed orbs of joy that come together in about 15 minutes flat. We’re talking creamy, tangy, smoky, and with just the right amount of crunch. The best part? You can make them way ahead of time, which means when your guests arrive, you’re cool, calm, collected, and ready to party right alongside them.
I’m a firm believer that the best party foods are the ones that bring people together—literally. Plop a tray of these down with some pretzel sticks for dipping, and watch hands fly. They’re conversation starters, crowd-pleasers, and secretly the easiest thing you’ll make all week. So, let’s ditch the stress and make a snack that’s guaranteed to create a happy little tidal wave of flavor in your kitchen.
A Cheesy, Coastal Memory
This recipe always takes me right back to my grandma’s kitchen in my little coastal hometown. She was the queen of “making do,” and her version of a cheese ball was a legendary sight at every family gathering, church potluck, and holiday party. It was a massive, glorious sphere covered in walnuts, and we’d all crowd around the table with crackers, carving into it like it was a culinary treasure—which it absolutely was.
But as a kid, I remember thinking two things: One, I wished it had bacon (because, hello, bacon makes everything better). And two, it was a bit of a monolithic endeavor. You needed a knife, a plate, and some serious coordination to get a perfect bite without sending a cracker flying. Years later, while prepping for one of my own chaotic, friend-filled Sunday brunches, I had a lightbulb moment. What if we took all that glorious cheesy flavor, gave it a zesty ranch kick, wrapped it in smoky bacon, and shrank it down into a perfect, pop-in-your-mouth, single-serving size? The mini cheeseball was born, and it’s been a BiteTide staple ever since. It’s my modern, fun-loving nod to my grandma’s classic—proving that the best food memories are the ones we create and share, one delicious bite at a time.
Print
Mini Bacon Ranch Cheeseballs : Easy, Crowd-Pleasing Party Appetizer
- Total Time: 45 minutes
- Yield: 24 mini cheeseballs 1x
Description
These Mini Bacon Ranch Cheeseballs are bite-sized flavor bombs—creamy, cheesy, smoky, and totally addictive. Perfect for parties, game day, or holiday snacking, they’re easy to prep ahead and serve with pretzel sticks for a fun, dippable twist. Whether you’re entertaining or just in the mood for a savory snack, these little guys hit the spot.
Ingredients
8 oz cream cheese, softened
4 tbsp ranch seasoning powder
2 cups sharp cheddar cheese, shredded
1/2 cup green onions, finely chopped (for freshness and crunch)
1/2 tsp smoked paprika (for depth)
8 oz bacon bits (or crispy cooked bacon, finely chopped)
Pretzel sticks (for serving – optional)
Fresh parsley or chives, finely chopped (optional garnish)
Instructions
In a large bowl, mix softened cream cheese, ranch seasoning, cheddar cheese, green onions, and paprika until well combined.
Scoop out small amounts of the mixture and roll into bite-sized balls.
Spread bacon bits on a plate and roll each cheeseball to fully coat.
Chill cheeseballs in the fridge for 30 minutes to firm up and let flavors blend.
Before serving, garnish with parsley or chives and insert pretzel sticks if desired for easy grabbing.
- Prep Time: 15 mins
- Cook Time: 30 mins
- Category: Snack
Gathering Your Flavor Crew
This is where the magic starts! The beauty of this recipe lies in its simplicity and the powerhouse ingredients that do all the heavy lifting. Here’s your shopping list—and a few of my favorite chef-y insights to help you nail it every time.
- 8 oz Cream Cheese, softened: This is the creamy, dreamy base that holds everything together. Pro-Tip: Let it sit on the counter for at least 30-60 minutes before you start. A rock-hard block will make your arms ache, but room-temperature cream cheese blends into a silky-smooth perfection with zero effort.
- 4 tbsp Ranch Seasoning Powder: This is our flavor MVP! It packs that herby, tangy, unmistakable punch. I like using the powder from the salad dressing aisle. If you’re watching sodium, you can use a lower-sodium version or make your own blend with dried dill, parsley, garlic powder, and onion powder.
- 2 cups Sharp Cheddar Cheese, shredded: The sharper, the better! This gives our cheeseballs a fantastic tang and sturdy texture. Chef’s Secret: Always, always shred your own cheese from a block. Pre-shredded bags are coated with anti-caking agents that can make your mixture a bit grainy and prevent it from melting together as smoothly.
- 1/2 cup Green Onions, finely chopped: These little green gems bring a necessary pop of freshness and a mild, oniony crunch that cuts through all the richness. Don’t skip ’em!
- 1/2 tsp Smoked Paprika: Just a half-teaspoon! This isn’t for heat, but for a deep, smoky depth that beautifully complements the bacon. It adds a whole new layer of flavor complexity.
- 8 oz Bacon Bits (or crispy cooked bacon, finely chopped): The glorious, crunchy coat! While real, crispy, chopped bacon is absolute heaven here, don’t feel guilty about using high-quality real bacon bits from the bag for a serious shortcut. It works like a charm.
- Pretzel Sticks (for serving): Optional, but highly recommended! They turn these from a simple finger food into a fun, dippable, edible utensil. The salty crunch of the pretzel with the creamy cheeseball is a match made in snack heaven.
- Fresh Parsley or Chives, finely chopped (optional garnish): A little sprinkle of green at the end makes these look professionally pretty and adds one last fresh flavor note.
Let’s Get Rolling! Your Foolproof Guide
Ready to see how easy this is? Put on some fun music, because we’re about to whip up some party magic in record time. Follow these steps, and you’ll be a mini cheeseball pro.
- The Big Mix-Down. Grab your largest mixing bowl and plop in that beautifully softened cream cheese. Add the ranch seasoning, your freshly shredded sharp cheddar, the green onions, and that secret weapon—the smoked paprika. Now, roll up your sleeves and get mixing! I like to use a sturdy silicone spatula at first, but I often end up diving in with my (very clean!) hands to make sure everything is perfectly and evenly combined. You want no streaks of plain cream cheese left! Chef Hack: If you have a stand mixer with a paddle attachment, you can let it do the work for you on low speed. Just 1-2 minutes is all it takes!
- The Art of the Ball. Now for the fun, hands-on part! Line a baking sheet or plate with parchment paper. Using a small cookie scoop (about 1 tablespoon in size), portion out the mixture. A scoop gives you uniform, picture-perfect balls, but a tablespoon measure or even just two spoons works great too. Roll each portion between your palms until it forms a smooth, round ball. If the mixture starts sticking to your hands, a little trick is to lightly dampen your palms with water. It creates a non-stick barrier without adding any extra moisture to the cheeseballs.
- The Bacon Blanket. Spread your bacon bits out on a separate plate. Take each cheeseball and gently roll it around in the bacon, pressing lightly to make sure those delicious, smoky bits adhere to every single surface. You’re giving each one its own crispy, flavorful jacket. Place the finished, bacon-coated ball back on your parchment-lined tray.
- The Power of Patience (a.k.a. The Chill). I know, I know—you want to eat one right now. But trust me on this: this 30-minute chill in the fridge is non-negotiable. It allows the flavors to meld and party together, and, most importantly, it firms up the cheeseballs, making them the perfect texture for serving. They’ll hold their shape beautifully and won’t squish when someone picks one up.
- The Grand Finale. Once they’re nicely chilled, take your tray out of the fridge. Give them a final flourish with a sprinkle of fresh parsley or chives for that gorgeous color contrast. Just before serving, poke a pretzel stick into the top of each one. It creates an adorable, easy-to-grab handle that everyone will love. Arrange them on your favorite platter and watch them disappear!
Plating Up the Perfect Party Platter
Presentation is part of the fun! Don’t just dump these beauties in a bowl. Create a stunning centerpiece for your snack table by arranging them on a large wooden board or a sleek slate platter. Scatter a few extra pretzel sticks around them for easy access. For a pop of color and a refreshing palate cleanser, tuck in some grape tomatoes, baby pickles, or carrot sticks around the edges. It creates a beautiful, balanced, and inviting spread that says, “Come on over and dig in!”
Ride Your Own Flavor Wave: Fun Variations!
The basic recipe is a flawless classic, but part of the BiteTide philosophy is to get creative! Here are a few of my favorite ways to mix things up:
- Everything Bagel Twist: Swap the bacon coating for Everything Bagel Seasoning! The garlic, onion, sesame seeds, and poppy seeds are a phenomenal combination with the ranch and cheese.
- Jalapeño Popper Vibe: Add 1-2 tablespoons of finely minced pickled jalapeños and use pepper jack cheese instead of cheddar for a spicy kick.
- Everything But the Kitchen Sink: Fold in 1/4 cup of finely chopped sun-dried tomatoes and a tablespoon of chopped fresh dill for a Mediterranean flair.
- Lighter Option: Use Neufchâtel cheese (the 1/3 less fat cream cheese) and swap half the cheddar for a finely shredded part-skim mozzarella. They’ll still be incredibly tasty!
Isla’s Chef Notes & Kitchen Confessions
This recipe has seen me through more parties, potlucks, and last-minute “I need a snack NOW” moments than I can count. It’s evolved from that first batch I made for brunch into my ultimate no-fail appetizer. A funny story? I once decided to double the recipe for a huge holiday party and, in my haste, accidentally used an entire container of French onion dip instead of cream cheese. It was… an interesting experiment! Let’s just say we’re sticking with the original plan here.
My biggest piece of advice is to make these YOURS. Taste the mixture before you roll it! Want more ranch? Add it! Want more kick? More paprika! This is your kitchen, and you are the boss of the flavor. The recipe is wonderfully forgiving and flexible. I also highly, highly recommend making a double batch and freezing half. They freeze beautifully for up to a month, and you’ll always have a secret weapon ready to go for unexpected guests (or unexpected cravings).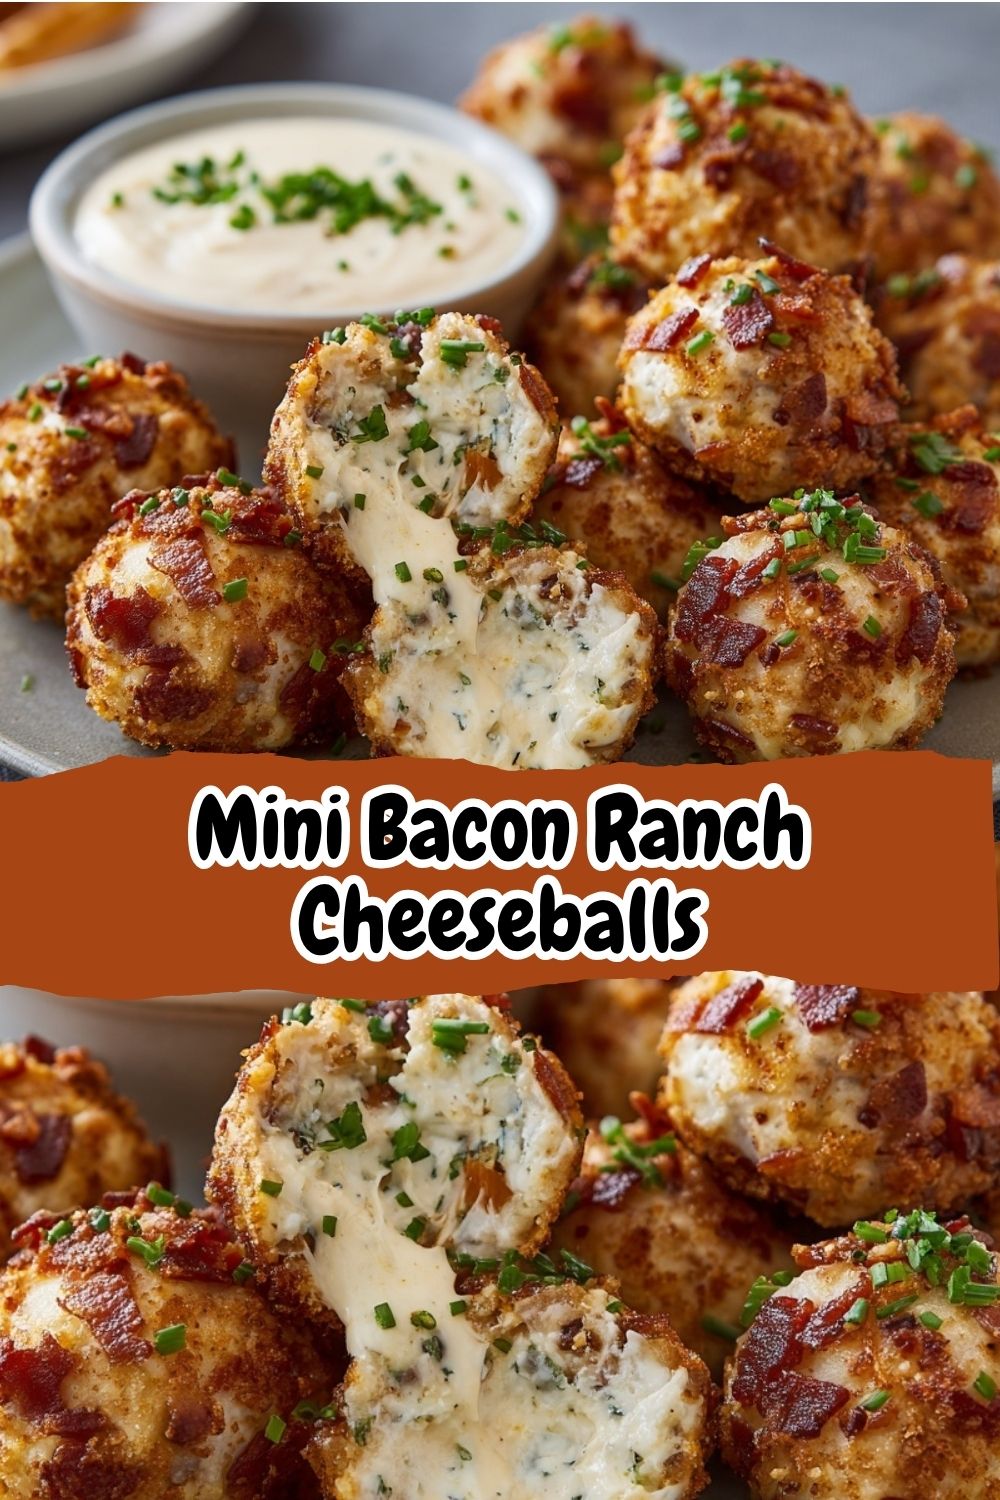
Your Questions, Answered!
Over the years, I’ve gotten a lot of brilliant questions about this recipe from the BiteTide community. Here are the answers to the most common ones!
Q: My cheeseball mixture is too soft and sticky to roll. What did I do wrong?
A: Don’t panic! This usually happens for one of two reasons. First, your cream cheese might have been a little too warm. Pop the whole mixture into the fridge for 20-30 minutes to firm up. Second, pre-shredded cheese can sometimes be the culprit due to those anti-caking agents. Next time, try shredding your own from a block—it makes a world of difference! In a pinch, you can add a tablespoon or two of extra shredded cheese to help absorb some moisture and firm it up.
Q: Can I make these ahead of time? How far in advance?
A: You absolutely can, and I encourage it! They are the perfect make-ahead appetizer. You can assemble them completely (including the bacon coating) and store them in an airtight container in the fridge for up to 2 days. I’d wait to add the pretzel sticks and the fresh herb garnish until right before you serve, so the pretzels stay crunchy and the herbs look fresh.
Q: I’m not a big ranch fan. Are there other seasoning options?
A> Of course! The flavor world is your oyster. You could use a packet of dry onion soup mix for a classic “California Dip” flavor, or even a tablespoon of taco seasoning for a south-of-the-border twist. Get creative with your favorite dry spice blends!
Q: Can I freeze these mini cheeseballs?
A> Yes, and it’s a game-changer! After you’ve rolled and coated them, place the tray in the freezer until the balls are frozen solid (about 2 hours). Then, transfer them to a freezer-safe bag or container. They’ll keep for up to 1 month. Thaw them overnight in the fridge before serving.
Quick Nutritional Snapshot
Please note: This is an estimate provided for informational purposes only. Exact values can vary based on specific ingredients used.
Per cheeseball (approx.): Calories: 120 | Protein: 5g | Carbohydrates: 1g | Fat: 10g
Prep Time: 15 minutes | Chill Time: 30 minutes | Total Time: 45 minutes | Servings: 24 mini cheeseballs