Gingerbread Cheesecake Tart: Your New Holiday Showstopper
Hey there, friend! Isla here from BiteTide, coming at you from my flour-dusted kitchen with a recipe that has officially stolen my heart (and probably my entire holiday season). We all have that one dessert we dream about when the air gets crisp and the twinkle lights go up, right? For me, it’s always been the warm, spicy hug of gingerbread. But this year, I wanted to level it up. I wanted to create something that felt both nostalgic and dazzlingly new, a dessert that would make everyone at the table stop mid-carol and say, “Wow.”
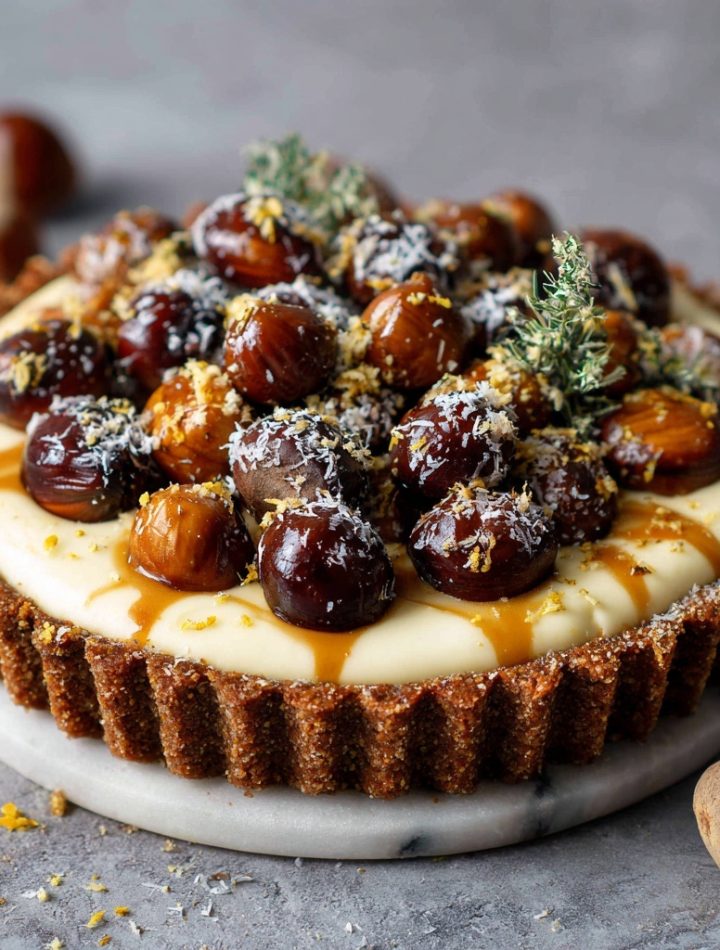
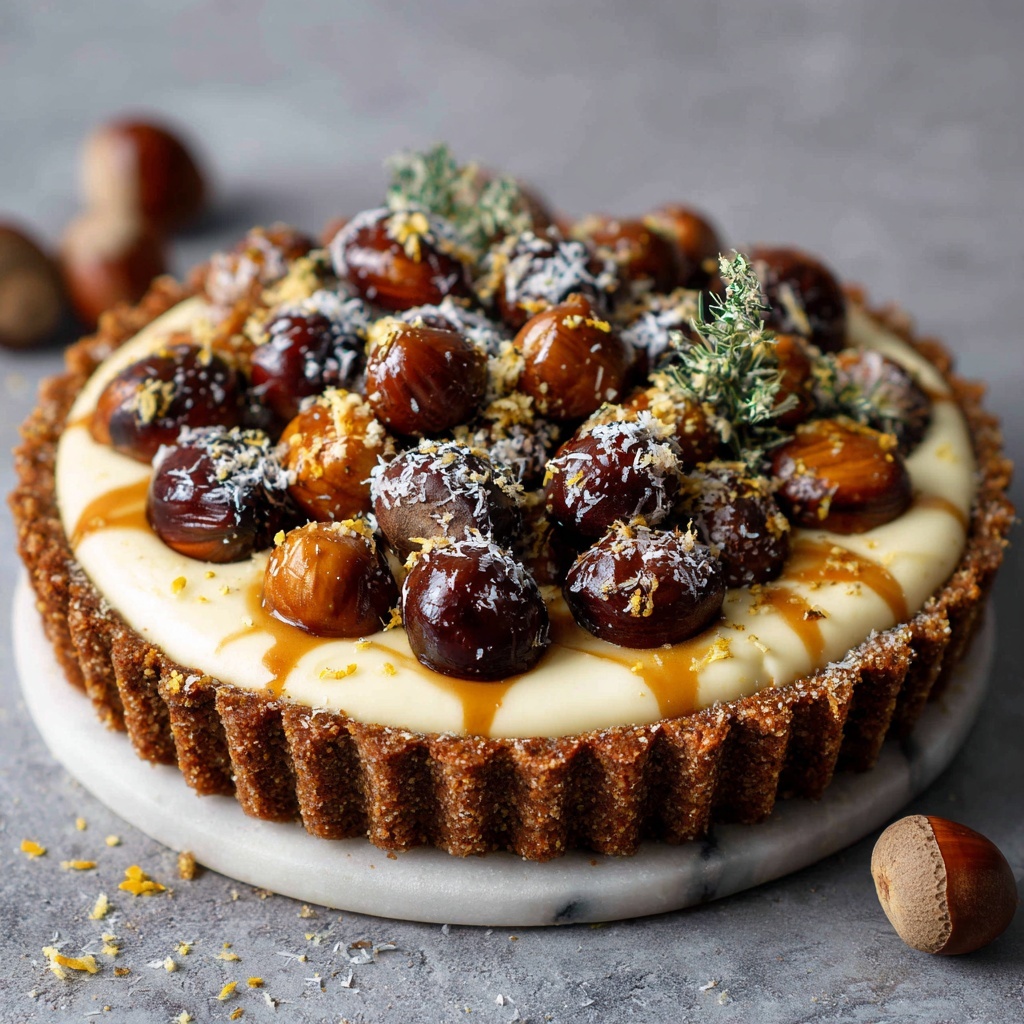
Enter this Gingerbread Cheesecake Tart with Caramelised Chestnuts. Just saying the name makes me happy! Imagine this: a deeply spiced, buttery gingerbread cookie crust that crumbles at the slightest touch. It cradles a filling that’s the stuff of dreams—silky, tangy, and luxuriously smooth, with just a hint of bright orange zest to cut through the richness. And the crowning glory? Glossy, caramelised chestnuts that add a beautiful crunch and a toasty, sweet flavor that just screams “festive celebration.”
This isn’t a fussy, days-long project. This is a showstopper that believes in you. We’re talking about a tart that comes together with simple steps, forgiving techniques, and a whole lot of love. It’s the perfect centerpiece for your holiday table, the star of your cookie exchange, or a gloriously indulgent treat for a cozy night in. So, tie on your favorite apron, put on some holiday tunes, and let’s make some magic together. This is the holiday dessert you didn’t know you needed, and I am so thrilled to share it with you.
Print
Gingerbread Cheesecake Tart with Caramelised Chestnuts : A Festive Holiday Showstopper
- Total Time: 2 hrs 50 min
- Yield: 8 servings 1x
Description
This Gingerbread Cheesecake Tart is the holiday dessert you didn’t know you needed. A buttery gingerbread cookie crust hugs a silky cheesecake filling, topped with glossy caramelised chestnuts and a hint of orange zest. It’s warm, cozy, and festive — a tart that feels like a winter hug and looks like it belongs on every celebration table.
Ingredients
1 1/2 cups ginger cookie crumbs
1/4 cup melted butter
1 tbsp brown sugar
1/2 tsp cinnamon
Cheesecake Filling:
8 oz cream cheese, softened
1/2 cup sour cream
1/3 cup maple syrup or brown sugar
1 egg
1 tsp vanilla extract
Zest of 1/2 orange
Pinch of salt
Caramelised Chestnuts:
3/4 cup cooked chestnuts, roughly chopped
2 tbsp butter
2 tbsp brown sugar
Pinch of sea salt
Instructions
Preheat oven to 350°F (175°C). Mix crust ingredients, press into a tart pan, and bake for 8–10 minutes. Cool slightly.
Beat cream cheese until smooth. Add sour cream, sweetener, egg, vanilla, orange zest, and salt. Pour into crust.
Bake 20–25 minutes until just set. Cool, then chill for at least 2 hours.
For chestnuts: melt butter in a pan, stir in chestnuts, sugar, and salt. Cook until glazed and golden.
Spoon caramelised chestnuts over chilled tart before serving.
- Prep Time: 20 minutes
- Cook Time: 30 mins
- Category: Dessert
A Tale of Two Grandmas and One Messy Kitchen
This tart is more than just a recipe for me; it’s a beautiful collision of my two favorite food memories. My dad’s mom, Nana, was the Queen of Gingerbread. Every December, her tiny kitchen would smell of molasses, cloves, and ginger for weeks. She’d let me cut out the gingerbread men, always saving the last bit of dough for me to sculpt into a messy, delicious “snowball.” That flavor is pure, unadulterated childhood joy for me.
On the other side of the family, my Mummu (that’s Finnish for grandma) was a cheesecake purist. Her New York-style cheesecake was legendary, a dense, creamy masterpiece that required a ritualistic water bath and absolute silence in the kitchen while it baked. I was always too intimidated to try it myself, but I loved watching her, a picture of calm precision.
This Gingerbread Cheesecake Tart is my love letter to both of them. It takes Nana’s warm, spiced soul and lets it hug Mummu’s creamy, elegant heart. I’ve skipped the intimidating parts (goodbye, water bath!) but kept all the love. Every time I make it, I think of Nana’s laughter and Mummu’s quiet concentration, and I feel like they’re both right there in the kitchen with me, taste-testing the filling and approving of the messy, caramelised chestnut topping. And trust me, they’d approve.
Gathering Your Flavor Crew: The Ingredients
Let’s talk ingredients! This is where the flavor magic starts. I’ve broken everything down into three simple parts. Don’t be intimidated—we’re using simple, real ingredients that work together like a holiday dream team.
For the Gingerbread Crust:
- 1 1/2 cups ginger cookie crumbs: I use store-bought gingersnaps for ease (my favorite little hack!). You want a fine crumb, so blitz them in a food processor or give them a good smash in a zip-top bag with a rolling pin. Chef’s Insight: The better the cookie, the better the crust! Look for ones with a deep, spicy flavor.
- 1/4 cup melted butter: This is the glue that holds our crunchy crust together. Use unsalted so we can control the salt level. Substitution Tip: For a dairy-free version, coconut oil works beautifully here.
- 1 tbsp brown sugar: A little extra sweetness and moisture to make our crust even more irresistible.
- 1/2 tsp cinnamon: We’re amplifying the cozy vibes! This adds a warm, aromatic note that pairs perfectly with the ginger.
For the Silky Cheesecake Filling:
- 8 oz cream cheese, softened: This is NON-NEGOTIABLE. Take it out of the fridge at least an hour before you start. Room temp cream cheese whips up smooth and lump-free, which is the key to that luxurious texture. Chef’s Insight: I use full-fat for the creamiest result, but reduced-fat will work in a pinch.
- 1/2 cup sour cream: This is my secret weapon! It adds a delightful tang and helps create a lighter, silkier filling that doesn’t crack. Substitution Tip: Plain Greek yogurt is a fantastic 1:1 swap if that’s what you have on hand.
- 1/3 cup maple syrup or brown sugar: I adore the deep, caramel-like flavor maple syrup brings, but brown sugar is a classic and equally delicious choice. This is less sugar than a typical cheesecake, letting the gingerbread and chestnuts truly shine.
- 1 egg: Our binding agent! It gives the filling structure and a rich, custardy feel. Make sure it’s at room temperature too.
- 1 tsp vanilla extract: The flavor backbone that makes everything taste more, well, everything!
- Zest of 1/2 orange: Don’t you dare skip this! The bright, citrusy pop cuts through the richness and makes the gingerbread spices sing. It’s a game-changer.
- Pinch of salt: This is what separates good desserts from great ones. Salt enhances all the other flavors and balances the sweetness perfectly.
For the Caramelised Chestnut Topping:
- 3/4 cup cooked chestnuts, roughly chopped: You can find these vacuum-sealed or in jars at most grocery stores. Their starchy, slightly sweet flavor is pure holiday nostalgia. Substitution Tip: No chestnuts? Toasted pecans or walnuts would be a delicious, crunchy alternative.
- 2 tbsp butter: For sautéing and creating that glossy, buttery caramel sauce.
- 2 tbsp brown sugar: This melts into the butter and creates a gorgeous, sticky glaze for our chestnuts.
- Pinch of sea salt: A pinch of flaky sea salt at the end makes this topping absolutely irresistible. Sweet, salty, crunchy perfection.
Let’s Build This Beauty: Step-by-Step Instructions
Okay, team! This is where we roll up our sleeves and have some fun. Follow these steps, and you’ll have a flawless tart. I’ve packed this section with all my favorite little hacks to ensure your success.
- Preheat and Prep: First things first, get that oven preheating to a cozy 350°F (175°C). This gives your oven time to settle into the perfect temperature for even baking. While it’s warming up, grab your tart pan (one with a removable bottom is ideal for easy, beautiful serving!) and give it a light coating of non-stick spray. Chef’s Hack: Place your tart pan on a baking sheet. This makes it infinitely easier to move in and out of the oven without spilling.
- Create the Crust: In a medium bowl, combine your ginger cookie crumbs, melted butter, that one tablespoon of brown sugar, and the cinnamon. Mix it with a fork until it looks like wet sand and every crumb is coated. Now, dump this glorious mixture into your prepared tart pan and press it firmly and evenly into the bottom and up the sides. I like to use the flat bottom of a measuring cup to really tamp it down—this prevents a crumbly crust disaster later! Pop it in the oven for 8-10 minutes. You’ll smell that amazing gingerbread aroma. Pull it out and let it cool on a rack while you make the filling. Chef’s Commentary: Don’t skip pre-baking (we call this “blind baking”)! It ensures our crust stays crisp and doesn’t get soggy from the wet filling.
- Whip Up the Filling: Now, for the star of the show! In a large bowl, beat your softened cream cheese with an electric mixer (or a stand mixer with the paddle attachment) on medium speed until it’s completely smooth and fluffy. This should take about 1-2 minutes. Scrape down the sides of the bowl. Add in the sour cream and your sweetener of choice (maple syrup or brown sugar), and beat again until everything is perfectly combined and silky. Now, with the mixer on low, add the egg, vanilla, orange zest, and that all-important pinch of salt. Mix just until it’s one uniform, pale, beautiful mixture. Chef’s Hack: Over-mixing after adding the egg can incorporate too much air and lead to cracking. Mix until just combined—no longer!
- Bake to Perfection: Pour your luscious filling into the slightly cooled crust and spread it out evenly. Carefully slide the baking sheet with the tart on it into your preheated oven. Bake for 20-25 minutes. The tart is done when the edges are set but the center still has a slight, gentle jiggle—like Jell-O. It will firm up as it cools! Chef’s Insight: We’re not looking for a golden brown top here. We want a pale, creamy filling. If the top starts to color, your oven might be running hot.
- The All-Important Chill: This is the hardest part, I promise! Let the tart cool completely on a wire rack at room temperature. Then, gently cover it with plastic wrap and transfer it to the refrigerator. You need to chill it for at least 2 hours, but honestly, overnight is even better. This patience pays off BIG TIME, giving you that perfect, sliceable, creamy texture.
- Caramelise the Chestnuts: Right before you’re ready to serve, let’s make that showstopping topping. In a small skillet over medium heat, melt the 2 tablespoons of butter. Add the chopped chestnuts and toss to coat. Sprinkle the brown sugar and a pinch of salt over everything. Cook, stirring frequently, for 3-5 minutes, until the sugar has melted and the chestnuts are glistening and fragrant. They’ll look like little golden nuggets of joy.
- The Grand Finale: Take your chilled tart out of the fridge. Spoon the warm, caramelised chestnuts over the top, spreading them out in a gorgeous, artful pile. Let that caramel drizzle over the creamy surface. You are now a dessert artist!
How to Serve Your Masterpiece
Presentation is part of the fun! I love to place the whole tart, still on its pan base, on a beautiful cake stand or a simple wooden board for that rustic-chic vibe. Just before serving, I add a final flourish—a light dusting of cinnamon or a few fine curls of extra orange zest over the top. When you slice it, use a sharp, thin-bladed knife that you’ve run under hot water and wiped dry. This gives you the cleanest, most beautiful slices. Serve it as is, or with a dollop of lightly sweetened whipped cream or a scoop of vanilla bean ice cream for the ultimate indulgence.
Ride Your Own Flavor Wave: Recipe Variations
This tart is wonderfully adaptable! Here are a few ways to make it your own:
- Chocolate Swirl: Before baking, dollop 1/4 cup of melted chocolate over the filling and use a toothpick to swirl it into a marbled pattern.
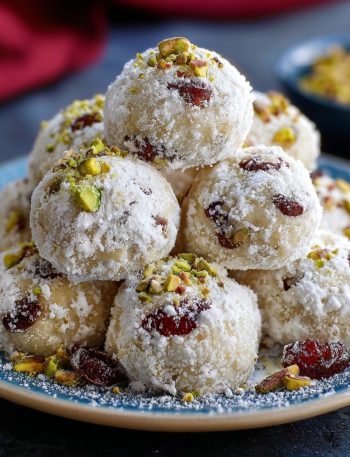
- Cranberry Orange Twist: Swap the chestnuts for a quick cranberry compote (simmer 1 cup cranberries with 2 tbsp orange juice and 2 tbsp maple syrup until bursting).
- Boozy & Bold: Add a tablespoon of bourbon or dark rum to the cheesecake filling for a grown-up kick.
- Nut-Free Delight: Instead of chestnuts, use caramelised apple chunks or pear slices for the topping.
- Lighter Version: Use Neufchâtel cheese, low-fat sour cream, and a sugar substitute that measures like brown sugar for a lighter take.
Isla’s Chef’s Notes & Kitchen Confessions
This recipe has seen a few iterations in my kitchen, let me tell you! The first time I made it, I was so excited I forgot to pre-bake the crust. The result was… delicious, but structurally unsound. Let’s call it a “deconstructed gingerbread cheesecake crumble.” It was a happy, tasty mess, but it taught me the importance of that first bake!
I’ve also learned that this tart has a mind of its own when it comes to timing. My oven runs a little cool, so it often takes the full 25 minutes. Yours might be done at 22. Trust the jiggle, not the clock! The beauty of this recipe is its resilience. Even if a tiny crack appears (which, in my book, just shows it’s homemade with love), the glossy chestnut topping covers it right up. No one will ever know. This tart is now a non-negotiable part of our holiday season, and I have a feeling it’s about to become one of yours, too.
Your Questions, Answered: FAQs & Troubleshooting
I’ve tested this recipe a ton, but I know questions can pop up! Here are answers to the ones I get most often.
Q: My cream cheese was still a little cold, and now my filling has tiny lumps. What can I do?
A: Don’t panic! This happens to the best of us. The best fix is to pass the finished filling through a fine-mesh sieve before pouring it into the crust. It might feel like a fussy step, but it will strain out any pesky lumps and give you that perfectly silky texture we’re after.
Q: Can I make this tart ahead of time?
A: Absolutely! This is a fantastic make-ahead dessert. You can bake and chill the tart (without the topping) for up to 2 days in advance. Keep it covered in the fridge. Make the caramelised chestnuts right before you plan to serve it so they stay gloriously crunchy. You can also assemble the entire tart up to a day ahead; the chestnuts will soften slightly but will still be delicious.
Q: I don’t have a tart pan. What can I use instead?
A> No problem! A standard 9-inch pie dish will work just fine. The slices might be a little messier to get out, but the flavor will be 100% there. For the cleanest slices from a pie dish, make sure to chill it thoroughly. You could also use a springform pan, but your crust will be thinner, so keep a close eye on it during the pre-bake.
Q: Why did my filling puff up and crack in the center?
A> This usually means we got a little over-enthusiastic with the mixing after adding the egg, or the oven temperature was a bit too high. Over-mixing incorporates air, which expands and then collapses, causing cracks. A too-hot oven can also cause the proteins to set too quickly.
This Gingerbread Cheesecake Tart is a holiday masterpiece—creamy, spiced, and perfectly balanced with a crisp ginger crust and caramelized chestnut topping. Adaptable, make-ahead friendly, and visually stunning, it’s the ultimate festive dessert to impress family and friends.