
Hey there, friend! Isla here, from my cozy kitchen to yours. Let’s be real for a second: some nights, the dinner struggle is SO real. You’re caught between a hungry family, a ticking clock, and the desire to eat something that’s actually exciting—not just another sad, slapped-together meal. You want flavor, comfort, and maybe even a little cheer from the cheese pull. Am I right?
Well, get ready to meet your new kitchen bestie: Cheesy Taco-Stuffed Bell Peppers. This is the recipe that lives permanently in my back pocket, the one I turn to when I need a guaranteed win. It’s the glorious love child of taco night and a cozy, oven-baked classic. Imagine: colorful bell pepper shells, acting as the perfect edible bowls for a sizzling, spiced-up filling of juicy ground beef, savory taco rice, zesty Rotel tomatoes, and a glorious, bubbling blanket of melty Mexican cheese.
This isn’t just food; it’s a hug in pepper form. It’s hearty enough to satisfy the biggest appetites, packed with flavor that feels like a celebration, and secretly easy enough to pull off on even the most chaotic of weeknights. So, tie on your favorite apron, preheat that oven, and let’s ride this delicious flavor wave together. I promise, this is one recipe that’s about to become a regular on your table!
Print
Cheesy Taco-Stuffed Bell Peppers
- Total Time: 1h
- Yield: 4–6 servings 1x
Description
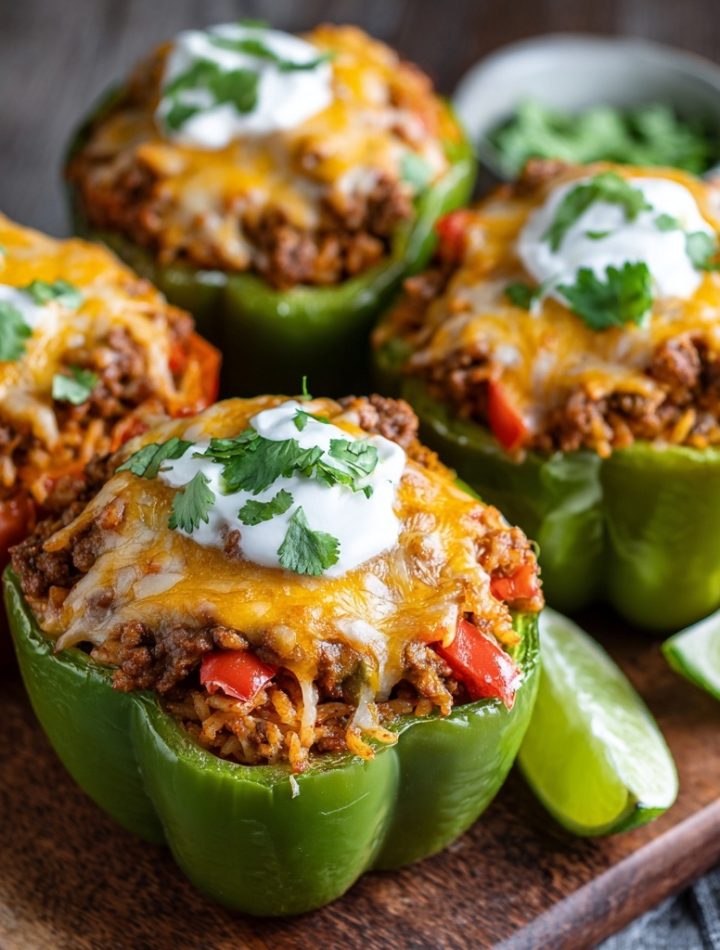
These taco-stuffed bell peppers are the perfect fusion of Tex-Mex flavor and weeknight ease. Juicy ground beef, spiced taco rice, Rotel tomatoes, and melty cheese come together in a colorful bell pepper shell—hearty, cheesy, and downright comforting. Great for family dinners or prepping ahead for busy days.
Ingredients
4 green bell peppers
1 lb taco-seasoned ground beef
1 package Knorr Taco Rice
1 can Rotel, drained
1 cup shredded Mexican cheese blend (divided)
Instructions
Preheat oven to 350°F (175°C).
Slice the tops off the bell peppers (or cut in half if bottoms are uneven). Remove seeds and place in a baking dish, cut side up. Bake for 20 minutes while prepping filling.
Brown the ground beef and season with your favorite taco seasoning.
Cook Knorr Taco Rice according to package instructions.
In a bowl, combine cooked taco meat, half of the rice, drained Rotel, and ½ cup shredded cheese.
Remove bell peppers from oven and stuff with the filling.
Top with remaining cheese, cover with foil, and bake for 20 minutes.
Uncover and bake for an additional 10 minutes until cheese is melted and bubbly.
- Prep Time: 20 minutes
- Cook Time: 40 minutes
- Category: Dinner
Nutrition
- Calories: 360
- Fat: 18g
- Carbohydrates: 24g
- Protein: 25g
A Pepper-Fueled Memory: My Dad’s “Everything But The Kitchen Sink” Philosophy
This recipe always takes me right back to my dad’s tiny, slightly chaotic harbor-side kitchen. My dad wasn’t a formal chef; he was a “throw-it-in-the-pan-and-see-what-happens” kind of cook, a true flavor adventurer. Sundays were for cleaning out the fridge, and his signature move was what he called “The Vessel.” It could be a giant baked potato, a hollowed-out loaf of crusty bread, or, you guessed it, a bright bell pepper.
I can still see him, humming an off-key sea shanty, scooping out pepper seeds with a teaspoon. He’d use leftover rice from Friday’s fish fry, whatever ground meat we had, a can of tomatoes from the pantry, and a heroic handful of cheese. “Isla, my girl,” he’d say, winking, “the best meals aren’t in fancy restaurants. They’re the ones you build yourself, with a little bit of this and a little bit of that.” That spirit of joyful, no-fuss improvisation is baked right into the DNA of these stuffed peppers. They’re a tribute to making something wonderfully delicious out of simple, real ingredients—and having a whole lot of fun doing it.
Gather Your Flavor Crew: The Ingredients
Here’s your shopping list for this flavor fiesta! Don’t stress if you’re missing something—I’ve included my favorite swaps and chef-y insights for each ingredient. Cooking is about playing, not perfection!
- 4 large green bell peppers – I love the classic, slightly bitter crunch of green bells, but this is your canvas! Red, yellow, or orange peppers are sweeter and gorgeous. Pro tip: Look for peppers with flat bottoms so they stand up proudly in your baking dish!
- 1 lb ground beef (80/20 blend is perfect) – The 80/20 blend gives you the ideal balance of lean meat and flavor-giving fat. For a lighter option, ground turkey or chicken works beautifully. My vegetarian friends, a plant-based ground “meat” or a cup of cooked lentils are fantastic swaps!
- 1 package Knorr Taco Rice – This little packet is a weeknight superhero, packed with seasoning that delivers big flavor fast. If you can’t find it, no worries! Cook 1 cup of white rice with 1 ½ cups of beef broth and a hefty tablespoon of your favorite taco seasoning.
- 1 can (10 oz) Rotel tomatoes, drained – Rotel is the secret weapon for a little zing! The combo of diced tomatoes and green chilies adds a subtle, manageable heat and tons of flavor. If you don’t have Rotel, a can of plain diced tomatoes plus a tablespoon of diced green chiles or a pinch of chili powder will do the trick.
- 1 cup shredded Mexican cheese blend, divided – Cheese pull alert! I use a pre-shredded blend for convenience, but if you have the time, shredding a block of Monterey Jack and sharp cheddar yourself is a game-changer for meltiness. We’re dividing it because a little cheese inside the filling makes it extra creamy and glorious.
- Your favorite taco seasoning – Use a store-bought packet or make your own blend with chili powder, cumin, garlic powder, paprika, and a pinch of salt. This is where you can really make it your own—add a dash of cayenne for heat or some oregano for earthiness!
Let’s Get Cooking: Your Step-by-Step Guide to Pepper Perfection
Ready to build these beauties? Follow these steps, and I’ll be right here with you, whispering my best kitchen hacks in your ear. You’ve got this!
- Preheat and Prep Your Peppers: Fire up your oven to 350°F (175°C). Now, let’s get those peppers ready for their big moment. Slice the tops off the bell peppers—just like you’re giving them a little hat! Be careful to cut just below the stem so you don’t lose too much of the precious pepper body. If the bottoms are uneven and they wobble, just shave a tiny, thin slice off the bottom to create a flat, stable base. Use a small paring knife or a teaspoon to scoop out all the seeds and white membranes from the inside. A clean pepper is a happy, stuffable pepper! Place them cut-side-up in a baking dish just big enough to hold them snugly. We’re going to give them a quick pre-bake for 20 minutes. This softens them up perfectly so they’re tender, not crunchy, when the filling is done.
- Create the Filling Fiesta: While the peppers are getting cozy in the oven, let’s make the magic happen on the stovetop. In a large skillet over medium-high heat, brown your ground beef. Break it up with a wooden spoon as it cooks until it’s no longer pink. This is the time to drain off any excess grease if you need to. Now, sprinkle over your taco seasoning and a splash of water, stir, and let it simmer for a minute until fragrant. In a separate pot, cook the Knorr Taco Rice according to the package directions. It’s usually as simple as bringing water, the rice, and the seasoning packet to a boil. So easy!
- The Big Mix: In a big mixing bowl, combine your beautifully browned taco meat, about half of the cooked taco rice (this keeps the filling from being too dense—trust me!), the drained can of Rotel, and a generous ½ cup of your shredded cheese. Mix it all together with a big spoon. Take a peek at your peppers in the oven—they should be starting to soften and smell amazing. Give the filling a little taste. Need more salt? A pinch more cumin? This is your moment to be the boss of the flavor!
- Stuff and Bake to Bubbly Bliss: Carefully pull the baking dish out of the oven. Using a spoon, generously pack the filling into each pepper shell. Don’t be shy—pile it high! They can handle it. Now, for the grand finale: top each one with the remaining ½ cup of cheese. Cover the entire baking dish tightly with aluminum foil. This creates a little steam sauna, melting the cheese and heating everything through perfectly. Bake for 20 minutes covered.
- The Golden Finale: After 20 minutes, remove the foil. Ah, the reveal! Your peppers are now cooked, but we want that cheese to be gorgeously golden and bubbly. Pop them back into the oven, uncovered, for another 10 minutes. This is when the magic really happens. You’ll know they’re done when the cheese is melted and speckled with golden-brown spots, and the pepper edges are tender. Let them cool for just 5 minutes before serving—they are molten lava hot straight out of the oven!
How to Serve These Cheesy Masterpieces
Presentation is part of the fun! I love placing one stuffed pepper right in the center of a plate. For a true restaurant-worthy touch, sprinkle a little extra fresh chopped cilantro or thinly sliced green onions over the top. The green pop of color against the melted cheese is just *chef’s kiss*.
These peppers are a full meal in themselves, but if you want to go all out, serve them with a cool dollop of sour cream or Greek yogurt, a side of creamy avocado slices, a big spoonful of zesty pico de gallo, or a simple side salad with a lime vinaigrette to cut through the richness. It’s all about building your perfect bite!
Make It Your Own: Delicious Recipe Twists
Feel like riding a different flavor wave? Here are a few of my favorite ways to mix it up:
- Southwest Style: Swap the ground beef for ground chicken or turkey and add a can of drained black beans and a cup of corn kernels to the filling.
- Spicy Fiesta: Use Pepper Jack cheese instead of the Mexican blend and add a diced jalapeño (seeds and all for maximum heat!) to the meat mixture.
- Low-Carb/Lazy Night: Skip the rice entirely! The meat and cheese filling is still incredibly satisfying and cuts down the carbs.
- Breakfast-for-Dinner: Fill the peppers with scrambled eggs, cooked breakfast sausage, diced potatoes, and top with cheddar cheese. Bake as directed. You’re welcome.
Isla’s Chef Notes & Kitchen Confessions
This recipe has been a living, evolving thing in my kitchen for years. The first time I made it, I was so worried about the peppers being undercooked that I baked them into a sad, mushy state. We’ve come a long way since then! The pre-bake is the key to pepper perfection—tender but still holding their shape.
I also have a hilarious core memory of making these for a date years ago. I was so nervous, I accidentally used cinnamon instead of paprika in the taco seasoning. Let me tell you, cinnamon-taco peppers are… an acquired taste. He was a good sport, but it’s a story that still makes me laugh. Always, always label your spice jars, people!
Over time, I’ve learned that this recipe is incredibly forgiving. It’s become my go-to for potlucks and new-parent meal trains because it travels well, reheats like a dream, and pretty much everyone loves it. Don’t be afraid to make it your own—that’s where the real magic is.
Your Questions, Answered!
I’ve gotten a lot of questions about this recipe over the years! Here are the answers to the most common ones.
Q: Can I make these stuffed peppers ahead of time?
A: Absolutely! They are a meal prep dream. You can assemble them completely (through step 4), cover the dish tightly, and refrigerate for up to 24 hours. When you’re ready, just pop them in the oven. You may need to add 5-10 minutes to the baking time since they’ll be going in cold.
Q: My filling is a bit dry. What happened?
A> No worries, this is an easy fix! The Rotel tomatoes add moisture, so if you drained them very thoroughly or skipped them, that could be the culprit. Next time, try not draining the Rotel completely, or add a tablespoon or two of tomato sauce, salsa, or even beef broth to the filling mixture before stuffing. The world won’t end if your filling is a little saucy—it’ll be delicious!
Q: Can I freeze these?
A: You can! Bake them completely, let them cool fully, then wrap each pepper individually in plastic wrap and foil, or place them in a single layer in a freezer-safe container. They’ll keep for up to 3 months. To reheat, thaw in the fridge overnight and then bake at 350°F until heated through, about 20-30 minutes.
Q: The bottom of my peppers are still a little firm. Help!
A> If you find the bottoms are stubborn, try this chef hack: add about ¼ cup of water or broth to the bottom of your baking dish before you put it in the oven (both for the pre-bake and the final bake). The steam will help cook the peppers from the bottom up, ensuring they’re tender all the way through.
Quick Nutrition Info (Approximate per serving)
This is a general estimate and can vary based on your specific ingredients and portion size.
- Calories: 360
- Protein: 25g
- Fat: 18g
- Carbohydrates: 24g
- Fiber: 4g