
Your New Favorite Cookie Just Walked In: White Chocolate Cranberry Oatmeal Cookies
Hey there, friend! Isla here, from my flour-dusted kitchen to yours. Have you ever had a cookie that just feels like a hug? You know the one—it’s chewy, a little hearty, and has those little bursts of flavor that make you close your eyes and just *savor* the moment. Well, pull up a stool and preheat your oven, because we’re about to make that cookie together.
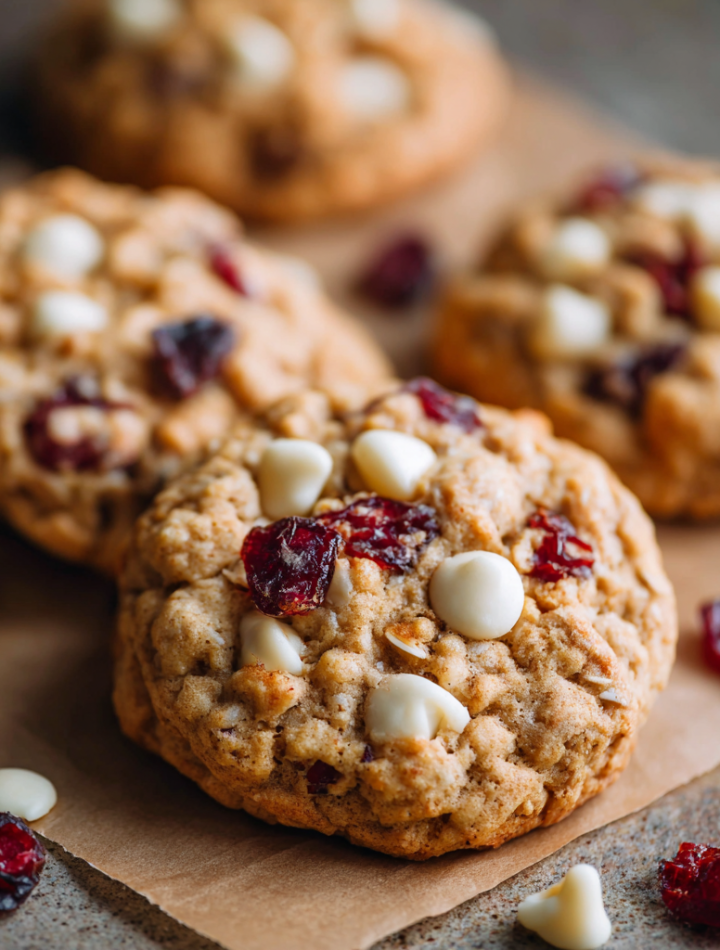
I’m talking about my all-time favorite: White Chocolate Cranberry Oatmeal Cookies. This isn’t just any cookie recipe; it’s a flavor experience. Imagine the creamy, dreamy sweetness of white chocolate meeting the bright, tart punch of dried cranberries, all held together by the cozy, wholesome embrace of oats. It’s a party in your mouth, and everyone’s invited.
I designed this recipe for real life. Maybe you’ve got a last-minute school bake sale, a cookie swap you almost forgot about, or you just need a little project that fills your kitchen with the best smell in the world. These cookies are your answer. They’re deceptively simple to make, but they taste like you spent all day in the kitchen. That’s the BiteTide promise: maximum flavor, zero fuss. So, tie on your favorite apron, and let’s bake some joy!
A Cookie That Tastes Like Memories
Every time I bake these cookies, the smell takes me right back to my grandma’s kitchen. It was a tiny, warm room with a linoleum floor that was always a little sticky, and a window that looked out over the ocean. Grandma wasn’t a fancy baker, but she was a generous one. Her cookie jar was never empty.
One blustery afternoon, when I was about ten, she decided to teach me her “everything but the kitchen sink” oatmeal cookie recipe. We didn’t have chocolate chips, but we did have a bag of white chocolate buttons from who-knows-when and some leftover cranberries from Thanksgiving. We tossed them in, crossing our fingers. What came out of the oven was pure magic. That perfect balance of sweet and tart, chewy and soft, felt like we’d discovered a secret. We sat at her little formica table, eating them warm while watching the rain, and I knew this was one of those moments I’d carry forever. For me, these cookies will always taste like her creativity, her warmth, and the simple joy of making something beautiful with what you have.
Print
White Chocolate Cranberry Oatmeal Cookies
- Total Time: ~30 minutes
- Yield: ~36 cookies
Description
Chewy, hearty, and just sweet enough—these White Chocolate Cranberry Oatmeal Cookies are a festive twist on a classic favorite. The tart cranberries balance the creamy sweetness of white chocolate, while the oats give them that cozy, homemade feel. They’re perfect for holiday trays, cookie swaps, or simply pairing with a hot cup of coffee.
Ingredients
1 cup unsalted butter, softened
1 cup light brown sugar, packed
½ cup granulated sugar
2 large eggs
2 teaspoons vanilla extract
1½ cups all-purpose flour
1 teaspoon baking soda
1 teaspoon cinnamon (optional)
½ teaspoon salt
3 cups old-fashioned oats
1 cup dried cranberries
1 cup white chocolate chips
Instructions
Preheat oven to 350°F (175°C). Line baking sheets with parchment paper.
In a large bowl, cream together butter, brown sugar, and granulated sugar until fluffy.
Beat in eggs one at a time, then add vanilla.
In another bowl, whisk flour, baking soda, cinnamon, and salt. Gradually mix into the wet ingredients.
Stir in oats, cranberries, and white chocolate chips until well combined.
Drop rounded spoonfuls of dough onto prepared baking sheets, leaving 2 inches of space.
Bake for 10–12 minutes, until edges are golden but centers are soft.
Let cool on the baking sheet for 5 minutes before transferring to a wire rack.
- Prep Time: 15 mins
- Cook Time: 10–12 minutes
- Category: Dessert
Nutrition
- Calories: 150
- Sugar: 12g
- Fat: 7g
- Carbohydrates: 20g
Gathering Your Flavor Crew
Here’s the lineup for our cookie dream team! I’ve included some of my favorite chef-y insights and swaps so you can make this recipe your own.
- 1 cup (2 sticks) unsalted butter, softened – This is the heart of our cookie, giving it that rich, melt-in-your-mouth quality. Pro Tip: “Softened” means cool to the touch but your finger can leave a gentle indent. Don’t let it get oily or melted, or your cookies will spread too much! If you only have salted butter, just reduce the added salt in the recipe to ¼ teaspoon.
- 1 cup light brown sugar, packed – This is our flavor MVP. The molasses in brown sugar brings that deep, caramel-like sweetness and, most importantly, moisture for an ultra-chewy texture. Pack it firmly into your measuring cup!
- ½ cup granulated sugar – The white sugar helps create a slightly crisp edge while the center stays soft. It’s the perfect partner to the brown sugar.
- 2 large eggs – Our binding agents! They bring everything together and add structure. Make sure they’re at room temperature to blend seamlessly with the butter and sugar.
- 2 teaspoons vanilla extract – The flavor enhancer. It might seem like a lot, but trust me, it rounds out all the other flavors beautifully. Use the real stuff if you can!
- 1½ cups all-purpose flour – The foundation that gives our cookies structure.
- 1 teaspoon baking soda – Our leavening agent, helping the cookies rise and become perfectly puffy.
- 1 teaspoon cinnamon (optional, but highly recommended) – This is my little secret weapon! It adds a whisper of warmth that makes the white chocolate and cranberry sing. You won’t taste “cinnamon,” you’ll just taste “better.”
- ½ teaspoon salt – Never, ever skip the salt! It balances the sweetness and makes all the other flavors pop.
- 3 cups old-fashioned oats – This is what makes them oatmeal cookies! Old-fashioned (or rolled) oats give the best hearty, chewy texture. Don’t use quick oats—they’ll get too mushy.
- 1 cup dried cranberries – Our tart superstar. I love the ruby-red color and the juicy burst they provide. Craisins work perfectly here!
- 1 cup white chocolate chips – The creamy, sweet counterpart to the cranberries. You can also chop up a high-quality white chocolate bar for gorgeous, melty pockets.
Let’s Bake! Your Step-by-Step Roadmap to Cookie Bliss
Okay, team, let’s get mixing! I’ll walk you through every step. Read through these once before you start—it makes the whole process feel like a breeze.
- Preheat and Prep. Fire up your oven to 350°F (175°C). Line your baking sheets with parchment paper. Chef Hack: This is a non-negotiable for me! It prevents sticking AND makes cleanup a dream. No parchment? A silicone baking mat works wonders too.
- Cream the Butter & Sugars. In a large bowl, cream together the softened butter, brown sugar, and granulated sugar. Use an electric mixer on medium speed for about 2-3 minutes. Chef Insight: We’re not just mixing here; we’re creaming. This step is crucial for creating a light and fluffy texture by beating tiny air bubbles into the butter. You’ll know it’s ready when the mixture is pale and looks a little like creamy peanut butter.
- Incorporate the Eggs & Vanilla. Beat in the eggs one at a time, making sure the first is fully incorporated before adding the second. Then, pour in that glorious vanilla. Scrape down the sides of the bowl with a spatula to make sure everything is homogenous. This is where the cookie base gets its perfect consistency.
- Combine the Dry Ingredients. In a separate, medium-sized bowl, whisk together the flour, baking soda, cinnamon (if using!), and salt. Chef Hack: Whisking is my favorite lazy-person’s sifter. It evenly distributes the baking soda and salt so you don’t get a bitter bite in one cookie and a flat one in another.
- Bring the Wet & Dry Together. Gradually add the dry ingredients to the wet ingredients, mixing on low speed just until the flour disappears. Pro Tip: Don’t overmix at this stage! Overworking the flour can lead to tough cookies. A few streaks of flour are okay—they’ll get incorporated in the next step.
- The Grand Finale: Mix-Ins! Switch to a sturdy spatula or wooden spoon. Stir in the oats, followed by the dried cranberries and white chocolate chips. Fold until everything is evenly distributed throughout the dough. That color is just beautiful, isn’t it?
- Scoop and Space. Drop rounded tablespoons of dough onto your prepared baking sheets, leaving a good 2 inches between each one. Chef Insight: I like to use a small cookie scoop for uniformity—it ensures they all bake at the same rate. For a bakery-style look, you can roll the dough into balls with your hands.
- Bake to Perfection. Bake for 10-12 minutes. You’re looking for golden edges but soft, slightly underdone-looking centers. Chef’s Golden Rule: They will look underbaked, but I promise you, they are not! This is the secret to a super chewy cookie. They will continue to cook on the hot baking sheet as they cool.
- The All-Important Cool Down. Let the cookies cool on the baking sheet for a full 5 minutes. This allows them to set up so they don’t fall apart when you move them. Then, transfer them to a wire rack to cool completely. Try to resist eating at least one warm… who am I kidding, dive right in!

How to Serve These Beauties
Presentation is part of the fun! I love piling these cookies high on a rustic wooden board or a vintage cake stand. They look especially festive during the holidays nestled in a cellophane bag tied with a ribbon for gifting. But let’s be real, their best serving partner is a giant, steaming mug of coffee or a cold glass of milk. The way the white chocolate slightly melts when dipped… it’s a religious experience.
Ride Your Own Flavor Wave: Recipe Variations
Feel like mixing it up? Go for it! This dough is a fantastic canvas for your creativity.
- Nutty Professor: Add ½ cup of chopped pecans or walnuts for a delightful crunch.
- Triple Citrus Zing: Add the zest of one orange to the dough for a sunny, bright twist that pairs amazingly with the cranberry.
- Dark Chocolate Dream: Not a white chocolate fan? Swap it out for an equal amount of dark or semi-sweet chocolate chips.
- Everything But The Kitchen Sink: Turn them into kitchen sink cookies by adding ½ cup of shredded coconut and ½ cup of your favorite seeds, like pumpkin or sunflower.
- Gluten-Free Friendly: Use a 1:1 gluten-free all-purpose flour blend and ensure your oats are certified gluten-free.
Isla’s Chef’s Notes & Kitchen Confessions
This recipe has been a living, evolving thing in my kitchen for years. The first time I made them, I was so impatient that I skipped the “cool on the pan” step and ended up with a dozen delicious, but tragically crumbled, cookies. A tasty lesson learned!
I’ve also found that the dough only gets better with a little rest. If you have the willpower, cover and chill the dough for 30-60 minutes before baking. This prevents overspreading and results in a slightly thicker, chewier cookie. Sometimes I’ll even scoop the dough onto a sheet and freeze the balls solid, then toss them in a freezer bag. That way, I can bake off two or three fresh, warm cookies anytime a craving hits. You’re welcome.
Your Cookie Questions, Answered!
I’ve gotten thousands of comments on my cookie recipes over the years, so I’ve compiled the most common questions right here to help you out.
Q: My cookies spread too much and came out flat! What happened?
A: This is usually a temperature issue. The most common culprits are butter that was too warm or melted, or an oven that wasn’t fully preheated. Next time, make sure your butter is just softened, and if your kitchen is warm, don’t be afraid to chill the dough for a bit before baking. Also, double-check your baking soda isn’t expired!
Q: Can I use quick oats instead of old-fashioned?
A: You can, but the texture will be different. Quick oats are cut smaller and absorb more moisture, which can make the cookies a bit more cake-like and less chewy. For the best hearty, chewy texture, old-fashioned oats are the way to go.
Q: My white chocolate burned! How do I prevent that?
A> White chocolate is delicate. If your cookies are browning too quickly on top, your oven might be running hot. Try lowering the temperature by 25°F and baking for a minute or two longer. You can also position your rack in the center of the oven, not the top, to prevent direct heat.
Q: Can I make the dough ahead of time?
A> Absolutely! You can keep the dough, covered, in the fridge for up to 3 days. Let it sit at room temperature for 15-20 minutes before scooping if it’s too hard. Or, scoop the dough balls and freeze them on a sheet pan before transferring to a freezer bag. Bake from frozen, adding 1-2 minutes to the baking time.
Quick Nutrition Bite
Please note: This is an estimated nutritional breakdown per cookie, based on a yield of 36 cookies. Values can vary based on specific ingredients used.
- Calories: ~150
- Fat: 7g
- Carbohydrates: 20g
- Sugar: 12g
- Protein: 2g