The Irresistible Magic of Halloween Crack: Your New Favorite Treat!
Hey there, friend! Isla here from BiteTide, and I am just bubbling over with excitement to share this recipe with you. If there’s one treat that perfectly captures the fun, playful, and slightly mischievous spirit of Halloween, it’s this right here. We’re making Halloween Crack—and trust me, the name is no joke. This is the kind of dangerously addictive, can’t-eat-just-one-piece candy that will have you hiding the tin from yourself!
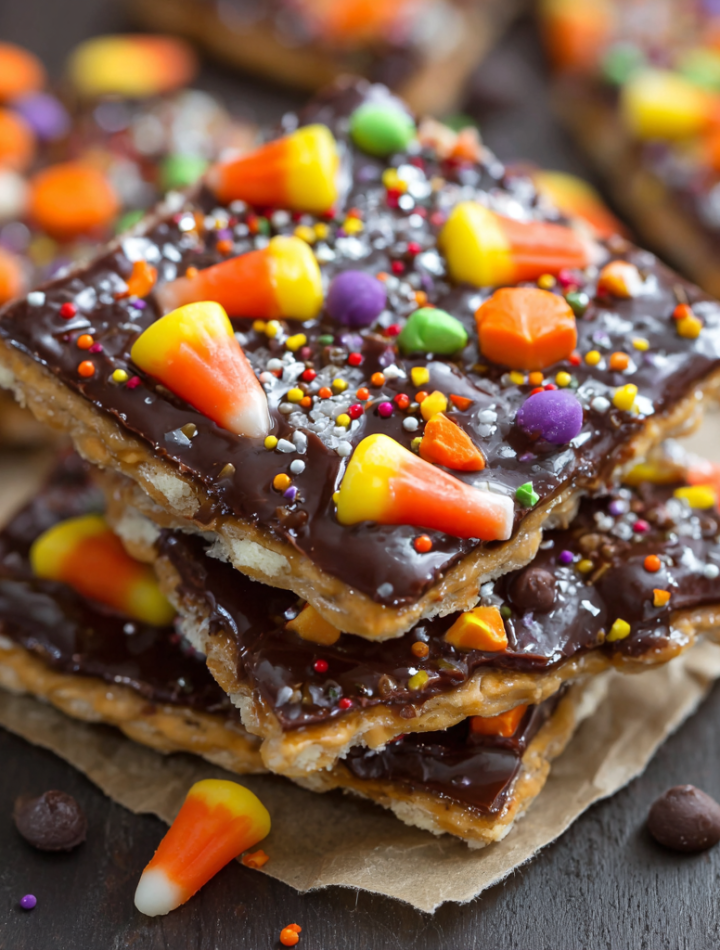
Imagine this: a buttery, crunchy saltine cracker base, transformed by a layer of rich, homemade toffee. That toffee gets topped with a blanket of melted chocolate that’s just begging for a confetti of your favorite Halloween candies. It’s sweet, it’s salty, it’s crunchy, and it’s ridiculously easy to make. We’re talking about 20 minutes of active kitchen time for a treat that looks and tastes like you slaved away for hours. This is the ultimate secret weapon for your Halloween party, your trick-or-treat handout spread, or just a cozy night in watching spooky movies. So, tie on your favorite apron, and let’s create some kitchen magic together!
A Spooky Kitchen Memory: Where the Magic Began
This recipe always takes me right back to my grandma’s warm, always-bustling kitchen. She wasn’t one for elaborate, fussy desserts. Her magic was in taking simple, humble ingredients and turning them into something extraordinary. The first time I saw her make a version of this, my eyes were as wide as a full moon. She had laid out these plain saltine crackers on a battered old baking sheet. “Just wait, little chef,” she’d said with a wink. “We’re about to perform a little alchemy.”
I stood on a stool, mesmerized, as the butter and brown sugar bubbled and foamed into a gorgeous golden toffee. Pouring it over the crackers seemed like pure madness to my young mind—why would you put candy on a cracker?! But then came the chocolate chips, melting into a glossy pool under the warmth of the toffee. The best part was the grand finale: the sprinkle. We didn’t have fancy Halloween candies back then; we used whatever was in the cupboard—chopped-up peanuts, a handful of rainbow sprinkles, maybe a few chocolate jimmies. We’d break it into jagged pieces while it was still slightly warm, burning our fingers a little because we simply couldn’t wait. That combination of salty-sweet-crunchy was a revelation. It was more than a treat; it was a lesson in kitchen creativity that I carry with me in every recipe I create at BiteTide.
Print
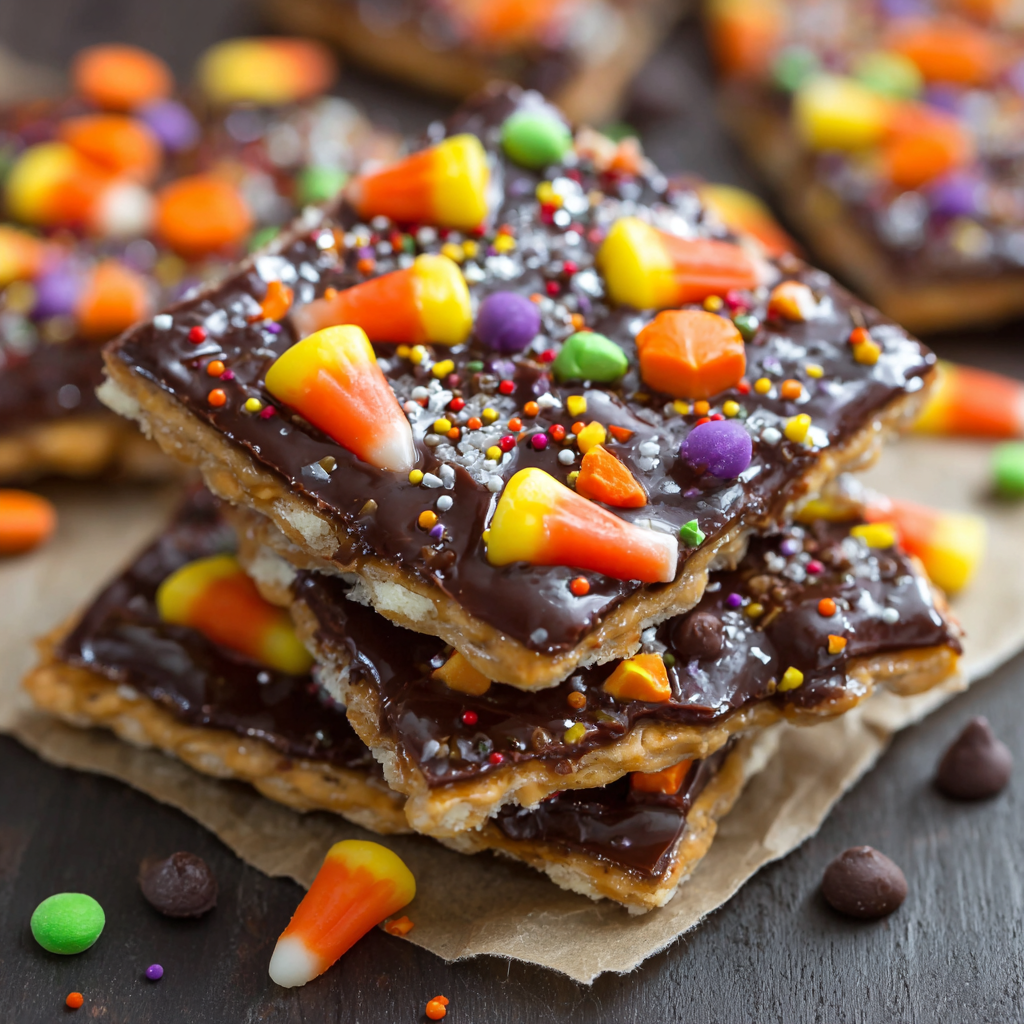
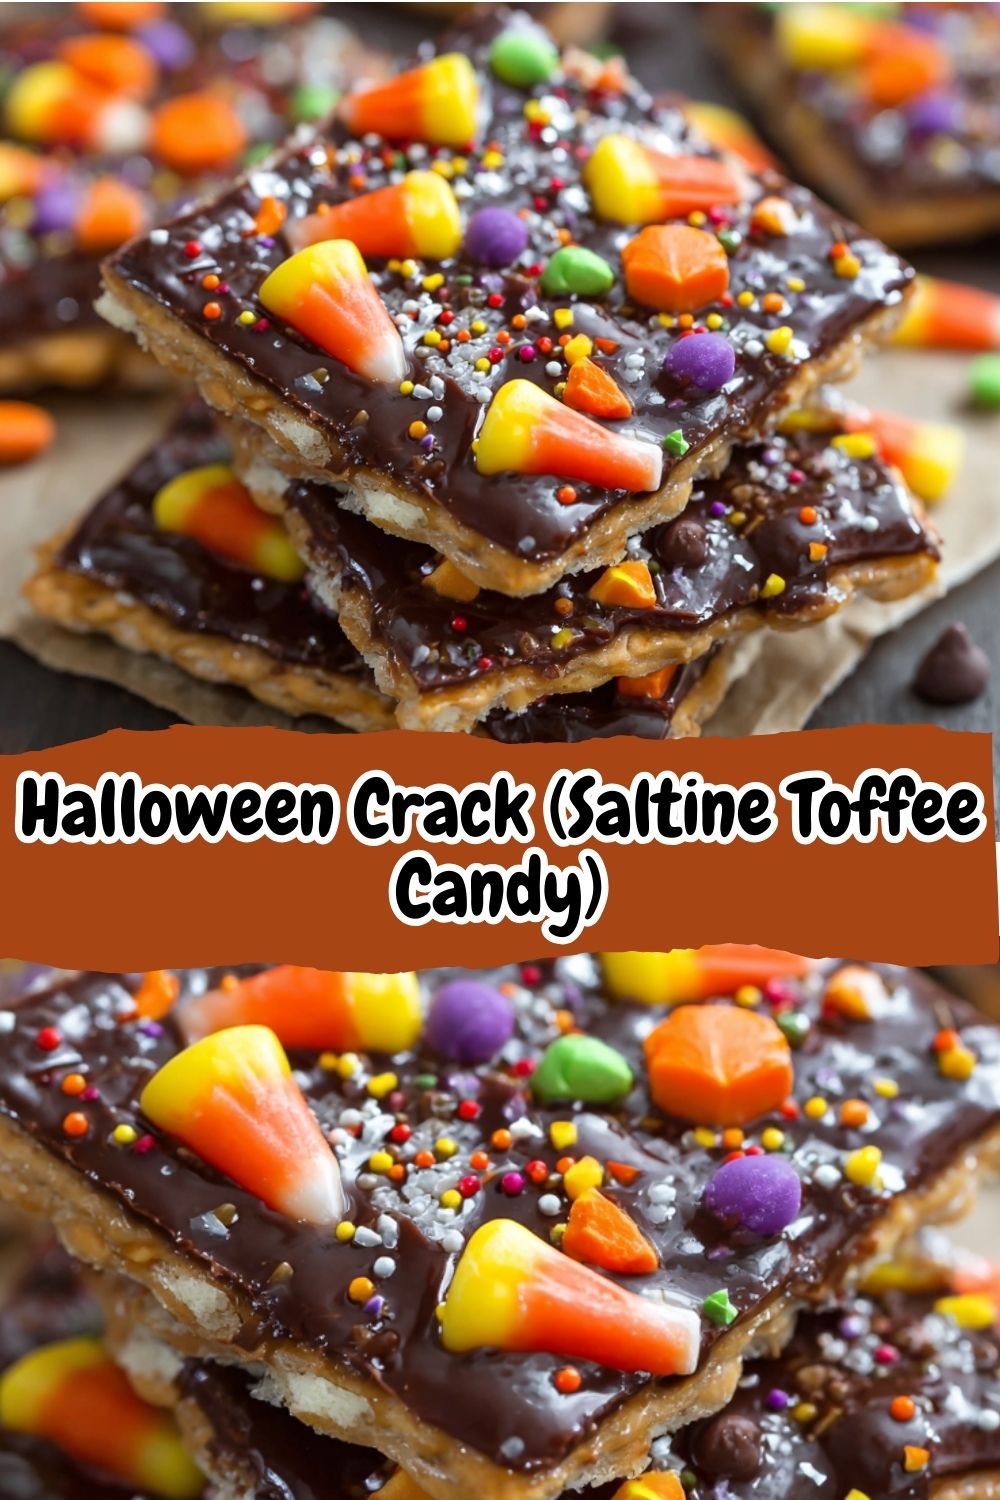
Halloween Crack (Saltine Toffee Candy)
- Total Time: 20 minutes
- Yield: ~20 pieces
Description
Halloween Crack is the ultimate spooky-season treat: crunchy, sweet, salty, and topped with festive fun. It’s quick to make, easy to customize with your favorite Halloween candies, and dangerously hard to stop eating. Perfect for parties, trick-or-treat trays, or just snacking straight from the fridge.
Ingredients
1 sleeve saltine crackers (about 40)
1 cup unsalted butter (2 sticks)
1 cup brown sugar
2 cups chocolate chips (milk or semi-sweet)
Halloween candy toppings: chopped candy bars, candy corn, Reese’s pieces, M&Ms
Halloween sprinkles (optional)
Instructions
Preheat oven to 350°F (175°C). Line a baking sheet with parchment paper or foil and arrange saltines in a single layer.
In a saucepan, melt butter and brown sugar over medium heat. Bring to a boil and let simmer for 3 minutes, stirring constantly.
Pour the hot toffee over the crackers and spread evenly.
Bake for 5 minutes until bubbling.
Remove from oven and immediately sprinkle chocolate chips over the top. Let sit 2–3 minutes to melt, then spread with a spatula.
Quickly top with Halloween candies and sprinkles before the chocolate sets.
Chill in the fridge for 1 hour or until firm. Break into pieces and enjoy!
- Prep Time: 10 mins
- Cook Time: 10 mins
- Category: Dessert
Nutrition
- Calories: 180
- Fat: 10g
- Carbohydrates: 22g
Gathering Your Spellbook Ingredients
Part of the beauty of this recipe is its simplicity. You probably have most of this in your pantry right now! Here’s what you’ll need to conjure up your own batch of Halloween Crack.
- 1 sleeve saltine crackers (about 40): The unsung hero! Their flat surface and slight saltiness are the perfect canvas. They provide a crucial crunchy texture that holds up against the toffee. Chef’s Insight: Don’t use a fancy cracker here; the simple, bland flavor of saltines is key to balancing the sweetness.
- 1 cup (2 sticks) unsalted butter: For that deep, rich, buttery toffee flavor. Using unsalted lets you control the salt level. Substitution Tip: In a pinch, salted butter works too! Just maybe skip the extra salt sprinkle later.
- 1 cup packed brown sugar: Pack it firmly into your measuring cup! The molasses in the brown sugar is what gives the toffee its classic, deep flavor and chewy-but-crunchy texture.
- 2 cups chocolate chips: Milk chocolate is classic and crowd-pleasing, but semi-sweet is my personal favorite for cutting the sweetness a bit. Chef’s Insight: Feel free to use chopped chocolate bars for an even smoother melt!
- Your favorite Halloween candy toppings: This is where you get to play! Think chopped Reese’s peanut butter cups, candy corn, M&M’s, Reese’s Pieces, crushed Oreos, or even festive sprinkles. The world (or the candy aisle) is your oyster!
- A generous pinch of flaky sea salt (optional but highly recommended): A sprinkle of flaky salt like Maldon on top of the chocolate before it sets takes this from great to absolutely legendary. It enhances every single flavor.
Brewing the Potion: Let’s Make Some Candy!
Don’t let the fancy look fool you—this is one of the easiest candy recipes out there. Follow these steps, and you’ll be a Halloween candy wizard in no time.
- Preheat and Prep: First things first, preheat your oven to 350°F (175°C). Now, line a standard 10×15-inch jelly roll pan or a similar-sized baking sheet with parchment paper or aluminum foil. If you use foil, a very light spritz of cooking spray will prevent any sticking. Arrange your saltine crackers in a single, even layer, filling the entire pan. It’s okay if they’re cozy! Chef’s Hack: If you have any tiny gaps at the edges, you can break a cracker to fit. We’re covering it all in toffee anyway!
- Create the Toffee Magic: In a medium saucepan, combine the butter and packed brown sugar. Melt them together over medium heat, stirring constantly with a wooden spoon or whisk. Once the mixture comes to a full, rolling boil, let it boil for exactly 3 minutes. Don’t walk away! Keep stirring the whole time. You’ll see it transform from grainy to smooth and beautifully bubbly. This boiling time is crucial for the toffee to set up correctly later. Chef’s Commentary: This is the only ” tricky” part, and it’s not tricky at all! Just set a timer and enjoy the incredible caramel smell filling your kitchen.
- The Great Toffee Pour: Immediately, and carefully, pour the hot toffee mixture over the arranged saltines. Use a spatula to quickly spread it into an even layer, covering all the crackers right to the edges of the pan. Work fast, as the toffee will begin to set quickly. Little Chef Hack: Tilt the pan gently to help the toffee spread itself. A offset spatula is a dream tool for this if you have one!
- A Quick Bake: Pop the pan into your preheated oven and bake for 5 minutes. You’ll see the toffee bubbling away enthusiastically, seeping into all the nooks and crannies of the crackers. This step ensures everything is perfectly baked together.
- The Chocolate Blanket: Take the pan out of the oven (place it on a heat-safe surface!) and immediately sprinkle the chocolate chips evenly over the top. Now, walk away. I’m serious! Let it sit for 2-3 minutes. The residual heat from the toffee will melt the chocolate perfectly. After a few minutes, take a spatula and gently spread the now-melted chocolate into a smooth, gorgeous layer. Chef’s Insight: This method is so much easier than melting chocolate separately, and it prevents the chocolate from seizing up.
- The Grand Topping Finale: This is the fun part! While the chocolate is still warm and gooey, unleash your inner artist. Sprinkle on all your chopped Halloween candies, sprinkles, and that optional but amazing pinch of flaky sea salt. Gently press them down just slightly so they adhere. Pro Tip: If you’re using a mix of colors, think about your design! Maybe orange and black candies in one corner, purple and green in another? Go wild!
- The (Hard) Part Where We Wait: Now, for the toughest step of all: patience. Transfer the entire pan to your refrigerator and chill for at least 1 hour, or until the chocolate is completely firm and set. You can also leave it at room temperature, but it will take longer. Chef’s Confession: I have been known to sneak a slightly warm, slightly messy piece at the 30-minute mark. No judgment here!
- Break and Enjoy! Once it’s completely firm, lift the entire slab out of the pan using the parchment paper. Place it on a cutting board and break it into irregular, rustic pieces with your hands. Alternatively, you can use a knife to cut cleaner squares. Then, try to stop yourself from eating it all in one sitting. I dare you.
How to Serve Your Spooky Masterpiece
This candy is a star all on its own! Pile the broken pieces high on a festive platter or in a large Halloween-themed bowl for parties. For trick-or-treaters, you can break it into smaller, bite-sized pieces and put them in little cellophane treat bags tied with orange and black ribbon. It also makes an incredibly thoughtful and impressive homemade gift—just box it up in a cute tin! However you serve it, be prepared to hand out the recipe, because everyone will be asking for it.
Ride Your Own Flavor Wave: Creative Twists!
The base recipe is a perfect blank slate. Here are a few of my favorite ways to mix it up throughout the year:
- The Peanut Butter Lover: Swirl ½ cup of melted peanut butter into the melted chocolate before topping. Then, use chopped Reese’s, peanut M&M’s, and a drizzle of more peanut butter.
- Christmas Crack: Swap the Halloween candy for red and green M&M’s, crushed peppermint candies, and a drizzle of white chocolate. Instant holiday hit!
- The Salty-Sweet Supreme: After sprinkling the chocolate chips, add a layer of mini pretzels along with your candy. The extra crunch and salt are unbelievable.
- Dairy-Free Delight: Use vegan butter, dairy-free chocolate chips, and check your candy toppings to make sure they’re dairy-free. It works like a charm!
- Mocha Madness: Add 1-2 teaspoons of instant espresso powder to the butter and brown sugar mixture as it melts. It adds a incredible depth of flavor that chocolate lovers adore.
Isla’s Kitchen Notes & Funny Stories
This recipe has been through it all in my kitchen! I’ve made it with my niece and nephew, and let me tell you, the “sprinkle” step turns into a candy free-for-all. There are usually more candies on the floor than on the cracker, but that’s half the fun. I’ve also learned a valuable lesson: always use a pan with a lip. I once used a flat cookie sheet for a double batch, and let’s just say a river of molten toffee cascaded into my oven, setting off every smoke alarm in the house. My dog, Pepper, still hides under the bed when I get out the saucepan!
Over time, I’ve found that letting the toffee boil for the full three minutes is the key to a crisp finish. If you under-boil, it can be a bit chewy (still delicious, though!). And if you’re a dark chocolate fan, this is your chance to shine—a good quality dark chocolate makes this treat feel incredibly sophisticated. Well, as sophisticated as something called “crack” can feel!
Your Questions, Answered!
Q: My toffee turned out grainy. What happened?
A: This usually means the sugar didn’t fully dissolve. The key is to stir constantly while the butter and sugar are melting *before* it comes to a boil. Once it boils, keep stirring for the full 3 minutes to ensure everything is perfectly incorporated.
Q: Can I use something other than saltines?
A: Absolutely! This recipe is very forgiving. Club crackers or Ritz crackers work wonderfully. Ritz will give you a richer, buttery flavor. You can even use matzoh for a Passover-friendly version!
Q: How do I store this, and how long does it last?
A: Store it in an airtight container at room temperature for up to a week, or in the fridge for up to two weeks (if it lasts that long!). The layers might soften a tiny bit at room temp, but it’s still delicious. I actually prefer the texture straight from the fridge—it’s extra snappy!
Q: My chocolate got clumpy when I tried to spread it. Help!
A: This means the chocolate got too hot or was stirred too vigorously, causing it to “seize.” The residual heat from the toffee should melt it gently. If you find your chocolate isn’t melting enough, you can pop the pan back into the warm (but turned off) oven for one minute. If it seizes, sadly there’s no fix, but it will still taste good, even if it looks a little rustic!
Nutritional Information*
*Estimated for 1 piece based on 20 pieces per batch. Values can vary greatly based on toppings used.
- Calories: ~180 kcal
- Fat: 10g
- Carbohydrates: 22g
- Sugar: 16g
- Protein: 1g
There you have it! The easiest, most addictive Halloween treat that’s guaranteed to become a seasonal tradition. I hope you have as much fun making it as I do. If you try it, I’d love to see your creations! Tag me @BiteTide on social media so I can share in the fun.
Happy cooking, and happy Halloween!
– Isla 💛