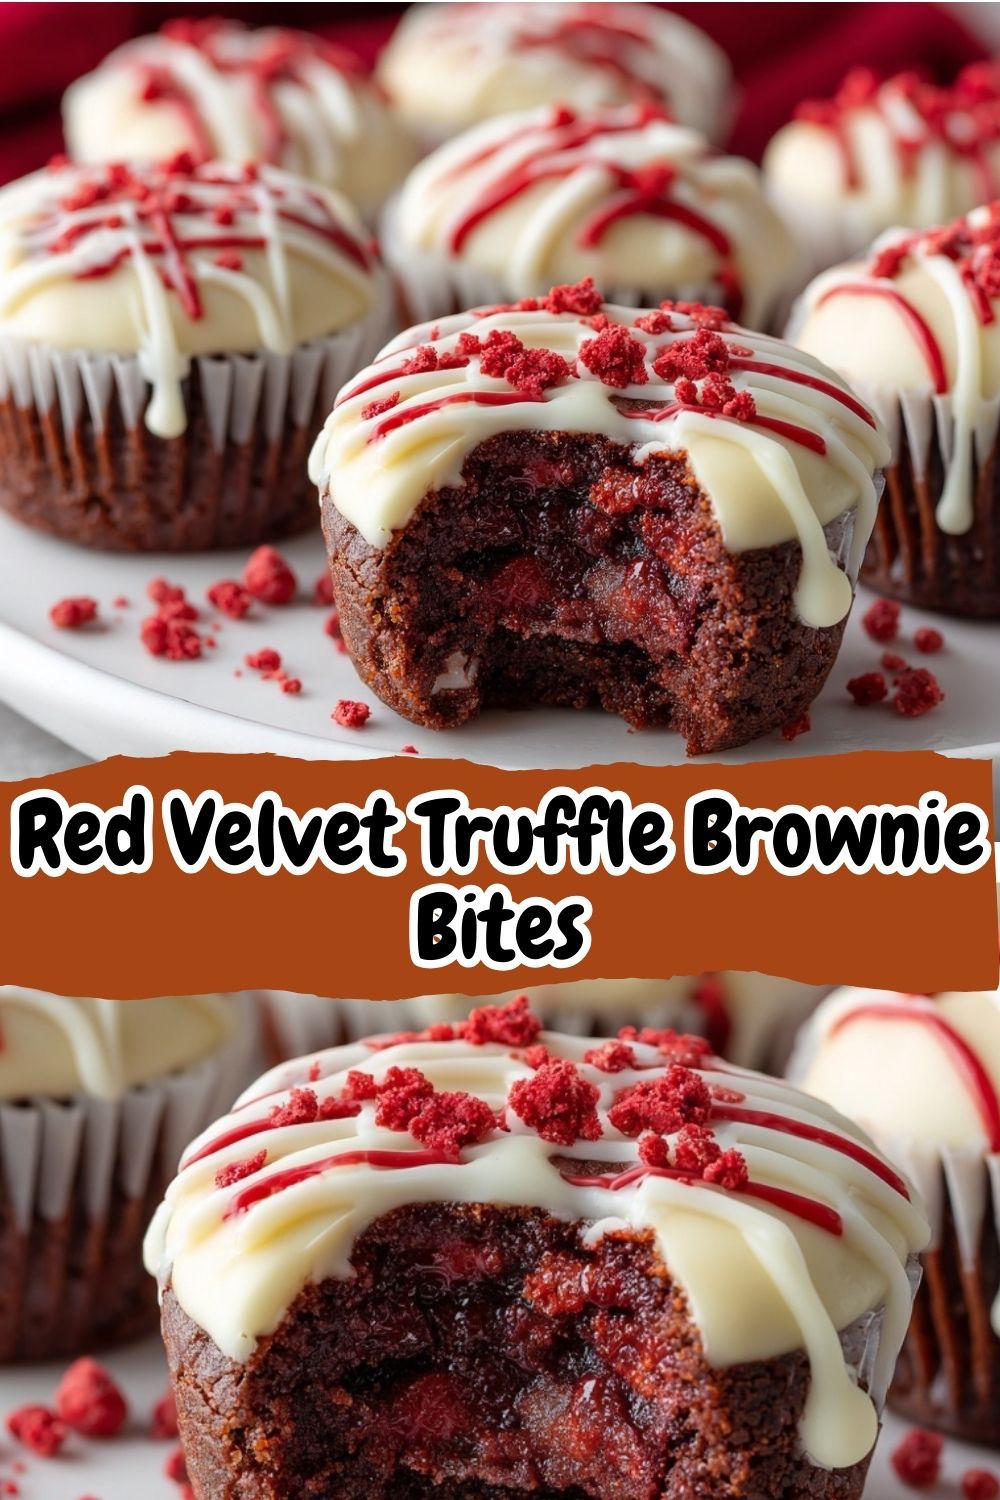
Red Velvet Truffle Brownie Bites: Your New Party Hero
Hey friend, Isla here! Let’s talk about that moment at a party or holiday gathering when you bring out a dessert tray and… silence. Not a bad silence. The good kind. The kind where everyone stops mid-conversation, their eyes widen, and they all start inching toward the table trying to be casual (but failing miserably). That’s the power of a truly stunning, bite-sized treat. And I’m about to hand you the secret recipe for that exact moment.
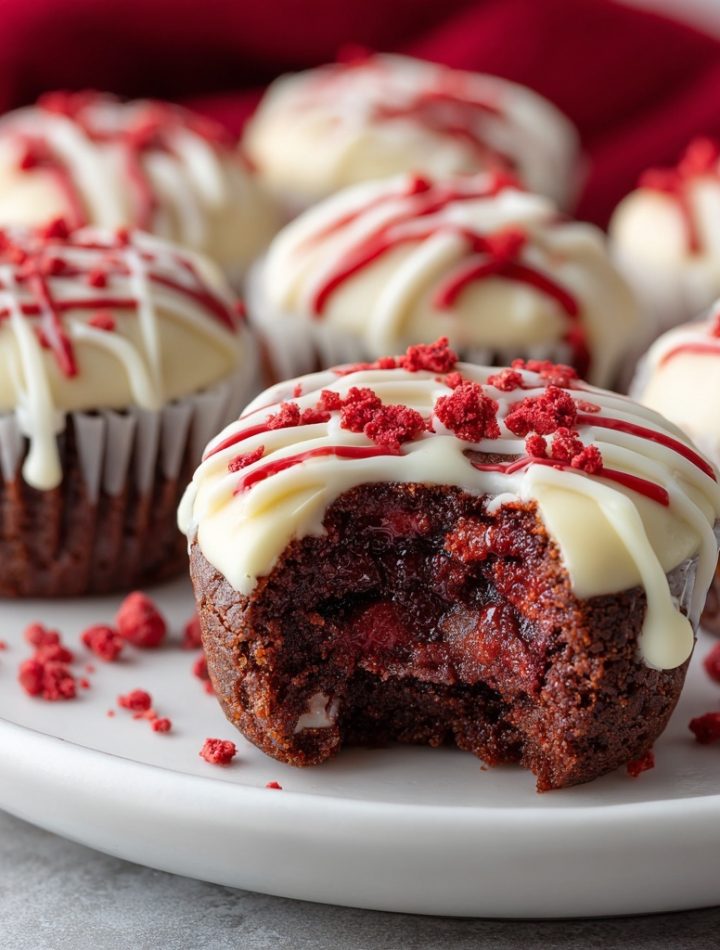
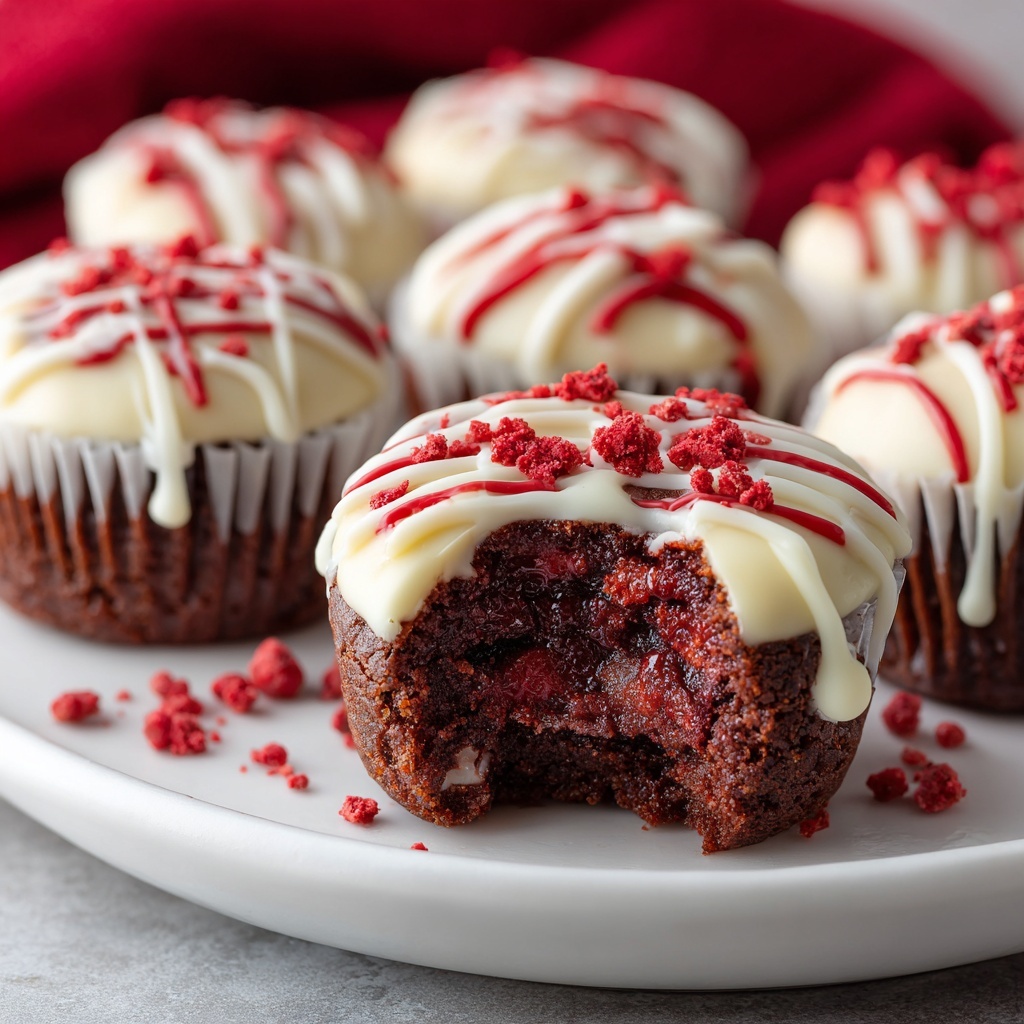
These Red Velvet Truffle Brownie Bites are my not-so-secret weapon. Imagine: a perfectly fudgy, slightly chewy brownie, baked into a cute little cup. Now, picture that cup filled to the brim with a shockingly smooth, rich, and velvety red velvet ganache that tastes like a red velvet cake had a delicious lovechild with a truffle. And because we believe in a little drama here at BiteTide, we crown the whole thing with an elegant drizzle of white chocolate. The color contrast alone is a showstopper—deep crimson peeking out from a dark chocolate base, all streaked with white.
The best part? They look like you spent hours in a fancy pastry kitchen, but I’ve built in every smart shortcut and stress-free step I know. We’re using a trusty brownie mix as our foundation (no shame in my game!), and the ganache comes together in minutes. This is the definition of “fancy but not fussy,” and I am so excited for you to make them. Let’s turn your kitchen into the most delicious corner of the internet and make some magic!
Print
Red Velvet Truffle Brownie Bites : Rich, Velvety, and Dressed to Impress
- Total Time: ~1 hour
- Yield: 24 bites 1x
Description
Red Velvet Truffle Brownie Bites are a show-stopping treat with serious indulgence. Fudgy brownie cups cradle a silky red velvet ganache, finished with a delicate white chocolate drizzle. Elegant enough for holidays and easy enough for a party tray, these bite-sized beauties bring bold flavor and gorgeous contrast to any dessert spread.
Ingredients
For the Brownie Base:
1 box brownie mix (plus eggs, oil, and water as directed)
Nonstick spray or mini muffin liners
For the Red Velvet Ganache:
½ cup heavy cream
1 cup red velvet baking chips or red candy melts
1 tsp vanilla extract
For the Topping:
¼ cup white chocolate chips or melting wafers, melted
Instructions
Preheat oven to 350°F (175°C). Grease a mini muffin tin or line with mini cupcake liners.
Prepare brownie batter as directed on box. Fill each muffin cavity ¾ full.
Bake 12–15 minutes, or until just set. Let cool, then press down the centers gently with a spoon to create a cavity.
In a small saucepan, heat cream until just steaming. Pour over red velvet chips and let sit 2 minutes. Stir until smooth, then mix in vanilla.
Spoon or pipe ganache into brownie cups.
Drizzle with melted white chocolate and chill until set.
- Prep Time: 20 minutes
- Cook Time: 15 mins
- Category: Dessert
Nutrition
- Calories: 140
- Fat: 8g
- Carbohydrates: 15g
- Protein: 1g
The “Aha!” Moment: From Baking Blunder to Bite-Sized Brilliance
I wish I could tell you this recipe was born from a flawless, Instagram-worthy kitchen moment. The truth is far more relatable—it came from a happy little accident. A few years back, I was testing a red velvet layer cake for a friend’s birthday. I was distracted, chatting with my mom on the phone, and I let the cream for the frosting heat a little too long. When I poured it over my chocolate, instead of a thick frosting, I got this gloriously pourable, silky-smooth ganache.
My heart sank for a second… until I tasted it. It was incredible! Deep chocolate flavor with that subtle tang that makes red velvet so special. But I had a cake to frost and no time to start over. So, I did what any resourceful cook does: I improvised. I had a batch of simple brownie bites cooling on the counter (told you I love a brownie mix!). On a whim, I gently pressed a spoon into their centers and filled the little wells with my “mistake” red velvet ganache. A quick drizzle of white chocolate later, and a star was born.
My friend still talks about those brownie bites more than the actual birthday cake. It taught me a beautiful kitchen lesson: sometimes the best recipes aren’t meticulously planned; they’re discovered in the joyful, messy, real-life moments of cooking. That spirit of fun and flexibility is baked right into this recipe for you.
Gathering Your Flavor Crew: Ingredients & Insights
Here’s everything you’ll need to create these little bites of joy. I’ve added my chef notes and swap ideas so you can shop and bake with confidence!
For the Brownie Base:
- 1 box (approx. 18-20 oz) brownie mix – Use your favorite brand! I typically grab a “fudge” or “chocolate chunk” style for maximum chew. Chef’s Insight: The box mix is our brilliant shortcut, giving us a consistent, delicious base so we can focus our energy on the show-stopping filling.
- Eggs, Oil, and Water – As directed on your specific box. Pro-Tip Swap: For an even richer brownie, replace the water with brewed coffee or milk. The coffee won’t make it taste like coffee; it just amplifies the chocolate flavor magically.
- Nonstick spray or 24 mini muffin liners – Liners make for super easy cleanup and pretty presentation, but a well-sprayed pan works perfectly too.
For the Red Velvet Ganache:
- ½ cup heavy cream – Also called heavy whipping cream. This is the key to that luscious, silky texture. Important Note: Don’t try to substitute with half-and-half or milk; the ganache won’t set properly.
- 1 cup red velvet baking chips or red candy melts – This is where the signature flavor and color come from! You can find these near the chocolate chips or baking decorations at most craft stores or big-box retailers. Can’t find them? No panic! Use 1 cup of semi-sweet chocolate chips and add ½ teaspoon of distilled white vinegar + a few drops of red gel food coloring to the warm ganache. It works like a charm!
- 1 teaspoon pure vanilla extract – The finishing note that rounds out all the flavors.
For the Topping:
- ¼ cup white chocolate chips or melting wafers – For that beautiful drizzle. I prefer melting wafers (like Ghirardelli or Candy Melts) as they’re formulated to melt smoothly and set nicely, but chips work too—just add a tiny drop of oil when melting to help them flow.
Let’s Get Baking: Step-by-Step with Chef Isla
Follow these steps, and you’ll be a brownie bite pro in no time. I’m chatting right alongside you with all my best tips!
- Prep & Preheat. Crank that oven to 350°F (175°C). This is our golden rule for perfect baking. While it heats, generously spray your mini muffin tin with nonstick spray or line the cups with mini liners. Trust me, taking 2 minutes to do this well saves so much grief later!
- Make the Brownie Batter. In a medium bowl, prepare your brownie mix according to the package directions. My only extra tip here? Don’t overmix! Stir just until the ingredients are combined and no dry streaks remain. A few lumps are totally fine. Overmixing = tough brownies, and we want them fudgy and tender.
- Fill ‘Em Up. Using a small cookie scoop or a spoon, fill each mini muffin cup about ¾ of the way full. This is the perfect amount to get a nice, domed base that we can later shape. They should look generously full but not overflowing.
- Bake to Perfection. Slide the pan into your preheated oven and bake for 12-15 minutes. You’re looking for the tops to look set and a toothpick inserted near the edge (not the center!) to come out with moist crumbs, not wet batter. Watch closely at the 12-minute mark—ovens vary, and we don’t want to overbake.
- Create the “Truffle Well.” This is the fun, slightly therapeutic part! As soon as the brownie bites are cool enough to handle but still warm, take the rounded end of a wooden spoon, a small jar, or even your (clean!) thumb. Gently but firmly press down into the center of each brownie bite to create a little crater or well. Don’t press all the way to the bottom; leave a thin base. The warm brownie is pliable and will shape beautifully.
- Whip Up the Ganache. While the brownies cool completely, make the magic filling. In a small saucepan, heat the heavy cream over medium heat until it’s just beginning to steam and you see small bubbles form around the edges—do not let it boil. Place your red velvet chips in a heatproof bowl. Pour the hot cream over the chips, cover the bowl with a plate, and let it sit untouched for 2 full minutes. This quiet time allows the heat to gently melt the chocolate. After 2 minutes, whisk slowly from the center outward until you have a smooth, glossy, and gloriously red ganache. Whisk in the vanilla extract.
- Fill the Wells. Let the ganache cool and thicken for about 5-10 minutes. You can transfer it to a piping bag for ultimate precision or just use a small spoon. Carefully fill each brownie cup’s well with the red velvet ganache, letting it mound slightly. It will look like a tiny pool of red velvet lava—exactly what we want!
- The Final Drizzle. Melt your white chocolate in a small microwave-safe bowl in 15-second bursts, stirring in between, until smooth. Using a fork or a small zip-top bag with the corner snipped off, drizzle the white chocolate artistically over the filled brownie bites. There are no rules here—zigzags, swirls, whatever makes you happy!
- Set & Serve. Pop the entire tray into the refrigerator for at least 30 minutes to let everything set beautifully. This makes them neat to eat and allows all the flavors to meld into perfect harmony.
Plating Your Masterpiece: How to Serve
Once set, gently pop the brownie bites out of the pan (if you didn’t use liners, a small offset spatula or butter knife helps). Arrange them on a beautiful platter or a tiered dessert stand for major visual impact. I love scattering a few extra red velvet chips or white chocolate curls around the plate for a chef-y touch. These are perfect for a party tray, a holiday dessert table, or as a special homemade gift packed in a cute box. Serve them straight from the fridge for a cool, firm texture, or let them sit out for 10 minutes for a slightly softer, melt-in-your-mouth experience.
Ride Your Own Flavor Wave: Creative Twists
Love the base recipe? Here’s how to make it your own:
- Peppermint Sparkle: Add ¼ tsp peppermint extract to the ganache and crush some candy canes over the white chocolate drizzle for a festive winter treat.
- Orange Zest Dream: Stir the zest of one orange into the brownie batter and add a teaspoon of orange liqueur (like Grand Marnier) to the ganache for a sophisticated citrus twist.
- Cheesecake Swirl: Before baking, drop a tiny dollop (½ tsp) of sweetened cream cheese mixture into the center of each brownie cup batter. Bake as directed—you’ll get a surprise cheesecake center!
- Gluten-Free/Dairy-Friendly: Use a gluten-free brownie mix and ensure your chocolate chips are gluten-free. For dairy-free, use a DF brownie mix, coconut cream instead of heavy cream, and dairy-free chocolate chips.
- Salty-Sweet Upgrade: After drizzling, immediately sprinkle each bite with a tiny pinch of flaky sea salt. It’s a game-changer.
Isla’s Kitchen Notebook: Extra Thoughts
This recipe is a living, evolving thing in my kitchen. Sometimes I’ll use a dark chocolate brownie mix for deeper contrast. Other times, if I’m feeling extra, I’ll roll the ganache leftovers into tiny truffles and coat them in cocoa powder for a bonus treat—zero waste! A funny story: my nephew once “helped” me by pressing the wells with such gusto he made tunnels straight through the brownies. We simply patched the bottoms with a little extra ganache and called them “surprise molten lava bites.” He was so proud. The moral? Don’t stress the imperfections. These are homemade treats filled with love, and that’s the most important ingredient of all. They keep beautifully in an airtight container in the fridge for up to 5 days… if they last that long!
Your Questions, Answered: FAQs & Troubleshooting
Q: My ganache split/got grainy! What happened?
A: This usually means the cream was too hot or the chocolate was stirred too aggressively while melting. If it looks oily or curdled, don’t panic! Add a tablespoon of room-temperature cream or milk and whisk vigorously until it comes back together. If it’s just a bit grainy, pushing it through a fine-mesh sieve can save it.
Q: Can I make these ahead of time?
A: Absolutely! They are the perfect make-ahead dessert. Prepare them completely, let them set in the fridge, then store them layered between parchment paper in an airtight container for up to 2 days. The flavors actually get better! You can also freeze them for up to a month—thaw in the fridge overnight.
Q: My brownie bites stuck to the pan. Help!
A: First, my sympathy—it happens to the best of us. Next time, ensure your spray is super thorough, getting in every crevice. If they’re stuck now, let the pan sit on a warm, damp towel for a few minutes; the steam can help loosen them. Then, gently slide a thin knife or offset spatula around each one.
Q: Can I use a regular muffin tin?
A: You can, but they’ll be larger, more like individual desserts. Adjust the bake time to 18-22 minutes. You’ll also need to increase the ganache recipe by 1.5x to fill the larger wells.
Quick Nutrition Info (Per Bite)
Please note: This is an estimate based on standard ingredients. For precise dietary needs, calculate with your specific brands.
- Calories: ~140
- Protein: 1g
- Carbohydrates: 16g
- Fat: 8g
- Prep Time: 20 min | Cook Time: 15 min | Chill Time: 30 min | Total Time: ~1 hour 5 min