 From Discard to Delicious: Your New Favorite Sourdough Hack is Here!
Hey there, flavor friend! Isla here, from my cozy kitchen to yours. Let’s talk about that jar in your fridge. You know the one. It’s half-full of sourdough discard, looking a little lonely, and you’re feeling that tiny pang of guilt every time you open the door. Do you feed it? Do you bake a massive project? Or… do you finally pour it down the drain? STOP RIGHT THERE. I’m grabbing my apron and waving my wooden spoon because I have the most glorious, easy, and downright delicious solution for you.
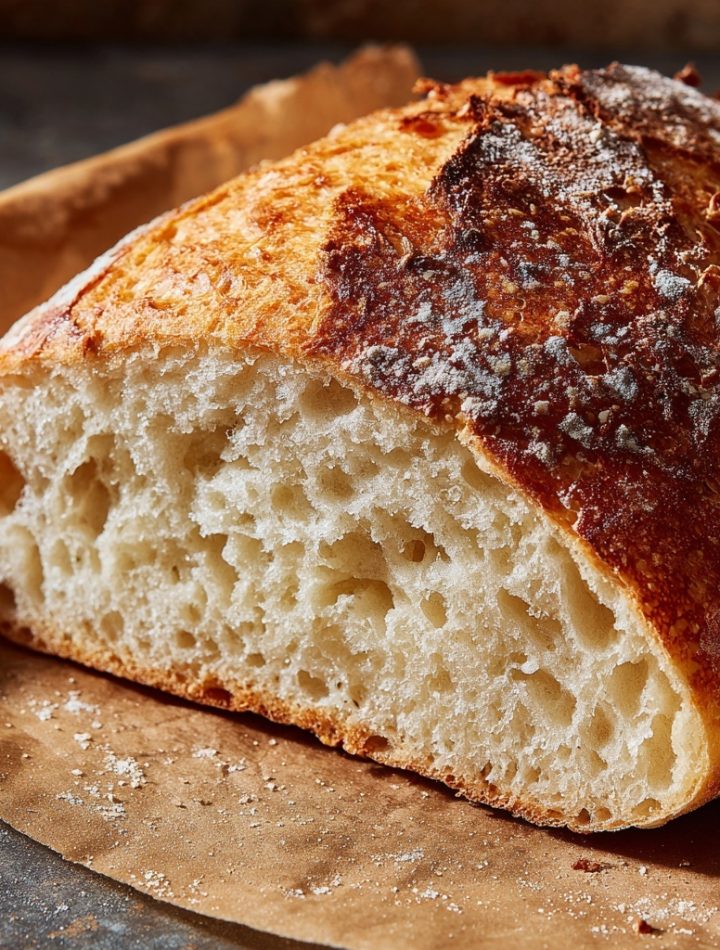
Today, we’re transforming that “leftover” into a masterpiece: Quick Sourdough Discard French Bread. This isn’t a days-long sourdough saga. This is a “I-want-fresh-bread-tonight” miracle. We’re talking a gorgeous, golden loaf with a crust that sings when you tap it and a soft, airy crumb just begging for a slather of good butter. It looks like you spent all day at a rustic French bakery, but the secret is it comes together in about 15 minutes of hands-on time. No fuss, no overnight rise, just pure, unadulterated bread joy. Whether you’re pairing it with a steaming bowl of soup, making the ultimate garlic bread, or simply treating yourself to a warm slice, this recipe is about to become your go-to. Ready to ride this flavor wave? Let’s bake!
Print
Quick Sourdough Discard French Bread : Easy & Delicious Homemade Loaf
- Total Time: 24 minute
- Yield: 1 medium loaf 1x
Description
Turn your sourdough leftovers into a beautiful golden loaf with this quick sourdough discard French bread recipe. With its crispy crust and soft, airy crumb, this loaf looks bakery-made but comes together easily—no fuss, no overnight rise. It’s perfect for sharing at brunch, serving with soup, or slicing up warm with butter for a cozy night in. A simple, impressive way to use that extra discard!
Ingredients
1 cup sourdough discard (unfed)
¾ cup warm water
1 tbsp sugar
2 tsp instant yeast
2 ½ cups bread flour (or all-purpose)
1 ½ tsp salt
Instructions
In a bowl, mix warm water, sugar, yeast, and sourdough discard. Let sit for 5–10 minutes until bubbly.
Add flour and salt, then mix until a shaggy dough forms.
Knead on a floured surface for 6–8 minutes until smooth and elastic.
Shape into a log or oval, place on parchment-lined baking sheet.
Cover and let rise in a warm spot for 45–60 minutes until doubled.
Preheat oven to 425°F (220°C). Score top with a sharp knife.
Bake for 25–30 minutes until golden brown and crusty. Let cool before slicing.
- Prep Time: 15 mins
- Cook Time: 25–30 mins
- Category: Breakfast
The Loaf That Started It All: A Kitchen Memory
This recipe always takes me back to my grandma’s sun-drenched kitchen. She was a wizard with “bits and bobs,” as she called them—never wasting a scrap. One rainy afternoon, I was lamenting my sourdough starter’s discard habit. She peered into the jar, chuckled, and said, “That’s not waste, darling. That’s flavor waiting for a purpose.” She then proceeded to whip up a version of this very bread with the casual ease of someone making a cup of tea.
The smell as it baked was magic—yeasty, warm, and comforting. When she pulled that crackling, golden loaf from the oven, I was in awe. She tore off a huge piece, steam billowing out, handed it to me with a pat of salty butter, and said, “See? Everything has its use.” That first bite, crispy and soft all at once, was a revelation. It taught me that incredible food doesn’t have to be complicated. It just has to be made with a little love and a lot of smart shortcuts. Every time I make this bread, I think of her, and I hope this recipe gives you that same feeling of simple, profound satisfaction.
Gathering Your Flavor Toolkit: What You’ll Need
Here’s everything to pull from your pantry and fridge. Remember, baking is part science, part soul—so let’s understand our players!
- 1 cup sourdough discard (unfed): This is our flavor hero! It doesn’t matter if it’s been in the fridge for a week—its tangy, complex flavor is the soul of the bread. Chef’s Insight: The acidity also helps tenderize the crumb. No active starter needed!
- ¾ cup warm water (about 105-110°F): The “warm” part is key! It should feel like a pleasant bath temperature, not hot. Too hot will harm the yeast; too cold will slow it down.
- 1 tbsp sugar: A tiny bit of food for our yeast friends to get them bubbling happily. It won’t make the bread sweet. You can sub with honey or maple syrup for a subtle flavor twist.
- 2 tsp instant yeast: Our rising superstar. Instant yeast lets us skip the proofing-in-water step. If you only have active dry yeast, that’s okay! Just mix it with the warm water and sugar first and let it foam for 5-10 minutes before adding the discard.
- 2 ½ cups bread flour: Bread flour has a higher protein content (usually 12-14%), which means more gluten and a better, chewier structure. Smart Sub: All-purpose flour works in a pinch! Your loaf might be slightly less chewy but still utterly delicious.
- 1 ½ tsp salt: The flavor amplifier. Salt tightens gluten, so we add it separately from the yeast. Never skip it!
Let’s Get Baking: Your Foolproof Roadmap to Golden Perfection
Follow these steps, and you’re guaranteed a winner. I’m chatting you through each one with all my best kitchen hacks!
- The Bloom (5-10 mins): In a large mixing bowl, whisk together the warm water, sugar, and instant yeast. Now, plop in that glorious sourdough discard and give it all a good stir until it looks like a creamy, beige smoothie. Let it sit for 5-10 minutes. You’re looking for a few bubbles and a slightly frothy surface—this tells you the yeast is alive and partying with the discard! Tip: No bubbles? Your yeast might be old. Time for a fresh packet!
- Bringing It Together (3 mins): Add the bread flour and salt to the bowl. Use a sturdy spoon or your hands to mix until you no longer see dry flour. It will be a shaggy, rough ball. Don’t worry about neatness here! This is the “rough draft” of your dough.
- The Knead (6-8 mins): Turn the dough out onto a lightly floured surface. Here’s where the magic happens! Use the heel of your hand to push the dough away from you, then fold it back over, give it a quarter turn, and repeat. You’re looking for a smooth, elastic dough that springs back lightly when poked. Chef’s Hack: Set a timer! It’s easy to under-knead. If the dough sticks to your hands, add a tiny sprinkle of flour, but resist adding too much—a slightly tacky dough is better than a dry one.
- First Shape & Rise (45-60 mins): Shape your smooth dough into a loose log or oval. Place it on a parchment-lined baking sheet (no need for a fancy proofing basket!). Cover it loosely with a damp kitchen towel or a big overturned bowl. Let it rise in a warm, draft-free spot. I like to turn my oven on for just 1 minute, turn it off, and let the dough rise in there. It should look puffy and nearly doubled in size.
- Score & Bake (25-30 mins): Preheat your oven to 425°F (220°C). Once risen, use a very sharp knife, razor blade, or bread lame to make 3-4 diagonal slashes about ¼-inch deep on top of the loaf. This isn’t just decorative—it lets the bread expand beautifully in the oven! Slide the parchment with the loaf right onto the oven rack (or keep it on the sheet). For an extra-crispy crust, place a small oven-safe dish with ½ cup of ice cubes on the bottom rack when you put the bread in. The steam works wonders! Bake until deeply golden brown and it sounds hollow when tapped on the bottom.
- The Most Important Step: COOL! (20 mins): I know, the temptation is REAL. But please, let your beautiful loaf cool on a wire rack for at least 20 minutes before slicing. This allows the steam inside to set the crumb. Cutting too soon leads to a gummy texture. Consider this your final test of willpower—you can do it!
How to Serve Your Masterpiece
Presentation is part of the fun! Place the whole, crackly loaf right on a wooden cutting board. Let people tear into it family-style for maximum cozy vibes. For a simple appetizer, slice it thick, drizzle with good olive oil, and sprinkle with flaky sea salt. It’s the perfect vehicle for soups, stews, and cheese boards, or simply toasted and smeared with jam for breakfast. This bread turns any meal into an occasion.
Ride the Flavor Wave: 5 Fun Twists to Try
Once you’ve mastered the classic, get creative! Here are some of my favorite spins:
- Everything Bagel Loaf: Before baking, brush the loaf with an egg wash (1 egg + 1 tbsp water) and generously sprinkle with everything bagel seasoning.
- Garlic & Herb Swirl: Roll the dough out into a rectangle before shaping, brush with melted butter mixed with minced garlic and Italian herbs, then roll up, seal, and bake.
- Whole Wheat Boost: Substitute 1 cup of the bread flour with whole wheat flour for a nuttier, heartier loaf. You may need an extra tablespoon or two of water.
- Cheesy Pull-Apart: Mix ½ cup of grated sharp cheddar and ¼ cup grated Parmesan right into the dry ingredients for a cheesy, savory treat.
- Seeded Crust: After scoring, brush the loaf with water and roll the top in a mix of sesame, poppy, and flax seeds for extra crunch and nutrition.
Isla’s Kitchen Notes: The Inside Scoop
This recipe has evolved so much since that first batch in my grandma’s kitchen. My biggest “aha!” moment was realizing I didn’t need to baby this dough. It’s resilient and forgiving! One time, my kids needed help with a school project right in the middle of the rise, and the dough ended up proofing for almost two hours. I thought it was ruined, but it baked up into the most wonderfully airy, open-crumbed loaf I’d ever made. So, don’t stress the clock too much.
I also highly recommend playing some good music while you knead. It makes the time fly and infuses the dough with good vibes (trust me, you can taste the joy). This bread has become my favorite gift for new neighbors or a friend having a tough week. Nothing says “I care” quite like a homemade loaf, still warm from the oven.
Your Questions, Answered!
Q: My dough didn’t rise much. What happened?
A: The most common culprits are old yeast or a drafty/too-cold rising spot. Check your yeast’s expiration date. Next time, try my “warm oven” trick for proofing! Also, ensure your water was warm, not hot, to activate the yeast properly.
Q: Can I make this dough ahead and bake it later?
A: Absolutely! After the first rise and shaping, you can cover the loaf tightly and pop it in the fridge for up to 24 hours. When you’re ready, take it out, let it sit at room temp for 30 minutes, score, and bake. You may need to add 3-5 extra minutes to the baking time.
Q: My crust isn’t very crispy. How can I fix that?
A> For a professional-level crust, steam is your best friend. Don’t skip the ice cube trick! Also, make sure your oven is fully preheated. Baking directly on the oven rack (with parchment) helps heat circulate better than a thick pan. Letting the loaf cool completely also allows the crust to fully set and crisp up.
Q: Is this a “true” sourdough? It has yeast.
A> Great question! This is a brilliant hybrid. The sourdough discard gives us that wonderful tangy flavor and helps condition the dough, while the commercial yeast gives us a quick, reliable rise. It’s the best of both worlds—all the flavor without the multi-day commitment.
Nutritional Information (Approximate, per slice out of 12)
Calories: ~150 | Carbohydrates: 28g | Protein: 4g | Fat: 1g | Fiber: 1g