Quick Mongolian Beef Bowls with Broccoli – Your New Healthy Meal Prep Obsession
Hey there, friend! Isla here. Let’s be real for a second: how many times have you stared into the fridge on a Wednesday night, the “hangry” monster starting to growl, and just defaulted to ordering takeout? You crave something saucy, savory, and satisfying, but you also want to feel good about what you’re eating. That glossy, irresistible Mongolian beef from your favorite spot calls your name, but so does the voice in your head whispering about sodium bombs and mystery sauces. I get it. I’ve been there more times than I can count.
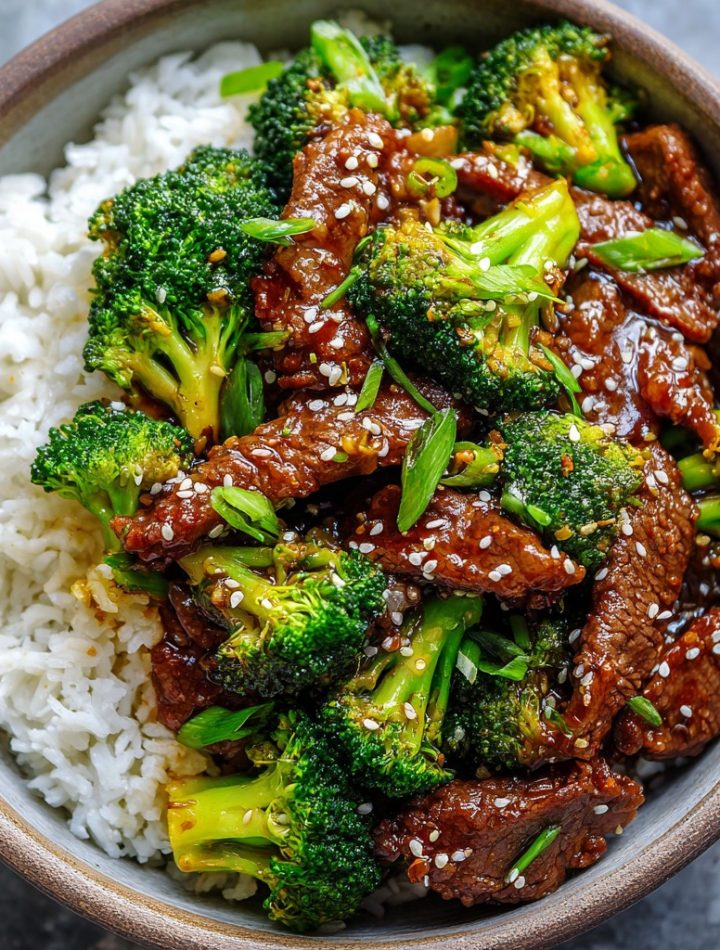
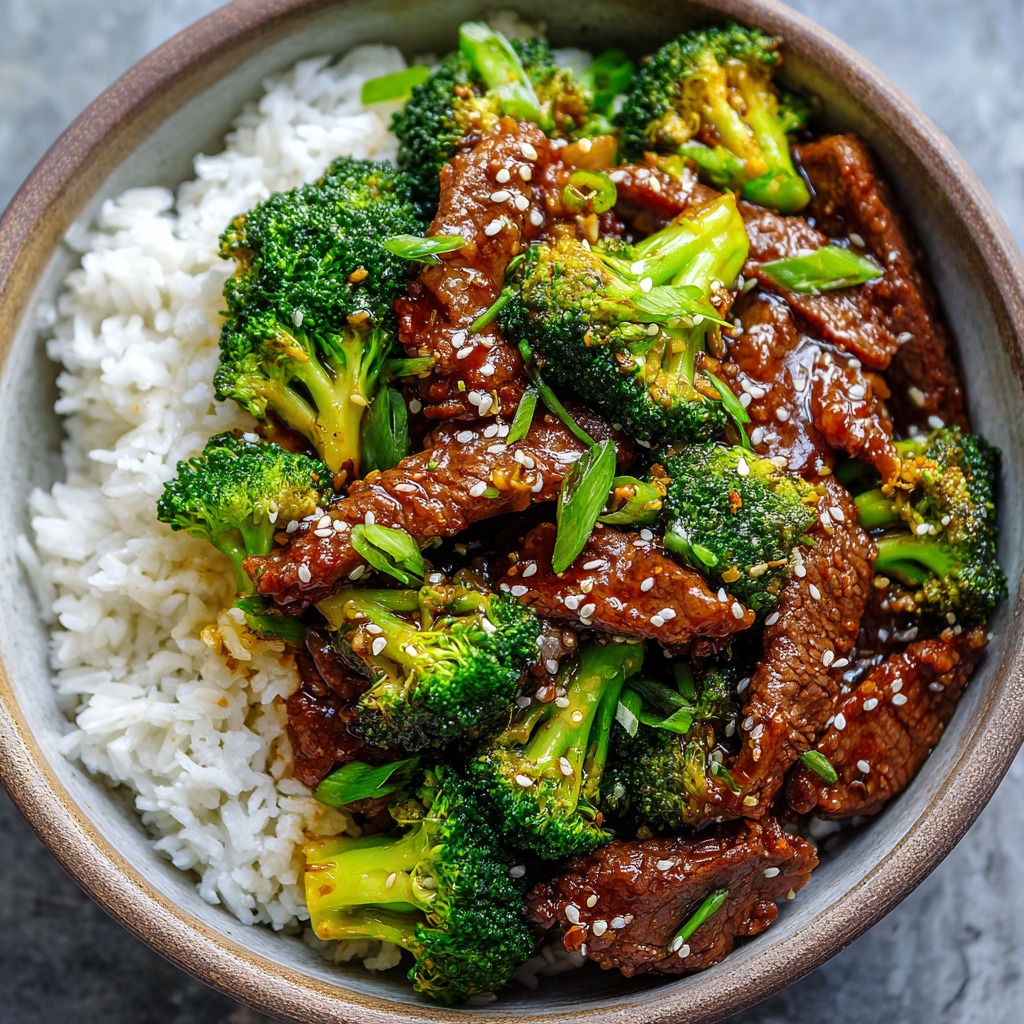
Well, grab your favorite skillet and get ready to do a little happy dance, because I’m about to hand you the ultimate solution. These Quick Mongolian Beef Bowls with Broccoli are my weekly MVP. They deliver every single bit of that sticky-sweet, garlicky, deeply savory flavor you dream about, but they’re whipped up in your own kitchen in under 30 minutes, with ingredients you can pronounce and control. It’s the perfect harmony of tender beef, crisp broccoli, and a sauce that you’ll want to drink with a spoon, all piled over fluffy rice. This isn’t just a recipe; it’s your ticket to reclaiming your weeknights and your meal prep game. Let’s make a promise to ourselves: more flavor, less fuss, and zero compromise. Sound good? Let’s get cooking!
The Takeout Box That Started It All
My love affair with Mongolian beef began in the most un-glamorous way possible: a fluorescent-lit food court. When I was in college, my best friend and I had a standing Wednesday night study date. We’d camp out with our textbooks, surrounded by the chaotic symphony of sizzling woks and shopping mall chatter, and we’d always, always split an order of Mongolian beef and white rice from the same Chinese-American counter. It was our ritual. That perfect bite—the chewy-sweet beef, the hit of ginger, the way the sauce clung to every grain of rice—was our little weekly prize for making it through another hump day.
Years later, living in my first real apartment with a kitchen the size of a postage stamp, I missed that flavor. But my budget and my desire to cook from scratch had other plans. So, I started tinkering. I wanted to capture that food court magic, but make it *mine*—a little healthier, a lot faster, and just as soul-warming. After many (many!) iterations, this recipe was born. It’s my grown-up, kitchen-confident homage to those Wednesday nights. It’s the taste of friendship, of small victories, and of realizing that the best flavors aren’t just for takeout boxes—they’re for your own bowl, too.
Gathering Your Flavor Crew
Here’s everything you need to create this wave of flavor. I’ve added my little chef-y notes next to each one because knowing the “why” makes you a more confident cook!
- 1½ lbs flank steak, thinly sliced against the grain: This is our star! Flank steak is lean, flavorful, and perfect for quick cooking. The against the grain part is non-negotiable—it guarantees tender, not chewy, bites. Chef’s Swap: Skirt steak works great too, or use thinly sliced chicken breast/thighs for a different twist.
- 2 tsp cornstarch: Our secret weapon for velvety beef and a glossy sauce. It creates a light coating on the beef that helps it sear beautifully and later helps thicken the sauce.
- 1 tbsp olive oil: For searing. Any high-heat oil (avocado, grapeseed) works.
- 3 cloves garlic, minced: The aromatic base. Please, for the love of flavor, use fresh!
- 1 tsp fresh grated ginger: The zingy soul of the dish. A microplane grater is your best friend here. In a pinch, ¼ tsp ground ginger will do, but fresh is best.
- ⅓ cup low-sodium soy sauce: The savory backbone. Using low-sodium lets us control the salt level. Chef’s Tip: For a gluten-free version, swap in tamari or coconut aminos.
- ¼ cup water: Balances the sauce and helps it come together.
- 2 tbsp brown sugar or honey: That essential sweet note that makes it “Mongolian.” I love the molasses depth of brown sugar, but honey is a gorgeous, floral alternative.
- 1 tsp sesame oil: The finishing touch. That nutty, toasted aroma is everything. Add it at the end to keep its flavor vibrant.
- 3 cups broccoli florets: Our green, crunchy, healthy buddy. It soaks up the sauce like a dream.
- 3 cups cooked jasmine or white rice: The fluffy foundation. Jasmine rice has a lovely fragrance, but any rice you love works.
- 2 green onions, sliced & Sesame seeds (optional): These aren’t just garnish—they’re essential fresh texture and color! The green onions add a sharp bite, and the sesame seeds give a tiny crunch.
Let’s Build Those Bowls! (Step-by-Step)
Ready to see how quickly this comes together? Follow these steps, and lean in for my little kitchen hacks along the way.
- Prep is Power: Start by slicing your flank steak against the grain into thin, bite-sized strips. Toss them in a bowl with the cornstarch until every piece has a light, dusty coating. This is step one to tender beef! Simultaneously, get your garlic minced, ginger grated, and sauce ingredients measured and ready by the stove. Cooking fast-paced dishes is all about mise en place (having everything in its place).
- Sear the Beef: Heat the olive oil in a large skillet or wok over medium-high heat until it shimmers. Add the beef in a single layer—don’t crowd the pan! Do this in two batches if needed. Crowding steams the meat instead of searing it. Let it sit undisturbed for 1-2 minutes to get a good brown crust, then flip and cook for another minute. Remove to a clean plate. It won’t be fully cooked through, and that’s perfect—it’ll finish in the sauce.
- Build the Sauce: In the same, now-flavor-packed pan (don’t you dare wash it!), add a tiny bit more oil if it’s dry. Toss in the garlic and ginger. They’ll sizzle and become fragrant in about 30 seconds—watch closely so they don’t burn! Quickly pour in the soy sauce, water, brown sugar, and sesame oil. Give it a good whisk and let it simmer for 2-3 minutes. You’ll see it start to bubble and slightly thicken into a gorgeous, glossy glaze.
- The Grand Reunion: Slide all the beef and any accumulated juices back into the skillet with the sauce. Toss everything together, letting the beef heat through and soak up all that saucy goodness for about 1-2 minutes. The cornstarch from the beef will help thicken the sauce further, making it cling to every strip.
- Broccoli Time: While the beef and sauce mingle, cook your broccoli. My favorite easy method: place the florets in a microwave-safe bowl with a splash of water, cover with a damp paper towel, and microwave for 1.5-2 minutes until crisp-tender. Or, you can quickly sauté them in a separate pan for 3-4 minutes. Season with a tiny pinch of salt.
- Assemble with Joy: Fluff your rice. Divide it between bowls or your meal prep containers. Top with a generous scoop of that glorious Mongolian beef, then a handful of bright green broccoli. Finish with a flourish of sliced green onions and a sprinkle of sesame seeds. Admire your masterpiece for a second—you earned it!
How to Serve & Savor
Presentation is part of the fun! For a family dinner, I love serving this family-style: a big platter of the saucy beef and broccoli next to a bowl of steaming rice, letting everyone build their own bowl. For meal prep, layer it neatly in containers: rice on the bottom, beef and sauce in the middle, broccoli on top to stay crisp. Garnish with green onions and seeds right before eating. A quick extra drizzle of sriracha or a squeeze of lime on top is *chef’s kiss* for a personalized kick.
Ride Your Own Flavor Wave (Variations!)
One of my core food beliefs? Recipes are launchpads, not prisons. Make this dish yours!
- Protein Swap: Use thin chicken strips, shrimp, or even firm tofu (pressed and cubed). Adjust cooking time accordingly.
- Veggie Load-Up: Add sliced bell peppers, snap peas, or matchstick carrots with the broccoli. Sauté them right in the pan before you make the sauce.
- Spicy Kick: Add 1-2 tsp of sriracha or a few dried red chili flakes to the sauce while it simmers.
- Pineapple Twist: Toss in ½ cup of fresh pineapple chunks with the beef at the end for a sweet-and-tangy tropical vibe.
- Low-Carb / Grain-Free: Serve it over cauliflower rice, zucchini noodles, or a bed of leafy greens.
Isla’s Kitchen Notes
This recipe has been a living, evolving staple in my kitchen for years. The biggest game-changer was learning the cornstarch-on-beef trick from a chef friend—it truly makes restaurant-quality results possible at home. A funny story? I once was filming a video for this recipe and, in my usual chatty excitement, added the sesame oil at the beginning with the garlic. The second it hit the hot pan, the fragrant oil evaporated, and I lost that beautiful finish. I had to start the sauce over! Lesson learned: some ingredients are for building flavor, and some are for finishing it. Now I always add the sesame oil at the end, right before I toss the beef back in. It’s a small step with a huge impact.
FAQs & Quick Fixes
Q: My sauce isn’t thickening. What did I do wrong?
A: Don’t panic! Two likely culprits: 1) The heat wasn’t high enough for a good simmer. Bring it to a lively bubble. 2) You might need a tiny bit more cornstarch. Mix 1 tsp of cornstarch with 1 tbsp of cold water into a “slurry,” then whisk it into the simmering sauce. It should thicken up in about 30 seconds.
Q: Can I make this ahead of time for meal prep?
A: Absolutely! It’s a meal prep superstar. Store assembled bowls in airtight containers in the fridge for up to 4 days. The flavors meld and get even better! Reheat gently in the microwave, stirring halfway through.
Q: My beef turned out tough. Help!
A: This almost always comes down to two things: not slicing against the grain (it’s crucial, I promise!), or overcooking. Remember, we’re doing a quick sear on high heat, not a long stew. It continues to cook when added back to the hot sauce, so pull it from the initial sear while it’s still a little pink inside.
Q: Is this freezer-friendly?
A> The beef and sauce freeze well for up to 2 months. Thaw overnight in the fridge. I don’t recommend freezing the broccoli or rice, as they can become mushy. Cook those fresh when you’re ready to eat.
Nutritional Info (A Per-Bowl Estimate)
Please note: This is an auto-calculated estimate for informational purposes. Values can vary based on specific ingredients and portion sizes.
- Calories: ~480
- Protein: 38g
- Carbohydrates: 45g
- Fat: 16g
- Prep Time: 10 mins | Cook Time: 15 mins | Total Time: 25 mins | Servings: 4
There you have it! Your new go-to for when the takeout craving hits but you want to feel amazing. I hope you love making (and eating!) these bowls as much as I do. Don’t forget to tag me @BiteTide if you share your creations—I love seeing your kitchen wins!
Until next time, keep riding that flavor wave!
– Isla 💛