
Your New Favorite Dessert is Here, and Your Oven Gets to Sleep In
Hey there, friend! Come on in and pull up a stool. Isla here, your partner in culinary crime, and I am so excited to share today’s recipe with you. Have you ever had one of those days where a dessert craving hits you like a tidal wave, but the thought of preheating the oven, washing a mountain of bowls, and waiting for something to bake feels… impossible? Yeah, me too. More often than I’d like to admit!
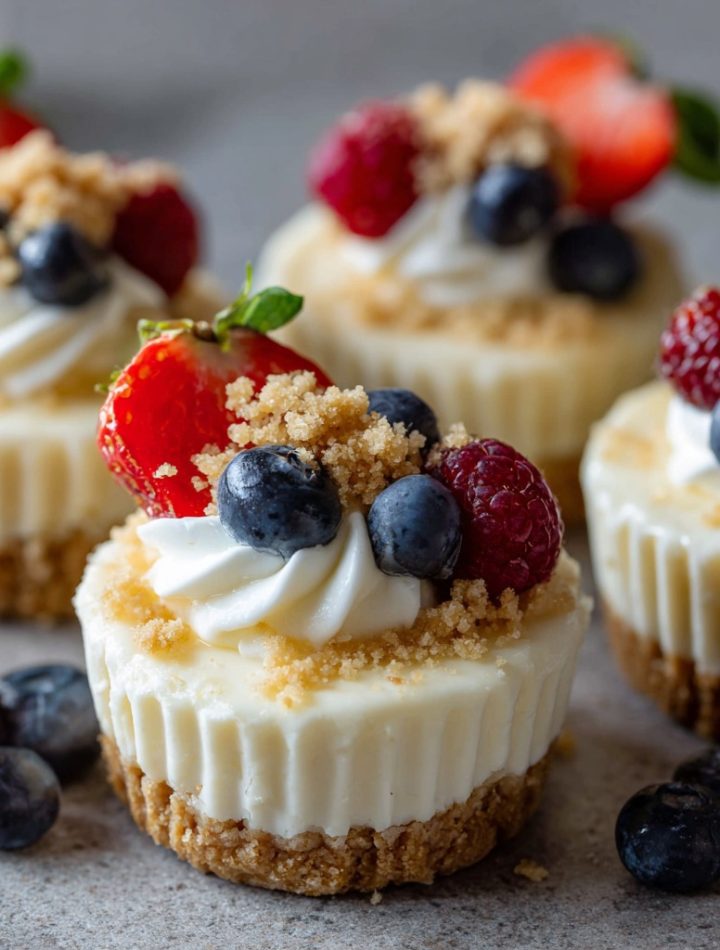
That’s exactly why these Mini No-Bake Cheesecake Cups are my secret weapon. They are the culinary equivalent of a magic trick: impossibly creamy, perfectly sweet, and ridiculously easy. Imagine individual portions of silky-smooth cheesecake filling, a sneaky little buttery crust if you’re feeling fancy, and a crown of your favorite topping—all coming together in about 15 minutes of active kitchen time. No oven, no water bath, no stress.
Whether you’re prepping for a spring brunch, need a last-minute showstopper for book club, or are just executing a highly important “treat yourself” mission on a Tuesday night, these little cups have your back. They’re endlessly customizable, totally approachable, and deliver that “wow, you made this?!” factor every single time. So, let’s grab a mixing bowl and make some magic happen. Your future self (and your taste buds) will thank you.
The Lazy Sunday That Started It All
This recipe was born on one of those gloriously lazy Sundays at my grandma’s house. The sun was streaming into her old kitchen, we were all stuffed from a big lunch, but—crucially—we still had a “little hole” for something sweet. The problem? My grandma’s ancient oven had decided to take the day off, and no one had the energy for a baking project.
So, we got creative. We raided the fridge: a block of cream cheese, some leftover yogurt, a sprinkle of sugar. We smashed up the last few graham crackers from the pantry and pressed them into her mismatched little juice glasses. What we whipped up was messy, imperfect, and absolutely devoured in minutes. There was something so joyful about having our own personal dessert, a little cup of cool, creamy bliss. It wasn’t a formal, sliceable cheesecake. It was better—it was spontaneous, shareable, and full of laughter. That’s the spirit I try to bake (or no-bake!) into every batch of these cups. They’re not about perfection; they’re about gathering, creating, and savoring the simple, sweet moments.
Print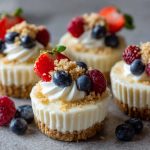
Mini No-Bake Cheesecake Cups : Creamy, Dreamy, and No Oven Needed
Description
These Mini No-Bake Cheesecake Cups are rich, creamy, and made without turning on the oven! With a buttery graham cracker crust and smooth cheesecake filling, they’re ideal for parties, holidays, or a quick sweet treat anytime.
Instructions
In a bowl, combine graham cracker crumbs, melted butter, and sugar. Mix until well combined.,Spoon the crust mixture into mini serving cups or jars, pressing down gently to form the base.,In a separate bowl, beat the softened cream cheese until smooth.,Add powdered sugar and vanilla extract; mix until well blended.,Gently fold in the whipped cream until the filling is light and fluffy.,Spoon or pipe the cheesecake filling over the crust layer in each cup.,Chill in the refrigerator for at least 2 hours, or until set.,Top with berries, jam, or your favorite garnish before serving.
Notes
Make them in mason jars or silicone cupcake liners for easy serving.,For a flavor twist, add lemon zest or swap vanilla with almond extract.,These can be made up to 2 days ahead and stored covered in the fridge.
- Category: Dessert
- Method: Baking
- Cuisine: American
Gathering Your Flavor Crew
Here’s what you’ll need to summon this no-bake magic. I’ve added my little chef notes next to each one because knowing your ingredients is the first step to feeling fearless in the kitchen!
- Cream Cheese (1 cup, softened): The star of the show! Use full-fat brick-style cream cheese for the richest, creamiest texture. Let it sit on the counter for a good 30-60 minutes before you start. A softened block blends into dreamy smoothness, while cold cream cheese will leave you with lumpy frustration. Chef Insight: I always have a backup block in the fridge. It’s a kitchen essential!
- Greek Yogurt or Whipped Topping (1/2 cup): This is our secret for lightening up the filling just a touch. Plain Greek yogurt adds a lovely tang and a protein boost. For a richer, more classic “no-bake” flavor and texture, use whipped topping (like Cool Whip), thawed. Sour cream works in a pinch, too!
- Powdered Sugar (1/3 cup): We’re using powdered sugar (also called icing or confectioners’ sugar) instead of granulated for a reason. It dissolves instantly, giving us a supremely silky filling with no graininess. Sub Tip: You can adjust this to taste! Start with 1/4 cup if you prefer less sweet, or add a touch more if you have a serious sweet tooth.
- Vanilla Extract (1 tsp): The flavor enhancer. Don’t skip it! A good quality pure vanilla extract makes all the difference, adding warm, aromatic notes. For a fun twist, try almond extract (just 1/2 tsp) or a scrape of fresh vanilla bean.
- For the Crust (Optional but Recommended):
- Crushed Graham Crackers or Cookies (1 cup): Graham crackers are classic, but get creative! Digestive biscuits, vanilla wafers, Oreos (with the cream scraped out), or even pretzels for a sweet-salty kick. A zip-top bag and a rolling pin are your best friends here.
- Melted Butter (3 tbsp): This is the glue that holds our crust together. Salted butter adds a nice flavor contrast. For a dairy-free version, coconut oil works beautifully.
- Toppings (The Fun Part!): Choose one or go wild with a mix-and-match bar!
- Lemon Curd: My personal favorite! The bright, zesty lemon cuts through the richness perfectly. Use a good store-bought one, or be a superstar and make your own.
- Fresh Berries: Blueberries, raspberries, sliced strawberries—anything seasonal and vibrant. Toss them with a tiny bit of sugar to let their juices macerate.
- Crushed Cookies or Graham Cracker Crumbs: A little extra crunch on top ties everything together beautifully.
Let’s Build Some Bliss, Step-by-Step
Ready? Let’s do this. I’ll walk you through each step with my favorite hacks so you end up with perfect cups every single time.
Step 1: The Crust Foundation (If Using)
Grab your chosen cookies or crackers and get smashing! Pour them into a sturdy zip-top bag, seal it tightly (let the air out!), and go to town with a rolling pin or the bottom of a heavy glass. You want fine crumbs, with a few little pebbles for texture. Dump the crumbs into a bowl and stir in the melted butter. It should look like wet sand and hold together when you pinch it. Chef Hack: No time? Skip pressing it into the cups and just sprinkle the buttery crumbs between layers for a delicious deconstructed vibe!
Step 2: The Creamy Dreamy Filling
In a medium mixing bowl, plop in your beautifully softened cream cheese. Using a hand mixer (or a sturdy whisk and some elbow grease), beat it on medium for about 30 seconds until it’s completely smooth and lump-free. This is the most important step! Scrape down the sides of the bowl. Now, add the Greek yogurt (or whipped topping), powdered sugar, and vanilla. Start mixing on low so the sugar doesn’t fly everywhere, then increase to medium-high and beat for 1-2 minutes. You’re looking for a light, fluffy, and utterly smooth mixture. Chef Tip: Taste it here! Adjust sugar or vanilla if needed. Remember, the flavor will mellow a bit once chilled.
Step 3: Assembly & The Art of Layering
Grab your vessels! I use 4-6 oz glass jars, ramekins, or even those cute little espresso cups. If using the crust, press about 1.5-2 tablespoons of the buttery crumb mixture into the bottom of each cup. Use the bottom of a small glass or a tamper to press it down firmly—this prevents a crumbly crust disaster when you dig in with a spoon later. Now, spoon or pipe the cheesecake filling on top. Piping from a zip-top bag with the corner snipped off gives you super clean, professional-looking layers. Fill almost to the top.
Step 4: The Grand Topping Finale
This is where you make them yours. Swirl on a spoonful of lemon curd. Artfully arrange a pile of berries. Or, for a cookies-and-cream situation, sprinkle on some reserved cookie crumbs. Get colorful and creative!
Step 5: The Patience Game (The Hardest Part!)
Carefully transfer your beautiful creations to the refrigerator. They need to chill and set for at least 1 hour, but honestly, 2-3 hours is ideal. This firming-up time is non-negotiable for that perfect, sliceable-yet-creamy texture. Cover them with plastic wrap if chilling longer.
How to Serve These Little Showstoppers
Presentation is half the fun! I love serving these right in the jars or cups I made them in—it’s charming and means zero extra dishes. Arrange them on a wooden board or a pretty tray. For a party, line them up and let guests choose their own adventure. Add a final flourish just before serving: a mint leaf, a light dusting of citrus zest, or a tiny drizzle of honey or chocolate sauce. Don’t forget the spoons! The simple act of digging into your own personal cup is part of the delight.
Ride Your Own Flavor Wave: 5 Tasty Twists
The base recipe is your canvas. Here’s how to paint with different flavors:
- Chocolate Peanut Butter Cup: Use crushed chocolate grahams for the crust. Add 2 tbsp of unsweetened cocoa powder and reduce the powdered sugar to 1/4 cup to the filling. Top with a dollop of peanut butter and chopped Reese’s.
- Strawberry Shortcake: Fold 1/4 cup of finely chopped fresh strawberries into the filling. Use a vanilla cookie or shortbread crust. Top with more berries and a sprinkle of basil.
- Tropical Escape: Fold 1/3 cup of well-drained crushed pineapple into the filling. Use a ginger snap or coconut cookie crust. Top with toasted coconut and a mango slice.
- Lemon Berry Bliss: Add the zest of one lemon to the filling. Layer with fresh raspberries or blueberries before topping. A lemon cookie crust sends this over the moon.
- Dairy-Free Delight: Use a vegan cream cheese alternative, coconut whipped topping, and a coconut oil/gluten-free cookie crust. It works like a dream!

Isla’s Kitchen Confidential
This recipe has been my trusty sidekick for years, and it’s evolved with me. The first time I made a version for the blog, I was so nervous about the filling setting that I added gelatin. It worked, but it lost that wonderful, luscious creaminess. I learned to trust the chill time! Now, I see these cups as my kitchen’s mood ring. Feeling fancy? I’ll make a from-scratch blueberry compote. Exhausted on a Wednesday? It’s a straight scoop of good-quality store-bought raspberry jam and a grateful sigh. They’ve seen me through last-minute potlucks, celebratory “I got the job!” moments, and quiet nights when I just needed a sweet hug in a cup. That’s the real magic—they meet you where you are.
Your Questions, Answered!
Q: My filling is too runny! What did I do wrong?
A: Don’t panic! The most common culprits are: 1) The cream cheese wasn’t full-fat, 2) It wasn’t softened enough, leading to overmixing and incorporating too much air, or 3) The yogurt had a high water content (try straining regular yogurt in a cheesecloth, or stick to Greek). Pop the cups in the freezer for 45 minutes to an hour to set them up quickly.
Q: Can I make these ahead of time?
A: Absolutely! They are the perfect make-ahead dessert. Assemble them completely and store, covered, in the fridge for up to 2 days. Add any fresh fruit toppings within a few hours of serving so they don’t get soggy.
Q: What can I use instead of individual jars?
A: Get creative! Ramekins, small mugs, martini glasses, or even a clean, short canning jar work great. You can also make one larger no-bake cheesecake in a 6-inch springform pan—just double the recipe and chill for at least 6 hours or overnight.
Q: Is there a way to make these less sweet?
A> For sure. Reduce the powdered sugar to 1/4 cup and use plain, full-fat Greek yogurt. The tang will balance it out beautifully. You can also opt for a less-sweet crust, like digestive biscuits or bland cookies.
Quick Nutrition Snapshot
Please note: This is an estimate for one mini cup with a graham cracker crust and lemon curd topping, based on widely available nutritional calculators. Values will vary with your specific ingredients and toppings.
Prep Time: 15 mins | Chill Time: 1 hour | Total Time: 1 hour 15 mins | Servings: 6
Per Serving (Approx.): Calories: ~250 | Protein: 5g | Carbohydrates: 20g | Fat: 16g | Fiber: 1g
These Mini No-Bake Cheesecake Cups prove that an elegant dessert doesn’t have to be complicated. With a silky filling, simple ingredients, and endless topping options, they’re perfect for parties, weeknights, or anytime you want something sweet fast. Keep this recipe handy — it’s one you’ll come back to again and again. 🥄💛