Your New Secret Weapon for a Flawless Week: Honey Lemon Chicken Meal Prep Bowls
Hey, friend! Isla here. Let’s get real for a second. How many times have you stared into the fridge at 6 PM on a Tuesday, feeling that familiar mix of hunger and dread, wondering what on earth you can throw together that’s actually satisfying? Your brain is fried, your willpower is zero, and the siren song of takeout is getting louder by the minute. I’ve been there more times than I can count, usually while simultaneously trying to find a missing soccer cleat and answer a work email.
That’s exactly why I’m utterly obsessed with a solid meal prep strategy. But I’m not talking about sad, steamed chicken and bland broccoli that you force down all week. No way! I believe meal prep should be something you genuinely look forward to. It should be vibrant, packed with flavor, and make your future self do a little happy dance.
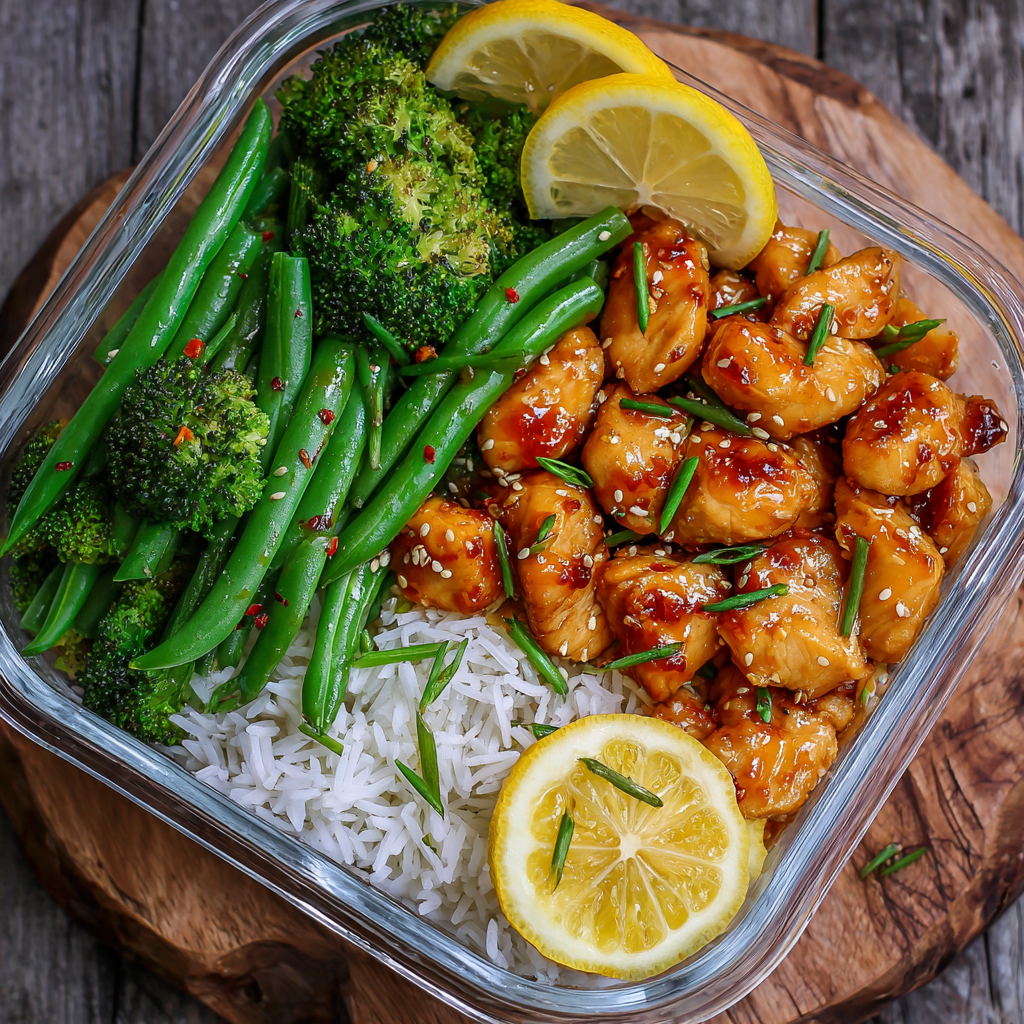
That’s where these Honey Lemon Chicken Meal Prep Bowls come in. They are my absolute go-to, my number one, my ride-or-die for conquering busy weeks. Imagine this: juicy, pan-seared chicken and crisp-tender veggies, all swimming in a glossy, sweet-and-tangy honey lemon glaze that’s so good you’ll want to eat it with a spoon. Served over a bed of fluffy basmati rice, it’s a complete, high-protein meal that checks every single box. It’s the hero your week needs, and I’m so excited to show you how to make it.
A Little Sunshine on a Rainy Day
This recipe always takes me back to my grandma’s kitchen, which was perpetually sunny, even on the grayest coastal days. She had this tiny, gnarled lemon tree in a pot by the back door, and she treated it like one of the family. “A little citrus lifts the spirits, Isla,” she’d say, handing me a bright yellow fruit to zest. Her signature dish was a simple roasted chicken with lemon halves tucked inside, and the entire house would smell like sunshine and herbs.
One particularly blustery afternoon, I was helping her shred the leftover chicken, and she started whisking together honey and the juice from those roasted lemons. She tossed the chicken in it, and it transformed the leftovers into something magical. It was my first real lesson in the power of a simple sauce to elevate and reinvent. This honey lemon chicken is my modern, meal-preppy homage to her—a way to bottle a little of that kitchen sunshine for the week ahead. It’s comfort and zest, all in one perfect bite.
Print
Honey Lemon Chicken Meal Prep Bowls
- Total Time: 25 minutes
- Yield: 4 servings 1x
- Diet: Low Fat
Description
A fresh and flavorful meal prep recipe featuring tender honey lemon chicken served with rice and crisp vegetables. These bowls are perfect for make-ahead lunches or weeknight dinners—healthy, satisfying, and easy to customize.
Ingredients
- 1 lb boneless, skinless chicken breasts or thighs, cut into bite-sized pieces
- 2 tbsp olive oil (divided)
- 2 cloves garlic, minced
- 1/4 cup honey
- 1/4 cup fresh lemon juice
- 1 tbsp soy sauce
- 1 tsp lemon zest
- Salt and black pepper, to taste
- 2 cups cooked brown or white rice
- 2 cups steamed or roasted vegetables (e.g., broccoli, bell pepper, carrots)
- Optional: sesame seeds or chopped green onions for garnish
Instructions
- In a bowl, whisk together honey, lemon juice, lemon zest, soy sauce, garlic, salt, and pepper.
- Heat 1 tbsp olive oil in a skillet over medium-high heat. Add chicken and cook until browned and cooked through, about 5–7 minutes.
- Pour honey lemon sauce over the chicken and simmer for 2–3 minutes, stirring, until thickened and chicken is glazed. Remove from heat.
- Divide cooked rice and vegetables evenly among 4 meal prep containers.
- Spoon the honey lemon chicken over the rice and veggies.
- Garnish with sesame seeds or green onions if desired. Let cool before sealing and refrigerating.
- Prep Time: 10 minutes
- Cook Time: 15 minutes
- Category: Meal Prep
- Method: Stovetop
Nutrition
- Serving Size: 1 bowl
- Calories: 420
- Sugar: 14g
- Sodium: 520mg
- Fat: 12g
- Saturated Fat: 2g
- Unsaturated Fat: 9g
- Trans Fat: 0g
- Carbohydrates: 45g
- Fiber: 3g
Gathering Your Flavor Arsenal
Here’s everything you’ll need to create this week-saving masterpiece. Don’t be daunted by the list—a lot of it is pantry staples, and I’ve got plenty of swaps and chef-y insights to guide you!
For the Chicken & Veggies:
- 5 Tbsp (100ml) Olive Oil, divided: We use a good glug to get a beautiful sear on the chicken and a vibrant cook on the veggies. Chef’s Insight: Dividing it ensures we don’t crowd the pan with cold oil when cooking the veggies.
- 4 large broccoli heads, trimmed: Look for heads with tight, dark green florets and firm stalks. Substitution Tip: No broccoli? Cauliflower florets or asparagus spears are fantastic here!
- 500g (17.6 oz) green beans, trimmed: They add a wonderful crisp texture and bright green color. Chef’s Insight: Snapping the ends off by hand is oddly therapeutic, but lining them up and slicing the tops off with a knife is much faster for a big batch!
- 2 kg (4.4 lbs) chicken thighs, diced: I highly recommend thighs for meal prep. Their higher fat content means they stay juicy and tender even after a few days in the fridge and reheating. Substitution Tip: You can use chicken breast if you prefer, but be extra careful not to overcook it.
For That Glorious Sauce:
- 1 cup (250ml) chicken stock: This forms the savory base of our glaze. Substitution Tip: Vegetable stock works perfectly for a veg-friendly version.
- 6 garlic cloves, minced: Because flavor! Don’t be shy. Chef’s Insight: A microplane is your best friend for turning garlic into a fine paste that melts seamlessly into the sauce.
- Juice of 4 lemons: For that essential, face-puckering tang that balances the honey. Chef’s Insight: Roll the lemons firmly on the counter under your palm before juicing—you’ll get so much more juice out of them!
- ⅔ cup (160g) honey: Our natural sweetener that creates that beautiful, glossy coating. Substitution Tip: Maple syrup or agave nectar are great vegan-friendly alternatives.
- 2 tsp onion powder & 3 Tbsp (60ml) soy sauce: Our umami power duo. They add a deep, savory backbone that makes the sauce taste complex and rich.
- 4 tsp (20ml) sesame oil: This is our flavor bomb finisher. That nutty, toasty aroma is unmistakable. Don’t skip it!
- 3 Tbsp (24g) corn flour mixed with 2 tbsp cold water: This is our “slurry”—the magic trick for a thick, clingy glaze instead of a runny sauce. Chef’s Insight: Always mix corn flour with cold water first to avoid lumpy gravy!
- Optional: 1 tsp chili flakes + 1 tbsp grated ginger: My favorite add-ins! The ginger adds a warm zing, and the chili flakes give a subtle heat that plays so nicely with the sweet and sour notes.
For the Fluffy Rice Base:
- 700g (24.7 oz) basmati rice, rinsed: Rinsing is non-negotiable! It washes off excess starch, giving you separate, fluffy grains instead of a gummy mess.
- 1.4 L cold water & Salt to taste: The perfect ratio for perfectly steamed basmati.
Let’s Build Those Bowls! Your Step-by-Step Roadmap
Okay, team! Aprons on, music up—let’s turn these ingredients into your future lunches. We’re going to work efficiently, like a well-oiled machine (or at least a mostly-organized kitchen).
Step 1: The Rice is the Foundation
Bring your rinsed rice, cold water, and a big pinch of salt to a boil in a large pot. As soon as it’s boiling, give it one quick stir, slap the lid on, and immediately reduce the heat to the lowest possible setting. Let it simmer, untouched, for 12–15 minutes. No peeking! That steam is doing its important work. After the time is up, take it off the heat and let it sit, still covered, for another 5-10 minutes. Then, fluff it with a fork and let it cool slightly before dividing it into your containers. Chef’s Hack: Spreading the hot rice out on a sheet pan for a few minutes speeds up the cooling process dramatically, which is key for food safety!
Step 2: Whisk Up the Liquid Gold (a.k.a. The Sauce)
While the rice is doing its thing, grab a medium bowl or a large liquid measuring cup. Whisk together the chicken stock, minced garlic, lemon juice, honey, onion powder, soy sauce, and sesame oil. If you’re using the ginger and chili flakes, add them now too. Give it a taste—is it balanced? Want more tang? Add a squeeze more lemon. Want more depth? A splash more soy sauce. This is your sauce, make it sing to you! Set this glorious mixture aside.
Step 3: Sear the Chicken to Perfection
Pat your diced chicken thighs completely dry with paper towels. This is the #1 secret to getting a golden-brown sear instead of steaming it. In a large skillet or wok, heat half of the olive oil over medium-high heat until it’s shimmering. Add the chicken in a single layer, working in batches if needed. Crowding the pan is the enemy of browning! Let the chicken cook undisturbed for a few minutes to develop a beautiful crust, then toss and cook until it’s just cooked through. Remove it to a clean plate. Chef’s Hack: It’s okay if the chicken is slightly underdone inside—it’s going to finish cooking in the sauce later!
Step 4: Wake Up the Veggies
In the same pan (see all those tasty browned bits left from the chicken? That’s pure flavor!), add the remaining olive oil. Toss in your broccoli and green beans. Stir-fry them for 5-6 minutes. You’re looking for them to be just tender—still having a bit of a crunch (they’ll soften a touch more later). This keeps the meal prep texture interesting!
Step 5: The Grand Finale – Bring It All Together
Return the seared chicken (and any accumulated juices) to the pan with the veggies. Pour your pre-made honey lemon sauce over everything. Bring it to a lively simmer and let it bubble away for 2-3 minutes. Now, give your corn flour slurry a quick re-stir (it settles) and drizzle it into the center of the pan while stirring constantly. Almost like magic, you’ll see the sauce transform from thin and soupy to thick, glossy, and luxurious. Keep stirring until every piece of chicken and veg is beautifully coated. Give it one final taste and adjust seasoning with salt and pepper if needed.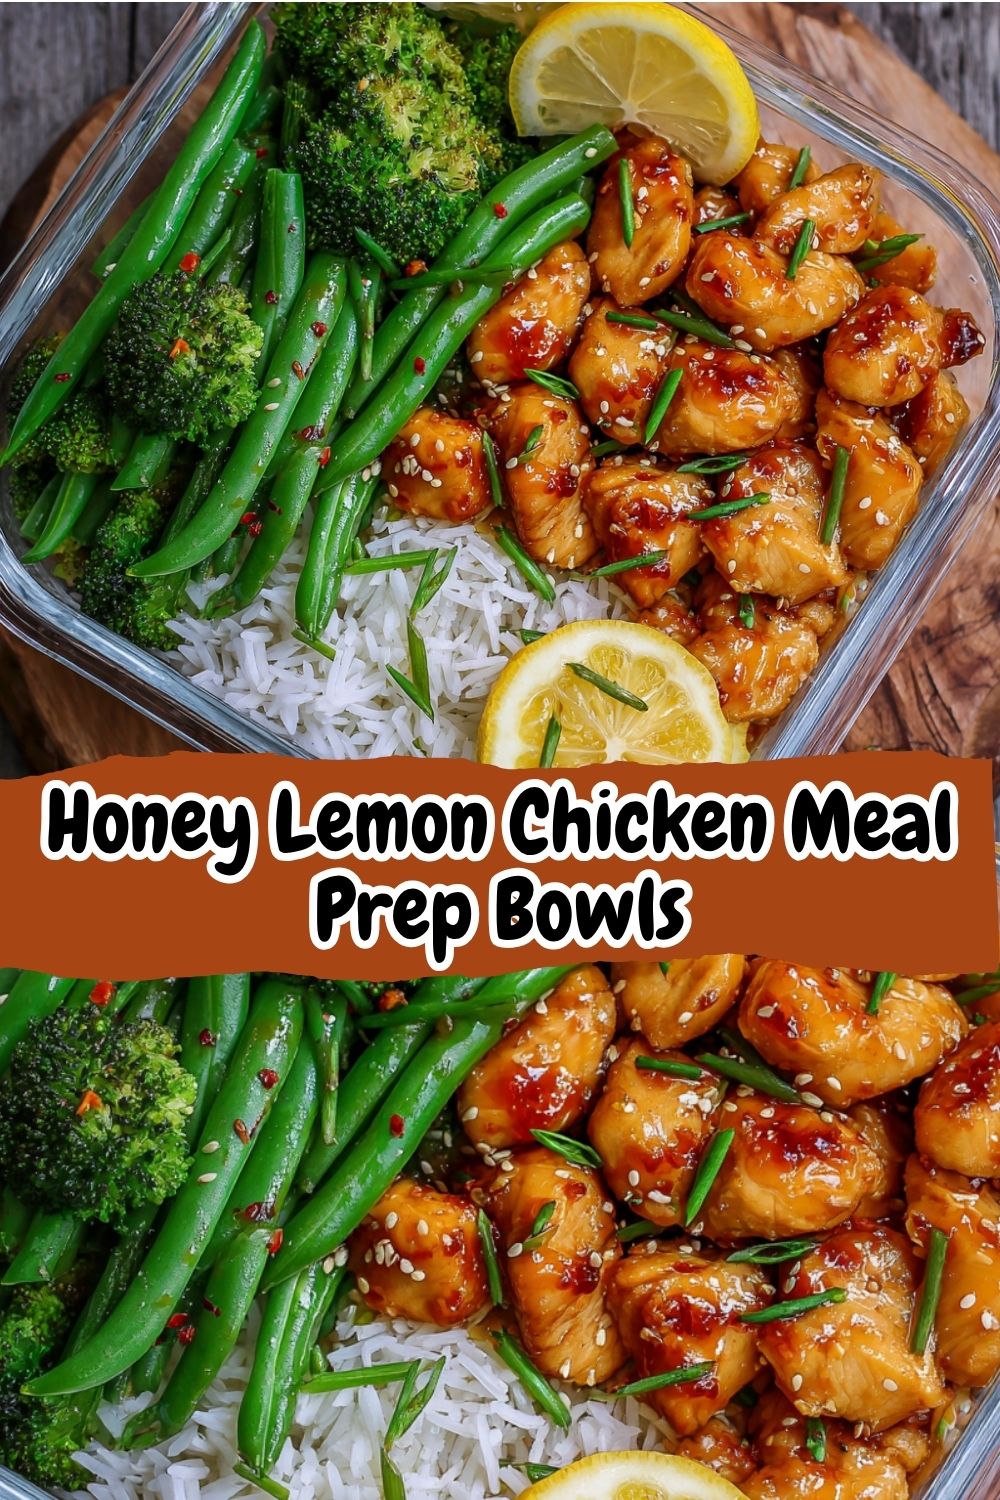
Plating Up (or Packing Down!)
If you’re eating this right away (lucky you!), grab a shallow bowl. Spoon a generous bed of that fluffy basmati rice and top it with the glistening honey lemon chicken and veggie mix. Be sure to spoon extra sauce over everything. For a fresh finish, a sprinkle of sesame seeds or thinly sliced green onions adds a perfect pop of color and texture.
For meal prep, let the chicken and rice mixture cool for about 15-20 minutes before assembling. This prevents condensation from making your rice soggy in the containers. Divide the rice evenly among 6-8 airtight containers, then top with the chicken and veggie mixture. Seal, label, and you are officially ready for the week!
Make It Your Own: Flavor Twists & Swaps
The beauty of this bowl is its versatility! Don’t be afraid to ride a different flavor wave.
- Go Citrus Crazy: Swap half the lemon juice for fresh orange juice. It creates a sweeter, sunshiny vibe that’s absolutely delicious.
- Spice It Up: Add a tablespoon of Sriracha or a big spoonful of chili-garlic paste to the sauce for a sweet and spicy kick.
- Veggie Vortex: Use whatever veggies you love or have on hand! Bell peppers, snap peas, carrots, or zucchini all work wonderfully.
- Grain Gain: Not a rice person? This is fantastic over quinoa, couscous, or even soba noodles for a different texture.
- Keep it Lean: As mentioned, chicken breast works, or use large shrimp—they cook super fast, so add them at the very end just until pink and cooked through.
Isla’s Kitchen Confidential
This recipe has become a BiteTide classic, but it didn’t start out perfect. The first time I tested it, I made the classic mistake of adding the corn flour directly to the hot sauce. Let’s just say I ended up with a pan full of little saucy dumplings—delicious, but not the glossy glaze I was going for! That’s how I learned the cold-water slurry trick the hard way, so you don’t have to.
This dish has also evolved based on your amazing feedback! So many of you in our email community suggested adding ginger, and it was a total game-changer. It just goes to show that the best recipes are living things, always getting better with a little shared inspiration. So if you come up with a brilliant twist, I want to hear about it!
Your Questions, Answered!
I’ve seen all your comments and DMs over the years, so here are answers to the most common questions about this recipe.
Q: My sauce didn’t thicken up! What did I do wrong?
A: Don’t worry, this is a common one! First, make sure your corn flour slurry was well-mixed. Second, after you add it to the pan, you need to bring the sauce back to a full simmer for a minute or two to activate the thickening power. If it’s still too thin, you can mix another tablespoon of corn flour with cold water and repeat the process.
Q: Can I make this gluten-free?
A> Absolutely! This recipe is easily gluten-free. Just swap the regular soy sauce for tamari or a certified gluten-free soy sauce. Double-check that your chicken stock is also GF, and you’re all set!
Q: My veggies got mushy after a few days in the fridge. How can I prevent that?
A> Great question! The key is to slightly undercook your veggies during the initial stir-fry. Remember, they continue to cook a little from residual heat and will soften again when you reheat the bowl. Taking them off the heat while they’re still bright green and crisp-tender is the secret to perfect meal prep texture.
Q: Can I freeze these bowls?
A> You bet! They freeze beautifully for up to a month. I recommend using freezer-safe containers. To reheat, you can thaw overnight in the fridge and then microwave, or microwave from frozen, adding an extra minute or two and stirring halfway through. The texture of the veggies will be a bit softer, but the flavor is still fantastic.
Nutritional Information (Approximate, per bowl)
- Calories: 540
- Protein: 38g
- Carbohydrates: 48g
- Sugar: 18g
- Fat: 22g
- Sodium: 560mg