
Your New Favorite Comfort Food is Here
Hey there, friend! Isla here, from my cozy kitchen to yours. Let’s talk about one of life’s greatest, most universal comforts: a truly epic, soul-warming, gloriously cheesy baked mac and cheese. You know the kind I’m talking about. The one that forms a gorgeous, golden-brown crust on top, but when you plunge your spoon in, you’re met with a river of creamy, velvety, impossibly rich cheese sauce that clings to every single noodle. The kind that doesn’t just fill your belly; it feeds your soul.
I’m a firm believer that everyone needs a go-to mac and cheese recipe in their back pocket. It’s the hero of potlucks, the savior of busy weeknights, and the star of every holiday table. But for far too long, I struggled with recipes that were either too fussy (I’m looking at you, complicated roux!) or that ended up dry, grainy, and just… sad.
Well, my fellow flavor seekers, our search is over. This Southern Baked Mac and Cheese is my absolute pride and joy. It’s creamy, cheesy, and oven-perfect every single time. The secret? A shockingly simple sauce base that requires zero flour and absolutely no fussy techniques. We’re talking about a “whisk-and-pour” situation that does all the magic for you in the oven. So, tie on your favorite apron, put on some good music, and let’s make some mac and cheese magic together. This is the one-baking-dish wonder you’ve been dreaming of!
Print
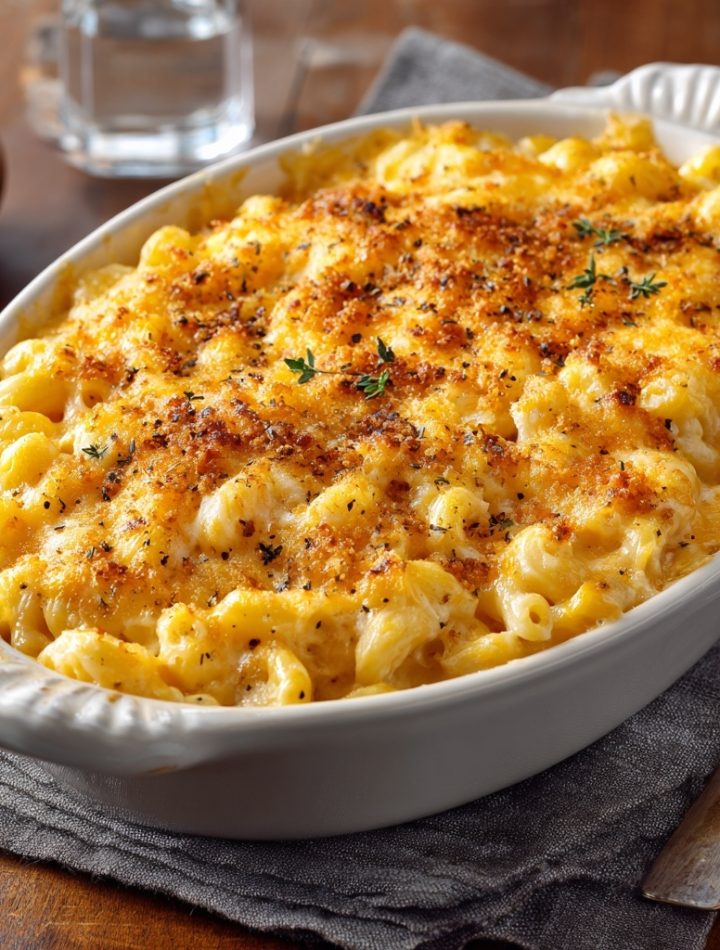
Good Ole Fashion Mac and Cheese : Creamy, Cheesy & Oven-Perfect
- Total Time: 50 minutes
- Yield: 8 servings 1x
- Diet: Vegetarian
Description
Good Ole Fashion Mac and Cheese is the ultimate comfort food—rich, creamy, cheesy, and baked to golden perfection. This classic dish features tender pasta coated in a smooth homemade cheese sauce with a crispy, irresistible top.
Ingredients
- 1 lb elbow macaroni (or other small pasta)
- 4 tbsp unsalted butter
- 1/4 cup all-purpose flour
- 2 cups whole milk
- 1 cup heavy cream
- 2 cups sharp cheddar cheese, shredded
- 1 cup mozzarella cheese, shredded
- 1/2 tsp salt
- 1/4 tsp black pepper
- 1/2 tsp ground mustard (optional)
- 1/4 tsp paprika (optional, for topping)
- 1/2 cup breadcrumbs (optional, for topping)
Instructions
- Preheat oven to 350°F (175°C). Lightly grease a 9×13-inch baking dish.
- Cook pasta in salted water until just al dente. Drain and set aside.
- In a saucepan, melt butter over medium heat. Whisk in flour and cook for 1–2 minutes to form a roux.
- Gradually whisk in milk and cream. Cook, stirring constantly, until thickened—about 5–6 minutes.
- Reduce heat and stir in cheddar and mozzarella until melted. Season with salt, pepper, and ground mustard if using.
- Stir in the cooked pasta until evenly coated with cheese sauce.
- Pour mixture into the prepared baking dish. Top with breadcrumbs and paprika if desired.
- Bake for 20–25 minutes, until bubbly and golden on top. Let rest for a few minutes before serving.
Notes
- Shred cheese from a block for the smoothest melt.
- Add bacon, ham, or extra cheese blends for variation.
- Top with crushed crackers or panko for a crunchy finish.
- Make ahead and refrigerate before baking—add extra time if baking from cold.
- Store leftovers in fridge for up to 4 days and reheat with a splash of milk.
- Prep Time: 15 minutes
- Cook Time: 35 minutes
- Category: Main Course, Side Dish
- Method: Baking
- Cuisine: American
Nutrition
- Serving Size: 1 cup
- Calories: 430
- Sugar: 4g
- Sodium: 400mg
- Fat: 25g
- Saturated Fat: 14g
- Unsaturated Fat: 9g
- Trans Fat: 0g
- Carbohydrates: 36g
- Fiber: 2g
- Protein: 15g
- Cholesterol: 70mg
Keywords: mac and cheese, baked macaroni and cheese, comfort food, cheesy pasta, classic side dish
The Mac and Cheese That Built a Family
Food memories are my favorite kind of time travel, and this recipe always whisks me right back to my Nana’s sunny, slightly chaotic kitchen in my little coastal hometown. Sundays at Nana’s meant two things: a house full of loud, laughing relatives and her legendary “Sunday Supper Mac.” It wasn’t a fancy recipe, but it was a ritual. I’d be perched on a wobbly stool, “in charge” of shredding what felt like a mountain of cheddar cheese, my little arms getting a workout. Nana would hum old tunes while she worked, and the smell of toasting breadcrumbs (a trick she added later) would mix with the salty sea air drifting through the screen door.
That big ceramic dish, scarred from decades of love, was always the first thing to empty. It didn’t matter if we were celebrating a birthday, consoling a heartbreak, or just gathered for the sake of it—that mac and cheese was the centerpiece. It was more than a side dish; it was a warm, cheesy hug that held our family together. It taught me that the best meals aren’t about perfection; they’re about the joy and the people you share them with. This recipe is my homage to Nana, to Sunday suppers, and to the simple, powerful magic of a perfectly baked mac and cheese.
Gathering Your Flavor Arsenal
Here’s everything you’ll need to create this masterpiece. The beauty of this recipe is in its simplicity and the quality of its core components. Let’s break it down!
- 3 cups dry elbow macaroni: The classic choice! Its small, tubular shape is perfect for cradling all that luscious sauce. Chef’s Insight: Don’t overcook it at this stage! We’re going for al dente, as it will continue to soften and absorb flavor in the oven.
- 4 tbsp salted butter: This adds a rich, foundational flavor and helps keep the noodles from sticking together before saucing. Substitution Tip: Unsalted butter works perfectly fine too; you can just adjust the final seasoning to taste.
- 2 cans (12 oz each) evaporated milk: This is our secret weapon! Evaporated milk is milk that’s had about 60% of its water removed, making it ultra-creamy and stable. It prevents the sauce from curdling in the heat, giving us that smooth, velvety texture without a roux. Chef’s Insight: This is the magic key to a fuss-free, no-lump sauce. Don’t substitute with sweetened condensed milk!
- ⅓ cup milk of choice: This thins the evaporated milk mixture just enough to create the perfect pouring consistency. I usually use whole milk for extra richness, but 2%, or even your favorite unsweetened plant-based milk, will work beautifully.
- 2 large eggs: Another superstar for texture! The eggs act as a binder, helping to set the sauce into a creamy, custard-like consistency as it bakes, rather than a greasy, separated one.
- ¼ tsp garlic salt: A tiny touch of savory, aromatic flavor that elevates the cheesiness without screaming “garlic!” Substitution Tip: No garlic salt? Use ¼ tsp of regular salt and a tiny pinch of garlic powder.
- 4 cups shredded cheddar cheese: The star of the show! I recommend using a sharp or extra-sharp cheddar for a more pronounced, tangy flavor that can stand up to the other ingredients. Chef’s Hack: For the love of all that is creamy, please shred your own cheese! Pre-shredded bags are coated with anti-caking agents that can make your sauce grainy and less smooth.
- 2 cups shredded mozzarella cheese: The perfect partner for cheddar. Mozzarella brings an incredible stretchy, gooey quality and a mild creaminess that balances the cheddar’s sharpness.
- 1 tsp paprika: Mostly for that beautiful, golden-orange color on top! It also adds a very subtle, smoky sweetness. Smoked paprika is a fantastic upgrade here if you have it.
Let’s Build That Creamy Dream
Ready to see how this all comes together? It’s easier than you think. Follow these steps, and you’ll be a mac and cheese master in no time.
- Preheat and Prep: First things first, get that oven preheating to 375°F (190°C). This ensures it’s perfectly hot and ready when our mac is assembled. While it’s warming up, lightly grease your 9×13 inch baking pan. A little butter, cooking spray, or a swipe of oil does the trick. Chef’s Hack: Preheating your pan for a minute or two in the warming oven can give you a crispier bottom crust, but it’s totally optional!
- Pasta Perfect: Bring a large pot of well-salted water to a rolling boil. Add your elbow macaroni and cook it until it’s just al dente—usually a minute or two less than the package instructions. Remember, it’s going to continue cooking in the oven, and we do NOT want mushy pasta! Drain it well and then return it to the warm pot.
- Butter Up: Immediately add your 4 tablespoons of butter to the hot, drained pasta and stir until it’s all melted and coating every single noodle. This not only adds flavor but also creates a light barrier that helps prevent the noodles from absorbing too much liquid and becoming soggy before we add our sauce.
- Create the Magic Elixir: In a medium-sized bowl, let’s make our miracle sauce. Grab your whisk and combine the two cans of evaporated milk, your ⅓ cup of regular milk, the two large eggs, and the ¼ teaspoon of garlic salt. Whisk it all together until it’s completely smooth and uniform. You shouldn’t see any streaks of egg yolk. This is the liquid gold that will transform into creamy perfection in the oven.
- Cheese, Glorious Cheese: In another bowl, toss together your 4 cups of shredded cheddar and 2 cups of shredded mozzarella. Mixing them now ensures every layer gets a perfect blend of sharp and gooey.
- The Art of Layering: Now for the fun part! In your greased baking dish, spread about one-third of your buttered macaroni in an even layer. Top that with one-third of your cheese blend. Repeat this process two more times—pasta, cheese, pasta, cheese—until you’ve used up all your components. You should end with a beautiful, generous blanket of cheese on top. This layering method ensures cheesy goodness in every single bite, from top to bottom.
- The Grand Finale Pour & Bake: Slowly and evenly pour your milk and egg mixture over the entire layered dish. You’ll see it seep down into all the nooks and crannies. Don’t stir! Finally, sprinkle the top with that teaspoon of paprika for its signature gorgeous color. Pop it into the preheated oven, uncovered, for 25-30 minutes. You’re looking for a bubbly, vigorously active center and a beautifully golden-brown top.
- The Most Important Step: Rest! I know, I know. The aroma is intoxicating, and you just want to dive right in. But trust me on this one. Once it’s out of the oven, let your mac and cheese rest for a full 5-10 minutes. This allows the custardy sauce to set properly, making it creamy instead of runny, and ensures you get a perfect, clean slice rather than a soupy mess.

How to Serve This Star
This mac and cheese is a superstar all on its own, but a little presentation goes a long way! I love serving it right from the baking dish at the table—it’s rustic and inviting. Use a large spoon to scoop out generous portions, making sure everyone gets a piece of that coveted cheesy crust. For a pretty touch, sprinkle a little fresh, finely chopped parsley or chives over the top right before serving. The green pop of color against the golden cheese is just gorgeous. It’s the ultimate companion to BBQ ribs, fried chicken, or a simple green salad to balance the richness. Honestly, it’s also a 10/10 meal eaten directly from the pan while standing in front of the fridge at midnight. No judgment here!
Ride Your Own Flavor Wave
Once you’ve mastered the classic, the world is your cheesy oyster! Here are a few of my favorite ways to mix it up:
- Spicy Buffalo Chicken: Stir in 2 cups of shredded cooked chicken tossed in ½ cup of buffalo sauce. Swap the mozzarella for pepper jack cheese and sprinkle with crumbled blue cheese before baking.
- Lobster Mac & Cheese (Hello, Fancy!): Fold in 1.5 to 2 cups of cooked, chopped lobster meat right before layering. A dash of Old Bay seasoning in the milk mixture takes it to the next level.
- Bacon & Caramelized Onion: Mix in 1 cup of cooked, crumbled bacon and 1 cup of deeply caramelized onions with the pasta before layering. The sweet and savory combo is unreal.
- Gourmet Four-Cheese: Swap the cheese blend for a combination of Gruyère, Fontina, White Cheddar, and a little Parmesan for a more complex, sophisticated flavor profile.
- Gluten-Free & Lighter: Use your favorite gluten-free pasta (the brown rice or chickpea ones work great). You can also use low-fat evaporated milk and reduced-fat cheese, though the texture will be slightly less rich.
More Chef-y Musings & Stories
This recipe has been a living, breathing thing in my kitchen for years. It’s evolved from a “good” mac and cheese to the “I-need-this-recipe-now!” version it is today. The biggest game-changer was switching from a roux-based sauce to this evaporated milk and egg method. I was so skeptical at first, but one bite of the creamy, non-grainy result and I was a convert for life!
A funny kitchen story? Oh, I’ve got plenty. There was the one time I was filming a reel for Instagram and was so busy chatting to the camera that I completely forgot to add the eggs to the milk mixture. I popped the “perfect-looking” mac in the oven, only to pull out a pan of delicious but *incredibly* oily soup. The eggs are crucial for emulsification, folks! We had to order pizza that night, but it was a delicious lesson learned. Now, I always line up my ingredients in order of use. No more egg-scapades!
Your Mac and Cheese Questions, Answered!
Over the years, I’ve gotten so many wonderful questions about this recipe. Here are the most common ones to help you nail it every single time.
Q: Why is my baked mac and cheese dry?
A: The most common culprit is overbaking. Oven temperatures can vary, so start checking at the 25-minute mark. You want it bubbly and golden, but not baking for so long that all the liquid evaporates. Another reason could be using too much pasta or not enough sauce. Make sure you’re using a level 3 cups of *dry* macaroni.
Q: My sauce turned out grainy. What happened?
A: Graininess is almost always a cheese issue. Pre-shredded bagged cheese is coated with potato starch or cellulose to prevent clumping, and these starches don’t melt smoothly, leading to a grainy texture. I can’t stress this enough: shred your own cheese from a block! It makes a world of difference. Also, avoid overbaking, as high heat for too long can cause the proteins in the cheese to tighten and squeeze out fat, which also creates a grainy texture.
Q: Can I make this ahead of time?
A: Absolutely! This is a fantastic make-ahead dish. Assemble the entire recipe right up to the point of baking (including pouring the milk mixture on top). Cover it tightly with plastic wrap or foil and refrigerate for up to 24 hours. When you’re ready, bake it straight from the fridge. You’ll likely need to add 10-15 minutes to the baking time since it will be starting from cold.
Q: How does this reheat? I’m a leftovers legend.
A> You’re in luck! This mac and cheese reheats like an absolute dream, which is rare for baked pasta. For the best results, reheat individual portions in the microwave with a splash of milk (a tablespoon or so) to bring back the creaminess. For a larger portion, cover it with foil and reheat in a 350°F (175°C) oven until warm throughout, again adding a tiny bit of milk to keep it moist.
Nutritional Info*
*Please note: These are estimates based on the ingredients used and will vary with any substitutions.
- Prep Time: 15 minutes
- Cook Time: 30 minutes
- Total Time: ~45 minutes
- Yield: 8–10 servings
- Estimated Per Serving (based on 10 servings): Calories: ~410 | Carbs: 32 g | Protein: 18 g | Fat: 24 g | Sugar: 6 g | Sodium: 520 mg
There you have it, friends! My heart, soul, and a whole lot of cheese, baked into one perfect dish. I can’t wait for you to try it and make it a part of your own family’s story. Don’t forget to tag me @BiteTide when you make it—seeing your creations absolutely makes my day!
With love and a full baking dish,
Isla 💛