Garlic Butter Bacon Cheeseburger Rollups – Your New Favorite Comfort Food
Forget the Bun, We’re Rolling with Flavor!
Hey there, friend! Isla here from BiteTide, coming at you from my flour-dusted kitchen with a recipe that’s about to become a permanent star in your dinner rotation. Let’s be real: some days, you crave that classic, no-fuss cheeseburger, but you also want something a little more fun, a little more shareable, and a whole lot more exciting than just slapping a patty on a bun. Am I right?
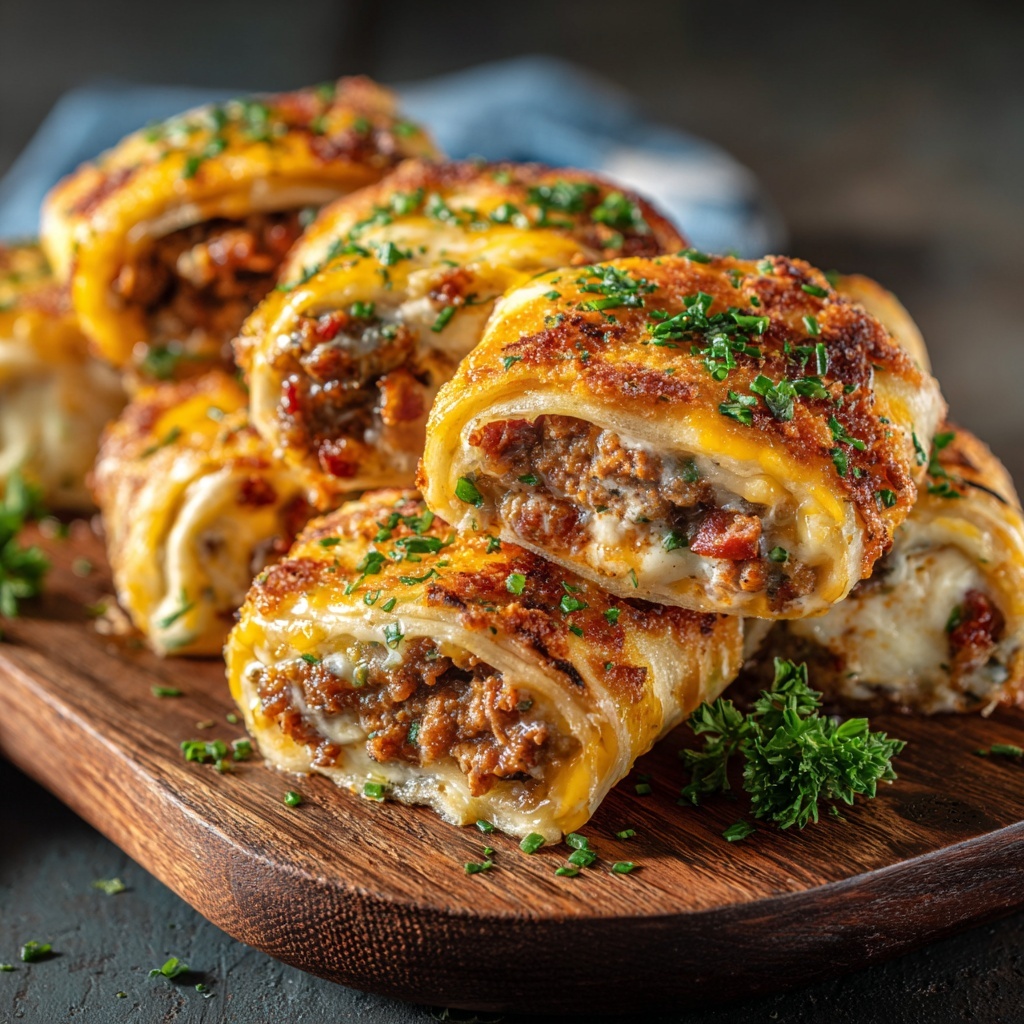
Well, get ready to meet your new kitchen bestie: Garlic Butter Bacon Cheeseburger Rollups. This is the ultimate comfort food mashup that takes everything we love about a fully-loaded burger—the juicy beef, the smoky bacon, the outrageously gooey cheese—and wraps it all up in a soft, golden, garlic-butter-brushed blanket of dough. It’s crispy, cheesy, and absolutely loaded with flavor in every single bite.
I designed this recipe for real life. It’s perfect for those busy weeknights when you need a guaranteed crowd-pleaser on the table fast, but it’s also fancy enough for your game day spread or your next get-together with friends. They’re like little flavor bombs of pure joy, and the best part? They come together in about 30 minutes with minimal fuss. So, tie on your favorite apron, and let’s make some kitchen magic happen!
A Messy Kitchen and a Happy Heart
This recipe always takes me right back to my grandma’s cozy, sunlit kitchen. She was the queen of “kitchen sink” meals—throwing together whatever we had into something magical. One rainy Sunday, my cousins and I were begging for burgers, but we were out of buns. Instead of a grocery run, she got this mischievous twinkle in her eye. She pulled out leftover biscuit dough, some cooked ground beef from taco night, and the last few slices of bacon. With our “help” (read: tiny, flour-covered hands), we rolled, stuffed, and baked our way into creating the very first, messy, imperfect, and utterly delicious version of these rollups. The kitchen was a disaster zone, but the sound of our collective happy chewing was all the cleanup we needed. It taught me that the best recipes aren’t about perfection; they’re about creativity, joy, and a whole lot of melted cheese.
Print
Garlic Butter Bacon Cheeseburger Rollups : Crispy, Cheesy, and Loaded with Flavor
- Total Time: 33 minutes
- Yield: 6 servings 1x
Description
These Garlic Butter Bacon Cheeseburger Rollups are the ultimate comfort food mashup. Imagine juicy seasoned beef, crispy bacon, and gooey melted cheese all wrapped in a golden crust and brushed with savory garlic butter. Perfect for parties, game nights, or indulgent dinners—these rollups bring all the burger flavor in one irresistible bite-sized package.
Ingredients
1 lb ground beef
½ tsp garlic powder
Salt & pepper to taste
6 slices cooked bacon, chopped
1½ cups shredded cheddar or mozzarella cheese
1 can refrigerated pizza dough or crescent dough sheet
2 tbsp butter, melted
1 clove garlic, minced
Optional: chopped chives or parsley for garnish
Instructions
Preheat oven to 375°F (190°C). Line a baking sheet with parchment.
Brown ground beef in a skillet with garlic powder, salt, and pepper. Drain excess grease.
Roll out dough into a rectangle. Evenly spread beef, bacon, and cheese over the surface.
Roll tightly into a log and slice into 1½–2 inch pieces.
Place rollups on the baking sheet. Mix melted butter with minced garlic and brush over the tops.
Bake for 15–18 minutes or until golden and bubbly.
Sprinkle with chives or parsley and serve with ketchup or dipping sauce.
- Prep Time: 15 mins
- Cook Time: 18 minutes
- Category: Dinner
Gathering Your Flavor Crew
Here’s your shopping list for this flavor fiesta! I’ve included some of my favorite swaps and insights to make this recipe your own.
- 1 lb Ground Beef: I like an 80/20 blend for the best flavor and juiciness, but leaner beef works too! For a twist, you could use ground turkey or even a plant-based ground meat.
- ½ tsp Garlic Powder: This is our flavor base for the beef. It gives that savory, aromatic depth we all love.
- Salt & Pepper to Taste: Don’t be shy! Seasoning your beef well is the foundation of a great rollup.
- 6 slices cooked Bacon, chopped: The crispy, smoky superstar. I like to bake my bacon on a sheet pan for easy, mess-free cooking. Pre-cooked bacon bits are a great time-saver here!
- 1½ cups shredded Cheddar or Mozzarella Cheese: Cheddar gives you that classic burger sharpness, while mozzarella is an epic melt-pull champion. Why not use a blend? A mix of both is my personal favorite move.
- 1 can refrigerated Pizza Dough or Crescent Dough Sheet: The ultimate kitchen shortcut! The pizza dough gives a slightly chewier, bread-like wrap, while the crescent dough is flakier and buttery. Both are absolute winners.
- 2 tbsp Butter, melted: This is the key to that gorgeous, golden-brown, crispy top. Unsalted is best so you can control the seasoning.
- 1 clove Garlic, minced: Fresh garlic mixed with the melted butter is a game-changer. It takes the flavor from “yum” to “WOW.”
- Optional: chopped Chives or Parsley for garnish: A little fresh green at the end makes it pretty and adds a pop of fresh flavor that cuts through the richness perfectly.
Let’s Build Some Flavor Magic: A Step-by-Step Guide
Okay, team! Let’s dive into the fun part. I’ll walk you through each step with all my best chef hacks to ensure your rollups are nothing short of spectacular.
- Preheat and Prep: First things first, get that oven preheating to a cozy 375°F (190°C). This is the perfect temperature to get the filling hot and bubbly while turning the dough a beautiful golden brown. Now, line your baking sheet with a piece of parchment paper. Chef’s Hack: This isn’t just for easy cleanup; it prevents the bottom of your rollups from getting too dark and ensures they release like a dream. No sticking allowed!
- Brown the Beef: Grab your favorite skillet and get it over medium-high heat. Crumble in your ground beef and sprinkle over the garlic powder, salt, and pepper. Cook it up until it’s beautifully browned, breaking it into super small crumbles as you go. Chef’s Insight: Why small crumbles? It makes rolling and slicing so much easier and gives you a perfect bite every time. Once it’s cooked, drain off any excess grease. We want flavor, not a greasy situation!
- Roll and Load: Time for the dough! Unroll your pizza or crescent dough onto a clean surface. If it’s being a bit sticky, a light dusting of flour will be your best friend. Use your hands or a rolling pin to gently press or roll it into a nice, even rectangle. Now, for the assembly line! Sprinkle the seasoned beef evenly over the entire surface, leaving just about a half-inch border around the edges. Follow that with the glorious chopped bacon and a generous, happy blanket of shredded cheese. Chef’s Secret: That clean border is crucial—it’s what seals the deal and keeps all that cheesy goodness inside during baking.
- The Tight Roll: Here’s the moment of truth! Starting from one of the longer sides, begin to tightly roll the dough up, jelly-roll style. Use your fingers to tuck the filling in as you go. Take your time here—a tight roll means a beautiful spiral when you slice it. Once it’s a complete log, give the final seam a little pinch to seal it shut.
- Slice and Place: Using a sharp serrated knife, gently slice the log into 1½ to 2-inch pieces. Pro Tip: A gentle sawing motion works best here—don’t press down hard or you’ll squish the roll. Place each beautiful spiral cut-side up on your prepared baking sheet, giving them a little room to breathe and puff up.
- The Garlic Butter Glaze: In a small bowl, mix your melted butter and that freshly minced garlic. This simple mixture is pure liquid gold. Grab a pastry brush (or even just the back of a spoon) and generously brush this glorious garlic butter over the tops of every single rollup. This is what’s going to give them that irresistible, crispy, golden, flavor-packed crust.
- Bake to Perfection: Slide your masterpiece into the preheated oven and let it bake for 15-18 minutes. You’re looking for the tops to be a deep, golden brown and the cheese to be bubbly and oozing out the sides. Your kitchen is going to smell absolutely incredible right about now.
- Garnish and Serve: Once they’re out of the oven, let them rest for just a minute or two on the pan (the filling is molten lava hot!). Then, sprinkle with those fresh chives or parsley for a fresh, colorful finish. Serve them up warm and watch them disappear!
How to Serve These Cheesy Wonders
Presentation is part of the fun! I love piling these rollups high on a big wooden board or a warm platter. They’re a star all on their own, but let’s talk dipping sauces. A classic ketchup is always a win, but for a real flavor adventure, try them with a zesty burger sauce (mayo, ketchup, relish, and a dash of Worcestershire), a creamy ranch, or even a spicy sriracha mayo. For a full meal, pair them with a simple crisp green salad or some sweet potato fries to round out the ultimate comfort food plate.
Ride Your Own Flavor Wave: Fun Variations!
One of my favorite things about this recipe is how easily it adapts! Don’t be afraid to get creative and make it your own.
- Pepperoni Pizza Style: Swap the beef and bacon for pepperoni and use mozzarella cheese. Add a spoonful of pizza sauce over the dough before the other toppings!
- BBQ Chicken Twist: Use shredded cooked chicken tossed in your favorite BBQ sauce instead of the beef, and try a blend of cheddar and Monterey Jack cheese.
- Philly Cheesesteak: Sauté thin slices of steak with onions and bell peppers. Use provolone cheese for that authentic Philly vibe.
- Spicy Southwest: Mix a tablespoon of taco seasoning into the beef and add a layer of canned green chiles before the cheese. Serve with salsa for dipping!
- Make it Low-Carb: For a keto-friendly version, you can use a fathead dough or even flattened slices of cauliflower as your wrapper.
Isla’s Chef Notes & Kitchen Confessions
This recipe has seen many iterations in my kitchen! The first time I made it, I was so excited I totally forgot to drain the beef grease. Let’s just say we had a… *lubricated* situation that made the dough a bit soggy. Lesson learned! Now I’m militant about draining. Another fun evolution? The garlic butter brush. It started as just a melted butter wash, but one day I had a clove of garlic hanging out and thought, “Why not?” It was a revelation that instantly became non-negotiable.
These rollups are also a fantastic way to get kids involved in the kitchen. My niece loves being in charge of sprinkling the cheese (which usually means sneaking a few handfuls) and brushing on the garlic butter. It’s messy, it’s fun, and it creates the best memories. Remember, cooking is about the joy of creation, not perfection. If a little cheese leaks out, just call it “cheesy crispies” and know it’s going to taste amazing anyway!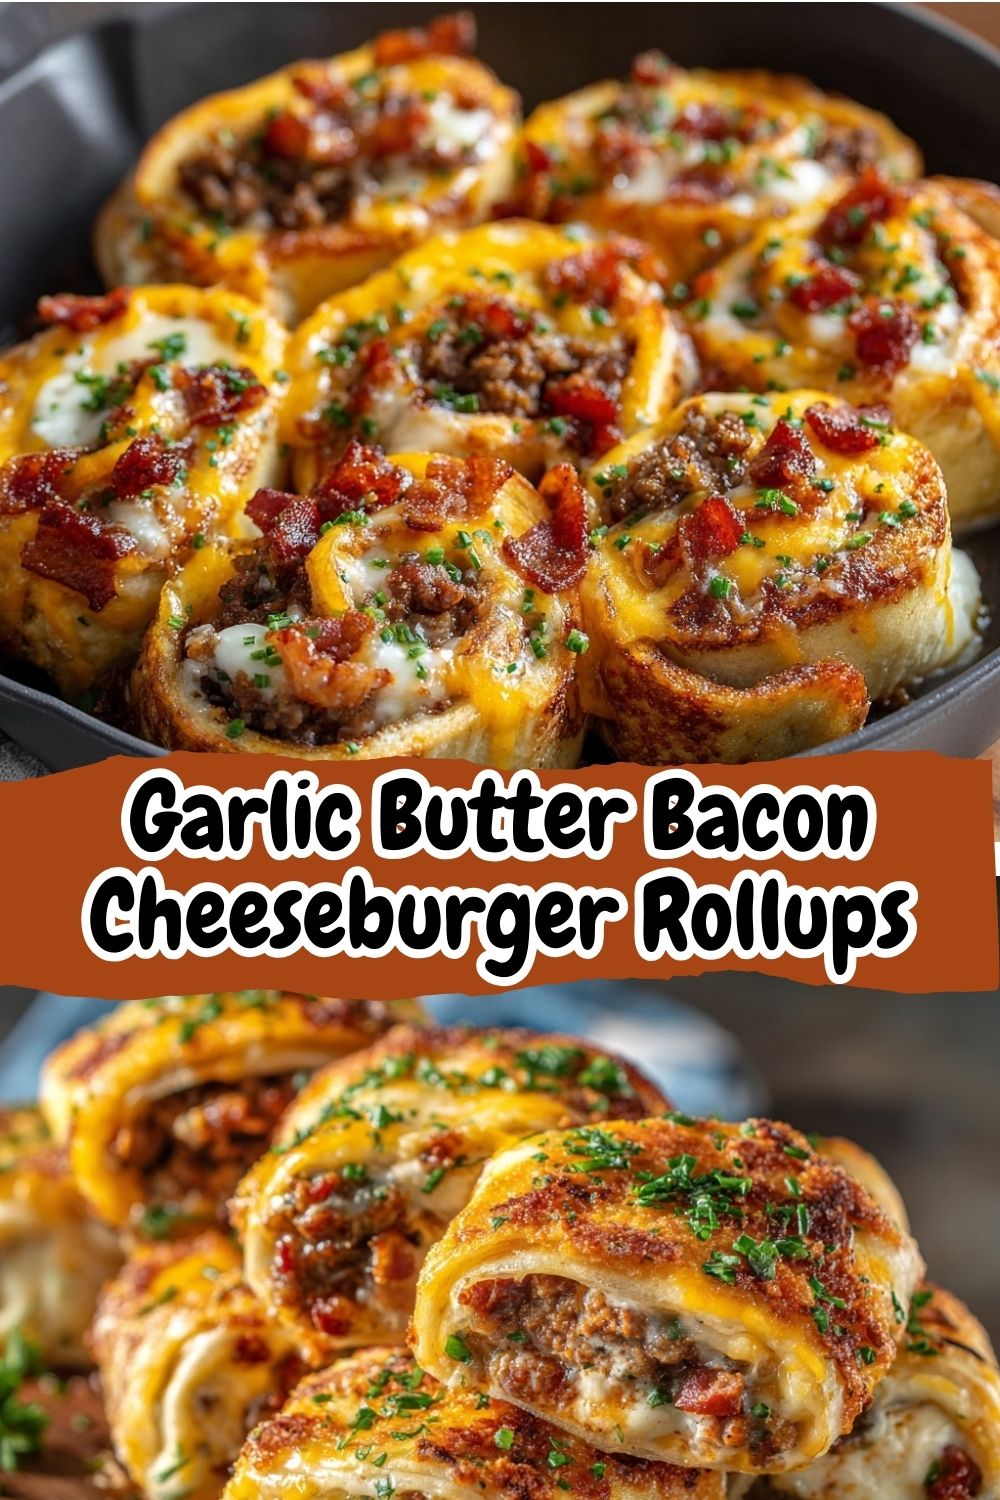
Your Questions, Answered!
I’ve gotten so many wonderful questions about this recipe over time! Here are answers to the most common ones to help you out.
Q: My dough ripped while I was rolling it! What do I do?
A: Don’t panic! This happens to the best of us. Just pinch the tear together to seal it as best you can. Remember, the rollup will be sliced, so a small tear in one spot likely won’t ruin the whole batch. If it’s a bigger tear, you can patch it with a tiny piece of dough from the ends. They will still taste incredible.
Q: Can I make these ahead of time?
A: Absolutely! You can assemble the whole log, wrap it tightly in plastic wrap, and keep it in the fridge for up to 24 hours. When you’re ready, just slice, brush with the garlic butter, and bake. You might need to add 2-3 extra minutes to the baking time since you’re starting with a cold log.
Q: Why is my filling spilling out during baking?
A: A little cheese bubbling out is normal and delicious! But if you’re having a major spillage, two things could be the culprit: 1) You might have overfilled the dough. A little less filling next time can help. 2) Make sure you’re rolling it tightly and sealing that final seam well. A loose roll is more likely to unravel in the oven’s heat.
Q: Can I freeze the baked rollups?
A: You sure can! Let them cool completely after baking, then place them in a single layer on a baking sheet to “flash freeze” for about an hour. This prevents them from sticking together. Then, transfer them to a freezer bag for up to 2 months. To reheat, pop them straight from the freezer into a 350°F oven for 10-15 minutes until hot and crispy.
Quick Nutrition Note
While we’re all about indulgence here at BiteTide, I know it’s helpful to have a general idea of what you’re enjoying! Please note, this is an estimate and can vary based on specific ingredients used.
Per Serving (approx., based on 6 servings): Calories: 430 | Protein: 21g | Carbs: 22g | Fat: 30g
There you have it! My ultimate, go-to, never-fail recipe for Garlic Butter Bacon Cheeseburger Rollups. I truly hope this recipe brings as much laughter and happy full bellies to your home as it has to mine. Don’t forget to tag me @BiteTide on social media if you make them—I love seeing your creations! Now go forth, cook with confidence, and ride that flavor wave.
With love and a full plate,
Isla 💛