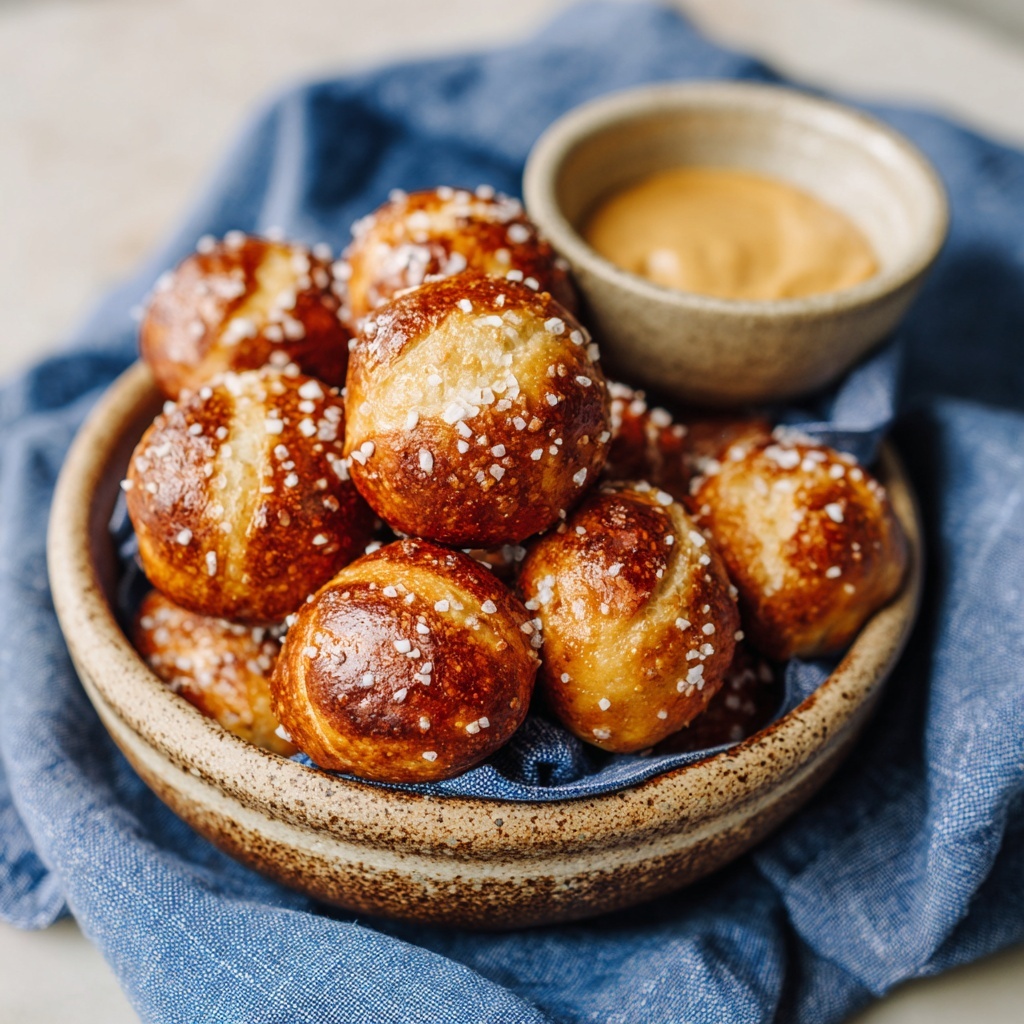
Easy Homemade Sourdough Discard Pretzel Bites: Your New Favorite Snack
Hey there, friend! Isla here from BiteTide, and I have to tell you, I’m buzzing with excitement to share this recipe with you today. We’re turning that often-overlooked jar of sourdough discard into something truly magical: Easy Homemade Sourdough Discard Pretzel Bites. Imagine the soft, chewy interior of a perfect pretzel, the distinctive golden-brown crust with that classic pretzel “snap,” all in a poppable, bite-sized form. Now imagine that happening in under an hour, with minimal fuss and maximum flavor payoff. Are you drooling yet? I know I am.
If you’ve ever felt a twinge of guilt pouring your sourdough starter discard down the drain, this recipe is your redemption song. It’s the ultimate “two birds, one stone” kitchen win. You get to reduce waste and create a snack that will have everyone begging for the recipe. These little bites are salty, satisfying, and seriously addictive. They’re perfect for game day gatherings, a fun after-school treat, a unique party appetizer, or just because it’s Tuesday and you deserve a delicious homemade snack. Let’s roll up our sleeves, dive into that discard jar, and create some chewy, salty, buttery magic together!
A Pretzel-Powered Memory
This recipe takes me right back to a specific, sun-drenched afternoon at a bustling farmer’s market in my old coastal town. I was about ten, clutching a few crumpled dollars in my hand, on a mission. The air was thick with the smell of grilled onions, fresh flowers, and, cutting through it all, the unmistakable aroma of baking dough and salt. I followed my nose straight to a small wooden stall where a man with flour-dusted hands was pulling twisted, glossy pretzels from a portable oven.
I bought one, still almost too hot to hold. That first bite was a revelation: the crackle of the crust giving way to a cloud-soft, warm interior. It was pure, simple joy. I’ve been chasing that flavor feeling ever since. Now, with my own sourdough starter bubbling away on the counter, I’ve found a way to bottle that memory. These pretzel bites have that same soul-satisfying quality, but with the added depth and tang that only our friend sourdough discard can bring. It’s my nostalgic market treat, meets my modern kitchen hustle. Let’s make some new memories, shall we?
Print
Easy Homemade Sourdough Discard Pretzel Bites : Soft, Chewy & Addictive
- Total Time: 30 mins
- Yield: 30 Pretzels 1x
Description
Turn your sourdough discard into a salty snack dream! These Easy Homemade Sourdough Discard Pretzel Bites are soft on the inside, golden on the outside, and finished with a sprinkle of flaky sea salt. They’re ready in under an hour, perfect for dipping in mustard or cheese sauce, and a total crowd-pleaser at parties, game days, or even breakfast on the go. Whether you’re a sourdough veteran or just starting out, this recipe is a fun and tasty way to use your starter discard.
Ingredients
1 cup sourdough discard (unfed)
1 ¼ cups all-purpose flour
½ tsp salt
1 tsp sugar
1 tsp instant yeast
⅓ cup warm water
2 tbsp butter (melted)
6 cups water + 1 tbsp baking soda (for boiling)
Flaky sea salt (for topping)
Instructions
In a large bowl, combine discard, flour, yeast, salt, sugar, and warm water. Mix until a soft dough forms.
Knead for 5–7 minutes until smooth. Cover and let rise for 30 minutes.
Preheat oven to 425°F (220°C). Line a baking sheet with parchment paper.
Divide dough into small pieces and roll into bite-sized balls.
Boil water with baking soda. Drop bites in for 30 seconds, then place on baking sheet.
Brush with melted butter and sprinkle with flaky salt.
Bake for 12–15 minutes or until golden brown.
Serve warm with your favorite dip!
- Prep Time: 15 mins
- Cook Time: 15 mins
- Category: Breakfast
Gathering Your Flavor Crew
Here’s the beautiful part: you likely have most of this crew hanging out in your pantry already. This is simple, honest food at its best. Let’s meet the team!
- 1 cup sourdough discard (unfed): This is our flavor MVP! Use discard straight from the fridge; it doesn’t need to be active or bubbly. The older the discard, the more tang it contributes. No starter? You can substitute with 1 cup of warm water mixed with 1 tablespoon of lemon juice or vinegar to mimic the tang, though you’ll miss the sourdough complexity.
- 1 ¼ cups all-purpose flour: The trusty backbone. I like unbleached all-purpose for its reliable structure. For a slightly more wholesome bite, you can swap in up to ½ cup of whole wheat flour, but know it’ll make the bites a bit denser.
- ½ tsp salt: Crucial for balancing all the flavors in the dough itself. Don’t skip it!
- 1 tsp sugar: Just a pinch! This tiny amount isn’t for sweetness; it’s food for the yeast, helping our dough get a little lift and that beautiful golden color in the oven.
- 1 tsp instant yeast: Our little powerhouse. Instant yeast works faster and doesn’t need to be proofed separately. It teams up with the wild yeast in the discard for a guaranteed rise. If you only have active dry yeast, that’s okay—just mix it with the warm water and let it sit for 5 minutes until foamy before adding.
- ⅓ cup warm water: The catalyst. Aim for water that feels warm to the touch, not hot (about 105-110°F). Too hot, and you’ll harm the yeast.
- 2 tbsp butter, melted: For brushing after baking. This gives that irresistible glossy finish and adds a layer of rich flavor. For a vegan twist, olive oil or melted coconut oil works wonderfully.
- 6 cups water + 1 tbsp baking soda (for boiling): This is the PRETZEL SECRET WEAPON! The alkaline bath is what gives pretzels their iconic dark mahogany color, chewy crust, and that distinct “pretzel” flavor. It’s a non-negotiable, magic step.
- Flaky sea salt (for topping): The finishing jewel. I adore Maldon salt for its delicate crunch. Coarse kosher salt works in a pinch, but flaky salt truly elevates it.
Let’s Get Our Hands Doughy: Step-by-Step
Ready to play? This process is so satisfying. Put on some good music, clear a little counter space, and let’s go.
- Mix the Dream Team. In a large mixing bowl, combine your sourdough discard, flour, instant yeast, salt, and sugar. Pour in the warm water. My chef hack? I often just use my hands for this initial mix—it’s the best tool to feel when the dough comes together! Mix until you have a shaggy, slightly sticky dough ball and no dry flour remains.
- Knead to Smoothness. Turn the dough out onto a lightly floured surface. Now, knead it for 5-7 minutes. You’re looking for a smooth, elastic dough that springs back slowly when you poke it. If it’s sticking to your hands, add a tiny sprinkle of flour, but resist the urge to add too much—a slightly tacky dough makes for softer bites. This is your arm workout for the day! Feel the texture change under your hands; it’s kitchen therapy.
- The Quick Rise. Place your lovely smooth dough ball back in the bowl, cover it with a damp kitchen towel or plastic wrap, and let it rest in a warm spot for 30 minutes. It won’t double in size like a traditional bread dough (thank the inactive discard for that), but it will relax and puff up noticeably. This is the perfect time to preheat your oven to a blazing 425°F (220°C) and line a large baking sheet with parchment paper.
- Shape the Bites. Punch the dough down (the fun part!) and turn it out onto a clean, un-floured surface if possible. Using a bench scraper or a sharp knife, divide the dough into four equal pieces. Roll each piece into a long rope, about ¾-inch thick. Now, slice each rope into ¾-inch to 1-inch pieces. Roll each little piece into a ball between your palms. Don’t stress about perfection—rustic, homemade-looking bites have the most charm! Pro tip: keep a small bowl of water nearby to dampen your hands if the dough starts to stick while rolling.
- The Magic Bath. Bring your 6 cups of water to a rolling boil in a wide, deep pot. Carefully add the 1 tablespoon of baking soda—it will fizz up! Reduce to a gentle boil. Using a slotted spoon or spider skimmer, carefully lower about 8-10 dough balls into the water. They’ll sink, then float. Let them bob for exactly 30 seconds. This quick bath is what creates that signature pretzel crust! Remove them, let the excess water drip off, and place them on your prepared baking sheet. Repeat with the remaining dough.
- Bake to Golden Perfection. Once all bites are boiled and on the sheet, brush them generously with the melted butter and sprinkle immediately with your flaky sea salt. Bake for 12-15 minutes, or until they are a deep, glorious golden brown. Your kitchen will smell AMAZING.
- The Hardest Part: Letting Them Cool (A Bit). Transfer the baked bites to a cooling rack. I know, I know—you want to eat them NOW. But giving them just 5 minutes to set up ensures the perfect chewy texture and saves you from a burnt tongue. Trust me, it’s worth the wait.
How to Serve These Salty Dreams
Presentation is part of the fun! I love piling these warm pretzel bites high in a big, rustic bowl or on a wooden board. For dipping, the options are endless. Offer a trio of sauces: classic yellow mustard, a grainy beer mustard, and a warm, velvety cheese sauce are my go-to. For a sweet-and-salty twist, a side of warm marinara or even a small dish of honey for drizzling is divine. They’re best served the day they’re made, but let’s be real—they rarely last that long.
Ride Your Own Flavor Wave: Fun Variations!
Once you’ve mastered the classic, get creative! Here are a few of my favorite twists:
- Everything Bagel Style: After the butter brush, toss the bites in an “Everything But The Bagel” seasoning blend instead of just salt.
- Cinnamon Sugar Sweet Bites: Skip the salt. After baking, brush with more melted butter and roll in a mix of cinnamon and sugar while still warm.
- Garlic Parmesan Heaven: Mix grated Parmesan, garlic powder, and a little dried parsley. Brush bites with butter and roll in this cheesy mix before baking.
- Seeded & Wholesome: Press sesame seeds, poppy seeds, or rolled oats onto the bites after boiling for extra texture and flavor.
- Spicy Everything: Add ½ teaspoon of smoked paprika or a pinch of cayenne pepper to the dry ingredients for a warm, subtle kick.
Isla’s Kitchen Notes & Stories
This recipe is a living, breathing thing in my kitchen! It started as a way to use up a huge amount of discard before a vacation and has evolved into my most-requested snack for casual get-togethers. One hilarious fail? The time I forgot the baking soda in the boiling water. I ended up with pale, sad, bread-blisters instead of pretzels. Lesson learned—the baking soda bath is the magic spell! Now, I keep a box right by the stove when I make these. Another fun evolution: my kid loves to help with the shaping. Her bites are… abstract, but she sprinkles the salt with the seriousness of a scientist, and they always taste incredible. That’s the spirit of BiteTide right there—imperfect, joyful, and delicious.
Your Questions, Answered!
Q: My dough is really sticky and hard to handle. What did I do wrong?
A: Don’t panic! Dough hydration can vary based on your specific flour and discard. First, ensure you kneaded for the full time to develop the gluten. If it’s still unworkably sticky after kneading, add flour one tablespoon at a time until it’s just slightly tacky but not sticking to your hands like glue.
Q: Can I make these ahead of time?
A> You can! Shape the bites, boil them, and arrange them on the parchment-lined sheet. Instead of baking, pop the entire sheet tray in the freezer until the bites are solid. Then transfer to a freezer bag. When ready to bake, place the frozen bites on a sheet, brush with butter/salt, and bake straight from frozen, adding 3-5 extra minutes to the baking time.
Q: Why boil with baking soda? Can I use lye?
A> The baking soda bath (a “lye substitute” for home bakers) creates an alkaline environment. This causes the Maillard reaction (browning) to happen faster and more intensely in the oven, giving the pretzels their color and signature flavor. While food-grade lye is traditional for German pretzels, baking soda is a much safer and more accessible option for home kitchens with the same fantastic result.
Q: My pretzel bites came out a bit dense. How can I make them lighter?
A> A dense bite usually points to over-kneading or, more commonly, using too much flour when shaping. Be gentle when rolling the balls—you’re just shaping, not squeezing all the air out. Also, make sure your yeast isn’t expired!
Quick Nutritional Snapshot
Please note: This is an approximate estimate per serving (about 6 bites), calculated using generic ingredients. Your specific brands may vary.
- Calories: 190
- Carbohydrates: 28g
- Protein: 4g
- Fat: 5g
- Prep Time: 15 mins | Rise Time: 30 mins | Cook Time: 15 mins | Total Time: ~1 hour | Yields: About 30 pretzel bites