Easy Easter Bunny Coconut Tails: Your New Favorite No-Bake Tradition
Hey there, friend! Isla here, from my cozy kitchen to yours. Can you feel it? That whisper of spring in the air, the hint of pastel peeking out in store windows, and the undeniable, sugar-coated excitement that Easter brings? It’s one of my absolute favorite times to bake—or in today’s case, not bake! I’m all about creating moments of joy without the stress, and that’s exactly why these Easy Easter Bunny Coconut Tails have my whole heart.
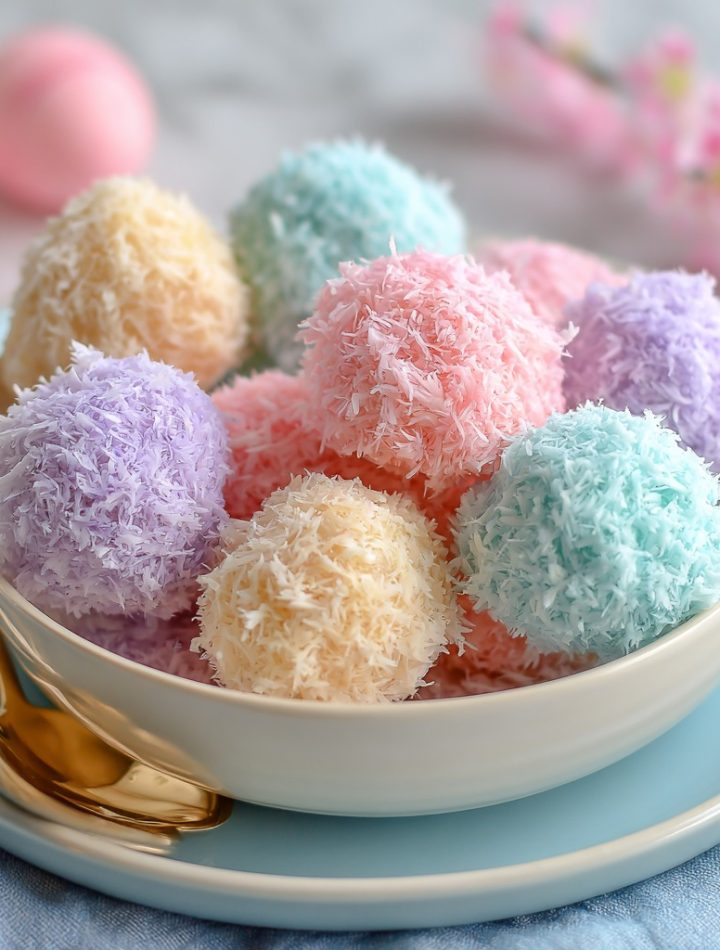
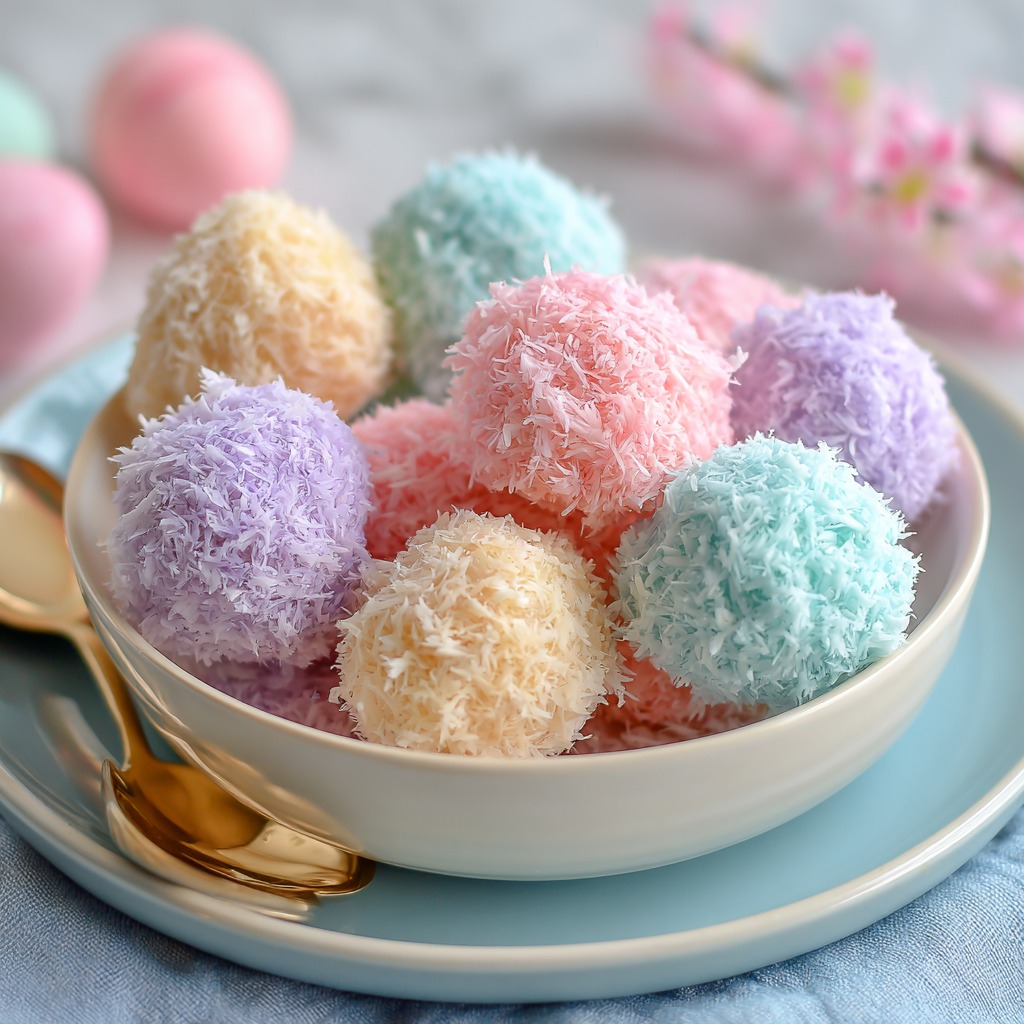
Imagine the softest, chewiest little coconut snowball, but dressed in its Sunday best for spring. A sweet condensed milk center hugged by a fluffy coat of pastel-tinted coconut that looks just like a soft, powdered bunny tail. They’re whimsical, they’re wonderfully simple, and they bring a smile to faces from ages 2 to 92. The best part? We’re talking about 15 minutes of hands-on fun, zero oven time, and a treat that’s as perfect for an elegant dessert tray as it is for a lunchbox surprise or a DIY gifting project. So, tie on your favorite apron (the one with the stains that tell stories), and let’s make some pastel magic together. This is the kind of recipe that creates happy kitchen memories, and I’m so thrilled you’re here to make them with me!
Print
Easy Easter Bunny Coconut Tails : No-Bake Pastel Coconut Balls
- Total Time: 1 hour 15 minutes
- Yield: 30 coconut tails 1x
Description
These Easy Easter Bunny Coconut Tails are the sweetest little no-bake treat for spring! Soft, chewy coconut centers are rolled in beautifully tinted pastel coconut for that fluffy “bunny tail” look. They’re simple to make, freezer-friendly, and perfect for Easter dessert trays, party favors, or gifting. With just a few ingredients and zero baking required, this beginner-friendly recipe is pure pastel magic!
Ingredients
5 cups unsweetened coconut, medium shred
2 cups unsweetened coconut, fine shred (for coating)
14 oz sweetened condensed milk
2 tbsp butter, melted and cooled
1 tsp vanilla extract
¼ cup confectioner’s sugar
Liquid food coloring (pastel shades)
Instructions
In a large bowl, whisk together sweetened condensed milk, melted butter, and vanilla until smooth.
Stir in medium-shred coconut and confectioner’s sugar until a thick mixture forms.
Cover and refrigerate for 15 minutes to firm slightly.
Divide fine-shred coconut into small bowls (about ½ cup each). Add 3–4 drops pastel food coloring and mix until evenly tinted.
Scoop 1½ teaspoon portions of chilled mixture and roll into smooth balls.
Roll each ball in colored fine coconut, gently pressing so coating sticks evenly.
Place on a parchment-lined tray.
Refrigerate for 1 hour, or until fully set.
Keep chilled until serving for best texture.
Notes
Difficulty: Very Easy
Storage: Refrigerate up to 5 days in airtight container
- Prep Time: 15 mins
- Category: Dessert
Nutrition
- Sugar: 12g
- Carbohydrates: 14g
- Protein: 2g
A Tale of Two Tails & My Grandma’s Sugar Jar
This recipe always takes me back to my grandma’s sun-drenched kitchen, the year I was maybe seven and utterly obsessed with the idea of the Easter Bunny. I was convinced if I left the right snack, I might catch a glimpse of him. My grandma, being the genius she was, suggested we make a snack for the Bunny, to thank him for his work. We whipped up a simple coconut candy from her tattered recipe box, shaped them like little carrots, and left them on a plate with a note.
The next morning, the “carrots” were gone, and in their place were a few of these pastel coconut balls—bunny tails!—with a tiny, floured paw print note that said “Delicious! Thank you!”. The magic in my little heart was absolute. Of course, I now know my grandma stayed up late, tinting coconut and painstakingly crafting the evidence of our magical visitor. But that’s the power of food, isn’t it? It’s not just flavor; it’s feeling. It’s love and imagination rolled into one sweet bite. These Bunny Coconut Tails are my homage to that memory—a way to pass on that sparkle of springtime magic, no fancy baking skills required.
Gathering Your Flock: What You’ll Need
Here’s the beautiful part: this recipe hinges on just a handful of simple ingredients. Quality matters, but fussiness does not. Let’s break it down:
- 5 cups unsweetened coconut, medium shred: This is the body of our tail! I prefer unsweetened because the sweetened condensed milk gives us all the sweetness we need. The medium shred provides the perfect chewy, substantial texture. Chef’s Insight: If you can only find sweetened, your tails will be perfectly tasty but a bit sweeter and possibly a tad stickier.
- 2 cups unsweetened coconut, fine shred (for coating): The “fur”! Fine shred creates that soft, fluffy, powdery look that mimics a bunny’s tail so perfectly. This is what we’ll tint our pastel colors.
- 14 oz sweetened condensed milk: The magical glue. It binds the coconut, adds creaminess, and provides that iconic sweet flavor. Do not substitute with evaporated milk—it’s not the same! Substitution Tip: For a dairy-free version, full-fat coconut milk can be simmered down with sugar to create a homemade vegan “condensed” milk, though it will change the texture slightly.
- 2 tbsp butter, melted and cooled: Just a little bit adds a lovely richness and helps the mixture firm up. Use salted or unsalted—your choice! Chef’s Insight: Let it cool so it doesn’t melt the coconut or cause the condensed milk to separate.
- 1 tsp vanilla extract: The flavor enhancer. It rounds out the sweetness and adds a warm, comforting note. Feel free to try almond extract for a different twist!
- ¼ cup confectioner’s sugar: This isn’t just for sweetness; it helps absorb excess moisture and makes rolling the balls a dream. It gives the interior a melt-in-your-mouth quality.
- Liquid food coloring (pastel shades): The fun part! Classic liquid dyes work perfectly for tinting the fine coconut. Gel colors will give more vibrant hues—use a toothpick to add just a tiny dot at a time. Think soft pink, baby blue, mint green, and pale yellow.

Let’s Make Some Magic: Step-by-Step
Ready? This is where the fun happens. I’ll walk you through every step with my favorite little hacks to ensure perfect bunny tails every single time.
Step 1: The Foundation. In a large, comfortable bowl, grab a sturdy whisk or a fork. Combine the sweetened condensed milk, cooled melted butter, and vanilla extract. Whisk it until it’s completely smooth and homogenous. You’re creating the silky base that will hold everything together. Tip: If your butter is even slightly warm, it might cause the mixture to look a bit separated. Don’t panic! Just keep whisking; it’ll come together as you add the dry ingredients.
Step 2: The Mix-In. Dump in all 5 cups of the medium-shred coconut and the confectioner’s sugar. Now, switch to a strong silicone spatula or even just clean hands. Mix and fold until every single strand of coconut is evenly coated and you have a thick, cohesive mixture. It will be sticky, and that’s perfect! Chef’s Hack: If it feels too loose or wet to handle, you can add an extra handful of medium coconut. Humidity can play a role!
Step 3: The Chill. Cover the bowl tightly with plastic wrap and pop it into the refrigerator for about 15 minutes. This brief chill firms up the butter and makes the mixture MUCH easier to roll without sticking to your palms. It’s a non-negotiable pause for sanity!
Step 4: Create Your Pastel Palette. While the mixture chills, let’s paint! Divide your 2 cups of fine-shred coconut between 3-4 small bowls. Aim for about 1/2 cup each. Add 3-4 drops of your chosen pastel food coloring to each bowl. Now, use a fork or your fingers to mix, mix, mix until the color is utterly even. It’s so satisfying! Tip: For more intense color, let the tinted coconut sit for 5 minutes; it deepens slightly.
Step 5: Roll & Coat. Line a baking sheet with parchment paper. Using a small cookie scoop (about 1.5 teaspoons) or a spoon, portion out the mixture. Roll it swiftly between your palms to form a smooth ball. Immediately roll it in one of your bowls of pastel coconut, pressing gently so the “fur” adheres in a nice, even layer. Place it on the tray. Repeat! Chef’s Hack: Keep a small bowl of water nearby to dampen your hands slightly if the mixture starts sticking. It’s a game-changer.
Step 6: Set & Forget. Once all your darling little tails are lined up, cover the tray loosely and refrigerate for at least 1 hour. This allows them to fully set, firm up, and for the flavors to meld beautifully. Patience, grasshopper!
Serving Up the Sweetness
Presentation is half the fun! For an Easter brunch, pile them high on a cake stand layered with green-colored coconut “grass.” For a gift, place them in a clear cellophane bag tied with a ribbon. On a dessert tray, mix the pastel colors artfully and maybe add a few chocolate eggs or edible flowers for contrast. They’re sweet, rich little bites, so I find one or two per person is perfect alongside a cup of coffee or tea. The contrast of the cool, chewy center with the fluffy coating is pure delight!
Ride Your Own Flavor Wave: Fun Variations
The basic recipe is a perfect canvas! Here are a few ways to make it your own:
- Citrus Zest: Add the zest of one lemon or orange to the main mixture for a bright, springy zing.
- Almond Joy: Mix 1/2 cup of finely chopped almonds into the base and use a drop of almond extract instead of vanilla. Roll in chocolate-sprinkled coconut for a candy bar vibe.
- Tropical Escape: Add 1/4 cup of finely chopped dried pineapple or mango to the mix, and use a mix of yellow and green coconut for coating.
- “Dirty Bunny” Tails: For the chocolate lovers, roll the set balls in melted chocolate first, then immediately in the pastel coconut for a chocolate-coconut surprise inside.
- Naturally Tinted: Skip the liquid dyes! Use freeze-dried raspberry powder (pink), matcha (green), or turmeric (yellow) to color your coconut naturally.
Isla’s Kitchen Notes & Stories
This recipe has evolved from my grandma’s more rustic version, which used just coconut and condensed milk. I added the butter for silkiness and the confectioner’s sugar after a hilarious kitchen fail where my first batch was delicious but stuck to everything like edible glue! The pastel coating was born one year when I ran out of sprinkles and got creative with what I had. That’s how the best recipes happen, right?
A funny note: my dog, Waffles, is OBSESSED with the smell of coconut. I have to be extra vigilant when these are setting on the counter, or I’ll turn around to find a very guilty-looking pup with pastel coconut all over his nose. Consider this your official warning if you have a furry kitchen helper!
Your Questions, Answered!
Q: My mixture is too wet/sticky to roll. What did I do wrong?
A: Don’t worry! This is usually due to humidity or brand variances. The fix is easy: just add more medium-shred coconut, a quarter cup at a time, until it’s manageable. Also, ensure you chilled it—that’s crucial!
Q: Can I make these ahead of time?
A: Absolutely! They are the perfect make-ahead treat. Store them in a single layer in an airtight container in the fridge for up to 5 days. You can also freeze them for up to 2 months. Just thaw in the fridge overnight.
Q: The color is bleeding/getting soggy. How do I prevent this?
A> This happens if the balls are rolled in the colored coconut while the interior mixture is still too warm or wet. Make sure your mixture is thoroughly chilled before rolling, and roll your balls smoothly so there aren’t any sticky “bald” patches for moisture to seep out from. Letting them set fully in the fridge also seals the deal.
Q: Can I use all medium or all fine shred?
A> I don’t recommend it for the best texture. The medium shred gives body, while the fine shred creates that signature fluffy tail look. Using all fine shred will make a denser, less textured ball, and using all medium for the coating won’t give you that soft, pastel “powder” effect.
Nutritional Info (Per Tail, Approximate)
Calories: 140 | Fat: 9g | Carbohydrates: 14g | Sugar: 12g | Protein: 2g
Remember: These are treats, meant to be enjoyed for their joy factor! This info is an estimate based on the specific ingredients I used.
Prep Time: 15 minutes | Chill Time: 1 hour | Total Time: 1 hour 15 minutes
Yield: About 30 delightful tails
Difficulty: So easy it feels like magic!