Easter Bunny Coconut Tails: The No-Bake Treat That’s All Fluff & Fun
Hey there, friend! Isla here, waving from my flour-dusted kitchen. Can you feel it? That little buzz in the air? Spring is finally shaking off the last of winter’s chill, and my mind is doing a happy dance straight towards Easter. I don’t know about you, but for me, this season is all about pastel colors, sunshine, and treats that make you smile without creating a mountain of dishes.
That’s where these little gems come in. Let me introduce you to Easter Bunny Coconut Tails. Imagine the most soft, chewy, melt-in-your-mouth coconut ball, all dressed up in the prettiest pastel coats. They look like they popped out of a storybook, but I promise you, they are seriously simple to make. No oven, no fuss, just pure, fun, flavor-filled magic. They’re perfect for Easter baskets, brunch tables, or just because you deserve a sweet, sunny bite. So, grab a mixing bowl and let’s make some magic that’s as easy as it is adorable!
A Sweet Pinch of Nostalgia
This recipe takes me right back to my grandma’s linoleum-floored kitchen. Every spring, without fail, she’d make her famous “Coconut Haystacks.” They weren’t fancy, just humble little mounds of coconut and sweetness, but to me, they were everything. I’d stand on a wobbly stool, “helping” by trying to sneak tastes of the condensed milk (and usually getting caught, sticky fingers and all).
She’d let me sprinkle the coconut, and my little-kid hands would make a glorious mess. What I remember most isn’t the perfect shape of her treats, but the joy in the making. The laughter, the stories, the shared anticipation of something sweet. My Bunny Tails are a direct descendant of those haystacks—a slightly more polished, pastel-dipped version, but carrying the same soul. They’re a reminder that the best recipes aren’t about perfection; they’re about the feeling you bake (or in this case, don’t bake!) right into them. Let’s create that feeling in your kitchen today.
Print
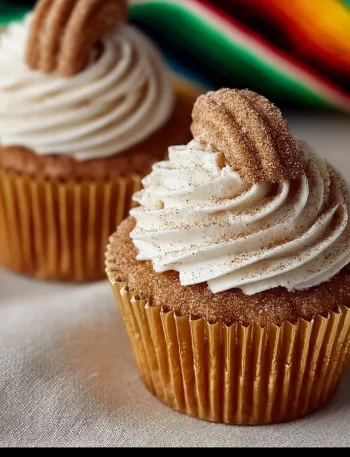
Easter Bunny Coconut Tails : Soft, Chewy Coconut Balls Rolled in Pastel Flakes
- Total Time: 1 hour 15 minutes (including chilling time)
- Yield: 24 balls 1x
- Diet: Vegetarian
Description
Soft and chewy coconut balls perfect for Easter, these Easter Bunny Coconut Tails are rolled in pastel-colored coconut flakes for a festive touch.
Ingredients
- 3 cups sweetened shredded coconut, divided
- 1 (14 oz) can sweetened condensed milk
- 1 teaspoon vanilla extract
- Food coloring (pink, yellow, green, blue – pastel shades)
Instructions
- In a large bowl, mix 2 1/2 cups of shredded coconut with the sweetened condensed milk and vanilla extract until fully combined.
- Using your hands or a cookie scoop, form the mixture into small bite-sized balls.
- Divide the remaining 1/2 cup of coconut into small bowls and tint each with different pastel food coloring.
- Roll each coconut ball in the colored coconut to coat.
- Place the balls on a baking sheet lined with parchment paper.
- Chill in the refrigerator for at least 1 hour to firm up before serving.
Notes
- Store in an airtight container in the refrigerator for up to 1 week.
- Use gloves when rolling and coloring to avoid sticky hands and staining.
- You can freeze them for up to a month.
- Prep Time: 15 minutes
- Cook Time: 0 minutes
- Category: Dessert
- Method: No-Bake
- Cuisine: American
Nutrition
- Serving Size: 1 ball
- Calories: 120
- Sugar: 13g
- Sodium: 35mg
- Fat: 6g
- Saturated Fat: 5g
- Unsaturated Fat: 1g
- Trans Fat: 0g
- Carbohydrates: 15g
- Fiber: 1g
- Protein: 1g
- Cholesterol: 5mg
Keywords: Easter dessert, coconut balls, no-bake treat, pastel snacks, bunny tails
Gathering Your Flavor Wave
Here’s the beautiful part: the ingredient list is short, sweet, and mighty. Each one plays a key role in creating that perfect soft-yet-chewy texture and sweet coconut flavor. Let’s break it down!
- 5 cups unsweetened medium shredded coconut: This is the star! Using unsweetened coconut lets the other sweeteners shine without going into sugar overload. The “medium” shred gives our tails a lovely, substantial chew. Chef’s Tip: If you can only find sweetened, just reduce the confectioner’s sugar a bit. Your mixture might be a tad stickier, but it’ll work!
- 2 cups unsweetened fine shredded coconut (for coating): The fine shred is our canvas. It creates that smooth, fluffy, pastel “fur” that makes these look so bunny-tail perfect.
- 14 oz sweetened condensed milk: This is our magic binder and primary sweetener. It gives the balls their signature richness and fudgy-chewy center. Do not substitute with evaporated milk—it’s not the same!
- 2 tablespoons butter, melted and cooled: A little fat for richness and to help everything hold together beautifully. Cool it so it doesn’t melt the coconut.
- 1 teaspoon vanilla extract: The flavor enhancer. It rounds out the sweetness and adds a warm, bakery-style note.
- ¼ cup confectioner’s sugar: This isn’t just for sweetness; it helps absorb excess moisture and gives the mixture a smoother, less sticky feel for rolling.
- Liquid food coloring (assorted pastel shades): The fun part! I like soft pinks, lavenders, blues, and yellows. Gel coloring works too, but you might need to mix it with a drop of water or vodka to distribute it evenly in the dry coconut.
Let’s Roll! Your Step-by-Step Guide
Ready? Put on some happy music, clear a bit of counter space, and let’s dive in. This is a fantastic recipe to do with helpers of all ages!
- Mix the Goodness: In a large bowl, grab a whisk and give the condensed milk, melted (and cooled!) butter, and vanilla a good whirl until they’re one smooth, glossy team. Chef Hack: I rinse my measuring spoon for the vanilla in the condensed milk can to get every last drop of both. No waste!
- Bring in the Coconut: Dump in your 5 cups of medium shredded coconut and the confectioner’s sugar. Now, switch to a sturdy spatula or just dive in with clean hands. Mix, mix, mix until every single strand of coconut is coated and you have a uniformly sticky, thick mixture. It will look like a mountain of coconut snow!
- The Chill Factor: This step is your best friend. Pop the bowl in the fridge for 15 minutes. This firms up the fats and makes the mixture infinitely easier to handle and roll. Trust me, don’t skip it!
- Create Your Pastel Palette: While the mix chills, let’s make rainbows. Divide the 2 cups of fine coconut into 4 or 5 small bowls. Add a few drops of different pastel food colorings to each. Now, get your hands in there again! Massage the color into the coconut until it’s evenly tinted. It’s so satisfying! Pro Tip: Start with less color—you can always add more. We’re going for “soft spring blossom,” not “neon rave.”
- Roll & Coat: Take your chilled mixture. Using a small cookie scoop or a teaspoon, portion out about 1½ teaspoons. Roll it quickly between your palms into a smooth ball. Immediately roll it in one of your bowls of colored coconut, pressing gently so the flakes adhere. Place the finished tail on a parchment-lined tray. Repeat, repeat, repeat! Chef Hack: If your hands get too sticky, rinse and dry them, then give them a very light dusting of confectioner’s sugar. It acts like edible non-stick spray!
- Set & Forget: Once all your bunny tails are lined up like a pastel army, cover the tray and refrigerate for at least 1 hour. This final chill sets them perfectly, making them firm on the outside while staying deliciously soft inside.
How to Serve These Sunny Bites
Presentation is half the fun! I love piling these into a rustic wooden bowl for a casual brunch spread. For Easter baskets, nestle them in green paper “grass” for a pop of color. You can also thread them onto lollipop sticks before the final chill for adorable “Easter Bunny Lollipops.” Arrange them on a tiered dessert stand with other treats, or pack them into cute cellophane bags tied with ribbon for the sweetest homemade gifts. However you serve them, get ready for “oohs,” “aahs,” and “can I have the recipe?”
Ride Your Own Flavor Wave: Fun Variations!
Once you master the basic wave, feel free to surf! Here are a few fun twists:
- Chocolate-Dipped Dreams: After chilling, dip half of each tail in melted white or dark chocolate. Let set on parchment.
- Tropical Twist: Add ½ teaspoon of coconut or rum extract to the mix, and roll in coconut tinted with yellow and a touch of green for a “pineapple” vibe.
- Lemon Berry Bliss: Add 1 tablespoon of lemon zest to the base mixture. Tint your coating coconut with freeze-dried raspberry or strawberry powder for a naturally fruity pink.
- “Nests” not “Tails”: Press a small indentation into the top of each ball before chilling. After setting, fill the “nest” with a few mini chocolate eggs.
- Dairy-Free/ Vegan Swap: Use full-fat coconut cream (thick part only) instead of condensed milk, and mix in ½ cup of powdered sugar and ¼ cup of maple syrup. Use coconut oil instead of butter. The texture will be slightly softer but just as delicious!
From My Kitchen to Yours: A Few Parting Thoughts
I’ve made these Bunny Tails more times than I can count, and every time, they bring a smile. The recipe has evolved from my grandma’s simple stacks—I started coloring the coconut one year when my niece declared they needed to be “more Easter-y.” The name “Bunny Tails” was her idea, too. The best kitchen moments often come from those little collaborations!
A funny story: One year, I was filming a reel of me making these, deep in my “content creator zone.” I had my perfect pastel coconut in little bowls, my perfect balls lined up… and my cat, Mochi, decided this was the ideal moment to leap onto the counter and bat a bright pink ball across the kitchen like a hockey puck. We had to pause filming for a full ten minutes of laughter (and chasing a coconut-covered cat). So, if your kitchen adventure gets a little messy or silly, you’re doing it right. That’s where the real memories are made.
Your Questions, Answered!
Q: My mixture is super sticky and hard to roll! What did I do wrong?
A: First, did you chill it? That’s step one! If it’s still sticky, your coconut might be extra moist, or you may have packed your cups a bit tight. No sweat! Just add another tablespoon or two of confectioner’s sugar to the mix and give it another quick chill. Also, lightly dusting your hands with confectioner’s sugar is a game-changer.
Q: Can I use sweetened coconut instead of unsweetened?
A: You can, but the final treat will be much sweeter. I’d recommend reducing or omitting the confectioner’s sugar in the base mixture if you use sweetened coconut. The texture might also be a bit more moist.
Q: How far in advance can I make these?
A: They are perfect for making ahead! Store them in a single layer in an airtight container in the fridge for up to 5 days. You can also freeze them for up to a month—just thaw in the fridge before serving.
Q: My food coloring is making my hands stain! Help!
A: This is common with liquid dyes. Wearing disposable food-safe gloves when mixing the colored coconut is a brilliant hack. If your hands do get tinted, a paste of baking soda and dish soap usually does the trick!
A Quick Nutritional Note*
*Approximate values per coconut tail (1/30th of recipe): Calories: 120 | Carbs: 14g | Fat: 6g | Sugar: 10g | Fiber: 2g
Prep Time: 20 mins | Chill Time: 1 hour | Total Time: 1 hour 20 mins | Servings: ~30 adorable tails
With love and flavor,
Isla 💛