 Deviled Egg Chicks: Your Secret to the Cutest, Most Delicious Easter Appetizer Ever
Hey there, friend! Isla here, from my cozy kitchen to yours. Can we talk about that magical moment when a dish walks into a party and the entire room lets out a collective “Awwww!”? That’s the power of food that’s not just delicious, but downright delightful. And today, we’re making the undisputed champions of edible adorable: Deviled Egg Chicks.
Now, I know what you might be thinking. “Isla, deviled eggs? Really?” Trust me, I get it. The classic version is a potluck staple for a reason—it’s creamy, tangy, and utterly satisfying. But these? These are a whole different breed (pun totally intended). We’re taking that beloved, familiar flavor and wrapping it up in a package of pure, unadulterated joy. Imagine fluffy little chicks peeking out from your Easter brunch spread, their carrot beaks bright and their peppercorn eyes full of (edible) mischief. They’re a conversation starter, a guaranteed kid-pleaser, and honestly, a little moment of kitchen magic that’s so much easier to pull off than you’d think.
So, whether you’re hosting the big family feast, heading to a friend’s gathering, or just want to make a regular Tuesday feel special, these chicks are your ticket. Let’s ditch the stress and embrace the fun. Grab your eggs, and let’s create something that’s as much a pleasure to make as it is to eat. Ready to make some cute little bites? Let’s do this!
Print
Deviled Egg Chicks : Adorable, Classic & Party-Ready
- Total Time: 32 minutes
- Yield: 12 chick eggs 1x
Description
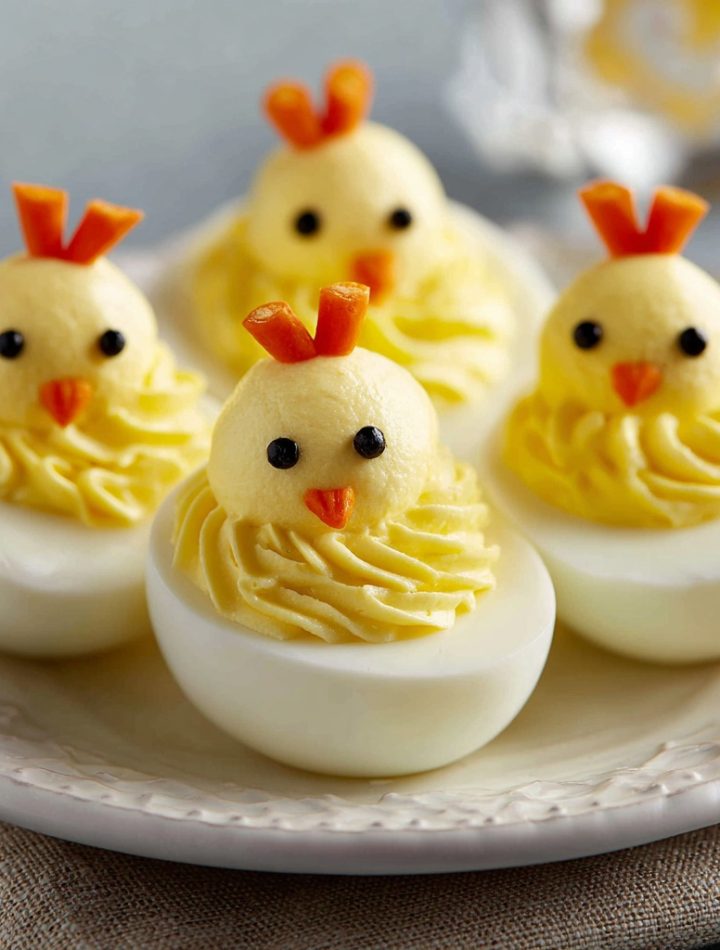
These Deviled Egg Chicks are guaranteed to steal the spotlight at any Easter table. Classic deviled eggs get a playful makeover with piped yolks shaped like fluffy chicks, complete with tiny eyes and carrot beaks. They’re familiar, festive, and irresistibly cute—perfect for kids and adults alike.
Ingredients
6 large eggs
3 tbsp mayonnaise or Greek yogurt
1 tsp Dijon mustard
Salt & black pepper, to taste
1 small carrot, cut into tiny triangles (beaks)
Black peppercorns or black sesame seeds (eyes)
Instructions
Place eggs in a saucepan, cover with water, and bring to a boil.
Turn off heat, cover, and let eggs sit for 10–12 minutes.
Transfer to ice water, cool completely, then peel.
Slice eggs in half lengthwise and carefully remove yolks.
Mash yolks with mayonnaise, mustard, salt, and pepper until smooth.
Spoon or pipe yolk mixture back into egg whites, forming a rounded “chick” shape.
Add two peppercorns or sesame seeds for eyes and a small carrot triangle for the beak.
- Prep Time: 20 minutes
- Cook Time: 12 minutes
- Category: Snack
Nutrition
- Fat: 7g
- Carbohydrates: 1g
- Protein: 6g
A Messy Apron & The Best Easter Memories
My love for these chirpy little appetizers is deeply rooted in a cloud of flour-dust and the sound of my grandma’s laugh. Every Easter, her kitchen transformed into a command center for cuteness. There were bunny-shaped rolls, lamb cakes with coconut fleece, and of course, the deviled eggs. But one year, when I was about seven, she decided we were going to make them “special.”
With the seriousness of a master sculptor, she showed me how to pipe the yolk filling just so, forming a little mound. Then, with my tiny, fumbling fingers, I was put in charge of the faces. I’d painstakingly place the peppercorn eyes, my tongue peeking out in concentration. The carrot beaks were my favorite—I’d sneak extra slivers, declaring that *my* chicks needed bigger beaks to sing louder. We’d make a colossal mess. Eggshell confetti everywhere, specks of paprika on our noses, but the result was a platter of cheerful characters that made everyone—from my serious uncle to my giggling cousins—smile before they even took a bite. That’s the spirit I want to bring to your kitchen. It’s not about perfection; it’s about the shared laughter, the little creative spark, and the memory you create around a simple plate of eggs.
What You’ll Need to Bring These Chicks to Life
Here’s your simple lineup. The beauty is in the classic ingredients—we’re just presenting them with a dash of whimsy!
- 6 large eggs: The foundation! Older eggs (about 1-2 weeks in your fridge) actually peel easier than brand new ones. A little life hack from me to you.
- 3 tablespoons mayonnaise OR full-fat Greek yogurt: This is your creamy base. Mayo gives that rich, classic flavor. Greek yogurt is my go-to for a tangier, slightly lighter filling that’s still incredibly creamy. You can’t go wrong.
- 1 teaspoon Dijon mustard: The flavor backbone! Dijon adds a subtle, sophisticated tang that’s miles better than yellow mustard here. It brings the “deviled” to the party.
- Salt & freshly cracked black pepper, to taste: Don’t be shy! Seasoning is key. Taste your filling and adjust until it sings.
- 1 small carrot: Our source of bright, sweet beaks! You’ll only need a couple of thin slices. Save the rest for snacking or dipping.
- For the eyes: Black peppercorns OR black sesame seeds: Peppercorns give a classic, bold look. Black sesame seeds are a fantastic, slightly more delicate option, especially if you’re worried about little ones finding a whole peppercorn.
- Optional Garnish: Paprika or fresh chives. A tiny sprinkle of paprika on the “cheeks” adds a warm color and flavor. Minced chives make for cute, grassy garnish on the platter.
Let’s Cook! Your Step-by-Step Guide to Adorable
Follow these steps, lean into the fun, and you’ll have a flock of perfect chicks in no time. I’m talking you through every step with my best tips!
Step 1: The Perfect Hard-Boiled Egg
Place your eggs in a single layer in a saucepan. Cover them with cold water by about an inch. Bring the pot to a full, rolling boil over high heat. The moment it hits that boil, turn off the heat, cover the pot with a tight-fitting lid, and set your timer for 10-12 minutes. (I do 11 minutes for my perfect, set-but-not-green yolks). This “steam” method is my kitchen secret for minimal cracking and perfect doneness every time.
Step 2: The Ice Bath Chill
While the eggs are cooking, prepare an ice bath—a big bowl filled with ice and cold water. As soon as the timer goes off, use a slotted spoon to gently transfer the hot eggs straight into the ice bath. Let them chill for at least 15 minutes. This stops the cooking instantly and, crucial for our cuteness mission, causes the egg to contract from the shell, making them a dream to peel. Pat them dry before moving on.
Step 3: The Great Peel
Gently tap each egg all over on the counter to crackle the shell. Start peeling from the wider end, where there’s usually an air pocket—it gives you a great starting point. Peeling under a tiny trickle of cool running water can help wash away any stubborn shell bits. Your goal: smooth, pristine egg canvases!
Step 4: Careful Surgery & Yolk Prep
This is the most delicate part. Using a sharp paring knife, slice each egg in half lengthwise. Gently pop out the yolks into a medium bowl. Place your hollowed-out egg whites on your serving platter. Now, mash those yolks with a fork until they resemble fine crumbs. This is your blank slate!
Step 5: Creating the Fluffy Filling
To the mashed yolks, add your mayo (or yogurt), Dijon mustard, salt, and pepper. Mash and stir until the mixture is gloriously smooth and creamy. Pro-Tip: For an extra-silky filling, push the mixture through a fine-mesh sieve with the back of a spoon. It’s an extra step, but oh, the texture is divine!
Step 6: Piping the “Chicks” (No Fancy Tools Needed!)
You can spoon the filling back in, but for that iconic fluffy chick shape, piping is the way. No piping bag? No problem! Spoon the filling into a sturdy zip-top bag, push it down to one corner, and snip a ½-inch opening off that corner. Now, pipe a tall, rounded mound of filling into each egg white. Start in the center and swirl upwards to create a little “body.” Don’t worry about making them identical—chicks in a nest aren’t uniform, and that’s part of the charm!
Step 7: The Grand Finale: Faces!
Here’s where the personality shines. Using the tip of your knife, cut tiny triangle slivers from your carrot slice for the beaks. Carefully add two black peppercorns or sesame seeds for eyes. Press them gently into the filling so they stick. Step back and admire your adorable creation! Cover loosely with plastic wrap and chill for at least 30 minutes before serving to let the flavors meld.
How to Serve Your Flock in Style
Presentation is half the fun! Don’t just plop these on a plate. Create a little nest for them. Shred some lettuce (butter lettuce works beautifully) or fresh spinach on a serving platter. Arrange your chick eggs on top. For an extra springy touch, scatter a few halved grape tomatoes (little “Easter eggs!”) or fresh parsley “grass” around the plate. It transforms your appetizer into a centerpiece that’s almost too cute to eat… almost.
Get Creative! Fun Twists on the Classic Chick
Once you’ve mastered the basic chick, the sky’s the limit! Here are a few ways to ride your own flavor wave:
- The “Everything Bagel” Chick: Add 1 tbsp of everything bagel seasoning to the yolk mix. Use everything seasoning and a tiny strip of scallion for the beak!
- The Smoky “Robin’s Egg” Chick: Add ¼ tsp smoked paprika and a tiny pinch of cayenne to the filling. It’s so good! Use a sliver of roasted red pepper for a darker beak.
- The Herb Garden Chick: Stir 1 tbsp of finely minced fresh chives or dill into the yolk mixture. So fresh and springy!
- Avocado-Lime Chick (Dairy-Free): Replace the mayo with mashed ripe avocado and a squeeze of lime juice. The filling will be a lovely pale green—perfect for spring!
- Bunny Rabbits! Skip the beak. Use two thin slivers of almond for bunny ears placed at the narrow end of the egg, and make the eyes with peppercorns. Instant transformation!
Isla’s Kitchen Notes & Stories
This recipe has evolved in my kitchen over countless Easters and spring parties. One year, I ran out of carrots and, in a panic, used tiny slivers of yellow bell pepper for beaks. They were a hit! It taught me that the best cooking is often about playful improvisation.
My biggest tip? Don’t stress the faces. If a beak is a little lopsided, or one chick looks a bit more “surprised” than the others, it just gives them character. I’ve had batches where my kids helped, and the chicks looked wonderfully derpy—and they were devoured the fastest because they were made with laughter. That’s the real secret ingredient. Make the memory, embrace the cute, messy process, and enjoy the delicious, creamy, happy result.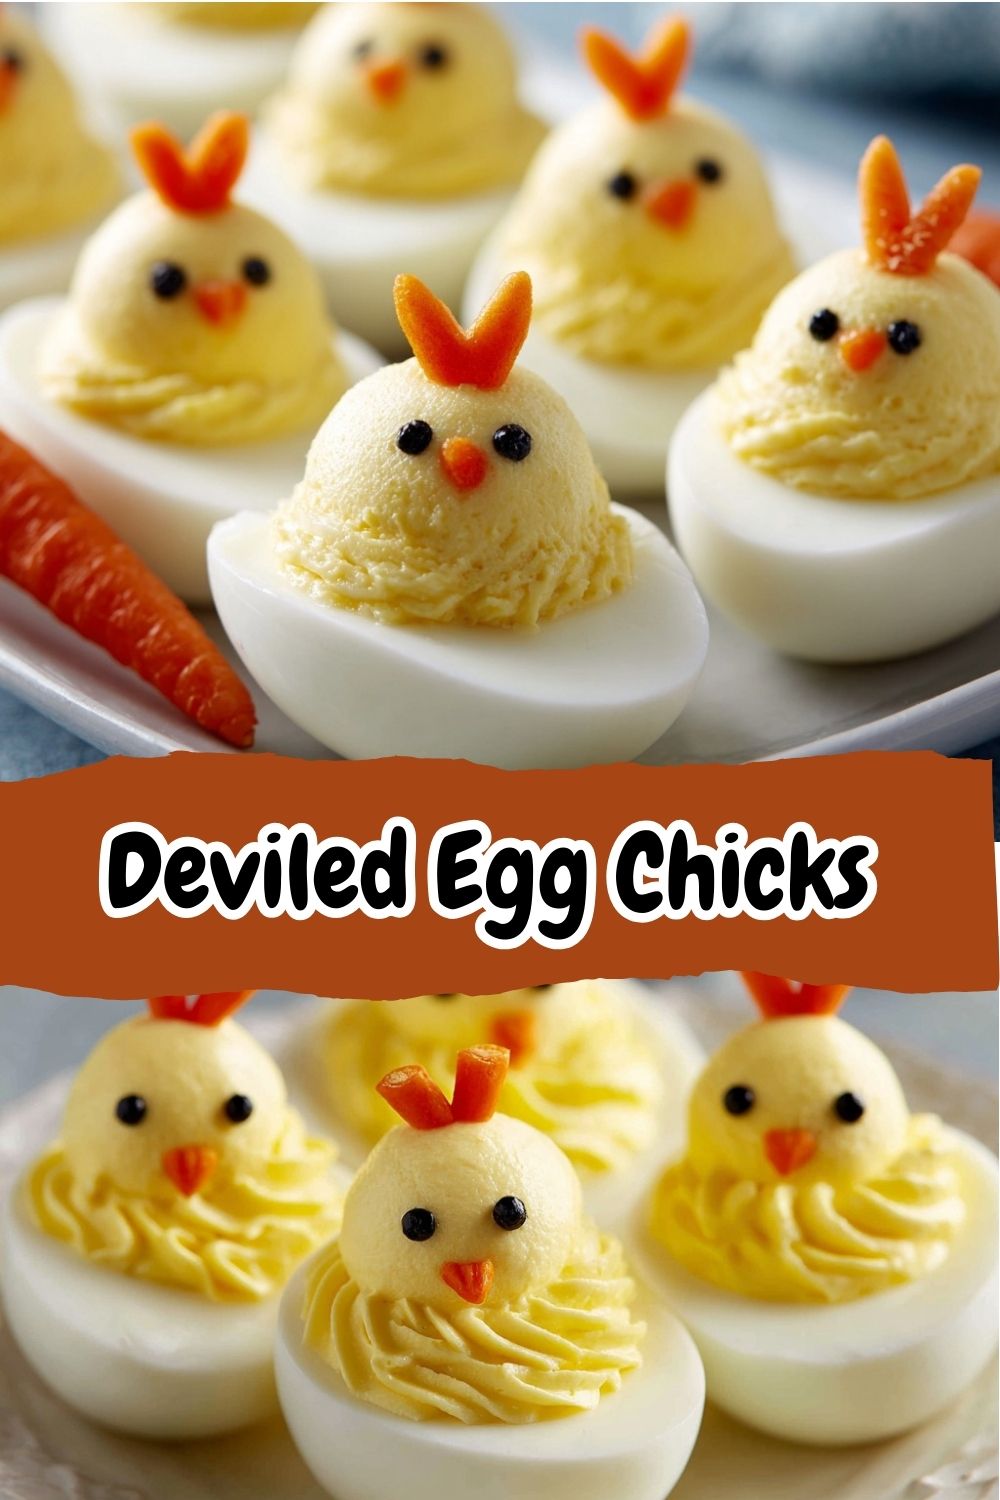
Your Questions, Answered!
Q: My eggs are impossible to peel! They look all lumpy and torn. Help!
A: This is the #1 issue! First, make sure you’re using the ice bath—it’s non-negotiable. Second, slightly older eggs peel better. And third, try steaming them: place eggs in a steamer basket over an inch of boiling water, cover, and steam for 12-13 minutes, then ice bath. Game changer!
Q: Can I make these ahead of time?
A: Absolutely! You can hard-boil and peel the eggs up to 2 days in advance (store them whole in a sealed container). You can also make the filling 1 day ahead and keep it separate in the fridge. However, I recommend assembling the chicks (piping and faces) the day of serving for the freshest look and to prevent the filling from drying out.
Q: My filling is too runny/too dry. How do I fix it?
A: Kitchen environments vary! If it’s too runny, add a little more mashed yolk or a sprinkle of smoked paprika to soak up moisture. If it’s too dry and crumbly, add a teaspoon more of mayo or yogurt at a time until it reaches a smooth, pipeable consistency.
Q: What’s a safe substitute for the peppercorn eyes for young kids?
A: Black sesame seeds are perfect! They’re small, edible, and pose no choking hazard. You can also use the tiniest dots of edible food marker if you have it on hand.
Nutritional Info (Because Knowledge is Power!)
Approximate values per chick half (using mayonnaise):
Calories: 90 | Protein: 6g | Carbohydrates: 1g | Fat: 7g
These are a fantastic source of high-quality protein and healthy fats. Using Greek yogurt will slightly lower the fat and calorie count while adding a bit of protein and probiotics.
There you have it, my friend! Everything you need to create a platter of pure, edible joy. I can’t wait for you to try these. When you do, tag me @BiteTide on Instagram or Pinterest—seeing your kitchen creations absolutely makes my day. Now go forth, pipe with confidence, and get ready for the compliments to roll in. Happy cooking!
– Isla 💛