
The Cookie That Feels Like a Warm Hug (Without Turning On the Oven!)
Hey there, friend! Isla here from BiteTide. Let’s be real: some days, you just need a cookie. Not just any cookie, but one that feels indulgent, looks adorable, and doesn’t leave you with a pile of dishes or a major sugar crash. You want something that whispers, “You’ve got this,” not something that screams, “I spent three hours cleaning up powdered sugar.” Am I right?
Well, pull up a stool and get ready to fall in love. These Date & Walnut Snowball Cookies are my latest obsession, and they’re about to become yours, too. They’re the magical, melt-in-your-mouth kind of treat that’s naturally sweet, packed with good-for-you ingredients, and requires exactly zero baking. We’re talking 10 minutes of prep, a quick whirl in the food processor, and a fun roll in some snowy coconut. That’s it! They’re gluten-free, vegan, and proof that the most delicious things in life are often the simplest. So, let’s ditch the fuss and make some magic together.
Grandma’s Kitchen & The No-Bake Revolution
This recipe takes me right back to my grandma’s cozy, always-warm kitchen. She was the queen of “a little of this, a little of that” cooking, and her counter was always covered in tins of cookies. But during the sweltering summer months in our coastal town, turning on the oven was a hard no. That’s when her no-bake date balls would appear. They were her secret weapon—a treat she could whip up with pantry staples to satisfy a crowd of sun-drenched, hungry kids (and adults!).
I remember standing on a step-stool, my small hands covered in sticky date mixture and shredded coconut, “helping” her roll them into lopsided balls. She’d never call them “snowballs”—that was my addition years later, inspired by their festive, snowy look. To her, they were just “those date things,” but to me, they were pure joy. They tasted like patience, creativity, and love. This recipe is my little homage to her—a nod to the magic of no-bake treats and the memories we make while making them.
Print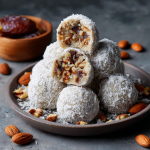
Date & Walnut Snowball Cookies
- Total Time: 10 minutes
- Yield: 14–16 cookies 1x
Description
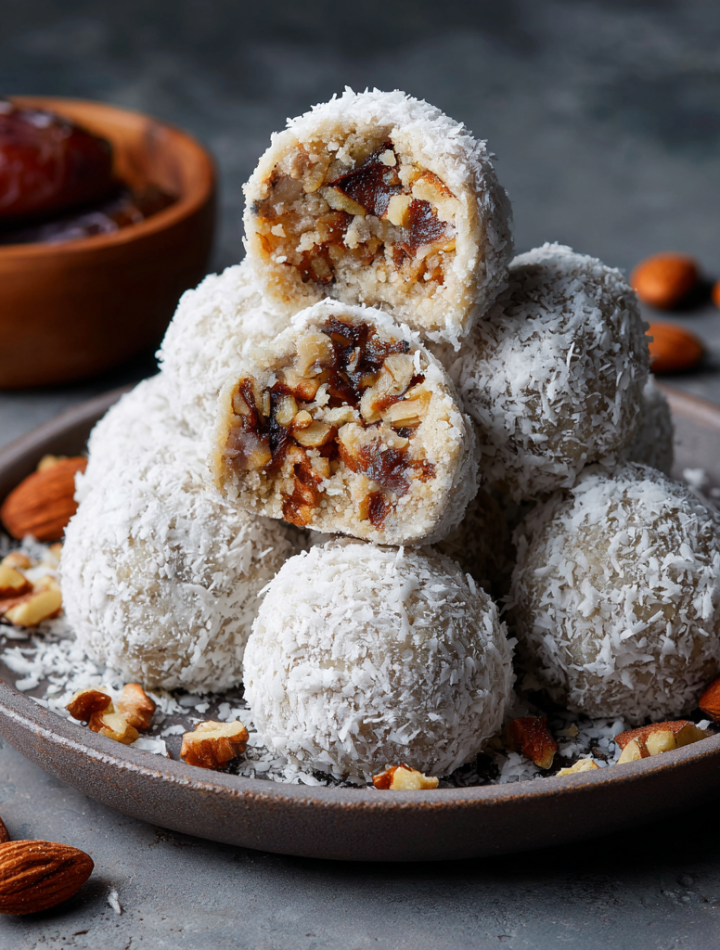
These melt-in-your-mouth snowball cookies are sweetened naturally with dates and packed with heart-healthy walnuts. Rolled in shredded coconut or powdered monk fruit, they bring the festive flair—without the sugar crash. A soft, nourishing treat that looks as magical as it tastes.
Ingredients
1 cup pitted Medjool dates (soaked if dry)
¾ cup walnuts
½ cup almond flour
1 tsp vanilla extract
Pinch of sea salt
Unsweetened shredded coconut or powdered monk fruit (for rolling)
Instructions
In a food processor, blend dates and walnuts until finely chopped and sticky.
Add almond flour, vanilla, and salt. Pulse until the mixture forms a soft dough.
Scoop and roll into 1-inch balls.
Roll each ball in shredded coconut or powdered monk fruit for a snowy finish.
Chill for 20 minutes to firm up, or enjoy straight from the bowl!
- Prep Time: 10 minutes
Nutrition
- Calories: 90
- Fat: 6g
- Protein: 2g
Gather Your Cast of Flavor Characters
Here’s the beautiful part: you only need a handful of simple, whole ingredients to create these little bites of heaven. Let’s break them down!
- 1 cup pitted Medjool dates: These are the MVP (Most Valuable Player!) of our recipe. Medjools are naturally super sweet and caramel-like, and they act as both our sweetener and glue. Chef’s Tip: If your dates seem a bit dry or firm, soak them in hot water for 10 minutes, then drain thoroughly. This brings them back to life and makes them easier to blend!
- ¾ cup walnuts: They give our snowballs a satisfying crunch and a lovely, earthy flavor that pairs perfectly with the sweet dates. Walnuts are also packed with omega-3s—a little brain boost with your treat! Don’t have walnuts? Pecans or almonds work beautifully too.
- ½ cup almond flour: This is our base flour that helps soak up the natural oils and bind everything together without being heavy. It keeps the cookies gluten-free and adds a delicate, nutty flavor. Substitution Tip: Oat flour is a great 1:1 swap if you need a nut-free option.
- 1 tsp vanilla extract: The flavor enhancer! A splash of vanilla deepens all the other flavors and makes the whole kitchen smell amazing.
- Pinch of sea salt: Never, ever skip the salt! It’s the secret weapon that makes the sweet dates and nuts pop. It balances everything out perfectly.
- Unsweetened shredded coconut or powdered monk fruit (for rolling): This is where the “snowball” magic happens! Shredded coconut gives a tropical, textured vibe, while powdered monk fruit (or powdered sugar if you prefer) creates that classic, snowy, melt-in-your-mouth exterior.
Let’s Make Some Magic: Your Foolproof Guide
Ready? This is the easiest “baking” you’ll ever do. No oven required!
- Prep Your Dates. First things first: if you haven’t already, make sure your dates are pitted. If they feel dry, give them a quick 10-minute soak in hot water and then drain them really well. Too much extra water will make our dough sticky and hard to roll.
- Pulse the Base. Toss your dates and walnuts into the bowl of a food processor. Now, pulse it! Don’t just turn it on and walk away—we want a fine, sticky crumb, not walnut butter. Pulse for 30-60 seconds, stopping to scrape down the sides once or twice, until the mixture looks like coarse sand and starts to clump together.
- Bring in the Team. Add the almond flour, vanilla extract, and that all-important pinch of sea salt to the food processor. Secure the lid and pulse again until everything is fully combined and a soft, slightly sticky dough forms. It should look uniform and hold together when you pinch it between your fingers. Chef’s Hack: If the mixture seems too dry and isn’t holding together, add a teaspoon of water or date soak water and pulse again. If it seems too wet, add another tablespoon of almond flour.
- Scoop and Roll. Time for the fun part! Use a small cookie scoop or a tablespoon to portion out the dough. Roll each portion between your palms into a smooth, tight 1-inch ball. This is a great job for little helpers (just warn them the dough is tasty!).
- The Snowy Finish. Pour your chosen “snow” (shredded coconut or powdered monk fruit) into a shallow bowl. Roll each ball in the coating until it’s generously covered. Press gently to help it adhere. The more you roll, the snowier they look!
- Chill Out. For the best texture, pop your beautiful snowballs on a plate or baking sheet and let them chill in the fridge for about 20 minutes. This helps them firm up perfectly. But hey, I won’t tell if you sneak one or two straight away—the cook’s treat!
How to Serve Your Snowy Masterpieces
These cookies are stars all on their own! I love to pile them high on a rustic wooden board or a pretty vintage plate for a casual, inviting look. They’re the perfect companion to your afternoon coffee or tea—that little sweet bite that makes a moment feel special. For a festive party platter, arrange them alongside some dark chocolate pieces and fresh berries. They also make incredibly thoughtful, homemade gifts. Tuck a few into a small cellophane bag, tie it with a ribbon, and you’ve just made someone’s day.
Ride the Flavor Wave: Fun Variations to Try
The best thing about this recipe is how adaptable it is! Here are a few ways to make it your own:
- Chocolate Dip: Melt some dark chocolate and dip half of each chilled cookie into it. Place on parchment paper to set for a decadent, dessert-worthy treat.
- Orange Zest Zing: Add the zest of one orange to the food processor with the almond flour for a bright, citrusy twist that cuts through the sweetness.
- Ginger Spice: Love a little warmth? Add ¼ teaspoon of ground ginger or even some finely chopped crystallized ginger to the mix.
- Nut-Free Version: Swap the walnuts for sunflower seeds and use oat flour instead of almond flour. You’ll get the same great texture and a totally nut-free snack!
- Cookie Dough Bites: Craving cookie dough? Roll these without the coconut coating and enjoy them as delicious, safe-to-eat-raw cookie dough bites.

Isla’s Chef Notes & Kitchen Confessions
This recipe has been through many iterations in my kitchen! The first time I made them, I was so excited I forgot the salt. They were… fine. But fine isn’t what we’re going for! That one pinch truly makes all the difference. Another time, my food processor was on its last leg, and I may have slightly over-pulsed the mixture, making it a little pasty. Lesson learned: pulse, don’t puree!
These cookies have also been a lifesaver for last-minute potlucks and those “I need something sweet NOW” moments. They’ve been shaped by little hands (some more oblong than round, which is absolutely perfect), and they’ve been the subject of many a happy dance when the coconut sticks just right. The recipe is forgiving, so don’t stress. Cooking is supposed to be fun, remember? Embrace the sticky fingers and enjoy the process.
Your Questions, Answered!
Q: My mixture is too dry and won’t stick together. What did I do wrong?
A: No worries! This usually happens if the dates were a bit too dry to begin with. The fix is easy. Add water, one teaspoon at a time, and pulse again until the dough comes together. It should feel like Play-Doh.
Q: Can I use a blender instead of a food processor?
A: I highly recommend a food processor for this. A blender tends to need more liquid to get things moving, which can make our dough too wet. If a blender is all you have, pulse in very short bursts and scrape down the sides constantly to avoid overworking the motor.
Q: How should I store these, and how long do they last?
A: Because they’re moist, they’re best kept in an airtight container in the fridge. They’ll stay perfect for up to a week! You can also freeze them for up to 3 months. Just let them thaw in the fridge before serving.
Q: My hands are getting super sticky while rolling. Help!
A: Welcome to the club! This is totally normal. A little chef’s hack: lightly dampen your hands with water or a tiny bit of oil. This creates a barrier and prevents the dough from sticking to you as much.
Nutritional Info (Per Cookie – approx.)
This is just an estimate, as ingredients can vary, but it’s a great guideline!
- Calories: 90
- Protein: 2g
- Carbs: 8g
- Fat: 6g
- Naturally sweetened, gluten-free, and vegan
Prep Time: 10 mins | Chill Time: 20 mins (optional) | Servings: Makes 14–16 cookies