 Crispy Pickle Cheese Bites: Your New Snack Obsession
Raise your hand if you’ve ever stood in front of the fridge, door wide open, on a heroic quest for the perfect snack. You know the one. It needs to be salty, crunchy, creamy, and deeply satisfying—something that hits every single craving button without requiring a culinary degree to make. We’ve all been there. And after one too many snack fails (dry crackers, I’m looking at you), I became a woman on a mission. I tinkered, I tested, and I may have eaten my weight in pickles and cheese, all in the name of snack science. The glorious, golden result? These Crispy Pickle Cheese Bites.
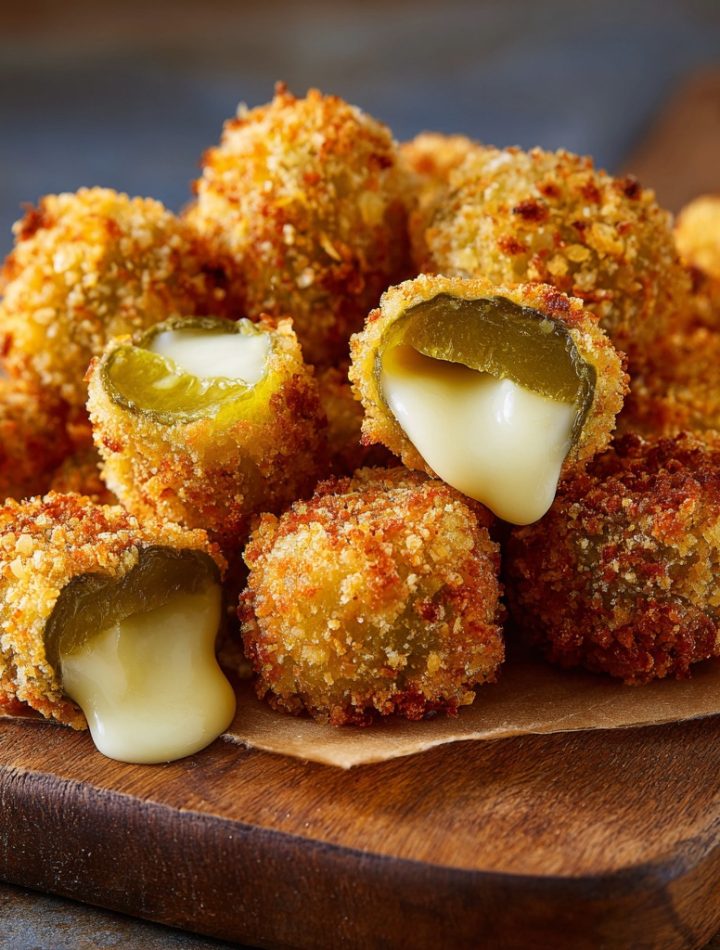
Imagine this: a cool, tangy dill pickle, hugged by a blanket of melty, gooey cheese, all encased in a shatteringly crisp, seasoned crust. It’s hot, it’s cold, it’s creamy, it’s crunchy. It’s a flavor and texture party in every single bite. Whether you’re gearing up for game day, hosting a last-minute gathering, or simply treating yourself to a next-level movie night, these bites are your secret weapon. They come together with minimal fuss, disappear with maximum speed, and are guaranteed to make you the snack hero of any occasion. So, tie on your apron, and let’s make some magic happen. Your taste buds are about to send you a thank-you note.
The Pickle Jar Epiphany
My love for the pickle-cheese combo isn’t just a happy accident; it’s baked into my food DNA. Some of my earliest (and loudest) kitchen memories are from my grandma’s house. She’d make these incredible, from-scratch sour dills every summer, and the whole place would smell like vinegar and dill for days. The rule was you couldn’t touch them for at least six weeks while they fermented. The anticipation was agony for a kid!
But the real magic happened on lazy Saturday lunches. My dad would build what he called “The Coastal Tower”: a thick slice of rustic bread, a slab of sharp cheddar, and right on top, one of Grandma’s crisp, cold pickles. He’d eat it open-faced, and I’d watch, mesmerized, as the cheese softened just slightly from the pickle’s chill and brine. That perfect bite of sharp, creamy, tangy, and crunchy was my first taste of true flavor harmony. These Crispy Pickle Cheese Bites are my fried, party-ready love letter to that simple, perfect combination. They take that nostalgic tower and turn the volume all the way up, capturing that same joyful contrast in a hot, handheld, utterly irresistible package.
Print
Crispy Pickle Cheese Bites : Crunchy, Cheesy Irresistible Snack
- Total Time: 20 minutes
- Yield: 12–16 bites 1x
- Diet: Vegetarian
Description
Crunchy, cheesy bites featuring tangy pickles wrapped in crispy, golden‑fried cheese — an irresistible snack that’s perfect for parties or cravings.
Ingredients
- 1 cup dill pickle slices (drained and patted dry)
- 8 oz cheddar cheese, cut into small cubes
- 1 cup panko breadcrumbs
- 1/2 cup all‑purpose flour
- 2 large eggs, beaten
- 1/2 tsp garlic powder
- 1/2 tsp paprika
- Salt and pepper (to taste)
- Oil for frying (vegetable or canola)
Instructions
- Prepare three shallow bowls: one with flour seasoned with garlic powder, paprika, salt, and pepper; one with beaten eggs; one with panko breadcrumbs.
- Wrap each pickle slice with a cube of cheddar cheese, pressing gently so the cheese adheres.
- Coat each cheese‑wrapped pickle first in seasoned flour, shaking off excess.
- Dip into the beaten eggs, then press into panko breadcrumbs ensuring full coverage.
- Heat about 1 inch of oil in a large skillet over medium heat until shimmering.
- Carefully place coated pickle cheese bites into the hot oil and fry until golden brown and crispy, about 1–2 minutes per side.
- Remove with a slotted spoon and drain on paper towels.
- Serve hot with your favorite dipping sauce (ranch, spicy mayo, or mustard dip).
Notes
- For extra crispiness, double‑coat in egg and breadcrumbs.
- Keep bites chilled before frying to help the cheese stay intact.
- Serve immediately — these are best enjoyed hot and crispy.
- Prep Time: 10 minutes
- Cook Time: 10 minutes
- Category: Snack
- Method: Frying
- Cuisine: American
Nutrition
- Serving Size: 3 bites
- Calories: 230 kcal
- Sugar: 1 g
- Sodium: 450 mg
- Fat: 15 g
- Saturated Fat: 7 g
- Unsaturated Fat: 6 g
- Trans Fat: 0 g
- Carbohydrates: 15 g
- Fiber: 1 g
- Protein: 8 g
- Cholesterol: 50 mg
Keywords: crispy pickles, cheese bites, snack, party appetizer, fried pickles
Gathering Your Flavor Wave
Here’s everything you need to create these crunchy wonders. Don’t stress about perfection—this is a choose-your-own-adventure snack! I’ve included my chef-y insights and swaps so you can make it work with what you’ve got.
- Dill Pickle Chips or Spears: The star of the show! Go for the cold, crisp, refrigerated kind if you can find them—they have the best snap. Chef Insight: Patting them bone-dry with paper towels is the most crucial step for a non-soggy crust. Trust me on this!
- Mozzarella or Cheddar Cheese: I use low-moisture, part-skim mozzarella blocks for that epic, stretchy pull. Sharp cheddar gives a bolder, tangier punch. Substitution Tip: Any good melting cheese works! Pepper jack for spice, gouda for smokiness, or even a dairy-free melty block for a vegan version.
- All-Purpose Flour: Our first coating layer. It creates a “glue” for the egg to stick to. Chef Hack: Season this flour with a pinch of garlic powder and salt to build flavor from the inside out.
- Eggs: Nature’s best binding agent. A quick beat is all they need. Substitution Tip: For an egg-free version, a thick buttermilk or even a flax egg can work in a pinch.
- Breadcrumbs or Panko: Panko (Japanese-style breadcrumbs) is my go-to for an ultralight, extra-crispy, shattery crust. Regular breadcrumbs give a denser, classic crunch. Flavor Boost: This is where you can get creative! Mix in grated Parmesan, everything bagel seasoning, or a bit of cayenne.
- Garlic Powder & Paprika: The dynamic duo for seasoning. Garlic powder adds savory depth, and paprika gives a subtle sweetness and gorgeous color. Smoked paprika is a fantastic twist!
- Salt & Black Pepper: Season every layer for balanced flavor. Go easy on the salt if your pickles and cheese are already salty.
- Oil for Frying or Air Frying: For frying, use a neutral oil with a high smoke point like canola, vegetable, or avocado oil. For air frying, a quick spritz of cooking spray is all you need for golden perfection.
Let’s Build Some Bites: A Step-by-Step Guide
Ready to get your hands a little messy? This process is super satisfying. I’ll walk you through each step with all my favorite hacks to ensure golden, cheesy success.
- The Wrap: Take a well-dried pickle piece and a small block of cheese. The cheese piece should be just big enough to wrap around the pickle’s middle. Press and mold the cheese around the pickle, sealing the edges as best you can. It doesn’t have to be a masterpiece—just make sure it’s snug! Pro Tip: Pop your wrapped bites on a plate and into the freezer for 10-15 minutes. This firms everything up, making the breading process MUCH easier and preventing cheese blowouts during cooking.
- Set Up Your Breading Station: This is key for efficiency and clean(ish) hands! Get three shallow bowls. In Bowl 1: your seasoned flour. Bowl 2: beaten eggs. Bowl 3: breadcrumbs mixed with garlic powder, paprika, salt, and pepper. Line them up in that order: Flour, Egg, Crumbs. I keep one hand for dry steps (flour and crumbs) and one for the wet egg step. Trust me, it’s a game-changer for avoiding “club hand.”
- The Breading Ballet: Gently roll a cheese-wrapped pickle in the flour, tapping off the excess. This dry layer helps the egg adhere. Next, dunk it fully into the egg, letting any excess drip back into the bowl. Finally, roll it in the seasoned crumbs, pressing gently so they stick in an even, glorious coat. For an extra-craggy, extra-crispy crust, repeat the egg and breadcrumb steps for a double coat. It’s worth the extra 30 seconds!
- The Cooking Method: You have two fantastic options here!
- For Frying (The Classic Crisp): Heat about 1 inch of oil in a heavy pot to 350°F (175°C). No thermometer? Test with a breadcrumb—it should sizzle vigorously. Fry the bites in batches for 2-3 minutes, turning once, until they’re a deep, golden brown. Don’t crowd the pan, or the oil temp will drop and make them greasy.
- For Air Frying (The Easy Clean-Up): Preheat your air fryer to 390°F (200°C). Arrange bites in a single layer, not touching. Spritz lightly with oil. Cook for 6-8 minutes, flipping halfway through, until golden and crispy. The cheese will be perfectly molten inside!
- The Finale: Transfer your beautiful, golden bites to a wire rack set over a paper towel. This keeps them crisp on all sides instead of getting steamy on a plate. Let them cool for just a minute—that cheese is lava-hot!—then serve immediately.
How to Serve & Devour
Presentation is part of the fun! I love piling these warm, crispy bites high on a big platter or in a rustic bowl. Scatter some extra fresh dill or parsley around for a pop of green. Now, the most important part: the dips. Offer a few little bowls of different sauces so everyone can dunk and decide. My must-haves are a classic cool, herby ranch dressing and a spicy mayo (just mix sriracha into mayo to your heat level). The contrast of the cool, creamy dip with the hot, crunchy bite is absolutely magical. Get ready for these to vanish in minutes!
Ride Your Own Flavor Wave: Fun Variations
Once you master the basic bite, the world is your pickle! Here are a few ways to mix it up:
- Spicy Everything: Use pepper jack cheese and add ½ tsp of cayenne or chipotle powder to the breadcrumbs. Serve with a jalapeño ranch dip.
- Reuben-Inspired: Swap dill pickles for sliced corned beef and use Swiss cheese. Add a little caraway seed to the breadcrumbs and serve with Thousand Island dressing.
- Italian Zest: Mix grated Parmesan and Italian herbs into the breadcrumbs. Serve with a warm marinara sauce for dipping.
- Gluten-Free & Keto-Friendly: Use almond flour or crushed pork rinds for the initial coating and crushed pork rinds or grated Parmesan for the outer crust. They crisp up beautifully!
- Baked, Not Fried: For a hands-off approach, place breaded bites on a parchment-lined baking sheet, spray generously with oil, and bake at 425°F (220°C) for 12-15 minutes, flipping once.

Isla’s Kitchen Confidential
This recipe is a living, breathing thing in my kitchen! It started as a messy experiment during a big football game—I was trying to replicate a state fair food and just started wrapping things in other things. The first batch was… a lesson. The cheese oozed out everywhere, creating a delicious but chaotic cheese-crisp in the oil. Hence, the “freeze before frying” hack was born out of delicious necessity!
These bites have become my go-to for potlucks because they travel surprisingly well. I’ll make them ahead, let them cool completely, and then re-crisp them in the air fryer for 3-4 minutes right before serving. They come back to life perfectly! The biggest compliment I ever get? When someone bites into one, closes their eyes, and does a little happy dance. That’s the whole point of BiteTide—creating those pure, joyful food moments. Don’t be afraid to make them your own!
Your Questions, Answered!
Q: My cheese keeps leaking out during frying! What am I doing wrong?
A: The number one culprit is not sealing the cheese well enough or the cheese being too warm. Make sure you really press and mold the cheese around the pickle. And don’t skip that 10-15 minute freezer chill after wrapping! It solidifies the cheese, giving it time to melt inside the coating instead of rushing out.
Q: Can I make these ahead of time?
A: Absolutely! You can bread the bites fully, lay them on a baking sheet, and freeze them solid. Once frozen, transfer to a freezer bag. Cook them straight from frozen, adding 1-2 extra minutes to the cooking time. No need to thaw!
Q: Why are my bites soggy/not crispy?
A: Two likely issues: 1) The pickles weren’t dry enough. Pat, pat, pat until no moisture remains. 2) The oil wasn’t hot enough. If the oil isn’t at a steady 350°F, the bites will soak up oil instead of quickly searing. Use a thermometer if you have one—it’s a lifesaver for frying.
Q: Air fryer vs. deep fryer—what’s the real difference?
A: Deep frying gives you that ultimate, all-around, shattering crispiness with a slightly richer flavor. The air fryer gives you a fantastic, lighter crisp with way less oil and cleanup. Both are winners! The air fryer version is a tad less “indulgent” tasting but still incredibly satisfying and my go-to for a quick weeknight treat.
Nutritional Information*
*Please note: This is an estimated nutritional breakdown based on a standard recipe using frying and serves as a general guide. Values can vary based on specific ingredients, cheese used, and cooking method (air frying will reduce fat content).
Yield: About 24 bites | Serving Size: 2-3 bites
Per Serving (approx.): Calories: ~190 | Total Fat: 13g | Saturated Fat: 5g | Cholesterol: 45mg | Sodium: 480mg | Total Carbohydrates: 11g | Dietary Fiber: 1g | Sugars: 1g | Protein: 7g