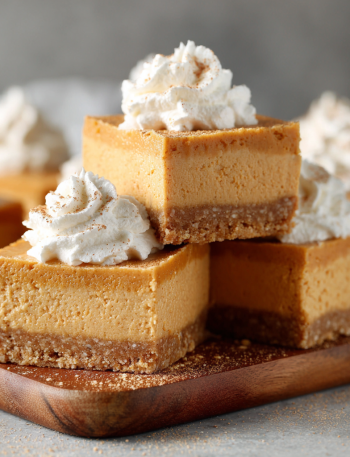
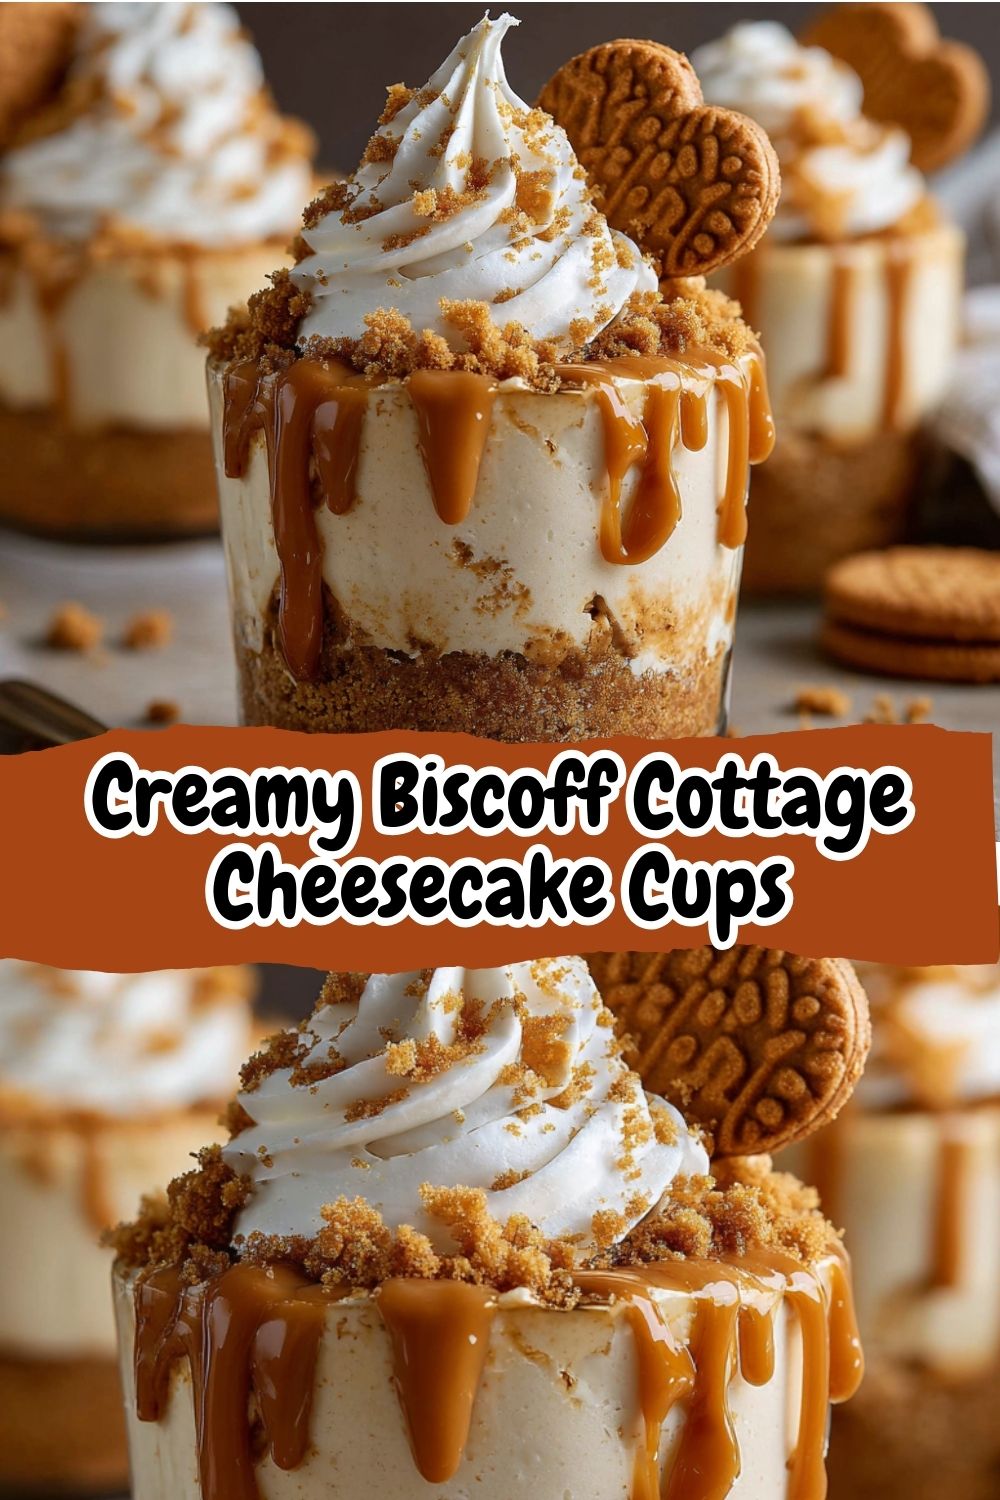
No-Bake Biscoff Cheesecake Cups: Your New Favorite Dessert Obsession
Hey, friend! Isla here. Can we talk about cravings for a sec? Some days, it’s a deep, soul-level need for a thick, fudgy brownie. Other days, it’s a bright, zesty lemon bar that calls your name. But then… there are those magical, universal cravings. The ones that whisper one word: Biscoff. You know the one. That warm, spiced, caramelized cookie flavor that feels like a hug for your taste buds. If you’ve ever found yourself sneaking just one more cookie from the airline packet (no judgment here!), then you, my friend, are in for the treat of a lifetime.
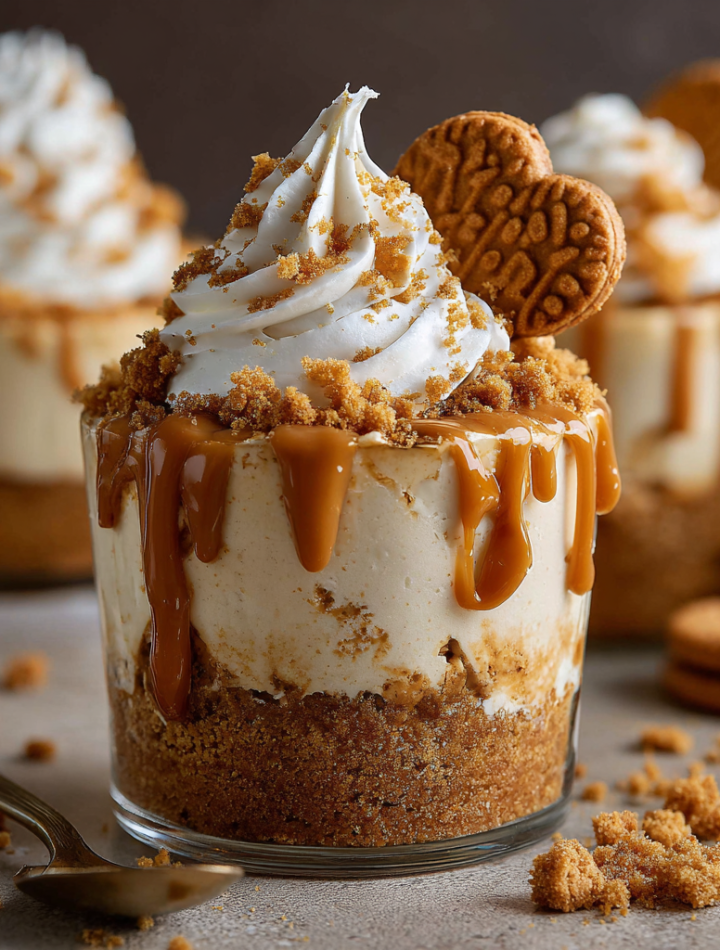
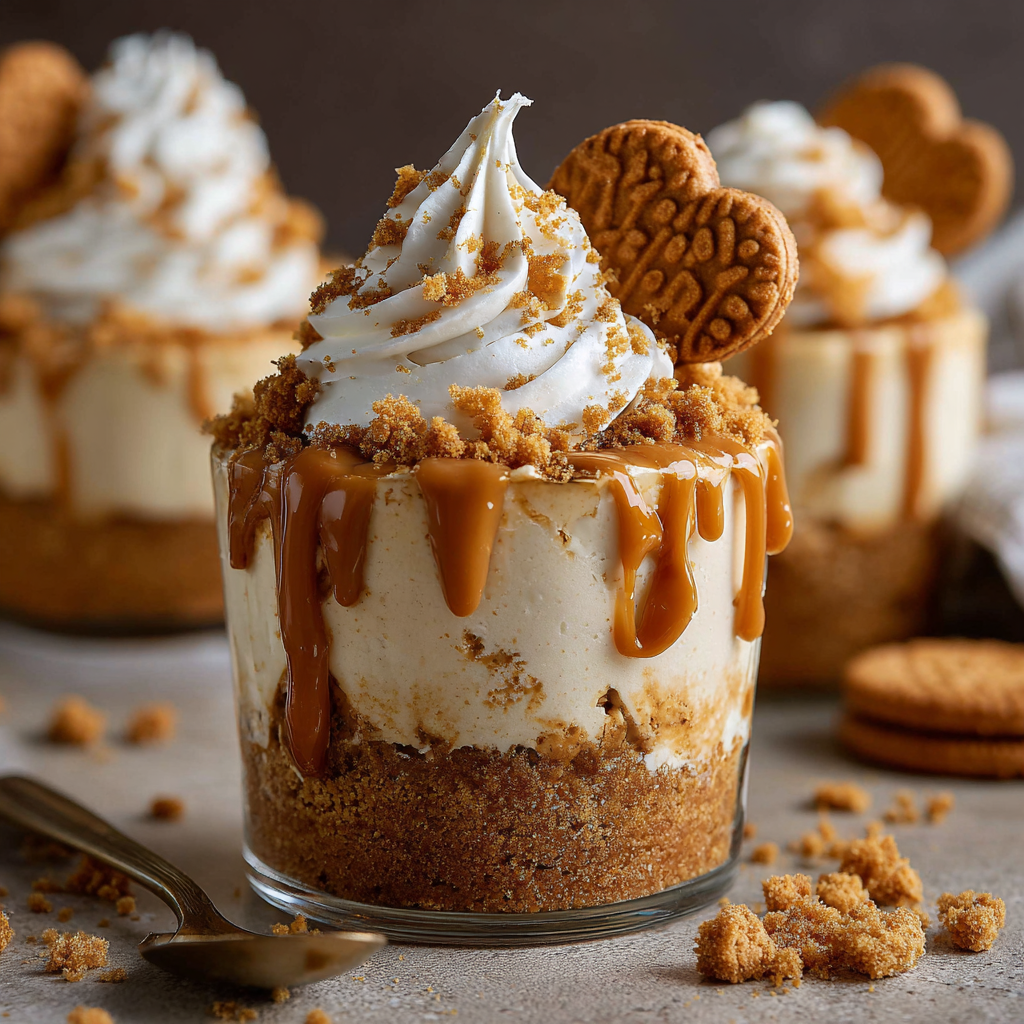
Today, we’re riding the flavor wave straight to dessert heaven with my Creamy Biscoff Cottage Cheesecake Cups. This is the no-bake, dreamy, cookie-loaded delight you didn’t know your life was missing. We’re talking a rich, velvety blend that’s secretly packed with protein, all nestled on a crunchy Biscoff crust and drowned in a river of melted cookie butter. It’s the kind of dessert that looks like you spent hours in a fancy patisserie, but guess what? You barely have to break a sweat.
I designed this recipe for real life. For busy weeknights when you need a sweet fix, fast. For last-minute get-togethers where you want to impress without the stress. And for those glorious moments when you just need to stand in the kitchen with a spoon and a jar of cookie butter—because you deserve it. So, grab your favorite blending appliance and let’s make some magic together. This isn’t just a recipe; it’s your new secret weapon for instant joy.
Print
Creamy Biscoff Cottage Cheesecake Cups
- Total Time: 20 minutes
- Yield: 12 cheesecake cups 1x
Description
A rich, velvety blend of cottage cheese and Greek yogurt meets the iconic flavor of Biscoff in this no-bake cheesecake twist. With double the servings and a few bold upgrades, these cups are layered heaven—sweet, spiced, and impossibly smooth.
Ingredients
Filling
3 cups cottage cheese (2% Good Culture recommended)
1 cup plain Greek yogurt (Greek Gods for extra creaminess)
4 tbsp maple syrup
1/2 cup Biscoff cookie butter
1 tbsp vanilla bean paste
Optional: pinch of cinnamon for warmth
Crust
4 cups crushed Biscoff cookies
1/4 cup melted butter (salted for contrast)
Topping
2/3 cup melted Biscoff cookie butter
Optional: crushed cookies, white chocolate curls, or flaked sea salt
Instructions
Mix crushed Biscoff cookies with melted butter. Press into the bottom of cups or jars to form the crust. Chill 10 minutes.
In a blender or food processor, blend cottage cheese, Greek yogurt, maple syrup, cookie butter, vanilla, and cinnamon until ultra-smooth.
Spoon or pipe the filling over the crust layer. Smooth tops.
Drizzle melted Biscoff butter on top. Chill for at least 2 hours.
Garnish with crushed cookies, white chocolate curls, or a tiny pinch of sea salt for contrast.
- Prep Time: 20 mins
- Category: Dessert
Nutrition
- Calories: 270
- Sugar: 12g
- Fat: 16g
- Carbohydrates: 21g
- Protein: 8g
The Day I Fell in Love with a Cookie
My obsession with Biscoff didn’t start in some fancy kitchen. Oh no. It started at 30,000 feet. I was on my way back from a food blogging conference, feeling totally inspired but also completely exhausted. You know that feeling—your brain is full of ideas, but your body is just… done. The flight attendant came down the aisle with that little cart, and she handed me a small packet of cookies I’d never seen before. “Speculoos,” she said with a smile.
I tore it open, not expecting much. But that first bite? Life-changing. It was like someone had bottled the cozy, spiced essence of Christmas morning and the toasty warmth of caramel all into one perfect, crispy cookie. I immediately flagged down the flight attendant and, with zero shame, asked for three more packets. I spent the rest of the flight crumbling them into my notebook, brainstorming what I could create. A pie? A cheesecake? A sauce? The ideas were flowing faster than the coffee they were serving!
That little packet of joy sparked a full-blown love affair. It reminded me that the best flavors often come from the simplest, most unexpected places. It took me back to my grandma’s kitchen, where she’d add a pinch of cinnamon or nutmeg to the most ordinary things, transforming them into something extraordinary. These cheesecake cups are my homage to that feeling—to the magic of discovery and the pure, uncomplicated joy of a really, really good cookie.
Gathering Your Flavor Arsenal
Here’s the beautiful part: this recipe keeps it simple with powerhouse ingredients. Each one plays a crucial role in creating that perfect, silky, craveable texture and deep flavor. Let’s break it down!
For the Filling:
- 3 cups cottage cheese (2% Good Culture recommended): Don’t you dare scrunch your nose! This is our secret weapon. It creates an incredibly rich and thick base that’s packed with protein, making this dessert feel indulgent but not overly heavy. I specifically love Good Culture brand because it’s consistently creamy and not watery or overly curdy. Chef’s Insight: If you’re skeptical, trust the process! Blending it transforms it completely—you won’t taste “cottage cheese,” I promise.
- 1 cup plain Greek yogurt (Greek Gods for extra creaminess): This adds a lovely tang that balances the sweetness and contributes to the ultra-smooth, mousse-like texture. Using a full-fat, extra-creamy brand like Greek Gods or Fage 5% makes a noticeable difference in luxury. Substitution Tip: Sour cream works in a pinch for a slightly tangier result!
- 4 tbsp maple syrup: Our natural sweetener! It adds a delicate, earthy sweetness that pairs beautifully with the warm spices in the Biscoff. Substitution Tip: Honey or agave nectar would work just fine here.
- 1/2 cup Biscoff cookie butter: The star of the show! This is where that iconic, spiced, caramelized flavor comes from. You can find it in jars near the peanut butter in most grocery stores.
- 1 tbsp vanilla bean paste: Vanilla is the flavor bridge that ties everything together. I prefer the paste over extract for those gorgeous little bean specks and its more robust, pure flavor. Substitution Tip: An equal amount of good-quality vanilla extract will work if that’s what you have.
- Optional: pinch of cinnamon for warmth: This is my little flavor boost! It just amplifies the cozy, spiced notes already in the cookie butter. Don’t skip it if you have it!
For the Crust:
- 4 cups crushed Biscoff cookies: That’s about one and a half standard packages. You’ll want fine crumbs for a firm base that holds together. Chef’s Hack: Toss the whole cookies into a zip-top bag and use a rolling pin to crush them. It’s a great way to get out any stress!
- 1/4 cup melted butter (salted for contrast): The glue for our crust! The salted butter provides a tiny, savory contrast that makes the sweet, spiced cookie crumbs absolutely sing. Substitution Tip: For a dairy-free version, melted coconut oil works perfectly.
For the Topping:
- 2/3 cup melted Biscoff cookie butter: Because more is more! Melting it makes it pourable so you can create that gorgeous, drippy, Instagram-worthy waterfall effect.
- Optional: crushed cookies, white chocolate curls, or flaked sea salt: The finishing touches! A little extra crunch, a flourish of white chocolate, or a tiny pinch of flaky sea salt to cut through the sweetness and elevate the whole thing to chef’s-kiss perfection.
Let’s Build Some Deliciousness: Step-by-Step
Ready? This is the fun part. Put on some good music, clear a little space on your counter, and let’s create these little jars of happiness.
- Crush and Conquer: First up, let’s make that crust. Get those Biscoff cookies into a sturdy zip-top bag. Seal it tightly, leaving just a little air inside. Now, take your rolling pin (or a heavy-bottomed glass or can!) and roll over the bag with purpose until you have beautiful, fine crumbs. You want them to be like sand—this ensures your crust will hold together when you take a bite. Chef’s Hack: No rolling pin? Pulse the cookies in your food processor! It’s faster and creates super even crumbs.
- Butter Up: Pour your beautiful crumbs into a medium bowl. Drizzle the melted salted butter over the top. Now, get in there with a fork (or your hands!) and mix until every single crumb is moistened and the mixture looks like wet sand. It should hold together when you pinch it. This buttery magic is what gives us that solid, snappy base.
- Form the Foundation: Grab your cups or jars—I use 8 oz mason jars because they’re adorable, but any clear glasses or even a muffin tin with liners will work. Divide the crumb mixture evenly among them. Use the bottom of a small glass or a tamper to press the crumbs down firmly and evenly. This is key for a crust that won’t fall apart! Pop them in the fridge to set for at least 10 minutes while you make the filling.
- Blend ‘Til Dreamy: Now, for the main event! To your blender or food processor, add the cottage cheese, Greek yogurt, maple syrup, 1/2 cup of cookie butter, vanilla bean paste, and that optional pinch of cinnamon. Now, blend! Start on low and gradually increase to high. Let it run for a good 1-2 minutes. You are looking for a completely smooth, velvety, pale mixture. Chef’s Pro Tip: Stop and scrape down the sides once or twice to ensure everything gets incorporated. The patience here is SO worth it for that silky texture.
- The Grand Layering: Pull your chilled crusts out of the fridge. You can spoon the filling on top, but for a super clean look, I love to pipe it! Just spoon the filling into a large zip-top bag, snip off one corner, and pipe it gently over the crust. Smooth the tops with the back of a spoon. Ah, look at that—already so beautiful!
- The Biscoff Waterfall: Time for the pièce de résistance! Gently melt the remaining 2/3 cup of cookie butter in the microwave in 20-second bursts, stirring in between. You want it warm and pourable, not scorching hot. Now, take a spoon and drizzle that liquid gold all over the top of each cheesecake cup. Watch it cascade down the sides—it’s pure dessert art.
- The Final Countdown (Chill Time!): I know, I know. The wait is the hardest part. But trust me, it’s non-negotiable. Carefully place the cups in the refrigerator and let them chill for at least 2 hours, though 4 or even overnight is ideal. This allows the filling to firm up perfectly and the flavors to marry and become absolute best friends.
- Garnish and Devour: Once they’re perfectly chilled, it’s time for the final flourish! Right before serving, add a sprinkle of crushed Biscoff crumbs, a few white chocolate curls, or that magical tiny pinch of flaky sea salt. Then, grab a spoon, dig in, and prepare for your mind to be blown.
How to Serve These Little Masterpieces
Presentation is part of the fun! These individual cups are already a serving dream. I love to line them up on a wooden board or a fancy tray for a gathering—they look incredible and make everyone feel special with their own personal dessert. For an extra touch, place a little Biscoff cookie on the saucer next to the jar or add a sprig of mint for a pop of color. They are perfect straight from the fridge, cold, creamy, and utterly satisfying. Serve them with a small spoon to make the joy last just a little bit longer!
Ride Your Own Flavor Wave: Creative Twists!
The beauty of this recipe is its amazing versatility. Once you’ve mastered the base, the world is your flavor oyster! Here are a few of my favorite twists:
- Chocolate Lover’s Dream: Swap the Biscoff cookie butter in the filling for Nutella or a dark chocolate spread. Use crushed chocolate wafer cookies or Oreos (filling removed) for the crust!
- Peanut Butter Cup: Use creamy peanut butter instead of Biscoff butter in the filling, and a crust made from crushed Nilla wafers or graham crackers. Drizzle with melted chocolate and chopped peanuts.
- Lemon Berry Brightness: Keep the Biscoff crust, but add the zest of one lemon to the filling. After chilling, top with a layer of fresh macerated strawberries or raspberries instead of the cookie butter drizzle.
- Mocha Madness: Add 1-2 tablespoons of instant espresso powder or strong cooled coffee to the filling blend. Use a chocolate cookie crust for a full coffee-chocolate experience.
- Dairy-Free Delight: Use a plant-based cottage cheese and yogurt (Kite Hill makes great ones!), and swap the butter for coconut oil in the crust. Ensure your Biscoff is vegan-friendly (it usually is!).
Isla’s Chef Notes & Kitchen Stories
This recipe has become a staple in my house, but it had a… gritty beginning. The first time I tested it, I was impatient. I didn’t blend the cottage cheese long enough. The result was, well, let’s just say it had a interesting “textural component” that my taste-testers (a.k.a. my friends) were too polite to fully criticize. I saw the slightly confused looks on their faces and knew I had to go back to the drawing board.
The lesson? BLEND. UNTIL. SMOOTH. I cannot stress this enough. You need to let that machine run for a full minute or two. You should hear the sound of the motor change to a higher pitch—that’s how you know it’s done. That one change transformed this from a “maybe” to a “OH MY GOSH, WHAT IS THIS SORCERY?!” kind of recipe. It’s also evolved to include the Greek Gods yogurt because I found it added an extra layer of creamy tang that just sent it over the top. Don’t be afraid to play and make it your own—that’s what cooking is all about!
Your Questions, Answered!
Q: My filling is a bit runny after blending. What did I do wrong?
A: This usually happens for one of two reasons! First, your cottage cheese or yogurt might have had more liquid than usual. Next time, you can strain your Greek yogurt in a cheesecloth for 15 minutes beforehand for a thicker result. Second, it might just need more blending! The friction from the blender can sometimes warm the mixture slightly, making it seem softer. Just pop the entire mixture (in the jar) into the fridge for 20-30 minutes before piping—it will firm up beautifully.
Q: Can I make one big cheesecake instead of individual cups?
A: Absolutely! This works great in a 9-inch springform pan. Just press the crust mixture firmly into the bottom and up the sides about an inch. Add the filling, smooth the top, and drizzle with the melted cookie butter. You’ll need to chill it for at least 6 hours, preferably overnight, to ensure it’s fully set before slicing.
Q: I can’t find Biscoff cookie butter! What can I use instead?
A> No problem! Any speculoos cookie butter will work. If you’re in a real pinch, you can mimic the flavor by using smooth peanut butter or almond butter and adding a teaspoon of cinnamon and a tablespoon of molasses to the filling. It won’t be identical, but it will still be delicious!
Q: How long do these keep in the fridge?
A: They keep incredibly well! Store them covered tightly in the refrigerator for up to 5 days. The crust might soften slightly after day 3, but they will still taste amazing. I do not recommend freezing them, as the texture of the creamy filling can become watery when thawed.
Nutritional Information*
*This is an estimate provided for informational purposes only. Calculations will vary based on your specific ingredients and brands.