
Your New Favorite Easter Tradition: The No-Mold Coconut Bunny Cake
Hey there, friend! Isla here, waving a flour-dusted hand from my kitchen. Can you feel it? That fizzy, hopeful energy in the air? Spring is whispering through the open window, and Easter is just around the corner, bringing with it the promise of pastel colors, family gathered around the table, and, let’s be real, all the delicious desserts.
But here’s the thing: I don’t know about you, but my holiday energy is a precious resource. Between dyeing eggs, planning brunch, and maybe hiding a chocolate stash for myself (a chef’s secret), I need my baking to be pure joy—not a stressful puzzle involving specialty pans I’ll use once a year. That’s why I’m completely obsessed with this Coconut Bunny Cake.
This isn’t just a cake; it’s a memory-maker, a guaranteed “Aww!” moment, and a total confidence booster. We’re taking a supremely soft, dreamily coconutty layer cake, giving it a smooth coat of tangy cream cheese frosting, and then—with a flurry of coconut flakes and a few cute candies—transforming it into the most adorable bunny you ever did see. No tricky mold, no carving anxiety. Just simple, fun, utterly celebratory baking. So, tie on your favorite apron, preheat that oven, and let’s create a centerpiece that’s as fun to make as it is to eat. Ready to hop to it?
Print
Coconut Bunny Cake (No Mold Needed, Easy Easter Showstopper)
- Total Time: 1 hour 20 minutes
- Yield: 10–12 1x
Description
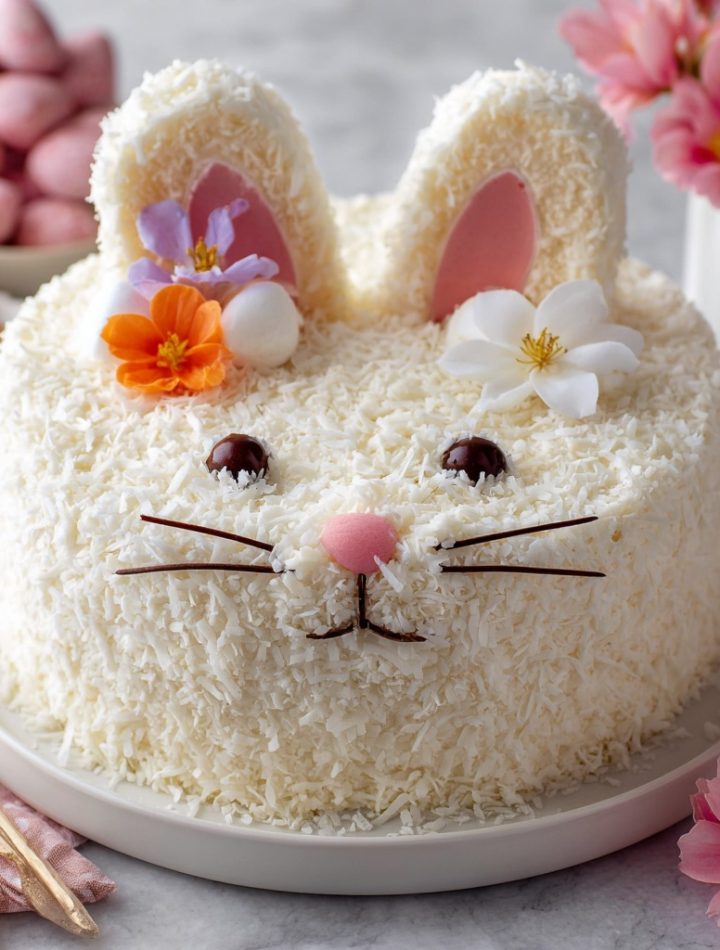
This coconut bunny cake is a playful Easter centerpiece made with a classic coconut layer cake—no specialty mold required. Soft, fluffy layers are frosted smooth, then transformed into an adorable bunny using coconut flakes, candy eyes, and marshmallow cheeks. It’s nostalgic, festive, and surprisingly simple to assemble, making it perfect for Easter gatherings and spring celebrations.
Ingredients
Coconut Cake
2 1/2 cups all-purpose flour
2 tsp baking powder
1/2 tsp baking soda
1/2 tsp salt
1 cup unsalted butter, softened
1 3/4 cups granulated sugar
4 large eggs, room temperature
1 tsp vanilla extract
1 tsp coconut extract
1 cup coconut milk
Cream Cheese Frosting
12 oz cream cheese, softened
1/2 cup unsalted butter, softened
3 1/2 cups powdered sugar
1 tsp vanilla extract
Decorations
Sweetened shredded coconut
Candy eyes
Large marshmallows (cut in half for cheeks)
Pink decorating gel or melted candy (for nose)
Optional: licorice or piping gel for whiskers
Instructions
Preheat oven to 350°F (175°C). Grease and line two 8-inch round cake pans.
Whisk flour, baking powder, baking soda, and salt in a bowl.
Cream butter and sugar until light and fluffy. Beat in eggs one at a time, then add vanilla and coconut extract.
Alternate adding dry ingredients and coconut milk, mixing just until combined.
Divide batter evenly between pans and bake 25–30 minutes, until a toothpick comes out clean. Cool completely.
Beat frosting ingredients until smooth and fluffy.
Stack and frost cake smoothly on top and sides.
Press shredded coconut gently over the entire cake.
Decorate the front with candy eyes, marshmallow cheeks, and a pink nose to create a bunny face.
Chill briefly to set decorations before serving.
- Prep Time: 30 minutes
- Cook Time: 30 minutes
- Category: Dessert
Nutrition
- Calories: ~460 kcal
- Fat: 26
- Protein: ~6 g
A Bunny, a Grandma, and a Cloud of Coconut
This cake takes me right back to my grandma’s linoleum kitchen, with its always-buzzing radio and the smell of something sweet in the oven. She wasn’t a fancy baker, but she was a magical one. One Easter, she presented not a lamb cake (the traditional star of her generation), but a lopsided, utterly charming bunny cake made from two humble round layers. My eyes must have been as wide as saucers. It looked like something from a storybook.
She let me press on the coconut “fur,” my small hands patting it gently while she strategically placed jelly bean eyes. I remember the serious concentration, followed by a giggle fit when the bunny ended up with a slightly cross-eyed expression. That cake tasted like love, spring, and shared laughter. My version today is a tribute to hers—a little more refined in technique (we’re creaming that butter properly!) but identical in spirit. It’s proof that the most special holiday moments don’t come from perfection; they come from the messy, sweet, shared joy of creating something delightful together.
Gathering Your Bunny-Making Supplies
Here’s everything you need to bring our fluffy friend to life. I’ve tucked some chef insights and easy swaps right next to each ingredient because flexibility is my kitchen mantra!
For the Coconut Cake:
- 2 1/2 cups all-purpose flour: The sturdy-yet-tender foundation. For a lighter crumb, spoon and level it into your measuring cup—don’t scoop! Chef’s Swap: A 1:1 gluten-free flour blend works beautifully here.
- 2 tsp baking powder & 1/2 tsp baking soda: Our dynamic leavening duo. The powder gives lift, while the soda reacts with the coconut milk for a perfect rise. Make sure they’re fresh!
- 1/2 tsp salt: The flavor enhancer. It makes the coconut and sugar sing, never overpowering.
- 1 cup unsalted butter, softened: The key to a fluffy cake is butter that yields gently to your thumb. Chef’s Tip: If you forget to soften it, cut it into chunks and let it sit near the preheating oven for 5-10 minutes.
- 1 3/4 cups granulated sugar: Sweetness and structure. It helps create those lovely air pockets when creamed with butter.
- 4 large eggs, room temperature: They bind, enrich, and add moisture. Room temp eggs incorporate smoothly! To quickly warm them, submerge in warm water for 5 minutes.
- 1 tsp vanilla extract & 1 tsp coconut extract: Vanilla is the warm background note; coconut extract is the star soloist. It delivers that unmistakable tropical flavor. No coconut extract? Use 2 tsp vanilla and 1/4 tsp almond extract for a similar nuanced vibe.
- 1 cup coconut milk: Use the canned, full-fat kind for maximum richness and flavor. Shake the can well before opening! This is our secret weapon for ultra-moist crumb.
For the Cream Cheese Frosting:
- 12 oz cream cheese, softened: Full-fat is best for stability and that iconic tangy flavor. Soften it alongside your butter.
- 1/2 cup unsalted butter, softened: Butter adds structure and a silky mouthfeel to the frosting.
- 3 1/2 cups powdered sugar: Sift it if it’s lumpy! This sweetens and thickens our frosting to the perfect spreadable consistency.
- 1 tsp vanilla extract: The perfect finishing note that ties everything together.
For the Decorations:
- 2-3 cups sweetened shredded coconut: Our bunny’s “fur”! Sweetened gives it a slight sheen and perfect texture. Toast 1/2 cup separately if you want to add a little highlight contrast.
- Candy eyes: The instant personality! Find them in the baking aisle.
- 2 large marshmallows: Cut in half horizontally for those iconic, pillowy bunny cheeks.
- Pink decorating gel or a pink candy melt: For a simple, cute little nose.
- Optional: Black licorice laces or black piping gel: For classic whiskers. A little goes a long way!
Let’s Build Our Bunny: Step-by-Step
Follow these steps, and you’ll have a cake that’s as fun to assemble as it is stunning. I’m chatting you through each part with my best tips!
- Prep & Preheat: Crank your oven to 350°F (175°C). This is our first non-negotiable—a properly preheated oven is crucial for an even rise. Grease the bottoms and sides of two 8-inch round cake pans, then line the bottoms with parchment paper circles. This guarantees a stress-free release every single time. Chef’s Hack: A light dusting of flour after greasing adds extra insurance.
- Whisk the Dry Team: In a medium bowl, whisk together your flour, baking powder, baking soda, and salt. Whisking isn’t just mixing; it’s aerating and ensuring those leaveners are evenly distributed. No one wants a baking soda pocket! Set this bowl aside.
- Cream Butter & Sugar: In your stand mixer or a large bowl with a hand mixer, beat the softened butter and granulated sugar on medium-high speed for a full 3-4 minutes. We’re not just combining them; we’re creaming them until the mixture is pale, fluffy, and almost white. This incorporates air, which is the foundation of a light cake. Scrape down the bowl halfway through.
- Incorporate Eggs & Flavor: With the mixer on medium, add the eggs one at a time, letting each fully incorporate before adding the next. This prevents the batter from breaking. Then, beat in the vanilla and coconut extracts. Your kitchen should smell amazing right now.
- Combine Wet & Dry: Reduce mixer speed to low. Add about one-third of your dry ingredients, mix until just combined, then pour in half of the coconut milk. Repeat, ending with the final third of the dry ingredients. Big Tip: Mix only until the last streak of flour disappears. Overmixing at this stage leads to a tough cake—we want tender!
- Bake & Cool: Divide the batter evenly between your prepared pans. I like to use a kitchen scale for precision, but the eye test works too. Smooth the tops. Bake for 25-30 minutes, until the tops are springy to the touch and a toothpick inserted into the center comes out clean. Let the cakes cool in the pans for 10 minutes, then run a knife around the edge and turn them out onto a wire rack to cool completely. Patience is key: frosting a warm cake is a slippery, sad mess.
- Make the Frosting: While the cakes cool, beat the softened cream cheese and butter together until completely smooth and lump-free. Gradually add the sifted powdered sugar on low speed (unless you want a sugar cloud!), then the vanilla. Once incorporated, beat on medium-high for 1-2 minutes until gloriously fluffy.
- Stack & Frost: Place one cake layer on your serving plate. Spread a generous layer of frosting on top. Add the second layer. Now, apply a thin “crumb coat”—a light layer of frosting all over to seal in any crumbs. Pop it in the fridge for 15 minutes to set. Then, pile on the remaining frosting and use an offset spatula or butter knife to create a beautifully smooth surface. It doesn’t have to be bakery-perfect; our coconut will cover it beautifully!
- Create the Bunny Fur: Pour your shredded coconut into a large, shallow bowl or plate. Hold your cake plate over the bowl and gently press handfuls of coconut onto the sides, then cover the top. You can pat it on, let it snow down, or do a combination. Get it covered completely for maximum bunny vibes.
- Decorate the Face: This is the magical part! Gently press on the candy eyes. Add the halved marshmallow cheeks just below. Dot on a little pink nose with your gel or a dab of melted pink candy. If using, add three short whiskers on each side. Step back and admire your handiwork! Chill for 20-30 minutes to set everything before slicing.
Presenting Your Masterpiece
This cake is a star all on its own! Place it on a simple cake stand or a pretty plate. For a full spring scene, scatter a few pastel-colored jelly beans, edible flowers, or even a little “grass” made from green-tinted coconut around the base. Serve it with a pot of fresh coffee, a pot of herbal tea, or a glass of cold milk. The moment you bring it to the table, be ready for smiles, phone cameras, and pure delight. It’s that kind of cake.
Hop Into Different Flavors: Fun Twists!
- Lemon Coconut Bunny: Add the zest of one lemon to the cake batter and use 1/4 cup lemon juice + 3/4 cup coconut milk for the liquid. For the frosting, add 1 tbsp lemon juice.
- Chocolate Coconut Bunny: Swap 3/4 cup of the flour for unsweetened cocoa powder for a chocolate base. Decorate with toasted coconut for a “mocha bunny” look.
- Piña Colada Bunny: Add 1/2 cup finely crushed dried pineapple to the batter and use a teaspoon of rum extract (optional) with the vanilla.
- Mini Bunny Cakes: Bake the batter in a 9×13 pan. Once cool, use a round cookie cutter to cut out circles. Frost, coat with coconut, and decorate individual mini bunny faces—perfect for place settings!
- Dairy-Free/Vegan Bunny: Use plant-based butter, vegan cream cheese, flax eggs (4 tbsp ground flax + 10 tbsp water), and ensure your sugar is vegan. It works like a charm!
Isla’s Kitchen Notes & Stories
This recipe has seen some things in my kitchen! One year, in a pre-Easter frenzy, I only had UNSWEETENED coconut. The result? A very health-conscious-looking, slightly austere bunny. We fixed it with a light drizzle of honey over the coconut, which actually added a lovely flavor. Another time, my “helper” (my then-toddler nephew) placed the eyes so far apart the bunny looked perpetually surprised. It was hilarious and perfect. The point is, it always works out.
Over time, I’ve found that toasting about a half-cup of the coconut and sprinkling it lightly on top of the white coconut adds fantastic texture and a depth of flavor. I also sometimes add a tiny pinch of cardamom to the cake batter—it whispers something special alongside the coconut. Don’t be afraid to make this recipe yours. That’s where the real magic happens.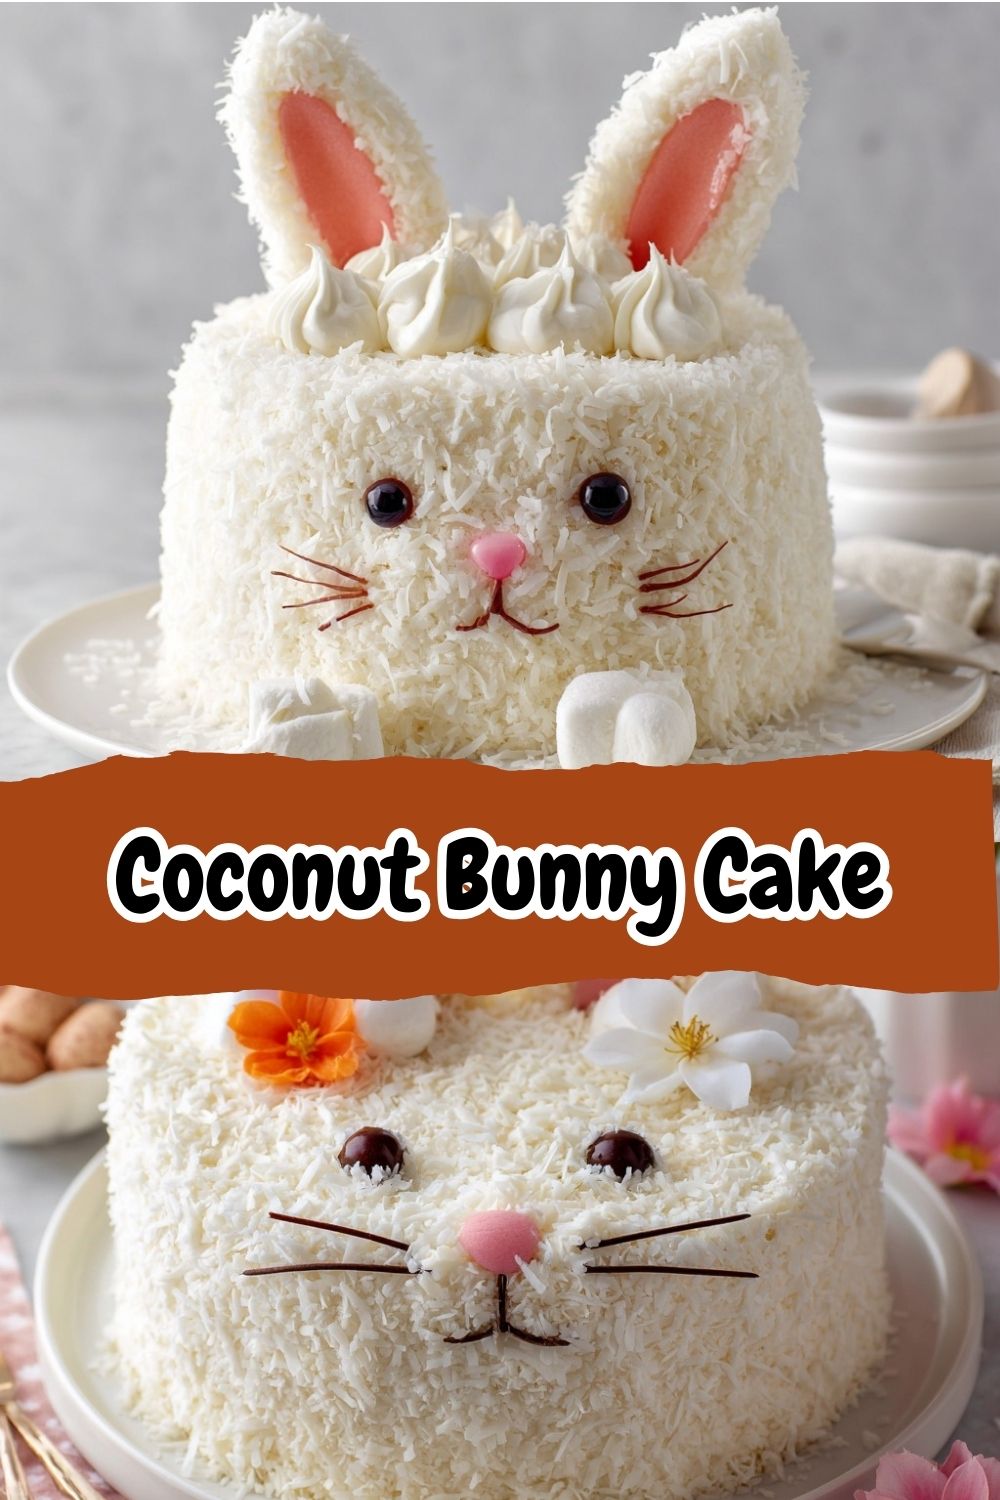
Your Questions, Answered!
My cake layers sunk in the middle. What happened?
This usually points to underbaking or opening the oven door too early. The cake’s structure sets in the first 20-25 minutes, so resist the urge to peek! Ensure your leaveners (baking powder/soda) are fresh. If it sinks just a little, don’t sweat it—extra frosting is a great filler.
Can I make any parts ahead of time?
Absolutely! Bake the cake layers up to 2 days ahead; wrap them tightly in plastic wrap once cool and store at room temp. You can also make the frosting 1-2 days ahead and store it covered in the fridge. Let it come to room temp and re-whip briefly before using. Decorate the cake the day you plan to serve it for the freshest look.
My frosting is too runny/too thick. Help!
If it’s runny, your cream cheese or butter may have been too soft, or it’s a warm day. Pop the whole bowl in the fridge for 20 minutes, then re-whip. If it’s too thick, beat in a teaspoon of coconut milk or cream at a time until it reaches a spreadable consistency.
I don’t like coconut. Can I skip the “fur”?
Of course! You’re making a “Naked Bunny.” Frost it smoothly, decorate the face, and maybe create bunny ear shapes with piped frosting or white chocolate on top. It will be just as adorable.