
Chicken Breast Roll-Ups: Your New Favorite Dinner Magic Trick
Hey friends, Isla here! Let’s be real for a second: are you, like me, sometimes just staring at that pack of chicken breasts in the fridge thinking, “Not again…?” We love chicken for its versatility and lean protein, but it can feel a little…predictable. If you’re dreaming of a dinner that’s secretly simple but looks like you fussed for hours, that brings a genuine “wow” to the table without the stress, I have the absolute *perfect* solution for you.
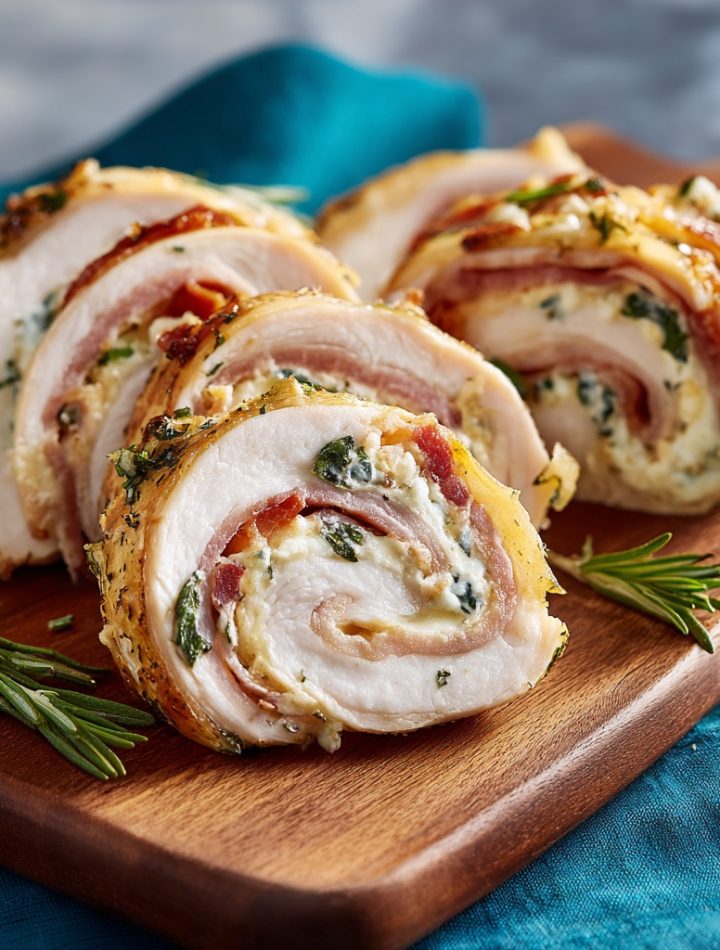
Today, we’re making Chicken Breast Roll-Ups—your ticket out of the bland chicken dinner loop. Imagine this: tender, thin-pounded chicken, swirled around melty cheese, savory ham, and vibrant spinach, all baked to golden perfection. When you slice into it? Beautiful, biteable spirals of flavor that make everyone at the table do a little happy dance. It’s fun to make, endlessly customizable, and proves that elegant doesn’t have to mean complicated. Whether it’s a busy Tuesday or you’re hosting your besties for dinner, this recipe is your secret weapon. So, tie on your apron, crank up your favorite playlist, and let’s turn that ordinary chicken into something extraordinary together!
Print
Chicken Breast Roll-Ups : Stuffed, Spiraled & Perfectly Biteable
- Total Time: 40 minutes
- Yield: 4 servings 1x
Description
Chicken Breast Roll-Ups are tender, juicy spirals stuffed with flavorful fillings like cheese, spinach, or herbs. These bite-sized rolls are baked or pan-seared to perfection, making them ideal for appetizers, light dinners, or lunchbox favorites.
Ingredients
- 2 boneless, skinless chicken breasts (pounded thin)
- 1/2 cup shredded mozzarella or provolone cheese
- 1/2 cup fresh spinach or basil leaves
- 2 tbsp cream cheese or pesto (optional)
- Salt and black pepper to taste
- 1/2 tsp garlic powder
- 1/2 tsp Italian seasoning
- 1 tbsp olive oil
- Toothpicks or kitchen twine (for securing)
Instructions
- Preheat oven to 375°F (190°C). Lightly grease a baking dish or line with parchment paper.
- Pound chicken breasts to about 1/4-inch thickness using a meat mallet or rolling pin between plastic wrap.
- Season both sides with salt, pepper, garlic powder, and Italian seasoning.
- Spread a thin layer of cream cheese or pesto (if using) over each piece.
- Layer spinach leaves and sprinkle shredded cheese evenly on each chicken breast.
- Roll up tightly from the short end and secure with toothpicks or twine.
- Heat olive oil in a skillet over medium-high heat and sear each roll-up until golden (about 2 minutes per side).
- Transfer to the baking dish and bake for 15–20 minutes, or until chicken is cooked through (internal temp 165°F).
- Let rest for 5 minutes, remove toothpicks, then slice into bite-sized spirals for serving.
- Prep Time: 15 minutes
- Cook Time: 25 minutes
- Category: Main Dish
- Method: Baked
- Cuisine: Italian
Nutrition
- Serving Size: 1 roll-up
- Calories: 260
- Sugar: 1g
- Sodium: 360mg
- Fat: 14g
- Saturated Fat: 5g
- Unsaturated Fat: 8g
- Trans Fat: 0g
- Carbohydrates: 3g
- Fiber: 0g
- Protein: 28g
- Cholesterol: 80mg
The Messy Magic of Grandma’s Kitchen
This recipe always takes me back to my grandma’s sunny, slightly chaotic kitchen. She was the queen of “fancy-looking peasant food”—taking humble ingredients and making them feel like a celebration. I remember one rainy afternoon, she decided to teach me her “magic meat roll.” It was actually a pork schnitzel situation, but the principle was the same: pound it thin, layer on goodies, roll it up. I was maybe ten, wielding a rolling pin like a sword, and flour was absolutely everywhere. We used what we had: some leftover Sunday ham, a handful of wilted greens from the garden she’d revived, and the last nub of cheese.
The real magic wasn’t just the delicious result (though my dad still claims it was the best thing he ever ate). It was the lesson she whispered as we worked: “Good food isn’t about perfect ingredients, cariño. It’s about being clever and putting love in the roll.” Every time I make these chicken roll-ups, I channel that spirit. It’s not about strict rules; it’s about playful creation. It’s about using up that leftover pesto or those roasted peppers hiding in the back of the fridge. It’s kitchen alchemy, and it all started with flour on my nose and my grandma’s laugh.
What You’ll Need for Flavorful Spirals
Here’s your cast of characters! This is my favorite classic combo, but think of this list as a launchpad—I’ll give you all the swap ideas in the variations section below.
- 4 boneless, skinless chicken breasts: The canvas for our art! Look for breasts that are roughly the same size so they cook evenly. Chef Insight: If they’re super thick, you’ll have an easier time butterflying them.
- Salt & pepper to taste: The foundational flavor boost. Don’t be shy here—season every layer for the best taste.
- 1 tbsp olive oil or melted butter: For searing that gorgeous golden-brown color. Butter gives incredible flavor, while olive oil has a higher smoke point. You can’t go wrong!
- 4 slices of mozzarella or provolone cheese: Our creamy, melty glue. Sub Tip: Swiss, fontina, or even a smear of cream cheese mixed with herbs work beautifully. Pre-shredded bagged cheese doesn’t melt as smoothly, so slices or a block you shred yourself are best.
- 4 slices of deli ham or turkey: Adds a salty, savory punch that pairs perfectly with the chicken. Chef Insight: Go for a thicker-cut ham from the deli counter if you can—it holds up better and tastes more substantial than the super-thin packaged kind.
- ½ cup sautéed spinach, squeezed very dry: A pop of color and earthiness. CRUCIAL TIP: You must squeeze all the water out of cooked spinach, or it’ll steam inside the roll and make everything soggy. Use your fists like you’re wringing out a tiny towel!
- 2 tbsp pesto OR Dijon mustard (optional but amazing): The flavor booster! A thin spread under the fillings adds so much depth. Pesto brings herby brightness, while Dijon adds a tangy kick.
- Toothpicks or kitchen twine: Our little safety pins to hold the rolls together. Soak wooden toothpicks in water for 10 minutes before using to prevent burning.
Let’s Build Some Flavor Spirals: A Step-by-Step Guide
Ready to roll? Literally! Follow these steps, lean into my little hacks, and you’ll have perfect roll-ups every single time.
- Prep & Preheat: First, get your oven heating to a cozy 375°F (190°C). This gives it time to come to the right temperature while we work. Grab a baking dish—no need to grease it yet.
- Butterfly & Pound: Here’s the fun, therapeutic part! Place one chicken breast on a sturdy cutting board. Place your hand flat on top. Using a sharp knife, carefully slice horizontally through the thickest part, stopping about ½ inch from the opposite edge so it opens like a book. Chef Hack: If you’re nervous, you can also just slice it completely in half to create two thinner cutlets. Place the butterflied breast between two sheets of plastic wrap or inside a large zip-top bag. Now, pound it to an even ¼-inch thickness using a rolling pin, meat mallet, or even a heavy skillet! This ensures even cooking and easy rolling. Repeat with all breasts, then season both sides generously with salt and pepper.
- Layer the Goodies: Lay your pounded chicken breasts flat. If using, spread a thin layer of pesto or Dijon over each. Then, layer in this order: a slice of cheese (it helps act as a moisture barrier), a slice of ham, and a small line of your squeezed-dry spinach. Leave a small border around the edges so the fillings don’t spill out when you roll.
- Roll & Secure: Starting from the shorter end, tightly roll the chicken up around the fillings, like a cozy little flavor burrito. Secure the seam with 2-3 toothpicks or tie gently with kitchen twine. Pro Tip: Roll as tightly as you can without squeezing the fillings out—a firm roll leads to a prettier spiral.
- Sear for Color (Optional but Recommended): Heat your oil or butter in a large oven-safe skillet over medium-high heat. Once hot, carefully add the roll-ups, seam-side down if possible. Sear for 2-3 minutes per side, until you get a beautiful golden-brown crust. This isn’t just for looks; it builds incredible flavor through the Maillard reaction (aka kitchen magic). If your skillet isn’t oven-safe, just transfer the seared rolls to your baking dish.
- Bake to Perfection: If you seared in an oven-safe skillet, just pop the whole skillet in the oven. Otherwise, place the roll-ups in your baking dish. Bake for 20-25 minutes, until the chicken is cooked through and registers 165°F (74°C) at the thickest part when checked with a meat thermometer.
- Rest & Slice: This is the hardest part—be patient! Let the chicken rest for 5-10 minutes after baking. This allows the juices to redistribute, ensuring every slice is juicy and not dry. Then, carefully remove the toothpicks or twine. Using a very sharp knife, slice each roll into 1-inch thick pinwheels to reveal those stunning spirals.
Plating Your Perfect Spirals
Presentation is part of the fun! Arrange the warm spirals on a platter or individual plates. The golden-brown exterior and peek-a-boo layers of green, white, and pink are so pretty all on their own. I love drizzling a little extra pesto thinned with olive oil or a balsamic glaze over the top for a restaurant-worthy finish. For sides, keep it simple and let the roll-ups shine: a big, crisp green salad, some garlic-roasted asparagus or green beans, or a pile of creamy mashed potatoes or buttery orzo to soak up any juices. It’s a complete, colorful plate that promises (and delivers) big flavor.
Mix It Up! Your Flavor Playground
The true beauty of this recipe is its adaptability. Don’t have ham? No problem! Here are a few of my favorite twists:
- Sun-Dried Tomato & Feta: Swap the ham for chopped oil-packed sun-dried tomatoes and the mozzarella for crumbled feta. Add a sprinkle of dried oregano.
- Caprese Style: Use a slice of fresh mozzarella, a basil leaf, and a thin slice of tomato (pat the tomato dry!). Drizzle with balsamic after baking.
- Spinach & Artichoke: Mix softened cream cheese with chopped artichoke hearts, spinach, and a little garlic powder. This is the ultimate creamy, dreamy filling.
- Protein-Packed & Veggie-Full: Skip the deli meat entirely. Use thinly sliced roasted red peppers, zucchini ribbons, or sautéed mushrooms as your main filler.
- Prosciutto & Sage: Use thin prosciutto instead of ham and place a fresh sage leaf under the cheese for an elegant, autumnal flavor.
Isla’s Kitchen Confessions & Tips
I’ve made these roll-ups approximately a zillion times, and they’ve evolved from a “company’s coming” dish to a regular in my weeknight rotation. The biggest game-changer for me was embracing the freezer! You can assemble these roll-ups (through the securing step), place them on a parchment-lined baking sheet to freeze solid, then transfer to a freezer bag. Bake from frozen, adding 10-15 minutes to the cooking time. Dinner salvation on crazy days!
Also, a funny story: I once was so distracted chatting with a friend while cooking that I forgot to secure the rolls with toothpicks. I popped them in the oven, and five minutes later, my kitchen looked like a cheese volcano had erupted—fillings everywhere! It was a delicious, messy lesson. Now, I always lay out my toothpicks before I start rolling. Learn from my cheesy disaster, friends!
Your Questions, Answered!
Q: My chicken always comes out dry. What am I doing wrong?
A: The most common culprits are overcooking and not pounding evenly. A meat thermometer is your best friend here—pull the chicken at 165°F. Also, ensure you’ve pounded it to an even thickness so one part isn’t paper-thin and overcooked while the thick part is still raw. Finally, don’t skip the rest time! It’s essential for juiciness.
Q: The roll won’t stay closed! Help!
A: This usually means you’ve overstuffed it or didn’t roll tightly enough. Leave a clearer border when adding fillings. Also, make sure you’re securing it with enough toothpicks (2-3 is ideal), placing one at each end and one in the middle. If it’s really unruly, a piece of kitchen twine tied around the middle can be a lifesaver.
Q: Can I make these ahead of time?
A: Absolutely! You can assemble the rolls (through step 4) up to 24 hours in advance. Keep them covered in the fridge until you’re ready to sear and bake. You may need to add a minute or two to the bake time since they’ll be cold from the fridge.
Q: What’s the best way to slice them without squishing?
A: A super sharp knife is non-negotiable. A dull knife will press down and deform your beautiful spiral. I use a long, sharp chef’s knife and use a gentle sawing motion without applying too much downward pressure. Let the knife do the work!
Nutritional Information (Per Serving, Approximate)
This is an estimate for one roll-up using the classic filling ingredients (mozzarella, ham, spinach).
Calories: 390 | Protein: 38g | Carbohydrates: 4g | Fat: 22g | Saturated Fat: 8g | Cholesterol: 130mg | Sodium: 750mg