 Ditch the Bun, Grab the Fun: Cheeseburger Bombs Are Here!
Okay, let’s be real. We all have those nights. The ones where you’re craving something deeply satisfying, something that feels like a hug from the inside, but the thought of firing up the grill or even just assembling a regular burger feels like… a lot. You want the iconic flavors—the juicy beef, the melty cheese, the salty bacon, the savory garlic—but you want them in a fun, no-fuss, shareable (or don’t-you-dare-share) package. You want your kitchen to smell like a dream and your people to look at you like you just performed actual magic.
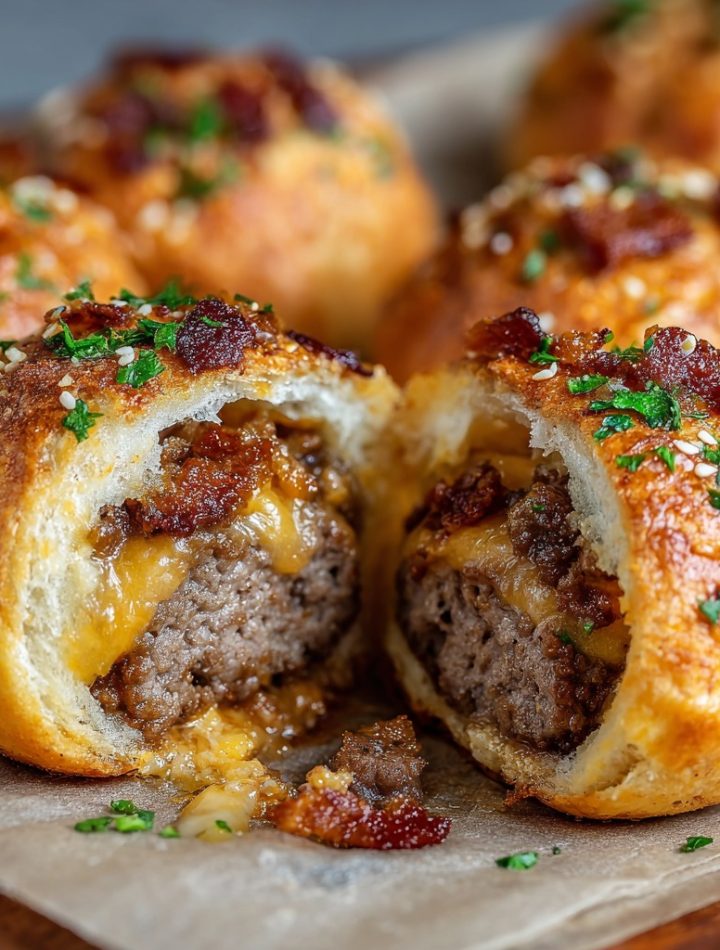
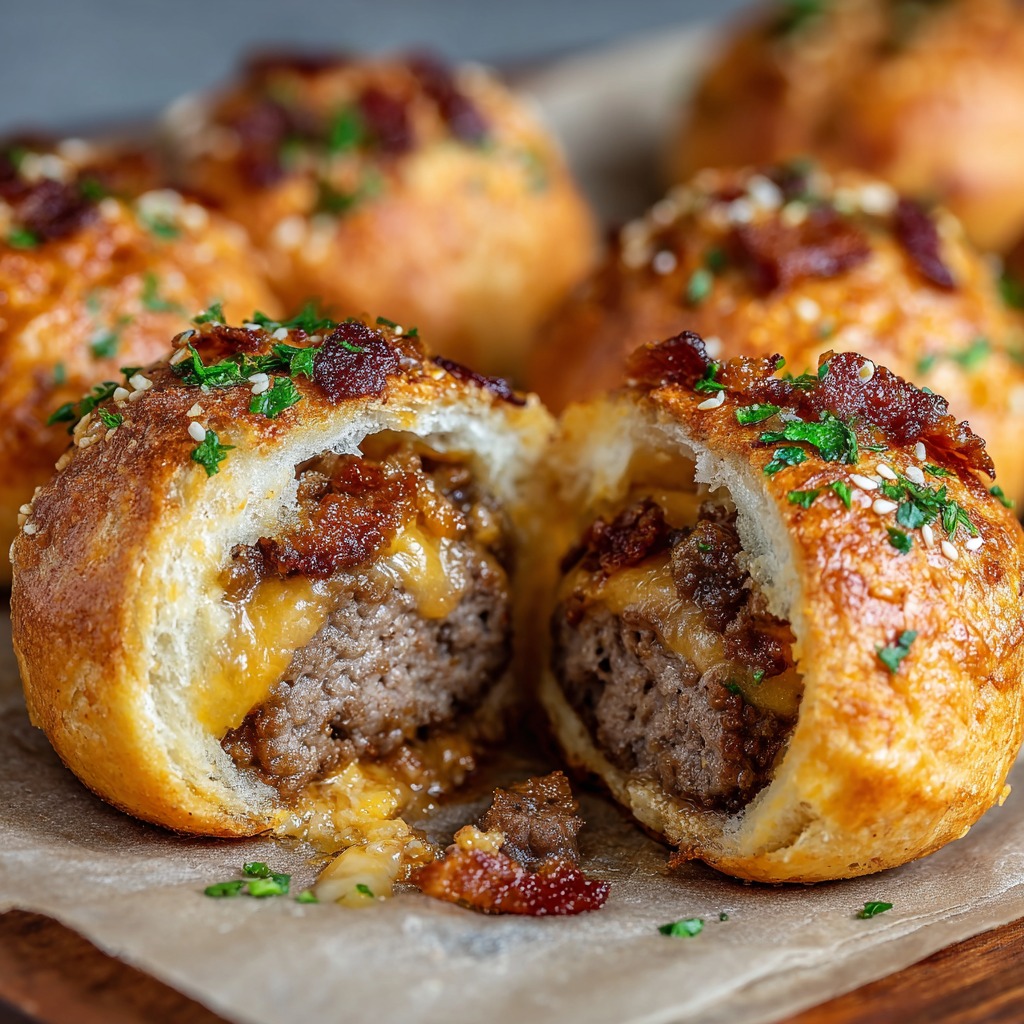
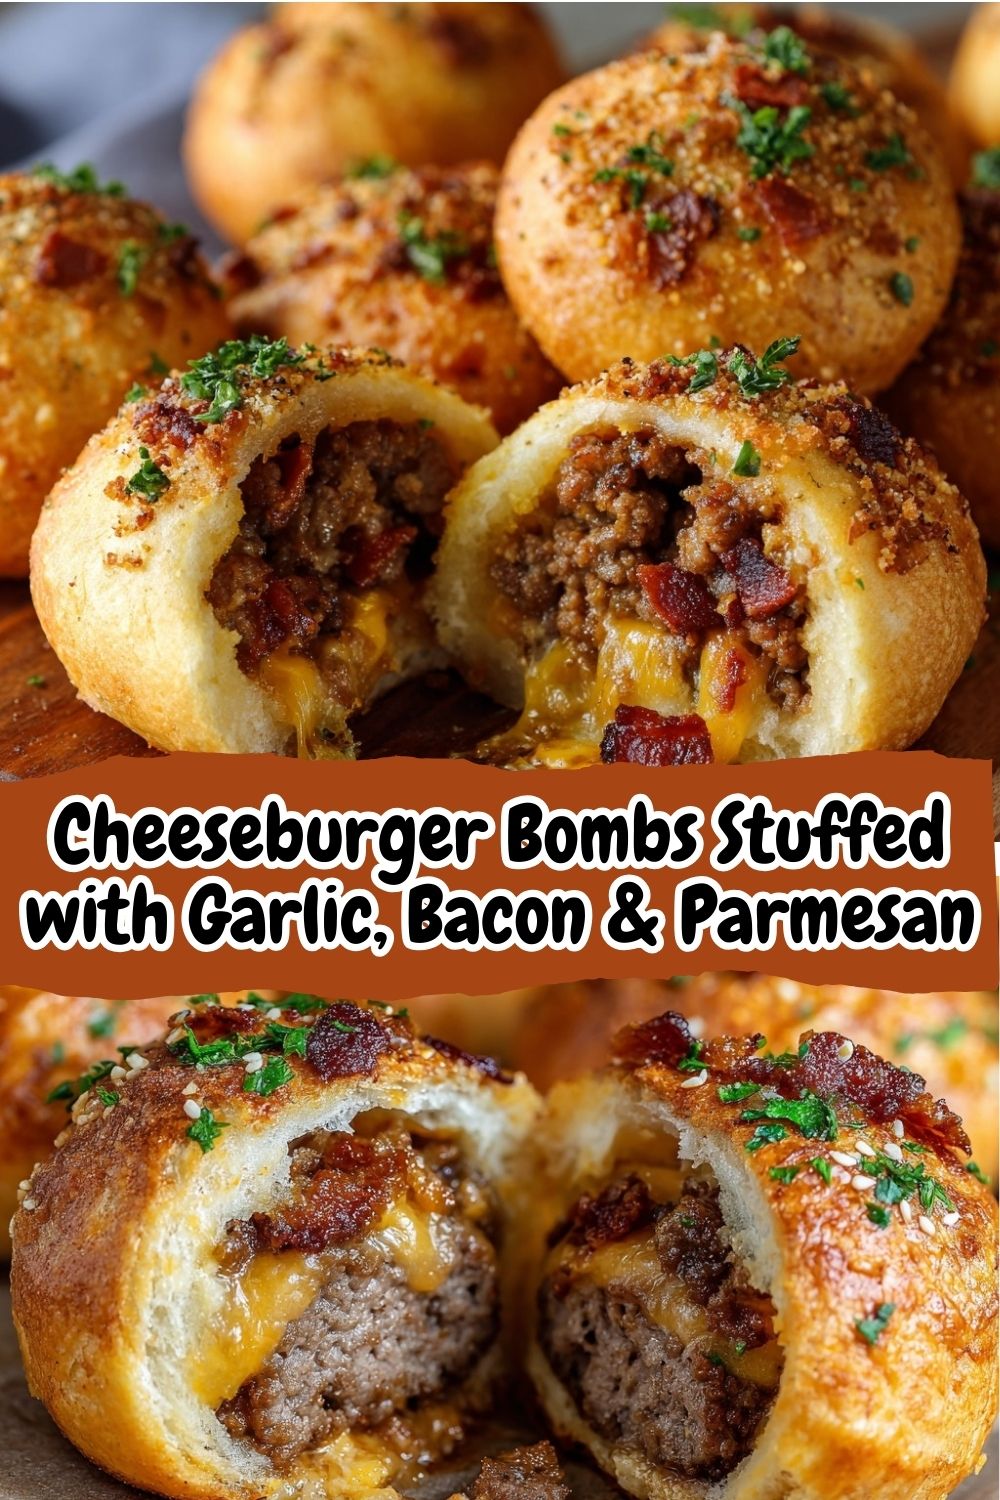
Well, my friend, your craving has officially been heard. Say a very enthusiastic hello to Cheeseburger Bombs Stuffed with Garlic, Bacon & Parmesan. Imagine this: tender, golden-brown dough wrapped around a heart of perfectly seasoned ground beef, a double punch of cheddar and parmesan, and crispy bits of bacon, all glazed with a simple garlic butter that sends the whole thing into the stratosphere of flavor. They’re the ultimate handheld flavor explosion, perfect for game day, family movie night, or just a “treat yourself” Tuesday that deserves a little extra sparkle.
This recipe is the epitome of what I love about cooking: big, bold taste without the big, complicated process. We’re talking about 40 minutes from fridge to face, using simple ingredients that pack a massive punch. So, tie on your favorite apron, cue up a good playlist, and get ready to make something that’s guaranteed to disappear faster than you can say “Is there another one?” Let’s turn that craving into reality.
The Night That Started It All: A Kitchen Pivot
This recipe has a special place in my heart because it was born from a classic “kitchen pivot.” Picture it: It was a chilly Friday evening, and I’d promised my nephew and his friends a “burger bonanza” after their soccer game. I had all the ingredients laid out—buns, patties, the works. Then, disaster (or so it seemed). I opened the bread drawer to find… one sad, slightly stale hot dog bun. That was it. The grocery store was a 20-minute drive away, and six very hungry, very energetic teenagers were due to descend upon my kitchen in approximately 30 minutes.
Panic? For a second. Then, my eyes landed on a forgotten can of biscuit dough in the fridge and a half-pack of bacon. A lightbulb went off. What if I could capture all the essence of a cheeseburger… but *inside* the dough? I scrambled, mixing the cooked beef with cheese and bacon, wrapping it up like little savory presents. I brushed them with the garlic butter I was making for garlic bread (another scrapped plan) and threw them in the oven. The smell alone brought everyone running. They were a roaring, messy, cheesy success. That night, a recipe was born not from meticulous planning, but from happy, chaotic necessity—and those are always the best kind.
Print
Cheeseburger Bombs Stuffed with Garlic, Bacon & Parmesan : A Flavor Explosion!
- Total Time: 40 mins
Description
Say goodbye to ordinary burgers—these Cheeseburger Bombs are the ultimate handheld bites of juicy beef, gooey cheese, crispy bacon, and savory garlic butter wrapped in golden dough. Whether you’re hosting game night or craving something fun and filling, this recipe brings major flavor with every bite. Get ready to make mouths water!
Ingredients
1 lb ground beef
1/2 tsp garlic powder
Salt & pepper to taste
1/2 cup cooked bacon, chopped
1/2 cup shredded cheddar cheese
1/4 cup grated Parmesan
1 can refrigerated biscuit dough (8 count)
2 tbsp melted butter
1 clove garlic, minced
Optional: sesame seeds or parsley for topping
Instructions
Preheat oven to 375°F (190°C) and line a baking sheet with parchment.
In a skillet, brown ground beef with garlic powder, salt, and pepper. Drain excess fat.
Remove from heat and stir in bacon, cheddar, and Parmesan.
Flatten each biscuit dough piece and fill the center with 1–2 tbsp of the cheeseburger mixture.
Pinch edges together to seal and form a ball. Place seam-side down on the baking sheet.
Mix melted butter with minced garlic and brush over each bomb.
Sprinkle with sesame seeds or parsley if desired.
Bake 15–18 minutes, until golden and cooked through.
Let cool for 5 minutes before serving.
- Prep Time: 20 minutes
- Cook Time: 20 minutes
- Category: Dinner
Gathering Your Flavor Arsenal
Here’s everything you need to create these little miracles. I’ve added my notes on why each ingredient matters and how you can swap things in or out based on what’s in your kitchen. Cooking is about flexibility!
- 1 lb ground beef (80/20 blend is ideal) – The star of the show! An 80/20 blend gives you the perfect mix of lean meat and fat for juicy, flavorful bombs without being greasy. Chef’s Insight: If you only have leaner beef, don’t worry! Just don’t overcook it when browning.
- 1/2 tsp garlic powder – We’re building layers of garlic flavor. The powder gets cooked right into the beef for a deep, savory base note.
- Salt & pepper to taste – Don’t be shy here! Season your beef well. It’s the foundation of the whole dish.
- 1/2 cup cooked bacon, chopped – The salty, smoky, crispy element that takes these from great to “OH WOW.” Pro Tip: I like to bake my bacon on a sheet pan for easy, mess-free cooking. Keep the fat to use for cooking the beef for extra bacon-y goodness!
- 1/2 cup shredded cheddar cheese – For that classic, gooey, stretchy cheeseburger melt. Pre-shredded works in a pinch, but block cheese you shred yourself melts creamier (it doesn’t have anti-caking agents).
- 1/4 cup grated Parmesan – The secret weapon! Parmesan adds a sharp, salty, umami depth that makes the filling incredibly savory. Trust me on this one.
- 1 can refrigerated biscuit dough (8 count) – Our quick and easy “wrapper.” It bakes up fluffy and golden and is the perfect vehicle. Substitution Tip: Homemade pizza dough or even crescent roll dough works beautifully too—just adjust rolling thickness.
- 2 tbsp melted butter – For the glorious garlic butter glaze. This is what gives the bombs their beautiful golden color and irresistible aroma.
- 1 clove garlic, minced – Fresh garlic in the butter! This provides the bright, aromatic top note that pairs with the powdered garlic inside.
- Optional: sesame seeds or chopped parsley for topping – A sprinkle of sesame seeds gives that authentic “burger bun” look, while fresh parsley adds a pop of color and a hint of freshness.
Let’s Build Some Bombs: A Step-by-Step Guide
Follow these steps, and you’ll have a tray of perfect cheeseburger bombs in no time. I’ve tucked my favorite kitchen hacks and commentary right in there with you!
- Preheat & Prep: Fire up your oven to 375°F (190°C). This ensures it’s perfectly hot and ready when your bombs are assembled. Line a baking sheet with parchment paper. (Why parchment? No sticking, easy cleanup, and it helps with browning. A chef’s best friend!)
- Brown the Beef: In a skillet over medium-high heat, cook your ground beef. Break it up as it cooks. When it’s about halfway done, sprinkle in the garlic powder, salt, and pepper. This lets the seasoning cook into the meat. Once it’s fully browned and no longer pink, drain off any excess fat. (Chef’s Hack: If you cooked bacon earlier, use a tablespoon of that bacon fat to cook the beef instead of oil. You’re welcome.)
- Mix the Filling: Take the skillet off the heat. This is crucial—we don’t want to melt the cheese yet! Stir in the chopped bacon, shredded cheddar, and grated Parmesan. The residual heat will just start to soften the cheese, making it easier to scoop. Let this mixture cool for a few minutes while you prep the dough. A warm filling is okay; a piping-hot one will make the dough hard to handle.
- Form the Bombs: Pop open that can of biscuit dough (the sound never gets old, does it?). Separate the biscuits. On a lightly floured surface, flatten and stretch each biscuit into a circle about 4-5 inches across. They don’t need to be perfect! Place 1-2 heaping tablespoons of the cheeseburger mixture in the center. Now, bring the edges of the dough up and over the filling. Pinch, pinch, pinch! Really seal it well, forming a neat little bundle or ball. Place it seam-side down on your prepared baking sheet. Repeat with the remaining seven. (Pro Tip: If you have a little filling left over, it makes an incredible omelet add-in tomorrow!)
- The Golden Glaze: In a small bowl, mix the melted butter and the minced fresh garlic. Using a pastry brush (or the back of a spoon), generously brush this garlic butter all over the top and sides of each bomb. This is where the magic happens—it creates that gorgeous, flavorful crust. Sprinkle with sesame seeds or parsley now, if using.
- Bake to Perfection: Slide your tray into the preheated oven. Bake for 15-18 minutes. You’re looking for a deep, golden-brown top and a cooked-through dough. (Don’t Peek Too Early! Give them at least 12 minutes before you open the oven door, or you’ll let the heat out.)
- The Hardest Part – Wait! When they’re beautifully golden, take them out. I know, I know, you want to dive in. But let them cool on the sheet for at least 5 minutes. The filling is molten lava hot right out of the oven. This brief rest lets the cheese settle slightly so you don’t burn your mouth, and it helps the bombs hold their shape when you pick them up.
How to Serve These Flavor Parcels
Presentation is part of the fun! I love piling these Cheeseburger Bombs high on a big wooden board or platter, maybe lined with a checkered napkin for that casual diner vibe. Place a couple of small bowls in the center for dipping sauces—classic ketchup and mustard are a must, but a sriracha mayo or a special burger sauce (mix mayo, ketchup, relish, and a dash of vinegar) takes it next level. They’re perfect finger food, so no plates or forks needed for a casual gathering. For a sit-down meal, serve two or three bombs alongside a simple, crisp green salad or some sweet potato fries to round it out. The contrast is delicious!
Get Creative! Flavor Twists & Swaps
The basic blueprint is perfection, but the canvas is yours to play with! Here are a few of my favorite ways to mix it up:
- BBQ Cheddar Style: Stir 2 tbsp of your favorite BBQ sauce into the beef filling and use smoked cheddar or gouda instead of regular cheddar.
- Pepperoni Pizza Bombs: Swap the beef for cooked Italian sausage, use mozzarella and parmesan, and add a tablespoon of pizza sauce and some chopped pepperoni to the filling. Brush with garlic-herb butter.
- Buffalo Chicken: Use cooked, shredded chicken tossed in buffalo sauce instead of beef. Fill with blue cheese crumbles and Monterey Jack. Brush with a mix of melted butter and a dash more buffalo sauce.
- Vegetarian “Big Mac” Style: Use a plant-based ground “meat” or finely chopped mushrooms sautéed with onions. Keep the cheese, and add a pinch of onion powder and a drizzle of thousand-island-style dressing inside.
- Everything Bagel: Skip the sesame seeds and brush the tops with an egg wash, then sprinkle generously with everything bagel seasoning before baking.
Isla’s Kitchen Notes
This recipe has evolved so much since that frantic Friday night! I’ve learned that slightly cooling the filling is the key to a non-messy assembly. I’ve also started making a double batch of the filling and freezing half. Then, on a busy weeknight, I can just thaw it, wrap it in dough, and bake—instant win. My husband’s contribution was the garlic butter brush. He wandered in, saw the plain dough balls, and said, “Needs garlic butter. Everything needs garlic butter.” He was, as always, 100% right.
A funny story: I once made a “test” batch for just the two of us and forgot to put the baking sheet in the oven, preheating it empty. I placed the parchment-lined bombs directly on the oven rack, thinking the sheet was in there! A minor cheese lava eruption occurred onto the oven floor. The smoke alarm sang its song. The bombs on the rack? Actually came out great, with extra-crispy bottoms. A happy, smoky accident. But maybe just use the sheet.
Your Questions, Answered
Q: My bombs are leaking cheese everywhere! What did I do wrong?
A: This usually means the filling was too hot when you wrapped it (melting the cheese instantly so it runs) or the seal wasn’t tight enough. Make sure your filling has cooled for 5-10 minutes, and really pinch that dough closed. If a small hole forms, a tiny piece of extra dough can be used as a patch.
Q: Can I make these ahead of time?
A: Absolutely! You can assemble the bombs, place them on the baking sheet, and refrigerate them, covered, for up to 4 hours before baking. You can also freeze them unbaked on the sheet, then transfer to a freezer bag once solid. Bake from frozen, adding 5-8 minutes to the bake time.
Q: The dough isn’t cooking through in the middle.
A: This happens if the bombs are too crowded on the pan (steam them instead of baking) or if your oven runs cool. Space them about 1.5 inches apart and consider using an oven thermometer to check your oven’s true temperature. If they’re browning too fast but still doughy inside, tent loosely with foil for the last few minutes.
Q: What’s the best cheese for maximum gooey-ness?
A: For the best melt, combine cheeses. The cheddar gives flavor, but adding a slice of American cheese or a bit of Monterey Jack to the center of each bomb before sealing creates an incredible, stretchy lava core. Experiment with your melty favorites!
Nutritional Information*
*Please note: Nutritional info is an estimate based on the specific ingredients listed and standard database calculations. Values may vary based on brands, substitutions, and portion size.
Per Cheeseburger Bomb:
Calories: ~300 | Total Fat: 19g | Saturated Fat: 8g | Cholesterol: 55mg | Sodium: 580mg | Total Carbohydrates: 20g | Dietary Fiber: 0g | Sugars: 3g | Protein: 14g