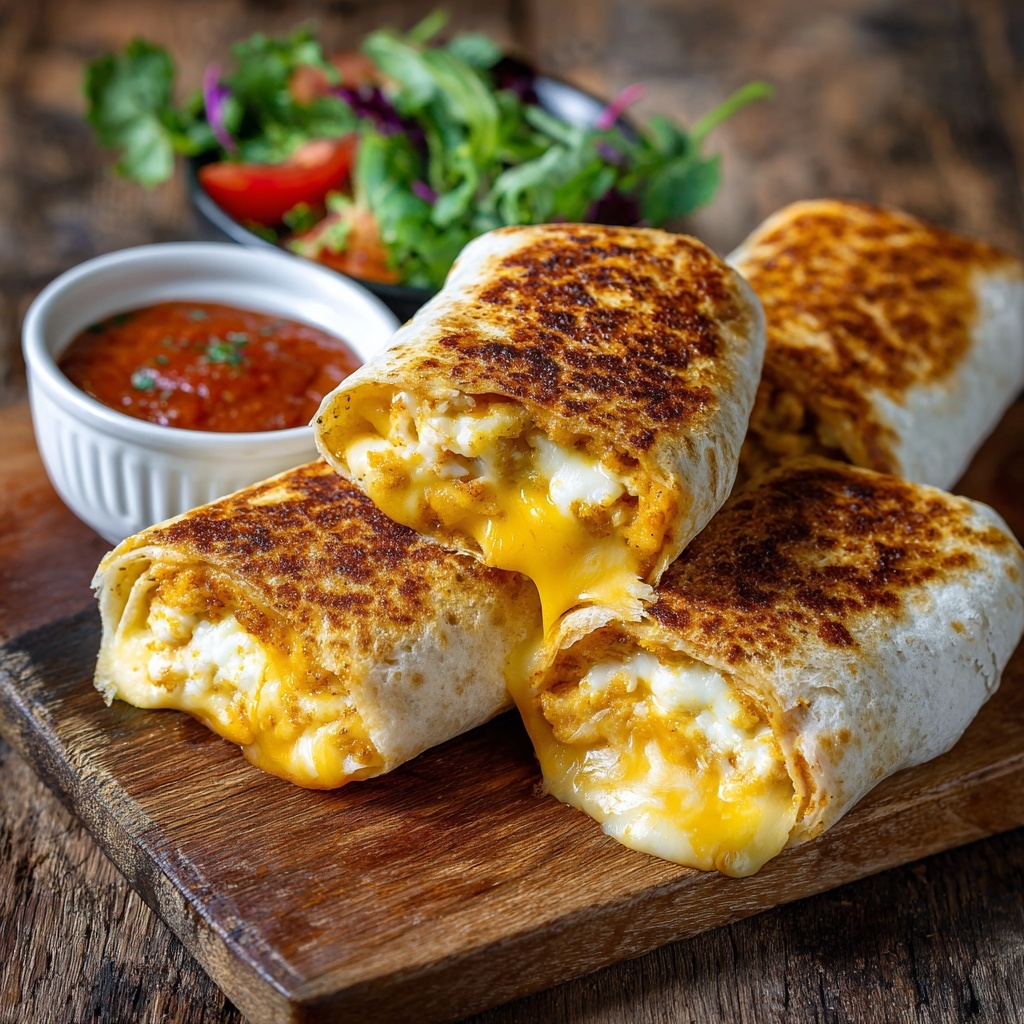
Cheese-Crusted Wraps: Your New Secret Weapon for Maximum Crispy, Melty Joy
Hey friend! Come on in, grab an apron, and let me tell you about the little kitchen trick that changed my lunch game forever. You know that feeling when you’re staring into the fridge, willing something magical to appear? You want crispy, you want melty, you want flavorful, and you want it now. No fuss, no fancy techniques, just pure, unadulterated deliciousness. Well, my fellow flavor fanatic, I’m about to introduce you to your new best friend: the Cheese-Crusted Wrap.
This isn’t just a wrap. This is a revelation. We’re taking a humble tortilla and its filling, and we’re giving it a crispy, golden, cheesy armor. Imagine: instead of cheese just melting inside your wrap, we’re creating an entire, lacy, caramelized cheese crust on the outside. It’s a textural masterpiece—a symphony of crunch giving way to a soft, warm, flavorful interior. It’s the ultimate upgrade for your leftover chicken, those roasted veggies, or that quick black bean scramble. It’s the “wow” factor you can achieve in under 10 minutes, and I am so excited to ride this crispy, cheesy wave with you. Let’s turn your everyday wrap into an extraordinary experience.
Print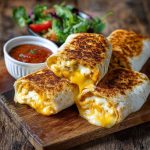
Cheese-Crusted Wraps : Extra Crispy, Golden & Melty Goodness
- Total Time: 10 minutes
- Yield: 1 wrap 1x
Description
Take your wraps to the next level with this genius Cheese-Crusted Wrap method. By sprinkling shredded cheese directly on the pan before placing your wrap on top, you get a crispy, golden crust that’s cheesy on the outside and packed with flavor inside. Perfect for grilled wraps, quesadillas, or any handheld meal that could use a little extra wow.
Ingredients
1 large flour tortilla
¼–⅓ cup shredded cheese (cheddar, mozzarella, or blend)
Filling of choice (e.g., chicken, veggies, turkey, etc.)
Optional: butter or oil for extra crisp
Instructions
Preheat a non-stick skillet over medium heat.
Sprinkle cheese evenly onto the dry skillet in a circular shape, roughly the size of your tortilla.
Immediately place your filled, folded wrap seam-side down on top of the cheese.
Press gently and cook for 2–3 minutes until the cheese is golden and crispy.
Flip carefully to heat the other side (optional if already warm).
Cool slightly, slice, and serve while melty and crisp.
- Prep Time: 5 mins
- Cook Time: 5 mins
- Category: Dinner
The “Happy Accident” That Started It All
I have to confess, this whole cheese-crusted magic started with a classic case of kitchen chaos. Picture it: a busy Wednesday, two hungry kids running around, and me attempting to make a quick quesadilla. In my rush, a generous handful of shredded cheddar missed the tortilla entirely and landed in a sizzling, lonely heap on my cast iron skillet. Instead of freaking out, I did what any curious cook would do—I pressed the tortilla right on top of it. What did I have to lose?
The result was nothing short of a crispy, golden epiphany. That cheese fused to the tortilla, creating a crust so perfect, so flavorful, it was like the tortilla had put on its Sunday best. It reminded me instantly of my dad’s “everything but the kitchen sink” hash browns, where he’d let the potatoes get super crispy in the pan—that same satisfying, golden-brown goodness, but with cheese! That moment of messy, happy accident is what BiteTide is all about: finding joy in the kitchen, embracing the little experiments, and stumbling upon methods that make food not just nourishing, but downright thrilling. This technique is a tribute to all those beautiful kitchen mishaps that lead to something better.
Gathering Your Flavor Arsenal
Here’s the beautiful part: you only need a few key players to create this masterpiece. The rest is up to your imagination and whatever’s hanging out in your fridge.
- 1 Large Flour Tortilla: The canvas for our creation! I prefer a burrito-sized tortilla for maximum filling potential. For a gluten-free option, your favorite GF tortilla works beautifully—just make sure it’s pliable. Chef’s Insight: Let your tortilla sit at room temp for a few minutes; it’s less likely to tear when folding.
- ¼ – ⅓ cup Shredded Cheese: This is your CRUST. The star. I love a sharp cheddar for its bold flavor and excellent melt, or a mozzarella for its epic stretch. A pre-shredded Mexican blend is my weeknight hero. Pro Tip: For the crispiest, laciest crust, shred your cheese from a block. Pre-shredded cheese has anti-caking agents that can sometimes inhibit that perfect melt.
- Filling of Choice (About ¾ – 1 cup): This is where you shine! Use what you love.
- Classic: Shredded rotisserie chicken, a sprinkle of taco seasoning, and a dollop of salsa.
- Veggie-Packed: Sautéed bell peppers, onions, black beans, and corn.
- Breakfast-for-Dinner: Scrambled eggs, crispy bacon, and a slice of avocado.
Key Point: Make sure your filling is either already cooked or doesn’t require much time, as we’re cooking the wrap quickly. And don’t overfill! It makes folding and flipping tricky.
- Optional: Butter or Cooking Spray: A tiny, tiny swipe of butter or spray on the second side (the one without cheese) before flipping will give you an all-over golden finish. It’s not strictly necessary, but it’s a delicious little bonus.
Let’s Build Some Crispy, Cheesy Magic: Step-by-Step
Ready? This is where the fun happens. I’ll walk you through every step with my favorite kitchen hacks sprinkled in.
- Prep Your Station. Have your tortilla, filling, and cheese measured and ready to go by the stove. This moves fast once the pan is hot, and we don’t want any frantic searching! Chef’s Hack: I always lay my tortilla flat, pile the filling slightly off-center (closer to the bottom third), and get my spatula ready. Being prepared is 90% of stress-free cooking.
- Heat the Pan. Place a non-stick or well-seasoned cast iron skillet over medium heat. Let it get properly warm for a minute or two. You want it hot enough to sizzle the cheese immediately, but not so hot that the cheese burns before the tortilla heats through. Tip: If a drop of water sizzles and evaporates quickly, you’re good to go.
- Create the Cheese Canvas. Here’s the revolutionary move! Evenly sprinkle your shredded cheese directly onto the dry, hot skillet. Form it into a circle that’s roughly the size of your tortilla. It should look like a little cheese island. Don’t touch it! Let it start its magic.
- Place & Press. Within 10-15 seconds, carefully place your filled and folded wrap seam-side down, directly on top of the cheese circle. Gently press down with your spatula—this helps the cheese adhere to the entire surface. Listen for that gentle sizzle. That’s the sound of success.
- Patiently Crisp. Now, let it cook undisturbed for 2-3 minutes. Peek at the edges. You’re waiting for the cheese to transform from melty white to a deep, golden brown. It will look lacy and caramelized. This patience is KEY for the ultimate crunch.
- The Flip. This is the moment of truth! Slide your spatula carefully under the entire wrap. It should release easily if the cheese crust is set. In one confident motion, flip it over. If you want the other side golden, you can add that tiny bit of butter to the pan now, then slide the wrap onto it. Cook for another 1-2 minutes just to warm and slightly crisp the second side.
- Rest & Slice. Transfer your gorgeous, cheesy-crusted wrap to a cutting board. Let it rest for just a minute—this helps the filling settle so it doesn’t gush out when you cut. Then, use a sharp knife or pizza cutter to slice it in half or into thirds. Reveal that beautiful, cheesy, crispy cross-section!
How to Serve Your Masterpiece
Presentation is part of the fun! I love serving these cheese-crusted wraps sliced on a simple wooden board or a bright plate, with the cheesy crust facing up so everyone can admire it. Pile some crunchy side salads next to it—a simple lime-dressed slaw or a handful of tortilla chips. Don’t forget the dips! A cool, creamy ranch, a spicy sriracha mayo, or a classic side of salsa and guac are perfect for dragging those crispy cheesy edges through. It’s handheld food, but it feels like a celebration.
Ride Your Own Flavor Wave: Creative Twists
- “Everything Bagel” Style: Use a garlic-herb cream cheese spread inside with smoked salmon or turkey. For the crust, use mozzarella and immediately after flipping, press the top (non-cheese side) into “Everything Bagel” seasoning.
- Pizza-Wrap Hybrid: Fill with pepperoni, marinara, and chopped olives. Use a mix of mozzarella and parmesan for the crust. Dip in warm marinara.
- Southwest Sweet Potato: Mashed roasted sweet potato, black beans, and cumin-spiced chicken. Use a pepper jack cheese for the crust for a kick.
- Dessert Wrap: Fill with sliced strawberries, a smear of Nutella or peanut butter, and mini marshmallows. Use a mild cheese like mozzarella for the crust, then dust with powdered sugar after cooking.
- Dairy-Free Delight: Use your favorite plant-based shredded cheese for the crust. The technique works the same! A filling of spicy chickpeas and roasted veggies is amazing here.
Isla’s Kitchen Notes & Stories
This recipe has become my ultimate “clean out the fridge” Friday night tradition. My kids now call them “Magic Crunch Wraps” and argue over who gets to sprinkle the cheese. Over time, I’ve learned a few things: First, bold, aged cheeses make a more flavorful but sometimes less uniform crust (which I love!), while milder cheeses like mozzarella give you that classic, photogenic lace. Second, don’t be afraid if a little cheese escapes the sides and fries up on its own—those are the cook’s treats, the crispy little bonuses for you to snack on while plating.
The biggest evolution? I started using it for more than just wraps. I now use this method for grilled cheese (bread on a cheese crust—trust me), and even to “glue” the edges of homemade empanadas shut. It’s a technique, not just a recipe, and that’s what makes it so powerful. Play with it, make it yours, and always, always do a little happy dance when you flip it and see that perfect golden crust.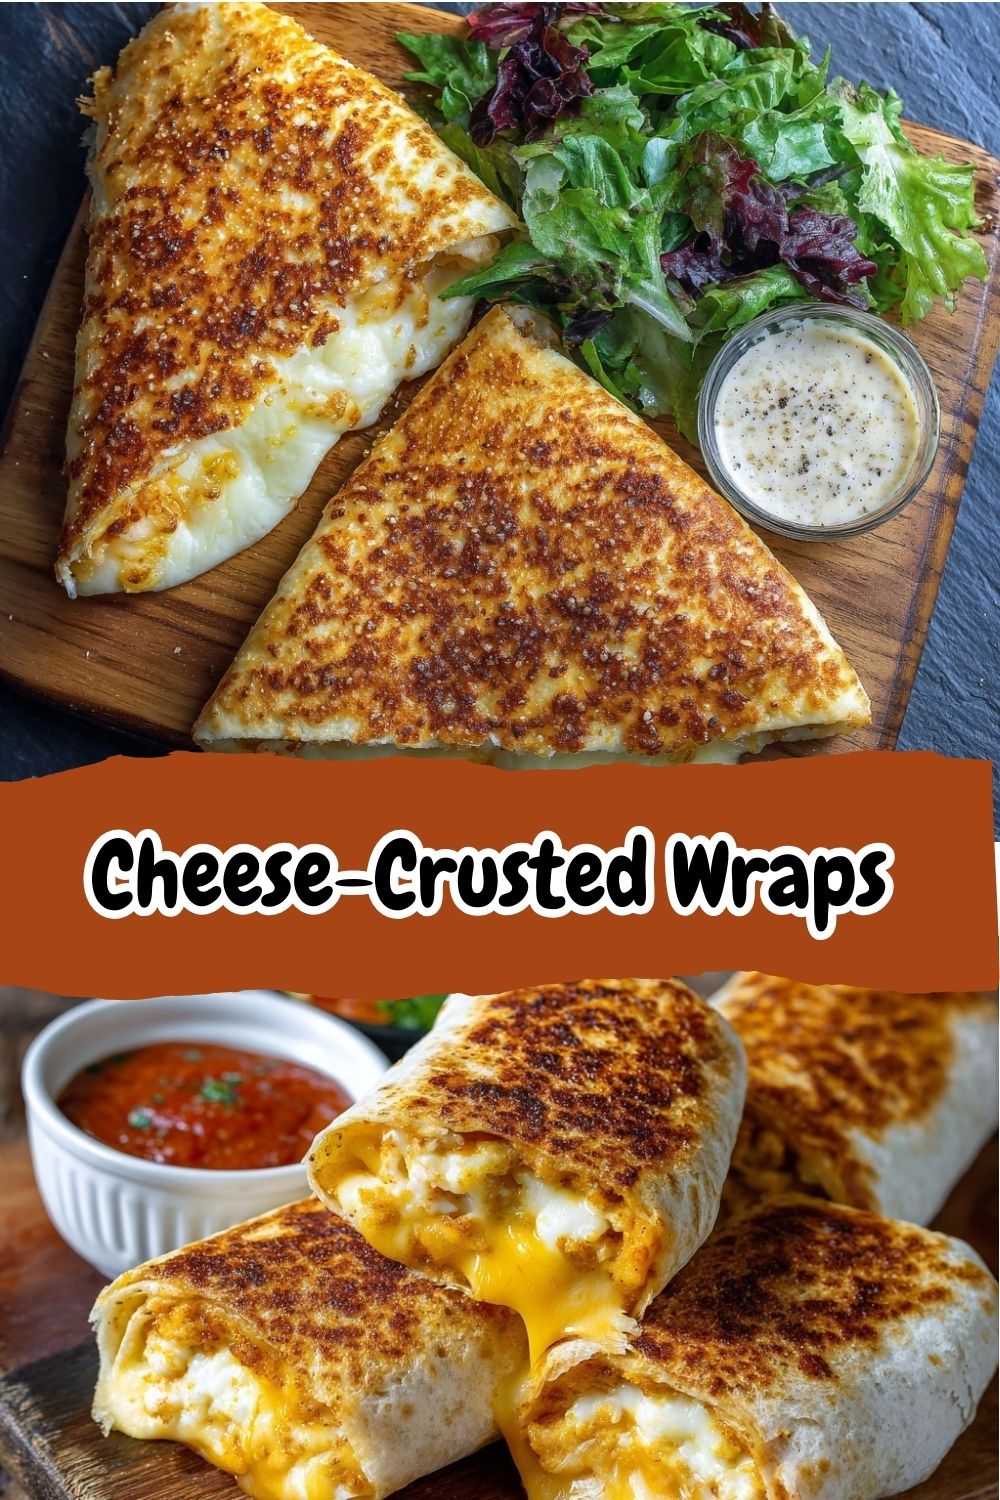
Your Questions, Answered!
Q: My cheese is burning before my wrap heats up. What’s happening?
A: Your heat is likely too high! Medium heat is your friend. You want a steady, even heat that melts and toasts the cheese while simultaneously warming the tortilla and filling. If it’s browning in under a minute, turn it down.
Q: Can I make multiple wraps at once?
A: Absolutely! I do this for my family. Just make sure you have enough space in your skillet to create separate cheese circles for each wrap without them merging. Cook them one after the other and keep finished wraps warm on a baking sheet in a 200°F oven.
Q: The cheese stuck to my pan! Help!
A> Two likely culprits: 1) The pan wasn’t hot enough when you added the cheese, causing it to melt and glue itself instead of sizzle. 2) You tried to flip or move it too early. Wait for that full golden-brown crust—it will release like a dream. For stubborn bits, let the pan cool, add some water, and simmer to loosen.
Q: Can I prep these ahead of time?
A> You can prep the fillings ahead, but I don’t recommend assembling and cooking until you’re ready to eat. The magic is in that immediate, fresh crispiness. However, you can keep the cooked wrap warm in the oven for about 20 minutes, though the crust will soften slightly.
Nutritional Information*
*This is a general estimate for a wrap with a cheddar crust and a chicken & veggie filling. Values will vary widely based on your specific ingredients and fillings.
Per Serving (1 wrap): Calories: ~450 | Total Fat: 25g | Saturated Fat: 10g | Cholesterol: 65mg | Sodium: 800mg | Total Carbohydrates: 32g | Dietary Fiber: 3g | Sugars: 2g | Protein: 24g