 Let’s Make Some Magic: Candied Cherry Divinity Squares
Hey there, friend! Isla here from BiteTide, and I am just buzzing with excitement to share today’s recipe with you. If you’ve ever found yourself wandering through a holiday market, mesmerized by the glossy, beautiful candies in the displays, but thought, “I could never make that at home,” then I’m here to tell you something important: you totally can. And I’m going to show you how, with zero fuss and maximum flavor. Welcome to the wonderfully simple world of Candied Cherry Divinity Squares.
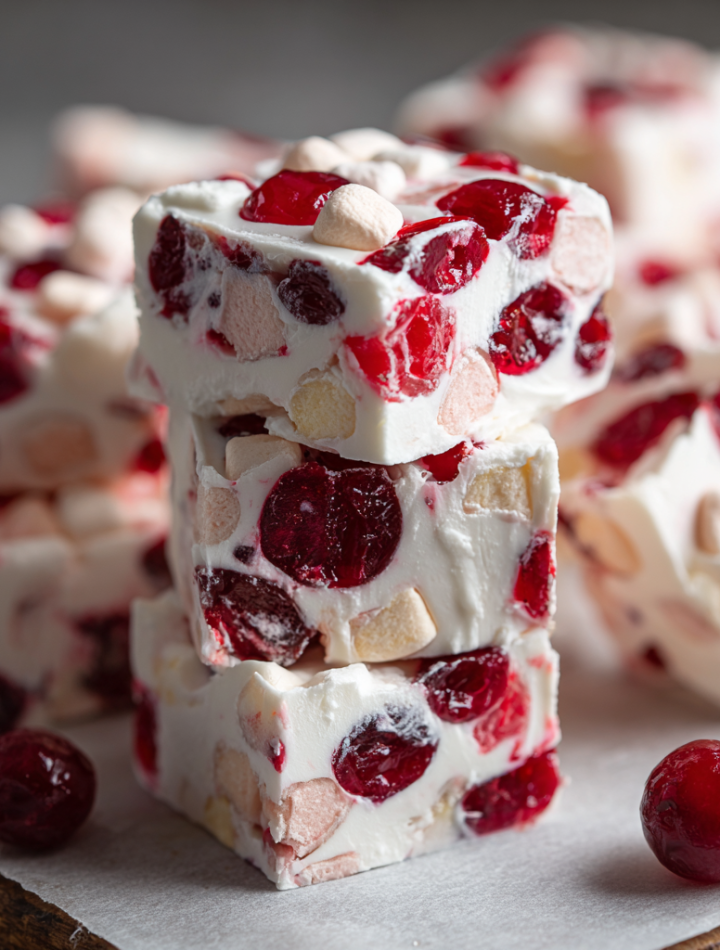
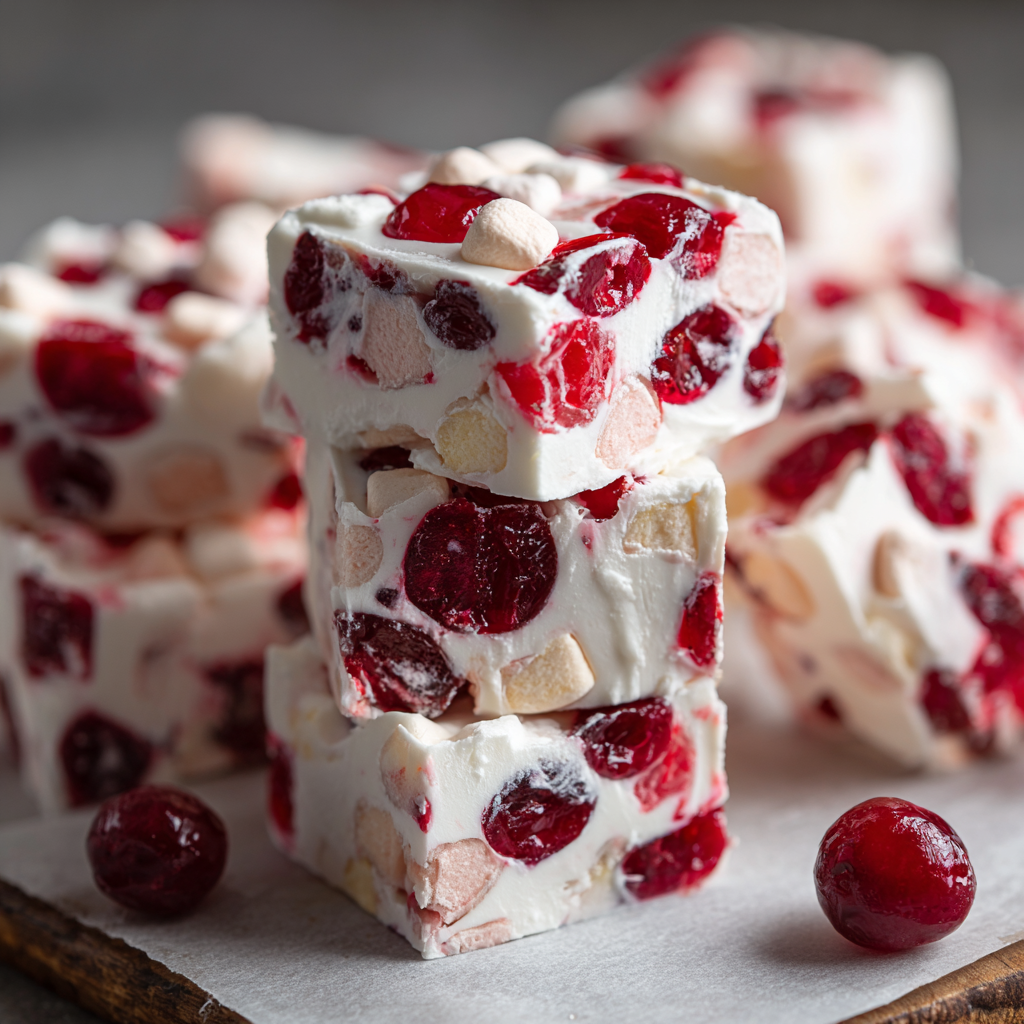
These little squares are like a bite of snowy, chewy, sweet heaven. They have that classic divinity candy texture—soft, pillowy, and melt-in-your-mouth—but without the finicky sugar thermometers or arm-aching stirring. Our secret? A genius no-cook method that uses white chocolate and marshmallows for a foolproof base. Studded with vibrant, sweet-tart candied cherries, they’re a feast for the eyes and the soul. They’re perfect for holiday cookie boxes, a sweet treat after dinner, or just because you deserve a little sparkle in your day. So, tie on your favorite apron, and let’s create something deliciously magical together.
A Spoonful of Sweet Memories
This recipe always takes me right back to my grandma’s kitchen during the holidays. The air would be thick with the scent of gingerbread and peppermint, and tins of every shape and size would be lined up on the counter, waiting to be filled. My job, as the official “tiny hands helper,” was to decorate the sugar cookies and, my favorite task, press the bright red candied cherries into the tops of her famous divinity.
She’d make the traditional kind, whipping egg whites and cooking sugar syrup to the soft-ball stage, a process that seemed like pure wizardry to me. I’d watch, utterly fascinated, as her stand mixer transformed clear syrup into a fluffy, white cloud. She’d always let me sneak a taste from the beaters—a memory that still makes me smile. This version is my modern, no-stress homage to her. It captures all that nostalgic flavor and fun textural joy but in a way that fits into our busy, beautiful, real lives. Every time I make these, I feel like she’s right there in the kitchen with me, and I hope they create some equally sweet memories for you, too.
Gathering Your Flavor Wave
Here’s the beautiful part: you only need a handful of simple ingredients to create this stunning candy. Let’s break them down, because knowing your ingredients is the first step to kitchen confidence!
- 2 bags (12 oz each) white chocolate chips: This is the foundation of our squares, providing structure and that creamy, vanilla-like flavor. Chef’s Insight: I highly recommend using a quality brand like Ghirardelli or Guittard for the smoothest melt. Cheap chips can sometimes be finicky and seize up more easily.
- 2 bags (10 oz each) mini marshmallows: These are our magic ingredient for that iconic airy, chewy divinity texture without any whipping required! Pro Tip: Minis are key here—they melt down much more evenly and quickly than large marshmallows.
- 5 tablespoons unsalted butter: Butter adds a rich flavor and helps create a wonderfully smooth, creamy texture. Using unsalted lets you control the salt level in your dessert.
- 1½ to 2 cups candied cherries, halved or chopped: The star of the show! Their jewel-toned color and sweet, slightly tangy flavor are the perfect contrast to the sweet base. Substitution Tip: Not a cherry fan? You can easily swap in an equal amount of candied pineapple, chopped dried apricots, or even toasted pecans for a different twist!Print

Candied Cherry Divinity Squares
- Total Time: 3 hours 10 minutes
- Yield: 30 squares 1x
Description
If you’re a fan of chewy nougat-style candy, these Candied Cherry Divinity Squares are a must-make. With a snowy white base and vibrant ruby-red candied cherries mixed in, every bite is soft, sweet, and visually stunning. They’re festive, nostalgic, and perfect for holiday gifting or snacking straight from the fridge.
Ingredients
Scale2 bags (12 oz each) white chocolate chips
2 bags (10 oz each) mini marshmallows
5 tablespoons unsalted butter
1½ to 2 cups candied cherries, halved or chopped
Instructions
Line a 9×13-inch baking pan with parchment paper.
In a large pot over low heat, melt white chocolate chips, marshmallows, and butter together, stirring constantly until smooth.
Remove from heat and let cool for 1–2 minutes.
Gently stir in candied cherries until evenly distributed.
Pour mixture into the prepared pan and press down evenly.
Refrigerate for at least 3 hours or until firm.
Cut into small squares and serve.
- Prep Time: 10 minutes
- Category: Dessert
Nutrition
- Calories: 160
- Sugar: 22g
- Fat: 6g
- Saturated Fat: 4g
Let’s Get Cooking: Your Foolproof Steps to Candy Bliss
Ready to make some magic? This process is wonderfully simple, but a few chef-approved tips will ensure your squares turn out perfectly every single time. Let’s do this!
- Line a 9×13-inch baking pan with parchment paper. This is non-negotiable for easy removal later! Let the parchment overhang on two sides—it acts like a sling so you can lift the entire block of candy out of the pan before cutting. Lightly greasing the pan first helps the parchment stick in place. Little Chef Hack: Use binder clips to secure the parchment to the sides of the pan while you pour the mixture in. Game-changer!
- In a large pot over LOW heat, melt white chocolate chips, marshmallows, and butter together, stirring constantly until smooth. Patience is your best friend here. Keep the heat low and steady to avoid scorching the chocolate. I like to use a sturdy silicone spatula for stirring—it scrapes the sides and bottom of the pot beautifully. You’ll see it start to look a bit lumpy at first, but just keep stirring! In about 7-10 minutes, it will transform into one gloriously smooth, creamy mixture.
- Remove from heat and let cool for 1–2 minutes. This short cooling period is crucial! If you add the cherries to the molten-hot mixture, they might bleed their color everywhere (which can look pretty, but if you want distinct red bits, let it cool). It also allows the mixture to thicken just a tad, making it easier to fold in the cherries without deflating the airiness.
- Gently stir in candied cherries until evenly distributed. Use a folding motion to incorporate them. You want every square to be packed with cherry goodness! If your cherries are sticky, a light dusting of powdered sugar can help them separate and distribute more evenly.
- Pour mixture into the prepared pan and press down evenly. Transfer the mixture to your lined pan. Because it’s sticky, I like to lightly grease my spatula or even my hands with a bit of butter or cooking spray to press it into a smooth, even layer without a mess.
- Refrigerate for at least 3 hours or until firm. Don’t rush this step! The fridge time allows everything to set up properly so you get clean, neat squares. If you’re in a huge hurry, you can pop it in the freezer for about an hour, but the fridge is best.
- Cut into small squares and serve. Use a sharp knife to cut them into 1-inch squares. For super clean cuts, you can wipe the knife blade clean between slices. These are rich and sweet, so small squares are the perfect size!
How to Serve These Little Gems
Presentation is part of the fun! Pile these snowy-white and ruby-red squares high on a beautiful vintage platter for a stunning holiday dessert table. For gifting, stack them in clear cellophane bags tied with a festive ribbon, or layer them in a festive tin between sheets of parchment paper. They pair wonderfully with a cup of strong black coffee to cut through the sweetness or a glass of cold milk for the ultimate nostalgic treat. Store them in an airtight container in the refrigerator—they love the cold!
Ride Your Own Flavor Wave: Creative Twists!
The beauty of this base recipe is how adaptable it is. Don’t be afraid to get creative and make it your own!
- Rocky Road: Swap the cherries for 1 cup of mini marshmallows (yes, more!), 1 cup of toasted walnuts, and ½ cup of mini chocolate chips.
- Tropical Bliss: Use chopped candied pineapple and macadamia nuts for a sunny, vacation-in-your-mouth vibe.
- Peppermint Patty: Omit the fruit and stir in 1 teaspoon of peppermint extract and ½ cup of crushed peppermint candies or candy canes.
- Nutty Buddy: Go classic divinity by using 1 ½ cups of toasted pecans or almonds instead of the cherries.
- Chocolate Dip: For next-level indulgence, dip half of each set square into melted dark chocolate and let it set on a parchment-lined tray.
Isla’s Chef Notes & Kitchen Stories
This recipe has become a staple in my holiday repertoire precisely because it’s so forgiving. I remember one year, I was filming a video for the blog and my cat, Pickles, decided the sound of the marshmallows melting was the most fascinating thing in the world. He launched himself onto the counter mid-shot, nearly sending the pot flying! We salvaged it (and the video, after some editing), and it just goes to show—even with a little chaos, these squares turn out. The recipe has evolved, too; I started with one bag of chips and learned the hard way that two gives a much sturdier, more satisfying set. Trust me, I’ve made the mistakes so you don’t have to. The most important ingredient you can add is a sense of fun!
Your Questions, Answered!
Q: My mixture became grainy or seized up. What happened?
A: This usually means the heat was too high, causing the chocolate to scorch or the sugar to tighten up. Unfortunately, it’s hard to come back from this. Next time, be sure to use a heavy-bottomed pot and keep the heat on low, stirring patiently and constantly. If you see even a hint of smoke, pull it off the heat immediately!
Q: Can I use frozen or fresh cherries instead?
A: I don’t recommend it. Fresh and frozen cherries contain too much water, which will prevent the candy from setting properly and could cause it to become a soupy mess. The dry, sugary quality of *candied* cherries is essential for the right texture and shelf stability.
Q: How far in advance can I make these?
A: They are fantastic for making ahead! Stored in an airtight container in the refrigerator, they will keep beautifully for up to two weeks. Their flavor even improves after a day or two as everything melds together.
Q: My squares are too sticky to cut. Help!
A: This means they likely needed more time to set. Pop the whole pan back into the fridge for another hour. If you’re still having trouble, lightly grease your knife with butter or cooking spray before each cut to get through the sticky layer smoothly.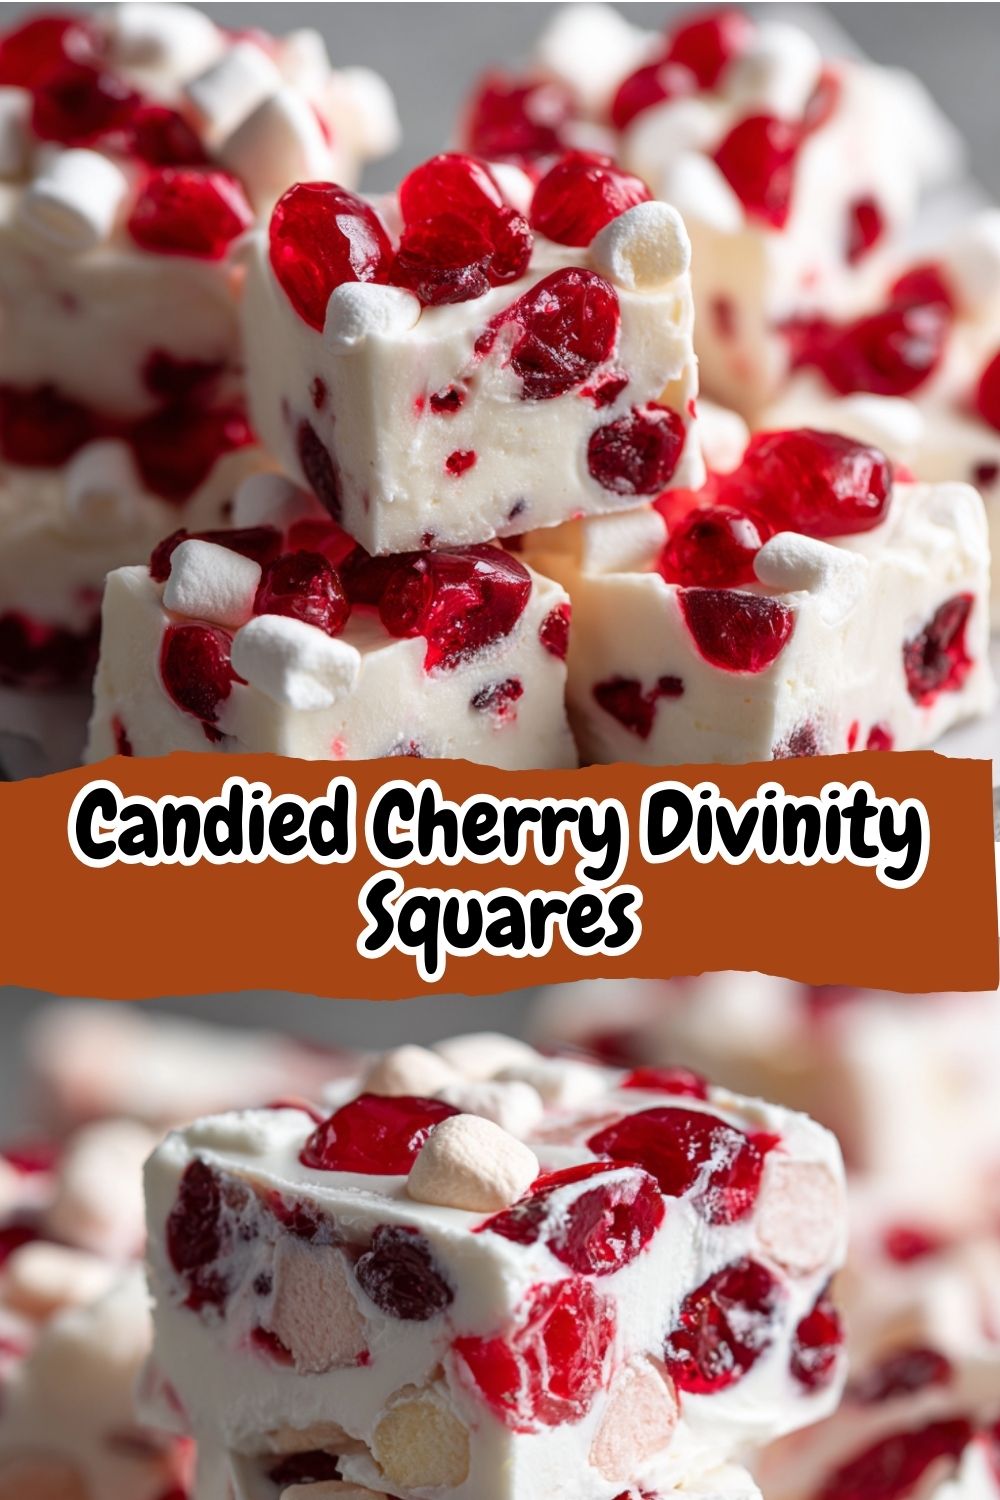
Nutritional Information (Per Square)
Yield: About 30 squares
Prep Time: 10 minutes
Chill Time: 3 hours
Total Time: 3 hours 10 minutes
Calories: 160 | Fat: 6g | Saturated Fat: 4g | Carbohydrates: 26g | Sugar: 22g | Protein: 1g | Sodium: 30mg
*Please note: Nutritional information is an estimate and may vary based on specific ingredients used.*