Bacon Deviled Eggs: The Ultimate Party Appetizer That Never Lasts
Hey there, friend! Isla here from BiteTide. Tell me if this sounds familiar: you’re heading to a potluck, a game day gathering, or just need a killer snack for movie night, and you want to bring something you know will be a hit. Something that says, “I’m an amazing host,” but also whispers, “and this was actually super easy to make.” Well, pull up a chair, because I’m about to share my secret weapon: the most incredibly addictive, smoky, savory Bacon Deviled Eggs you will ever taste.
We’re taking the classic, beloved deviled egg—a blank canvas of creamy, dreamy potential—and we’re turning up the volume. We’re adding the crispy, salty, utterly irresistible magic of bacon. It’s a combination that feels both gloriously indulgent and wonderfully familiar. This isn’t just a recipe; it’s a guaranteed crowd-pleaser, the first platter to empty at any party. I’ve made these more times than I can count, and I’ve perfected every step, from the foolproof easy-peel boiled egg to the creamy filling that’s perfectly balanced with a hint of tangy Dijon and a whisper of sweetness. So, let’s get our aprons on, put some bacon in the pan, and create some bite-sized magic together. Trust me, your future self (and all your friends) will thank you!
A Kitchen Full of Laughter and Deviled Eggs
This recipe always takes me right back to my grandma’s linoleum-floored kitchen, a place that always smelled like fresh coffee and something delicious baking in the oven. Every major family gathering, without fail, involved a massive Tupperware container of deviled eggs. It was my job, even when I was barely tall enough to see over the counter, to be the official “egg peeler.” I’d sit at the table with a big bowl of cool water, carefully tapping each boiled egg and rolling it gently to crack the shell, completely mesmerized as the peel came off in satisfying, curly strips.
My grandma would then take over, slicing them with a wire she kept specifically for the task (no knife marks on her yolks!), and I’d watch her mix the filling with a generous hand, always tasting it off the tip of a butter knife before giving me a nod of approval. She never wrote anything down, of course—it was all “a glug of this” and “a pinch of that.” These bacon deviled eggs are my love letter to her classic recipe, but with my own bold, BiteTide twist. That addition of crispy bacon? It’s the kind of fun, flavor-forward move she would have absolutely adored. Making them now, I can still hear her laughter echoing in my kitchen, a reminder that the best recipes are the ones that come with a side of happy memories.
Print
Bacon Deviled Eggs
- Total Time: 30 min
- Yield: 12 halves (6 whole eggs) 1x
Description
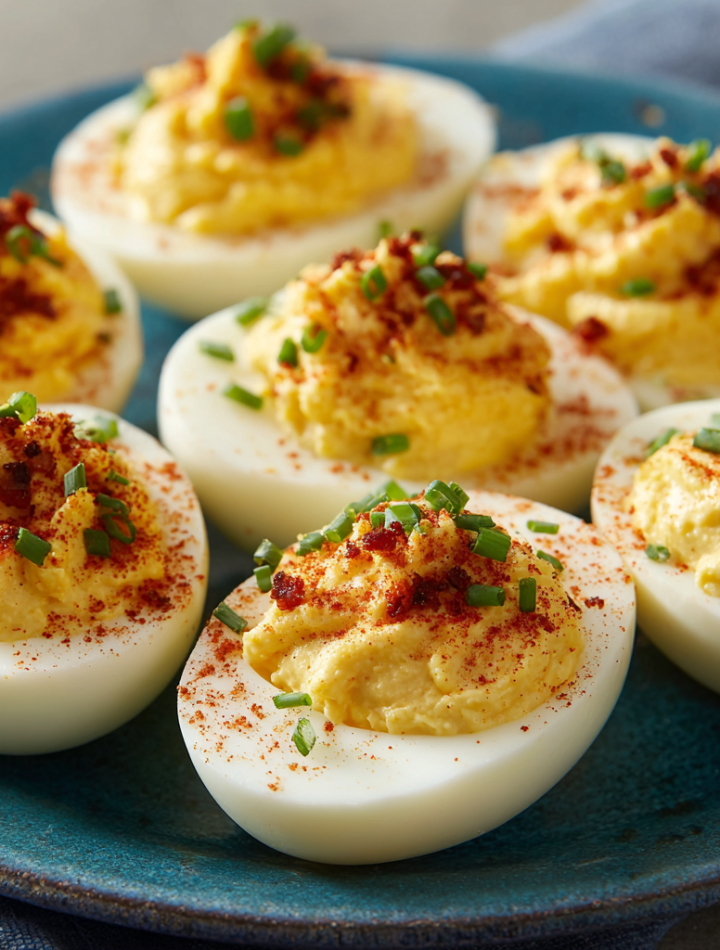
These bacon deviled eggs take a classic party favorite and give it a smoky, savory twist. Creamy yolks are blended with Dijon, mayo, and a hint of vinegar, then topped with crispy bacon, paprika, and fresh chives for a bite-sized appetizer that disappears fast.
Ingredients
6 large eggs
4 strips thick-cut bacon, cooked and crumbled
3 tbsp mayonnaise
1 tbsp Dijon mustard
1 tsp apple cider vinegar
1/2 tsp sugar
Pinch of salt
Pinch of black pepper
Smoked paprika, for garnish
Fresh chives, chopped (optional)
Instructions
Boil eggs: Place eggs in a saucepan and cover with cold water. Bring to a boil, then cover, remove from heat, and let sit for 10–12 minutes. Transfer to an ice bath to cool, then peel.
Halve and scoop: Slice eggs in half lengthwise and remove yolks. Place yolks in a bowl and mash with mayo, Dijon, vinegar, sugar, salt, and pepper until smooth.
Add bacon: Stir in most of the crumbled bacon, saving some for garnish.
Fill: Spoon or pipe the yolk mixture into the egg whites.
Garnish: Sprinkle with paprika, extra bacon, and chives if using.
- Prep Time: 20 min
- Cook Time: 10 min
- Category: Snack
Nutrition
- Calories: 90
- Fat: 7g
- Carbohydrates: 1g
- Protein: 5g
Gathering Your Flavor Crew: The Ingredients
Here’s your shopping list for these irresistible bites. Don’t worry, it’s all simple, easy-to-find stuff. I’ve included my best chef insights and substitution hacks so you can make this recipe work with whatever you have on hand!
- 6 large eggs: The star of the show! Older eggs are actually easier to peel, so if you can, use ones that have been in your fridge for a week or so. Room temperature eggs are less likely to crack during boiling, but I never remember to take them out early and it’s always fine—our method is foolproof!
- 4 strips thick-cut bacon: This is where the smoky, savory magic comes from. Thick-cut gives you a better, meatier crunch. For a lighter option, you can use turkey bacon, but pan-fry it until it’s super crispy to mimic that texture.
- 3 tbsp mayonnaise: This creates the lush, creamy base for our filling. Use a good-quality mayo you love the taste of! For a tangier twist, you could swap in half Greek yogurt or sour cream.
- 1 tbsp Dijon mustard: My little secret weapon! Dijon adds a complex, sharp tang that cuts through the richness perfectly. Yellow mustard works in a pinch, but it will give a different, more straightforward flavor.
- 1 tsp apple cider vinegar: A tiny bit of acidity is key to balancing the fat from the yolk, mayo, and bacon. It brightens everything up! White wine vinegar or even a squeeze of lemon juice are great substitutes.
- 1/2 tsp sugar: Just a pinch! This isn’t to make it sweet, but to round out the sharp edges of the vinegar and mustard, creating a perfectly harmonious filling. You won’t taste the sugar, I promise—you’ll just taste “perfection.”
- Pinch of salt & black pepper: Essential for making all the other flavors pop. Always season to taste at the end!
- Smoked paprika, for garnish: Not just for pretty color! Smoked paprika adds a final whisper of smokiness that complements the bacon beautifully. Sweet paprika works too, but smoked is truly next-level.
- Fresh chives, chopped (optional): A gorgeous, fresh, oniony finish that adds a pop of color and a lovely fresh flavor. If you don’t have chives, a little thinly sliced green onion or even a tiny bit of fresh dill would be lovely.
Let’s Get Cooking: Your Foolproof Step-by-Step Guide
Ready to make magic? Follow these steps, and you’ll have the most perfect, creamy, dreamy deviled eggs. I’ve packed this section with all my best tips and kitchen hacks to ensure your success!
Step 1: The Perfect Hard-Boiled Egg
Place your eggs in a single layer in a saucepan. Cover them with cold water by about an inch—this is crucial for even cooking! Bring the pot to a rolling boil over high heat. The second it hits a full boil, immediately put a lid on the pot and remove it from the heat. Set a timer for 10 minutes (for a perfectly set yolk with no gray ring) and walk away. No peeking! While they’re sitting, prepare an ice bath: a large bowl filled with cold water and ice. When the timer goes off, use a slotted spoon to transfer the eggs directly into the ice bath. Let them chill for at least 5 minutes. This shock stops the cooking process and, most importantly, makes them a dream to peel.
Step 2: Crispy Bacon is Key
While the eggs are doing their thing, cook your bacon. I like to lay the strips in a cold skillet and then turn the heat to medium. This renders the fat slowly, giving you an evenly crispy strip. Cook until it’s browned and crisp, then transfer to a paper towel-lined plate to drain. Once it’s cool enough to handle, crumble it into small bits. Don’t forget to save some for that gorgeous garnish on top!
Step 3: The Assembly Line
Once your eggs are completely cool, tap each one gently on the counter to crack the shell all over. I like to roll it gently between my hands to loosen it. Start peeling from the wider end, where there’s usually a small air pocket—it makes it much easier. Rinse any little bits of shell off under cool water and pat them dry. Now, slice each egg in half lengthwise. Gently pop the yolks out into a medium bowl and arrange the empty white halves on your serving platter.
Step 4: The Creamy Dreamy Filling
Now for the fun part! Take a fork and mash the yolks until they’re fine and crumbly. This is your base. Add in the mayonnaise, Dijon mustard, apple cider vinegar, sugar, salt, and pepper. Now, mix everything together until it’s incredibly smooth and creamy. I sometimes switch to a small whisk here to really get out any lumps. Taste it! This is your moment. Does it need more salt? More tang? Adjust to your liking. Now, fold in about two-thirds of your glorious crumbled bacon. Save the rest for the top!
Step 5: The Grand Finale
You can spoon the filling back into the egg white cups, but for a truly professional, gorgeous look, piping is the way to go. Spoon the filling into a plastic zip-top bag, snip off one corner, and pipe away! It looks beautiful and is honestly less messy. Once all your eggs are filled, it’s garnish time. A light dusting of smoked paprika, a generous sprinkle of the remaining bacon, and a few snips of fresh chives. And voila! You’ve just created a masterpiece.
Plating Your Masterpiece
Presentation is part of the fun! I love using a beautiful vintage deviled egg platter if I have one, but a simple white plate or a rustic wooden board works just as well. For a pop of color that makes the eggs really stand out, you can line the platter with a few leaves of butter lettuce or some vibrant spinach. Arrange the eggs in a circular pattern or in neat rows. Just before serving, add that final garnish of bacon and chives. They look so inviting, your guests won’t be able to resist diving in!
Ride the Flavor Wave: Creative Twists!
Once you’ve mastered the classic, the world of deviled eggs is your oyster! Here are a few of my favorite ways to mix it up:
- Spicy Sriracha: Add 1-2 teaspoons of sriracha to the filling and garnish with a tiny slice of jalapeño for a kick!
- Everything Bagel: Swap the bacon for a tablespoon of everything bagel seasoning mixed into the filling, and sprinkle more on top with extra chives.
- Avocado Lime: Replace half the mayo with mashed ripe avocado and add a big squeeze of fresh lime juice. So fresh and creamy!
- Buffalo Chicken: Add 1/4 cup of finely shredded cooked chicken and 1-2 tablespoons of buffalo sauce to the filling. Top with a tiny piece of celery for the full wing experience.
- Keto-Friendly: This recipe is already pretty keto! Just omit the tiny bit of sugar, and you’re good to go.
Isla’s Chef Notes & Kitchen Stories
This recipe has been through it all with me! I once made a triple batch for a huge family reunion and, in my haste, forgot to add the mayo. I started piping and was like, “Why is this so crumbly?!” Major facepalm moment. I had to scrape all the filling back into the bowl, mix in the mayo, and start over. Lesson learned: mise en place (having all your ingredients prepped and measured) is your best friend! Another time, my then-toddler decided the ice bath looked like a fun splash zone. Let’s just say we had a very wet kitchen, but the eggs still turned out perfectly. The moral of the story? Don’t stress. These eggs are resilient and hard to mess up. They’ve evolved from my grandma’s simple version to my bacon-loaded bite of heaven, and I love that you can make them your own, too.
FAQs: Your Questions, Answered!
Q: My eggs are impossible to peel! What am I doing wrong?
A: I feel your pain! The number one trick is to use older eggs (7-10 days old) and that ice bath. Shocking them in ice water causes the egg to contract away from the shell, making peeling a breeze. Also, make sure you’re peeling them under a thin stream of running water—it helps wash away any stubborn shell bits.
Q: Can I make these ahead of time?
A: Absolutely! This is a fantastic make-ahead appetizer. You can hard-boil the eggs up to 3 days in advance and keep them peeled and whole in a sealed container in the fridge. You can also cook and crumble the bacon ahead. I recommend mixing the filling and assembling the eggs the day of for the best texture, but they’ll still be delicious if you assemble them a few hours ahead. Just hold off on the final garnish until right before serving.
Q: My filling is a bit loose. How can I thicken it up?
A> No worries! Pop the filling into the fridge for 20-30 minutes to firm up before piping. If it’s still too loose, you can add a tiny bit more mashed yolk or a pinch of paprika to help absorb moisture.
Q: What’s the best way to transport these to a party?
A: Invest in a good deviled egg carrier! They have little indentations to keep the eggs from sliding around. If you don’t have one, place your platter on a flat surface in your car and have a passenger hold it steady. You can also put the filling in one container and the whites in another and assemble them at your destination—it’s a great trick to keep everything looking fresh.
Nutritional Information (Approximate, per deviled egg half)
Calories: 90 | Fat: 7g | Saturated Fat: 2g | Cholesterol: 95mg | Sodium: 115mg | Carbohydrates: 1g | Sugar: 0.5g | Protein: 5g
**Remember, friends, these are just estimates and can vary based on the specific brands and ingredients you use. The important thing is to enjoy every delicious, flavorful bite!
