 Hey There, Flavor Seeker! Ready to Make Some Magic?
Okay, let’s be real for a second. Brussels sprouts. They’ve spent decades being the most misunderstood, unfairly maligned veggie in the produce aisle. I’m talking about the vegetable everyone loved to hate. If you’ve ever been traumatized by a sad, mushy, boiled sprout from your childhood, I am here to be your culinary therapist. I’m about to show you how to transform these little green gems into a side dish so incredibly addictive, so ridiculously crispy and delicious, that it might just upstage the main course. And the best part? We’re letting the air fryer do all the heavy lifting. This isn’t just a recipe; it’s a revelation. We’re taking simple, humble ingredients and turning them into a crispy, caramelized, flavor-packed phenomenon that will have everyone at your table begging for seconds. So, if you’re ready to convert the skeptics and make your taste buds do a happy dance, preheat that air fryer, grab your favorite bowl, and let’s get cooking. Trust me, this is the start of a beautiful, crunchy friendship.
The Sprout That Stole My Heart
My love affair with Brussels sprouts didn’t start in a fancy restaurant. Oh no, it began in the most chaotic, laughter-filled kitchen imaginable: my best friend’s annual “Friendsgiving.” Picture this: six of us crammed into a tiny apartment kitchen, everyone assigned a dish, and I, the “food blogger,” was given the side-eye when I proudly announced I was bringing Brussels sprouts. My friend Mike groaned, “Isla, no one likes those! Remember my mom’s boiled ones? They tasted like sad cabbage!” Challenge accepted. I had just gotten my first air fryer and was obsessed with its crispy magic. I tossed them with oil, salt, pepper, and a wildcard—a splash of maple syrup I found in the cupboard. Fifteen minutes later, I pulled out a basket of golden, crispy, caramelized perfection. The smell alone turned heads. Mike, the biggest skeptic of all, tentatively tried one. His eyes went wide. “Whoa. What did you DO to these?!” He ate half the bowl himself. That was the moment I knew—the air fryer wasn’t just a gadget; it was a vegetable revolution machine. Now, these sprouts are a non-negotiable at every single gathering. They’re not just a dish; they’re a memory maker.
Print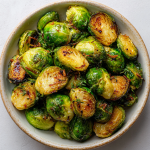
Air Fryer Brussels Sprouts
- Total Time: 20 mins
- Yield: 2–3 servings 1x
Description
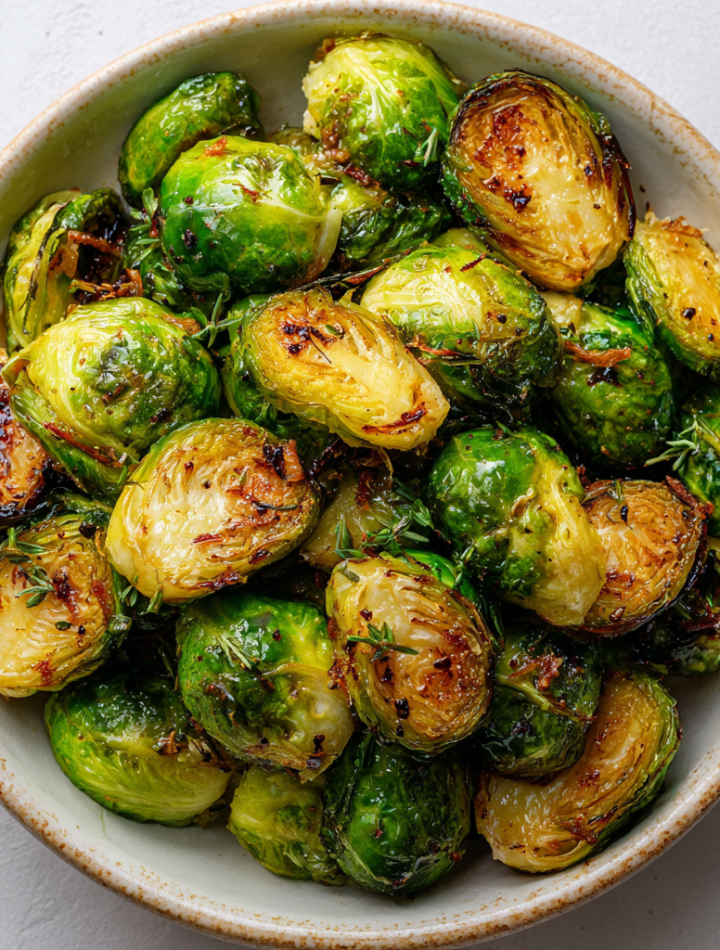
Crispy, caramelized, and full of flavor—these Air Fryer Brussels Sprouts are a total game-changer. Seasoned simply with garlic, onion, and just the right touch of salt and pepper, they’re roasted to golden perfection with zero fuss. Even Brussels skeptics will fall in love.
Ingredients
2 cups Brussels sprouts, halved
1 tbsp cooking oil (olive or avocado oil)
1/2 tsp garlic powder
1/2 tsp onion powder
Salt & pepper to taste
Instructions
Preheat air fryer to 390°F (200°C).
In a bowl, toss Brussels sprouts with oil, garlic powder, onion powder, salt, and pepper.
Air fry for 12–15 minutes, shaking halfway, until crispy and golden brown.
Serve hot, optionally topped with a sprinkle of Parmesan or a drizzle of balsamic glaze.
- Prep Time: 5 minutes
- Cook Time: 15 minutes
Nutrition
- Calories: 90
- Fat: 6g
- Carbohydrates: 8g
- Protein: 3g
Gathering Your Flavor Arsenal
Here’s everything you need to create this crispy masterpiece. The beauty of this recipe is in its simplicity, but each ingredient plays a starring role!
- 1½ lbs Brussels sprouts – Look for firm, bright green sprouts that are similar in size. This helps them cook evenly. Avoid any that are yellowing or have loose leaves. Don’t toss those outer leaves that fall off when you trim them! Throw them in the air fryer—they become these incredibly delicate, crispy chips. Chef’s insight: The smaller the sprout, the sweeter and more tender it tends to be.
- 2 tbsp olive oil – This is our crisp-enabler! It helps the seasonings stick and conducts heat for that perfect golden-brown exterior. Avocado oil is a great high-heat substitute if you prefer.
- 1 tsp garlic powder – Why powder instead of fresh? Fresh garlic can burn in the high, concentrated heat of the air fryer before the sprouts are done. Powder gives you that unmistakable garlicky flavor without the risk of a bitter, burnt taste.
- ½ tsp salt – Kosher salt or sea salt is my go-to. It draws out the natural sweetness of the sprouts as they cook. Don’t be shy—seasoning is key!
- ½ tsp black pepper – Freshly cracked pepper adds a little warmth and spice that complements the earthiness of the sprouts perfectly.
- 1 tbsp balsamic glaze (optional but highly recommended) – This is the flavor bomb at the finish line! The sweet, tangy, syrupy glaze clinging to the hot, crispy sprouts is a match made in heaven. You can find it near the vinegar in most stores. A reduction is thicker and stickier than regular balsamic vinegar, so it coats beautifully instead of making things soggy.
- 2 tbsp crispy fried garlic or shallots (optional) – This is my favorite “cheater” crunch topping. It adds a phenomenal texture and a huge boost of savory flavor. Find it in the international aisle of your grocery store. If you can’t find it, toasted panko breadcrumbs or even chopped toasted nuts make a great sub.
- Pinch of red pepper flakes (optional) – For my friends who like a little kick! A tiny pinch adds a subtle warmth that takes the flavor profile to the next level.
Let’s Make Some Crispy Magic: Your Step-by-Step Guide
Follow these steps, and you are guaranteed sprout success. I’m walking you through every detail!
- Preheat Your Air Fryer. Crank that baby to 375°F (190°C). I know, I know, preheating can feel like an extra step, but trust me on this one. It’s the secret to getting an immediate sear on the outside, which locks in that tender interior and kicks off the crisping process from the second the basket goes in. It usually takes about 3 minutes for most models to preheat.
- Prep Your Sprouts. This is the only “work” involved, I promise! Rinse your sprouts and pat them very dry with a kitchen towel or paper towels. Any excess water is the enemy of crispiness! Slice off the tough, woody stem end, then cut each sprout in half from top to bottom. Those outer leaves that fall off? DON’T THROW THEM AWAY! They are absolute gold. They’ll get extra crispy and are my favorite part. Chef’s hack: If you have any sprouts that are significantly larger than the others, cut them into quarters so everything cooks evenly.
- The Big Toss. In a large bowl, combine the halved sprouts (and all those loose leaves!), olive oil, garlic powder, salt, and pepper. Now, get in there with your hands and massage that oil and seasoning onto every single nook and cranny. This ensures maximum flavor and even browning. The bowl should look virtually dry when you’re done—the sprouts have absorbed the oil.
- Air Fry! Carefully place the sprouts in your preheated air fryer basket. This is crucial: arrange them in a single layer. No stacking! If they’re piled on top of each other, they’ll steam instead of roast. You want that hot air to circulate around every single sprout. It’s totally okay to cook in batches if your air fryer is on the smaller side. It’s worth the wait! Cook for 12-15 minutes.
- Shake It Up! Halfway through the cooking time, around the 6 or 7-minute mark, pull out the basket and give it a really good, vigorous shake. This redistributes the sprouts, ensuring all sides get equal exposure to the heat for uniform crispiness. This is when you’ll really start to smell the amazing aroma and see them turning golden brown.
- Check for Doneness. At the 12-minute mark, take a peek. They’re done when the outer leaves are dark brown, crispy, and caramelized, and the insides are tender when pierced with a fork. If you like them extra crispy (like I do!), let them go for another minute or two.
- The Grand Finale. Transfer your beautifully crispy sprouts to a serving bowl. While they’re still piping hot, drizzle them with the balsamic glaze and sprinkle generously with the crispy fried garlic and a pinch of red pepper flakes if using. Toss gently to combine. The heat from the sprouts will make the glaze get all sticky and wonderful.

How to Serve These Golden Gems
Presentation is part of the fun! Dump them into a wide, shallow bowl or on a rustic platter so everyone can see all those crispy edges. Let those crispy garlic bits and flecks of red pepper flake be visible—it makes them look as incredible as they taste. These sprouts are the ultimate versatile sidekick. They’re phenomenal next to a simple seared salmon fillet, piled high alongside a juicy roast chicken, or even served right on top of a bowl of creamy polenta. For a next-level vegetarian meal, toss them into a grain bowl with quinoa, roasted sweet potato, and a lemony tahini dressing. Honestly, I’ve been known to just eat a giant bowl of them straight from the air fryer basket with a fork. No judgment here!
Ride the Flavor Wave: Creative Twists!
Once you master the basic recipe, the world is your crispy oyster! Here are a few of my favorite ways to mix it up:
- Honey Sriracha: Swap the balsamic glaze for a mix of 1 tbsp honey and 1-2 tsp sriracha. Sweet, spicy, and utterly addictive.
- Parmesan Garlic: For the last 2 minutes of cooking, sprinkle the sprouts with ¼ cup of finely grated Parmesan cheese. Let it melt and get all cheesy and fabulous.
- Everything Bagel: After air frying, toss with a generous tablespoon of everything bagel seasoning. Instant flavor explosion!
- Maprye Bacon: Toss the raw sprouts with ½ tbsp maple syrup along with the oil. After cooking, toss with ¼ cup of cooked, crumbled bacon. A classic for a reason.
- Lemon Herb: Skip the glaze and garlic. After cooking, toss with the zest of one lemon, a squeeze of fresh lemon juice, and 2 tbsp of chopped fresh parsley or dill. So bright and fresh!
Isla’s Chef Notes & Kitchen Stories
This recipe has evolved so much since that first Friendsgiving. I’ve learned that the loose, rogue leaves are not a mistake—they’re the best part! I actively encourage them by peeling off a few extra outer leaves before halving. I also started adding the balsamic glaze *after* cooking instead of before. I made the mistake of adding it pre-cook once… let’s just say my air fryer had a very sticky, smoky deep-clean session afterward. Lesson learned! The funniest kitchen fail? The time I was filming a TikTok and went to do my dramatic “basket shake” move without securing the basket properly. Let’s just say my kitchen floor got a delicious coating of half-cooked Brussels sprouts. My dog was thrilled. I was… less thrilled. So learn from my chaos—always make sure that basket is clicked in securely!
Your Sprout Questions, Answered!
Q: Why are my Brussels sprouts not getting crispy?
A: The most common culprits are overcrowding the basket (they steam instead of roast) or not using enough oil. Make sure they’re in a single layer and nicely coated. Also, ensure they are thoroughly dried after washing!
Q: Can I make these in a regular oven instead?
A: Absolutely! Spread them on a parchment-lined baking sheet and roast at 425°F (220°C) for 20-25 minutes, flipping halfway through. They’ll be delicious, but the air fryer definitely gives them an unmatched crunch factor.
Q: How do I store and reheat leftovers?
A: Store cooled leftovers in an airtight container in the fridge for up to 3 days. To reheat, pop them back in the air fryer at 375°F for 3-4 minutes. This will bring back the crispiness much better than a microwave, which will make them soft.
Q: My air fryer is smoking! What’s happening?
A: A little smoke is normal from any tiny oil droplets, but a lot of smoke usually means oil has pooled at the bottom of the drawer. Make sure you’re tossing the sprouts thoroughly so the oil is absorbed, and always ensure your air fryer is clean before starting. Any old grease or food bits will smoke.
Nutritional Information (Per Serving)
Serves: 4 | This is an estimate provided for informational purposes only.
Calories: 130 | Protein: 4g | Carbohydrates: 11g | Dietary Fiber: 4g | Sugar: 3g | Fat: 8g | Saturated Fat: 1g | Sodium: 300mg
