The Ultimate Guide to Making a Banana Pudding Dessert Cheese Ball
Hey there, food lovers! 🌟 I’m Isla, and today, I’m here to share an absolutely delightful recipe that will make any gathering a hit—my Banana Pudding Dessert Cheese Ball! This dessert takes your classic banana pudding and gives it a fun twist that’s perfect for any occasion, whether you’re hosting a laid-back backyard BBQ or craving a cozy night in. Sit tight, grab your favorite apron, and let’s dive into this sweet treat!
Banana pudding is one of those classic desserts that brings back memories of family gatherings, summer picnics, and lazy Sunday afternoons. But instead of reaching for a standard bowl of banana pudding, why not surprise your loved ones with a dip that packs all the flavors you adore in a fun, shareable cheese ball? Trust me, once you set this beauty on the table, it’s going to be the star of the show.
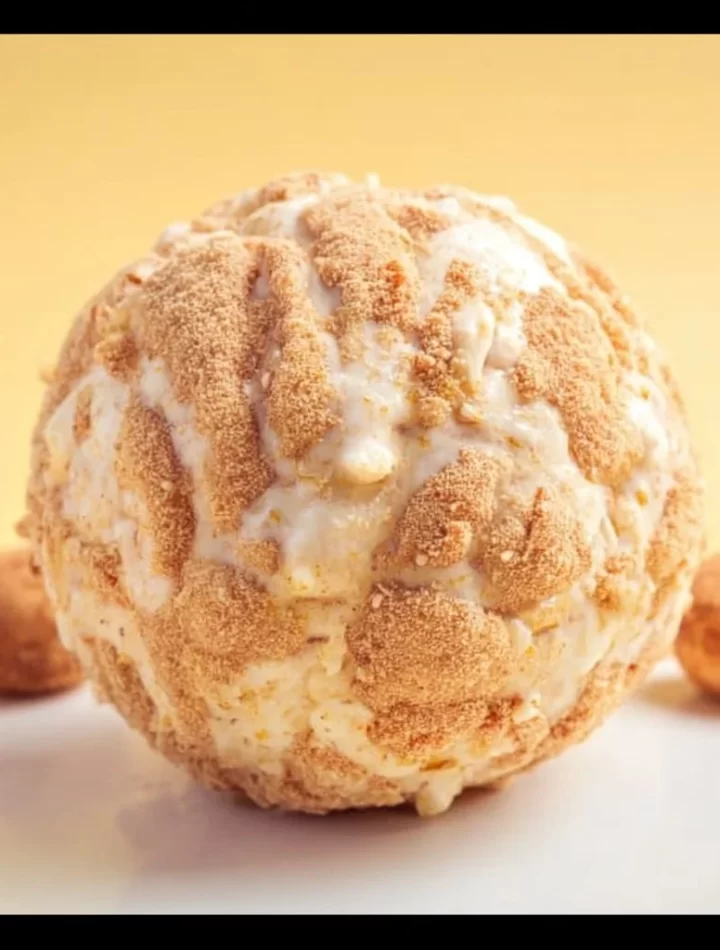
The combination of smooth cream cheese, rich vanilla pudding, and sweet bananas meld together to create a decadent flavor that’s light and nostalgic all at once. And the best part? It’s so simple to make, and it looks stunning! This dessert cheese ball is coated in crushed vanilla wafers that add a delightful crunch, perfectly contrasting the creamy filling. Plus, you can serve it with an array of dippers—think graham crackers, sliced apples, or more vanilla wafers—for the ultimate experience. It’s everything you love about banana pudding, packed into one scrumptious ball!
Are you ready to impress your friends and family with a dessert that tastes even better than it looks? Let’s get into it!
Personal Story
I vividly remember when my grandma first introduced me to banana pudding. Every summer, we’d gather at her house for family reunions, and the highlight of every meal was her signature dessert. She had a flair for making everything extra special, and her banana pudding was always a showstopper. She would layer creamy pudding with vanilla wafers and sliced bananas in a big glass bowl, and we’d all crowd around, fighting over the last scoop.
One summer, I decided to help her make it, and I can still picture her standing beside me, laughing as I accidentally dropped half a box of wafers into the bowl. Instead of getting upset, she simply shrugged and said, “The more, the merrier!” It was moments like these that helped me realize that cooking is about more than just food—it’s about love, laughter, and shared experiences.
Now, as I stand in my own kitchen creating this Banana Pudding Dessert Cheese Ball, I can’t help but feel connected to those joyous moments with my grandma. I want to pass on that same joy to you. So, grab your mixer and let’s whip up a treat that’ll make your taste buds sing!
Ingredients
Here’s what you’ll need to bring this dreamy dessert cheese ball to life:
-
8 oz cream cheese, softened
Softened cream cheese is the creamy foundation for this dessert. Ensure it’s at room temperature for easy mixing! If you want a lighter version, you can use Neufchâtel cheese instead—it has lower fat but still gives a great flavor. -
1/2 cup powdered sugar
This adds sweetness and helps to create a smooth texture. If you’re looking to cut down on sugar, feel free to use a sugar substitute that measures like sugar. -
1/2 cup vanilla pudding mix
This is the secret ingredient that gives our cheese ball that classic pudding flavor. You don’t need to prepare it beforehand—just add it directly to the mix! If you want a different flavor, try chocolate pudding mix for a chocolate twist! -
1/4 cup milk
Milk helps to bring everything together. If you’re looking for a non-dairy option, almond or coconut milk work just fine. -
1 tsp vanilla extract
A splash of vanilla extract elevates the overall taste. Use pure vanilla extract for the best flavor! -
1 cup crushed vanilla wafers
These iconic cookies add a delightful crunch. Choose any type of vanilla cookie that you love, or even graham crackers for a different vibe! -
1 banana, mashed
Bananas are the star of this show! Use a ripe banana for maximum sweetness. If you’re making this in advance, squeeze a little lemon juice on the mashed banana to prevent browning. -
1/2 cup mini chocolate chips
The mini chocolate chips add a delightful surprise! If you prefer, you can use dark chocolate chips or even leave them out entirely, depending on your taste. -
Chopped nuts for coating (optional)
Finely chopped walnuts or pecans make for a crunchy and delicious coating. If you have nut allergies, feel free to skip this step or use seeds instead!
Step-by-Step Instructions
Let’s get cooking! Follow these steps carefully so you can recreate this banana pudding magic at home.
-
Prep Your Ingredients
Before you dive in, make sure all your ingredients are prepped and ready to go. This is a great time to mash your banana and get that cream cheese softening. A little bit of preparation can save you time and hassle later on! -
Mix the Cream Cheese
In a medium mixing bowl, add your softened cream cheese. Using an electric mixer (or a good old-fashioned whisk if you prefer), beat the cream cheese until it’s smooth and creamy. This should take about 1 minute. The key here is to ensure there are no lumps—nobody wants lumps in their dessert cheese ball! -
Add in the Sweet Stuff
Now, add the powdered sugar and vanilla pudding mix to the cream cheese. Mix them together until they’re well combined and fluffy. The texture should be nice and creamy, almost like a thick frosting. It’s starting to look (and taste!) heavenly already! -
Pour in the Milk and Vanilla
Gradually add the milk and vanilla extract to your mixture. Beat again until everything is well blended. If it’s too thick, add a tad more milk, but be careful not to make it too runny—we want it scoopable, not soup! -
Fold in the Bananas and Chocolate Chips
This is where the magic happens! Gently fold in the mashed banana and mini chocolate chips using a spatula. Be careful not to overmix; we want those delicious banana and chocolate pockets throughout the cheese ball. -
Chill the Mixture
Cover your mixing bowl with plastic wrap and pop it in the fridge for about 30 minutes to an hour. This helps the mixture firm up, making it easier to shape into a ball. Plus, your kitchen will smell amazing while it chills! -
Shape the Cheese Ball
Once chilled, remove the mixture from the fridge. Lightly grease your hands with a bit of cooking spray to prevent sticking, and scoop the mixture into a ball shape. Gently pack it tightly as you go along to ensure it holds its form. -
Coat Your Cheese Ball
Roll the cheese ball in the crushed vanilla wafers until it’s completely coated. This adds both flavor and a delicious crunch. If you’re using nuts, you can roll it in chopped nuts as well. Just be careful not to press too hard; you want the coating to stay intact! -
Chill Again
Once coated, place the cheese ball back in the fridge for at least 1 hour. This allows all the flavors to meld together and makes it easier to serve. -
Serve and Enjoy!
Once ready, bring your dessert cheese ball to the table alongside your choice of dippers—whether they’re vanilla wafers, graham crackers, fresh fruit, or whatever you love! Spoon it out onto your plate, and enjoy the delightful, crunchy, creamy goodness!
Serving Suggestions
When it comes to serving, presentation is key! Place your cheese ball on a beautiful platter with a variety of dippers for an eye-catching display. You can even garnish it with a sprinkle of crushed nuts or more mini chocolate chips on top for that extra flair. This cheese ball is perfect for parties, so don’t hesitate to make it the centerpiece of your dessert table!
Dipper Ideas:
- Sliced apples for a refreshing crunch
- Graham crackers for that perfect sweet contrast
- More vanilla wafers, of course!
- Pretzels for a sweet and salty combo
- Fresh strawberries for a pop of color and flavor
Recipe Variations
Want to switch things up? Here are some variations you can try with this delightful cheese ball:
-
Coconut Twist: Mix in some shredded coconut with the banana and chocolate chips for a tropical kick.
-
Peanut Butter Bliss: Add in 1/4 cup of creamy peanut butter to the mixture for a nutty flavor that complements the banana beautifully.
-
Boozy Banana Cheese Ball: If you’re feeling festive, add a tablespoon of rum or whiskey for an adult twist!
-
Nut-Free Option: Skip the nuts altogether and maybe crush up some gluten-free cookies for that coating!
-
Chocolate Lovers: Replace the mini chocolate chips with peanut butter cups or butterscotch chips for a different flavor wave!
Chef’s Notes
Ah, the nostalgia of preparing this delightful dish brings back such fond memories! I’ve tweaked this recipe over time—adding a splash more vanilla, experimenting with different coatings, and even making it gluten-free for friends with dietary needs. This Banana Pudding Dessert Cheese Ball has become a staple in my house, and every time I make it, I can’t help but smile, remembering my grandma’s laughter as we devoured her classic dessert. Food truly has a magical way of connecting us to past moments, doesn’t it?
Sometimes, I even set out a mini “create your own” bar, with various toppings and dippers, encouraging friends and family to explore the flavors. It’s always a hit, and the kids love getting involved too!
FAQs and Troubleshooting
Q1: Can I make this ahead of time?
Absolutely! This dessert cheese ball can be made up to two days in advance. Just wrap it tightly in plastic wrap and keep it in the fridge.
Q2: What if my cheese ball doesn’t hold its shape?
If your cheese ball is too soft to hold its shape, try chilling it longer in the fridge. Alternatively, you could add more crushed vanilla wafers to the mixture for extra binding.
Q3: How do I store leftovers?
Keep any leftovers in an airtight container in the fridge for up to 5 days. The flavors continue to meld together, making it even more delicious!
Q4: Can I freeze this cheese ball?
While it’s best enjoyed fresh, you can freeze the cheese ball before coating it. Wrap it tightly in plastic wrap and place it in a freezer-safe container. Just let it thaw in the fridge overnight before serving.
Nutritional Info
While I believe in balance and enjoying every bite of your favorite desserts, it’s good to know what’s in them. Here’s an approximate nutritional breakdown for one serving (based on 10 servings total):
- Calories: 220
- Total Fat: 10g
- Saturated Fat: 5g
- Cholesterol: 30mg
- Sodium: 130mg
- Carbohydrates: 30g
- Fiber: 1g
- Sugar: 10g
- Protein: 2g
There you have it, my friends! This Banana Pudding Dessert Cheese Ball is not just a dessert; it’s a slice of nostalgia and a celebration of flavor. I can’t wait for you to try this recipe and share it with your loved ones. Happy cooking, and don’t forget to let loose and have fun in the kitchen! 🎉💛
Stay connected with me on Pinterest, Instagram, and TikTok for more delicious, easy recipes and fun kitchen tips. Until next time, happy cooking!
Print
Banana Pudding Dessert Cheese Ball
- Total Time: 60 minutes
- Yield: 10 servings 1x
- Diet: Vegetarian
Description
An innovative twist on classic banana pudding, this dessert cheese ball combines creamy flavors with a delightful crunch, perfect for any gathering.
Ingredients
- 8 oz cream cheese, softened
- 1/2 cup powdered sugar
- 1/2 cup vanilla pudding mix
- 1/4 cup milk
- 1 tsp vanilla extract
- 1 cup crushed vanilla wafers
- 1 banana, mashed
- 1/2 cup mini chocolate chips
- Chopped nuts for coating (optional)
Instructions
- Prep your ingredients by mashing the banana and softening the cream cheese.
- Mix the cream cheese in a medium bowl until smooth.
- Add in the powdered sugar and vanilla pudding mix, mixing until fluffy.
- Pour in the milk and vanilla, blending until combined.
- Fold in the mashed banana and mini chocolate chips gently.
- Chill the mixture in the fridge for 30 minutes to 1 hour.
- Shape the mixture into a ball after chilling.
- Coat the cheese ball with crushed vanilla wafers.
- Chill again for at least 1 hour.
- Serve with a variety of dippers and enjoy!
Notes
Wrap the cheese ball tightly in plastic wrap if making in advance. Serve with assorted dippers like graham crackers and sliced fruit.
- Prep Time: 15 minutes
- Cook Time: 10 minutes
- Category: Dessert
- Method: Chilling
- Cuisine: American
Nutrition
- Serving Size: 1 serving
- Calories: 220
- Sugar: 10g
- Sodium: 130mg
- Fat: 10g
- Saturated Fat: 5g
- Unsaturated Fat: 3g
- Trans Fat: 0g
- Carbohydrates: 30g
- Fiber: 1g
- Protein: 2g
- Cholesterol: 30mg
Keywords: banana pudding, dessert cheese ball, easy desserts, party food, no bake dessert